3com OfficeConnect 3CR414492 Getting Started Manual
- Categoria
- Networking
- Tipo
- Getting Started Manual
Questo manuale è adatto anche per

http://www.3com.com/
OfficeConnect
®
Remote 812 ADSL
Router Getting Started
Guide
Release 2.0
Part No. 10043336 AA
Published March 2001

ii
3Com Corporation
5400 Bayfront Plaza Santa Clara, California 95052-8145
Copyright ©2001 3Com Corporation. All rights reserved. No part of this documentation may be
reproduced in any form or by any means or used to make any derivative work (such as translation,
transformation, or adaptation) without written permission from 3Com Corporation.
3Com Corporation reserves the right to revise this documentation and to make changes in content
from time to time without obligation on the part of 3Com Corporation to provide notification of such
revision or change.
3Com Corporation provides this documentation without warranty of any kind, either implied or
expressed, including, but not limited to, the implied warranties of merchantability and fitness for a
particular purpose. 3Com may make improvements or changes in the product(s) and/or the program(s)
described in this documentation at any time.
UNITED STATES GOVERNMENT LEGENDS:
If you are a United States government agency, then this documentation and the software described
herein are provided to you subject to the following:
United States Government Legend: All technical data and computer software is commercial in
nature and developed solely at private expense. Software is delivered as Commercial Computer
Software as defined in DFARS 252.227-7014 (June 1995) or as a commercial item as defined in
FAR 2.101(a) and as such is provided with only such rights as are provided in 3Com’s standard
commercial license for the Software. Technical data is provided with limited rights only as provided in
DFAR 252.227-7015 (Nov 1995) or FAR 52.227-14 (June 1987), whichever is applicable. You agree not
to remove or deface any portion of any legend provided on any licensed program or documentation
contained in, or delivered to you in conjunction with this Getting Started Guide.
Unless otherwise indicated, 3Com registered trademarks are registered in the United States and may or
may not be registered in other countries.
3Com, the 3Com logo, and OfficeConnect Remote 812 are registered trademarks of
3Com Corporation. 3ComFacts is a service mark of 3Com Corporation.
Acrobat and Acrobat Reader are trademarks of Adobe. Intel and Pentium are registered trademarks of
Intel Corporation. Internet Explorer, Microsoft, MS-DOS, Windows, Windows 95, and Windows NT are
registered trademarks of Microsoft Corporation. Novell and NetWare are registered trademarks of
Novell, Inc. Other brand and product names may be registered trademarks or trademarks of their
respective holders.

iii
TABLE OF CONTENTS
ABOUT THIS GUIDE
Introduction 1
Conventions 2
1 GETTING STARTED
Introduction 1-1
What’s in the Package? 1-1
What Can the OCR 812 Do? 1-2
What Are the Features of This Product? 1-2
SuperNAT 1-5
Virtual Private Networks 1-5
Tunneling Protocols 1-5
Encryption Protocols 1-6
SIP Phone Support 1-6
OCR 812 Boot Mode Options 1-6
Setting DHCP Smart Mode 1-7
Setting Bridge Mode 1-7
Setting Unconfigured Mode 1-8
DIP Switch Settings 1-8
2 INSTALLING THE OFFICECONNECT REMOTE 812 ADSL ROUTER
Introduction 2-1
Installing the OCR 812 Hardware 2-1
Back Panel Features 2-1
Configuring the OfficeConnect Remote 812 Hardware 2-3
LED Light Operation 2-4
Configuring the Workstation and Selecting a Mode 2-5
Using DHCP Smart Mode 2-5
Using the Default Bridge Mode 2-5
Using the Unconfigured Mode 2-6
Installing the OfficeConnect Remote 812 Software 2-6
Prerequisites 2-7

iv
To Install the OfficeConnect Remote 812 Software 2-7
Installing Microsoft Internet Explorer 2-7
Installing Adobe Acrobat 2-8
Installing Instant Update 2-9
To Install Instant Update 2-9
Configuring the OfficeConnect Remote 812 Manager 2-9
Configuring in Bridge Only Mode 2-9
Changing the Login Name and Password 2-9
Configuring in DHCP Smart Mode 2-10
Configuring in Unconfigured Mode 2-10
Using the Remote 812 IP Configuration Wizard 2-10
Using the Command Line Interface 2-10
Starting the OfficeConnect Remote 812 Manager 2-11
Configuration Using the Remote 812 IP Configuration Wizard 2-12
Setting Up a Remote Site Profile 2-12
Remote 812 IP Configuration Wizard Field Descriptions 2-12
Remote Site Name 2-12
Network Service 2-13
ATM VC Parameters 2-13
Port Address Translation 2-14
WAN IP Information 2-14
Resetting the Configuration of Your Router 2-15
3 TESTING THE CONFIGURATION
Introduction 3-1
General Testing 3-1
Step 1: Check Interface Status 3-1
Step 2: Check Network Status 3-2
IP Testing 3-3
Option 1: OfficeConnect Remote 812 Manager Ping to ISP or Remote Site
Network 3-3
DNS Errors 3-4
Option 2: DOS Ping to ISP or Remote Site Network 3-4
Option 3: Internet Browser (Internet Access Only) 3-5
Advanced Troubleshooting 3-5

v
A CONFIGURING YOUR WORKSTATION TO BE A DHCP CLIENT
Workstation Configuration Using DHCP Smart Mode A-1
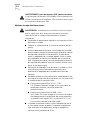
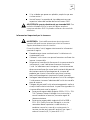
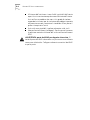
B SAFETY INFORMATION
Important Safety Information B-2
Wichtige Sicherheitsinformationen B-3
Important notice de securite B-4
Medidas de seguridad importantes B-6
Informazioni importanti per la sicurezza B-7
B-7
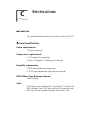
C SPECIFICATIONS
Introduction C-1
General Specifications C-1
Power requirements C-1
Temperature requirements C-1
Humidity requirements C-1
MTBF (Mean Time Between Failures) C-1
Jacks C-1
ADSL Interface (one RJ-11 jack) C-2
LAN Interface (four RJ-45 jacks) C-2
Console Interface (DB-9) (Default configured as DCE) C-2
INDEX
FCC DECLARATION OF CONFORMITY
3COM CORPORATION LIMITED WARRANTY

vi

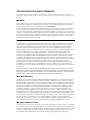
ABOUT THIS GUIDE
Introduction
The guide describes the features, installation, and initial
configuration of the OfficeConnect
®
Remote 812 ADSL
Router (OCR 812). The guide is intended for both first-time
and experienced computer network users who want to
install and use the OCR 812.
With your new OCR 812, we have provided an Installation
CD and an Installation Map.
If you are using Windows, put the Installation CD in
your CD-ROM drive and follow the steps given on the
screens using your foldout Map.
If your operating system is Macintosh or Unix-based,
you can begin by following the steps on the Map to set
up the hardware and then copying (or referencing) files
on the CD at Step 4. In Step 5, Configure the OCR 812,
you follow the instructions given for the type of Boot
Mode you have configured. There are small differences
in the procedure.
After you have initially configured the unit, you can
implement additional configuration to optimize the unit’s
performance on your network.
Refer to the OfficeConnect Remote 812 Online User’s
Guide (install from your OfficeConnect Remote 812
Installation CD) for advanced configuration options and the
Online HTML Help. Click the help buttons located on the
Tools page and the context-sensitive buttons on the
Configuration page for more information.
This Getting Started Guide is available in Adobe Acrobat
Reader Portable Document Format (PDF) or HTML on the
OCR 812 World Wide Web site located at:
http://www.3com.com/ocr812/

ii ABOUT THIS GUIDE
You can also learn about other 3Com products by going to
the following web site location:
http://www.3com.com/
Conventions
Table 0-1 and Table 0-2 list conventions that are used
throughout this guide.
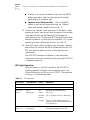
Ta ble 0-1 Notice Icons
Notice Type Description
NOTE Information that describes important features or
instructions
Caution Information that alerts you to potential loss of data
or potential damage to an application, system, or
device
Warning Information that alerts you to potential personal
injury
Ta bl e 0- 2 Text Conventions
Convention Description
Screen displays This typeface represents information as it appears on the
screen.
The words “enter”
and “type”
When you see the word “enter” in this guide, you must
type something, and then press Return or Enter. Do not
press Return or Enter when an instruction simply says
“type.”
Keyboard key names If you must press two or more keys simultaneously, the
key names are linked with a plus sign (+). Example:
Press Ctrl+Alt+Del
Words in italics Italics are used to:
Emphasize a point.
Denote a new term at the place where it is defined in
the text.
Identify menu names, menu commands, and software
button names. Examples:
From the Help menu, select Contents.
Click OK.
Highlight the name of a referenced book or pdf file.

1
GETTING STARTED
Introduction
This chapter provides instructions for pre-installation of the
OCR 812.
What’s in the Package?
What can the OCR 812 do?
What are the Features of this Product?
OCR 812 Boot Modes
What’s in the Package?
Before you install the OCR 812, check the contents of the
box against the packed contents checklist below. If any of
the items have been damaged in transit or are missing,
contact the 3Com dealer from whom the equipment was
purchased.
The OCR 812 Package contains the following:
OCR 812 unit
Power adapter and power cord
Ethernet cable (RJ-45 — RJ-45)
DSL cable (RJ-11 — RJ-11)
Console cable (DB-9 — DB-9)
OCR 812 Installation Map
CD-ROM containing the following:
OfficeConnect Remote 812 ADSL Router Getting
Started Guide (.pdf format only)
OfficeConnect Remote 812 ADSL Router Online
User’s Guide (viewable in your web browser)
OfficeConnect Remote 812 CLI User’s Guide (.pdf
format only)

1-2 CHAPTER 1: GETTING STARTED
Microsoft Internet Explorer version 5.5 in English,
Spanish, and Korean.
OfficeConnect Remote 812 Manager web-based
help files, the Instant Update Install program, and
the IP Wizard.
Note: The Instant Update Install program and the IP Wizard
are operational only for Windows users at this time.
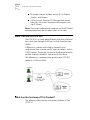
What Can the OCR 812 Do?
The OCR 812 is a stand-alone BRouter with data interfaces
to a Local Area Network (LAN) and a Wide Area Network
(WAN).
A BRouter is a router with bridging capability that
understands how to route specific types of packets, such as
TCP/IP packets. The bridge function of the Brouter forwards
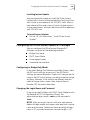
packets to other network(s) connected to the device.
The following is a representation of how your OCR 812
connects a LAN and WAN:
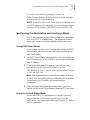
What Are the Features of This Product?
The following table displays the primary features of the
OCR 812:

What Are the Features of This Product? 1-3
Ta bl e 1- 1 OCR 812 Features
OCR 812 Features Feature Description
Super Network Address Translation
(SuperNAT)
Uses Network Address Translation (NAT)
and Port Address Translation (PAT)
intelligently together to send packets
over the network, and translates public
addresses to private ones.
Port Address Translation (PAT) An address translation protocol that
supports simultaneous connections from
different workstations on the LAN with
one public IP address.
Network Address Translation (NAT) An address translation protocol that
supports simultaneous connections from
different workstations on the LAN with
one or more public IP addresses. The
mapping can be done dynamically or
statically.
There are two types of NAT:
Dynamic NAT — Dynamically maps a
public address from a pool of
addresses to the private address of
your workstation on your LAN.
Static NAT— Statically maps a public
address to the private address of your
workstation on your LAN.
Virtual Private Network (VPN) A protected computer network that acts
like a private network over the Internet.
When the MPPE and PPTP protocols are
used together, a VPN is created.
Point-to-Point Protocol (PPP) Negotiates and establishes a connection
between two peers to provide a
standard method for transporting
multi-protocol datagrams over
point-to-point links. Sets the MSCHAPv1
authentication protocol.
Layer Two Tunneling Protocol (L2TP),
Point-to-Point Tunneling Protocol (PPTP)
Tunneling protocols that you use to
protect and configure a VPN.
MPPE An encryption protocol used to make a
tunnel private.
Supported by Microsoft CHAPv1, an
authentication protocol set with the
PPP command.
Session Initiation Protocol (SIP) Support Allows SIP telephones to connect to
Ethernet ports.

1-4 CHAPTER 1: GETTING STARTED
Generic Routing Encapsulation (GRE) A proposed Internet protocol
transported within other tunneling
protocols in a VPN.
ADSL WAN interface port Contains one port that connects to the
wide area network (WAN).
Asynchronous Transfer Mode (ATM) A network technology that transmits
video, audio, and computer data packets
in very small sizes over the same
network.
RFC 1483 protocol A defined protocol standard that
describes two encapsulation methods,
routed and bridged, for carrying
network traffic over ATM.
LAN interface A four-port Ethernet 10Base-T hub.
Networked workstations Allow one or more to connect to other
computers on a remote LAN and also
provide high-speed access to the
Internet.
Bridging Supports learning bridge and 802.1d
spanning tree functionality to eliminate
loops.
Internet Protocol (IP) and Internetwork
Packet Exchange (IPX) protocols
A protocol used to route data from
source to destination.
Routing Information Protocol (RIP) Specifies how routers exchange routing
table information.
Simple Network Management Protocol
(SNMP)
Provides a set of protocols for managing
complex networks.
Address translation Using Dynamic NAT, Static NAT,
SuperNAT, and Intelligent PAT.
Dynamic Host Configuration Protocol
(DHCP)
A protocol for assigning dynamic IP
addresses to devices on a network.
DHCP also provides services for your
LAN, including automatic assignment of
IP addresses to workstations.
Telnet Connects your PC to a server on the
network.
Packet filtering Provides an extensive set of data filtering
capabilities.
OCR 812 Manager Contains the Web-based online user’s
guide, Tools, Configuration, and
Monitor modes that support your 812
configuration. These modes have online
Help for each configuration function.
Ta bl e 1- 1 OCR 812 Features

What Are the Features of This Product? 1-5
The following are new features for the current release:
SuperNAT
SuperNAT is an address translation protocol that is
activated when data packets arrive destined for a public
address that matches both NAT and PAT rules. SuperNAT
first tries to use NAT address translations. If this does not
work, PAT address translation is used. You can configure
SuperNAT from the Web pages or the CLI.
NOTE: You cannot use the public WAN port IP address of
the OfficeConnect 812 as one of the NAT or SuperNAT
static or dynamic public IP addresses.
Virtual Private Networks
A Virtual Private Network (VPN) is a computer network that
contains characteristics of a private network operating
through the public infrastructure, like the Internet. You can
use several tunneling and encryption protocols to configure
a VPN and ensure that data remains secure in a private
tunnel that simulates a point-to-point connection.
Tunneling Protocols
Tunneling allows workstations on one network to send
data by encapsulating it in an IP data stream. You use
tunneling to move data between administrative domains
that use a protocol not supported by the Internet that
connects those domains.
The following are tunneling protocols:
L2TP - Layer Two Tunneling Protocol, an extension to
the PPP protocol that enables Internet Service Providers
(ISPs) to operate VPNs. L2TP merges the best features of
two other tunneling protocols: PPTP from Microsoft and
L2F from Cisco Systems. Like PPTP, L2TP requires that
the ISP's routers support the protocol.
PPTP - Point-to-Point Tunneling protocol, ensures the
security of messages transmitted from one VPN to
another. Generic Routing Encapsulation (GRE), a
proposed protocol that encapsulates and transports the
data portion of packets as they are routed, is also

1-6 CHAPTER 1: GETTING STARTED
supported. No additional configuration of the OCR 812
is required to support GRE.
Encryption Protocols
Microsoft Point-to-Point Encryption (MPPE) encrypts data in
PPTP VPN connections. MPPE provides privacy to a tunnel.
When you use MPPE and PPTP together, a VPN is created.
You can set the MPPE protocol on the Tunnel Modify web
page using the Encryption Algorithm field. From the CLI,
you set MPPE by specifying MSCHAPv1. See the CLI User
Guide for more information.
SIP Phone Support
Session Initiation Protocol (SIP) is an IP protocol that
supports a networked telephone that converges voice and
data on a single network. This instrument is a smart device
that performs many of the functions that are traditionally
handled by the phone company’s central office equipment.
When you connect SIP and the OCR 812, the SIP phone is
registered with the proxy server supplied by your ISP. If you
want to use SIP and NAT, you must select the PAT option of
NAT. For more information, see the Remote 812 ADSL
Router Online User’s Guide.
OCR 812 Boot Mode Options
To simplify the installation process, the OCR 812 can be
initialized with pre-configured parameters using the DIP
switches located on the back of the unit. These are the
Boot Mode options:
DHCP Smart Mode
Bridge Mode
Unconfigured Mode (the default)
ANSI Mode
MultiMode
N
OTE: These boot modes only take effect if the unit has not
been previously configured. To erase the existing
configuration and reset your unit, see Resetting the
Configuration of Your Router in Chapter 2.

OCR 812 Boot Mode Options 1-7
Setting DHCP Smart Mode
You can use the DHCP Smart Mode if:
You plan on using private addresses on the LAN (such
as, your Service Provider has provided you with only 1
public IP address)
You plan on using the server for the OCR 812 DHCP
The OCR 812 will automatically start up with the following
“DHCP Smart Mode” configuration:
LAN IP address = 192.168.200.254, Netmask
255.255.255.0.
DHCP IP address pool (40 addresses): 192.168.200.1-40
Domain Name: dummy.net
DNS Host: name = ocrdsl-3com.com,address =
192.168.200.254
Administrative Login profile, User Name: root and
Password:!root
Setting Bridge Mode
Use this mode if you want the OCR 812 to function as a
bridge automatically, with no special configuration. You are
not required to use the IP Wizard or install any software
from the CD unless:
You want to change the configuration.
You want to use Instant Update when a software
update to your OCR 812 is posted on the 3Com web
site. You can install Instant Update from the CD at any
time. For more information, see the OfficeConnect
Remote 812 Online User’s Guide.
1 Verify the Virtual Path Identifier/Virtual Channel Identifier
(VPI/VCI) settings in Table 1-2. These settings are
parameters that are connected with the Asynchronous
Transfer Mode (ATM). For more detailed information, see
the OfficeConnect Remote 812 Online User’s Guide.
2 Match the values your Service Provider has given you. See
the table under DIP Switch Settings. The OCR 812 will start
up with the following configuration:
Bridge network on the LAN Interface

1-8 CHAPTER 1: GETTING STARTED
A remote site profile named “bridge” is set up to bridge
all traffic with RFC 1483 encapsulation on the specified
VPI/VCI.
Spanning Tree Disabled
Administrative Login profile: User Name: root and
Password:!root
Setting Unconfigured Mode
Use this versatile mode if you want to boot the unit
without any configuration. You can manually configure the
unit to operate in any way, including Bridge Mode or DHCP
Smart Mode.
1 Set all switches to OFF to boot your unit in Unconfigured
Mode.
2 You must set all of the configuration parameters. This
allows you complete flexibility with your configuration.
DIP Switch Settings
The Dual Inline Package (DIP) switch settings initialize the
OCR 812 with pre-configured parameters. The
corresponding Boot Mode options are as follows:
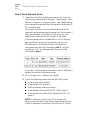
Table 1-2 DIP Settings
on position = set ADSL to ANSI mode
off position = set ADSL to Multimode
Your service provider gives you the VPI/VCI settings, but if
you want to change them, go to the Remote Site
1 2 3 4 Mode
off on off off DHCP Smart Mode
off off on off Bridge Mode, VPI=0,
VCI=35 (default settings)
off off off on Bridge Mode,
VPI=8, VCI=35
off off off off Default Unconfigured
Mode
on off off off ANSI
off off off off Multimode

OCR 812 Boot Mode Options 1-9
Configuration option on the Configuration web page and
select the Remote Site Add Configuration web page or use
the CLI commands. See the Online User’s Guide for more
information.

1-10 CHAPTER 1: GETTING STARTED

2
INSTALLING THE
O
FFICECONNECT REMOTE
812 ADSL R
OUTER
Introduction
In this release of the OCR 812, we have provided an
Installation Map and Install CD to help you set up and
install your unit, get started, and use the OCR 812
successfully.
This chapter is organized in the following sections:
Installing the OCR 812 Hardware
Configuring the OCR 812 Hardware
Configuring the Workstation and Selecting a Mode
Installing the OCR 812 Software
Configuring the OCR 812 Manager
Starting the OCR 812 Manager
Resetting the Configuration of Your Router
Installing the OCR 812 Hardware
This section provides a quick hardware setup procedure for
the OCR 812. Follow the steps below to learn more about
setting up your router.
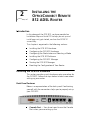
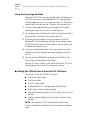
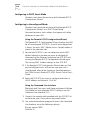
Back Panel Features
Below is a representation of the back panel. Familiarizing
yourself with the connections helps you to properly set up
your OCR 812.
Console Port — You do not need to use the Console
Port unless you are setting up the

2-2 CHAPTER 2: INSTALLING THE OFFICECONNECT REMOTE 812 ADSL ROUTER
OCR 812 in Unconfigured Mode and thus need to use
the Command Line Interface (CLI) to configure your
router. The DB-9 terminal port connects the OCR 812 to
your console. Then you would use a terminal emulator
program to access the CLI and run the Quick Setup and
QuickVC scripts. See the Installation Map for
instructions.
Reset button — This button, located on the rear of the
OCR 812, resets the configuration of the router. See
Resetting the Configuration of Your Router for more
information about resetting your router’s configuration
with the Reset button.
DIP (Dual Inline Package) Switches (4) — Switches 1
through 4 can be turned on and off in certain
combinations for different configurations. See OCR 812
Boot Mode Options in Chapter 1 for complete
instructions on the switches to set for specific
configurations.
Power Inlet — The power port attaches to an external,
15-volt DC power supply included in your package. The
other end of the power supply cable connects to a
standard electrical socket.
Ethernet (LAN) Ports (4) — The shielded, 8-pin, RJ-45
Ethernet (10Base-T) ports connect the OCR 812 with
the LAN. A 10Base-T cable is provided to make this
connection.
MDI/X Switch — Swaps the transmit (Tx) and receives
(Rx) signal pairs on Ethernet port 1.
When the MDI/X button is pressed in, then Port 1 on
the unit becomes a cascade hub port, for
connection to a non-cascade port on another hub.
When the MDI/X button is not pressed, Port 1 is
pinned the same as the remaining 3 ports. In this
mode, a workstation’s ethernet port or the cascade
port on another hub can be connected to any of the
four ports on the unit.
NOTE: The MDI/X button must not be pressed in to use
Port 1 for connection to a workstation.
La pagina si sta caricando...
La pagina si sta caricando...
La pagina si sta caricando...
La pagina si sta caricando...
La pagina si sta caricando...
La pagina si sta caricando...
La pagina si sta caricando...
La pagina si sta caricando...
La pagina si sta caricando...
La pagina si sta caricando...
La pagina si sta caricando...
La pagina si sta caricando...
La pagina si sta caricando...
La pagina si sta caricando...
La pagina si sta caricando...
La pagina si sta caricando...
La pagina si sta caricando...
La pagina si sta caricando...
La pagina si sta caricando...
La pagina si sta caricando...
La pagina si sta caricando...
La pagina si sta caricando...
La pagina si sta caricando...
La pagina si sta caricando...
La pagina si sta caricando...
La pagina si sta caricando...
La pagina si sta caricando...
La pagina si sta caricando...
La pagina si sta caricando...
La pagina si sta caricando...
La pagina si sta caricando...
La pagina si sta caricando...
La pagina si sta caricando...
La pagina si sta caricando...
La pagina si sta caricando...
La pagina si sta caricando...
La pagina si sta caricando...
La pagina si sta caricando...
La pagina si sta caricando...
La pagina si sta caricando...
La pagina si sta caricando...
La pagina si sta caricando...
La pagina si sta caricando...
La pagina si sta caricando...
La pagina si sta caricando...
La pagina si sta caricando...
-
 1
1
-
 2
2
-
 3
3
-
 4
4
-
 5
5
-
 6
6
-
 7
7
-
 8
8
-
 9
9
-
 10
10
-
 11
11
-
 12
12
-
 13
13
-
 14
14
-
 15
15
-
 16
16
-
 17
17
-
 18
18
-
 19
19
-
 20
20
-
 21
21
-
 22
22
-
 23
23
-
 24
24
-
 25
25
-
 26
26
-
 27
27
-
 28
28
-
 29
29
-
 30
30
-
 31
31
-
 32
32
-
 33
33
-
 34
34
-
 35
35
-
 36
36
-
 37
37
-
 38
38
-
 39
39
-
 40
40
-
 41
41
-
 42
42
-
 43
43
-
 44
44
-
 45
45
-
 46
46
-
 47
47
-
 48
48
-
 49
49
-
 50
50
-
 51
51
-
 52
52
-
 53
53
-
 54
54
-
 55
55
-
 56
56
-
 57
57
-
 58
58
-
 59
59
-
 60
60
-
 61
61
-
 62
62
-
 63
63
-
 64
64
-
 65
65
-
 66
66


3com OfficeConnect 3CR414492 Getting Started Manual
- Categoria
- Networking
- Tipo
- Getting Started Manual
- Questo manuale è adatto anche per
in altre lingue
- English: 3com OfficeConnect 3CR414492
Documenti correlati
-
3com HomeConnect 3CP4130 Manuale utente
-
-
-
-
-
-
-
3com 3CRWE675075 - 11a/b/g Wireless LAN Workgroup Bridge Manuale utente
-
-
Altri documenti
-
Linksys BEFDSR41W Manuale utente
-
 Telindus 1121 Manuale utente
-
-
HP 3C905B-TX Manuale utente
-
Aethra D2061 Lite Quick Manual
-
Palm Connect Manuale utente
-
-
Clavister SG3200C specificazione
-
D-Link DSR-250 Manuale del proprietario
-
