
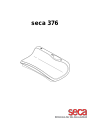
seca 376

English
Contents • 2
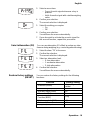
CONTENTS
1.
Full
certification ............................. 3
2. Description of device ..................... 4
2.1
Congratulations! ...................... 4
2.2
Intended use ........................... 4
3. Safety information ......................... 4
3.1
Basic safety precautions ........... 4
3.2
Safety information in this
manual .................................... 5
3.3
Handling (rechargeable)
batteries .................................. 6
4. Overview ...................................... 7
4.1
Controls/Features .................... 7
4.2
Symbols in display ................... 8
4.3
Information on rating plate ........ 8
4.4
Menu structure ........................ 10
5. Before you get started.................... 11
5.1
Create power supply ................ 11
Insert batteries ......................... 11
Connect the power supply unit
(optional) ................................. 11
5.2
Set up scales .......................... 12
6. Operation ..................................... 12
6.1
Weighing ................................ 12
Start weighing.......................... 13
Tare off additional weight
(TARE) ................................... 13
Continuous display of measured
result (HOLD).......................... 14
Transmit measured results to a
radio receiver .......................... 14
Automatic switchover of
weighing range ........................ 14
Switch off scales ...................... 15
6.2
Use additional functions ........... 15
Navigate in the menu ............... 15
Use differential function (BMIF) .
Activate Autohold function
(Ahold) ................................... 17
Activate acoustic signals
(BEEP) ................................... 17
Select attenuation (Fil) ............. 18
Restore factory settings
(RESET) ................................. 18
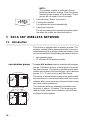
7. seca 360° wireless Network ........... 19
7.1
Introduction ............................ 19
seca wireless groups ................ 19
Channels ................................ 20
Detection of equipment
devices ................................... 20
7.2
Operate scales in a wireless
group ..................................... 21
Activate wireless module (SYS) . 21
Set up wireless group (Lrn) ....... 21
Activate automatic transmission
(ASend) .................................. 23
Select print option (APrt) .......... 23
Set time (Time) ....................... 24
8. Cleaning ...................................... 25
9. What to do if …? ........................... 25
10. Maintenance/Recalibration ............ 27
10.1
Information about maintenance
and recalibration ..................... 27
10.2
Check content of calibration
counter ................................... 27
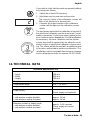
11. Technical data .............................. 28
12. Accessories ................................. 29
13. Disposal ...................................... 30
13.1
Disposal of device ................. 30
13.2
Batteries (including
rechargeables) ........................ 30
14. Warranty...................................... 30
16

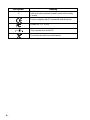
3
•
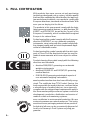
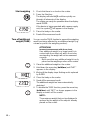
1.
FULL CERTIFICATION
With products from seca you are not only purchasing
technology developed over a century, but also quality
that has been validated by official bodies, the legal sys-
tem and relevant institutes. seca products comply with
European directives, standards and national laws. With
seca you are buying into the future.
The products in this user manual comply with the legis-
lation governing medical devices, i.e. with directives 93/
42/EEC and 2007/47/EC issued by the Council of the
European Community, which is embodied throughout
Europe in its national laws.
Scales bearing this symbol comply with the European
directive 2009/23/EC on non-automatic weighing
instruments. seca scales with this symbol comply with
the stringent quality and technical requirements appli-
cable to calibratable scales.
Scales bearing this symbol comply with the strict strin-
gent of Class III of the directive and can be used for
medical measurements which are subject to calibra-
tion.
Products bearing this symbol comply with the following
directives and standards
•
directive 2009/23/EC governing non-automatic
weighing instruments
•
directives 93/42/EEC and 2007/47/EC governing
medical devices
•
DIN EN 45501 governing metrological aspects of
non-automatic weighing instruments.
seca’s professionalism has also been officially recog-
nised. The certificate from TÜV Product Service, the
body responsible for medical devices, confirms that as
a manufacturer of medical devices, seca rigorously
complies with the stringent legal requirements applica-
ble. Here seca’s quality assurance system covers the
development, production, distribution and service of
medical scales and measuring systems.
seca contributes to environmental protection. We are
anxious to preserve our natural resources. This is why
we strive to save packaging material where practical.
And what is left over can be conveniently disposed of
locally via Germany's Dual System recycling pro-
gramme.
09
0109
0123
M

English
Description of device • 4
2.
DESCRIPTION OF DEVICE
2.1
Congratulations!
2.2
Intended use
By purchasing the electronic seca 376 baby scales you
are now in possession of an extremely accurate device
that is also robust at the same time.
seca has put its experience at the service of health care
for over 170 years and as a market leader in many coun-
tries, is constantly setting new standards with its innova-
tive developments for weighing and measurement.
The electronic seca 376 baby scales are mainly used in
hospitals, doctors' surgeries and inpatient care facilities
in accordance with national regulations. They are
designed to weigh babies at birth and to also check
their weight gain as they grow.
The seca 360° wireless network allows the measured
results to be transmitted wirelessly to a seca wireless
printer or a PC equipped with the seca analytics 105
software and the
seca 360° wireless USB adapter 456.
3.
SAFETY INFORMATION
3.1
Basic safety precautions
•
Please take note of the information in this user
manual.
•
Keep the user manual with the declaration of
conformity in a safe place.
•
Make sure that the scales are positioned
securely on a flat and stable surface.
•
Make sure you do not drop the scales. Pro-
tect the scales from violent impacts.
•
When using the scales with a power supply
unit, make sure you route the mains cable so
that no-one can trip over it.
•
Have the scales serviced and recalibrated
regularly (see "Maintenance/Recalibration" on
page 58).

5
•
•
Make sure that maintenance and repair are
only carried out by an authorised service part-
ner. You can find your local service partner at
www.seca.com or just send an e-mail to
service@seca.com.
•
Make sure you only use genuine seca acces-
sories and spare parts. Otherwise the war-
ranty provided by seca will become null and
void.
•
Make sure RF equipment such as mobile
phones is kept at a minimum distance of
approx. 1 metre to prevent incorrect meas-
urements or interference with radio transmis-
sion.
3.2
Safety information in this manual
DANGER!
Used to identify an extremely hazardous situa-
tion. If you fail to take note of this information,
serious irreversible or fatal injuries will result.
WARNING!
Used to identify an extremely hazardous situa-
tion. If you fail to take note of this information,
serious irreversible or fatal injuries may result.
CAUTION!
Used to identify a hazardous situation. If you fail
to take note of this information, minor to moder-
ate injuries may result.
ATTENTION!
Used to identify possible incorrect usage of
device. If you fail to take note of this information,
you may damage the device or the measured
results may be incorrect.
NOTE:
Includes additional information about use of the
device.

English
Safety information • 6
3.3
Handling (rechargeable) batteries
The device is supplied with 6 batteries, type AA
(Mignon). This type of battery is not rechargeable.
Please take note of the following safety information.
WARNING!
Personal injury with improper handling
Batteries contain harmful substances which
may explode if not handled properly.
Do not try to recharge such batteries.
Do not expose (rechargeable) batteries to
heat.
Do not burn (rechargeable) batteries.
If acid is leaking out, avoid contact with the
skin, eyes and mucous membranes. Rinse
affected areas with plenty of clean water and
seek medical help at once.
ATTENTION!
Damage to device and malfunctions with
improper handling
Only use the type of (rechargeable) battery
specified (see "Insert batteries" on page 42).
When replacing (rechargeable) batteries, al-
ways replace a complete set at a time.
Do not short-circuit (rechargeable) batteries.
If you do not use the device for a long period
of time, remove the batteries (incl. rechargea-
bles). This will prevent acid from leaking into
the device.

7
•
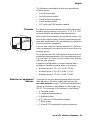
4.
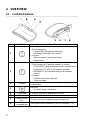
OVERVIEW
4.1
Controls/Features
No.
Control/Feature
Function
1
hold
tare
Arrow key
•
During weighing:
-
Press briefly: Activate Hold function
-
Hold down: Activate Tare function
•
In menu:
-
Select submenu, select menu item
-
Adjust value
2
send
print
Enter key
•
During weighing (if wireless network is set up):
-
Press briefly: Send measured result to receive-ready
equipment (PC with USB wireless module)
-
Hold down: Print out measured result (wireless
printer)
•
In menu:
-
Confirm menu item selected
-
Store set value
3
Display
Display element for measured results and for device
configuration
4
Start key
-To switch device off and on
5
Foot screw
4 screws, for precise alignment of device
6
Spirit level
Indicates whether device is horizontal
7
Power connec-
tion
Used to connect an optional power supply unit
8
Battery
compartment
Designed to take 6 batteries, type AA (Mignon), 1.5 V
5 6 7 8

English
Overview • 8
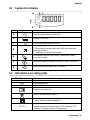
4.2
Symbols in display
A B C
G
F
E D
Symbol
Meaning
A
Operation with power supply unit
B
Batteries are weak
C
Non-calibratable function active
D
Weighing range currently in use:
1: More precise weight indication with reduced load-
bearing capacity
2: Maximum load-bearing capacity
E
Differential value function (BMIF: Breast Milk Intake
Function) active
F
Measured result in memory location 1 (BMIF function)
G
Select memory location (BMIF function)
4.3
Information on rating plate
Text/Symbol
Meaning
Model
Model number
Type
Type designation
Ser. No.
Serial
number
Refer to user manual
Type B electromedical device
Class II totally insulated appliance
FCC ID
For USA:
Device licensing number issued by US authority FCC
(Federal Communications Commission)

9
•
Text/Symbol
Meaning
IC
For Canada:
Device licensing number issued by authority Industry
Canada
Device complies with EC standards and directives.
Symbol for FCC (USA)
Only operate device with DC
Do not discard with household waste

English
Overview • 10
*Funknetzwerk seca 360° Wireless:
Raum (ID):
Max. drei seca Funkräume: 0, 1, 2
Maximal-Konfiguration pro Funkraum:
- 1 Babywaage
-1 Personenwaage
-1 Längenmessstab
- 1 Funkdrucker
- 1 PC mit USB-Funkmodul
Kanal (C1, C2, C3):
-Drei Kanäle pro Funkraum ( insg. 9 Kanäle)
-Kanalzahlen:
0-99
-Jede Kanalzahl für nur jeweils einen Kanal
-Empfohlener Abstand: 30
Beispiel-Konfiguration:
- Raum 0: C1__0, C2_30, C3_60
- Raum 1: C1_10, C2_40, C3_70
- Raum 2: C1_20, C2_50, C3_80
(Hinweis:
Im
Display
keine
Leerzeichen)
Erkannte Geräte (Mo):
- 1: Personenwaage
- 2: Längenmessstab
-3: Funkdrucker
- 4: PC mit USB-Funkmodul
-7: Babywaage
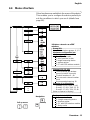
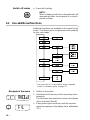
4.4
Menu structure
Other functions are available in the menu of the device.
This enables you to configure the device perfectly to
suit the conditions in which you use it (details from
page 46).
•
0
•
1
•
2
Fil
Navigation:
Call up menu:
tare
*Wireless network seca 360°
wireless
:
Group (ID):
Max. 3 seca wireless groups: 0, 1, 2
Maximum configuration per
wireless group:
1 set of baby scales
1 set of personal scales
1 length measuring device
1 wireless printer
1 PC with USB wireless module
Channel (C1, C2, C3):
Three channels per wireless
group (in total 9 channels)
Channel numbers: 0 - 99
Only use each channel number
once
Recommended spacing: 30
Example of configuration:
- Group 0: C1 0, C2 30, C3 60
- Group 1: C1 10, C2 40, C3 70
- Group 2: C1 20, C2 50, C3 80
(Note: no spaces in display)
Devices detected (Mo):
1: Personal scales
2: Length measuring device
3: Wireless printer
4: PC with USB wireless module
7: Baby scales
Group (ID)
Autohold
tare print

11
•
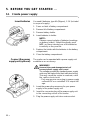
5.
BEFORE YOU GET STARTED …
5.1
Create power supply
Insert batteries You need 6 batteries, type AA (Mignon), 1.5 V (included
in scope of supply).
1.
Press on latch of battery compartment.
2.
Remove lid of battery compartment.
3.
Remove battery holder.
4.
Insert batteries in holder.
NOTE:
Observe correct polarity of batteries (markings
on battery holder). Should the display read
bAtt, you have inserted one of the batteries
incorrectly or they are flat.
5.
Replace the holder with the batteries in the battery
compartment.
6.
Close the battery compartment.
Connect the power
supply unit (optional) The scales can be operated with a power supply unit
available as an accessory.
WARNING!
Personal injury and damage to device if
incorrect power supply unit is used
The voltage provided by standard power supply
units may be higher than their indicated rating.
This may cause the scales to overheat, catch
fire, melt or short-circuit.
Only use genuine seca plug-in power supply
units with 9V or a controlled 12 V output volt-
age.
1. Insert the power plug necessary for your power
supply in the power supply unit.
2. Insert the connector plug of the power supply unit
in the connecting socket of the scales.
3. Plug the power supply unit into a mains socket.

English
Operation • 12
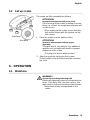
Spirit level
5.2
Set up scales
Air bubble
6.
OPERATION
6.1
Weighing
The scales are fully assembled on delivery.
ATTENTION!
Incorrect measurement with force shunt
If the housing of the scales is resting on some-
thing, e.g. a towel, the weight measurement will
not be correct.
When setting up the scales, ensure that they
only make contact with the ground via the
foot screws.
1. Place the scales on a flat, stable surface.
ATTENTION!
Incorrect measurement without proper
alignment
The spirit level is very delicate. Any additional
weights such as towels will result in improper
alignment of the scales.
Only align the device without a load.
2. Align the scales by turning the foot screws.
The air bubble in the spirit level must be centred in
the circle.
WARNING!
Serious injury to baby following a fall
Baby scales generally stand on raised work sur-
faces. If the baby falls from this surface, this
may result in serious irreversible or fatal injuries.
Never leave a baby unsupervised on the
scales.

13
•
Start weighing 1. Check that there is no load on the scales.
2. Press the Start key.
The display will read se[A and then quickly run
through all elements of the display.
The scales are ready for operation when the display
reads 0.000.
If the device is being operated with a power supply
unit, the symbol will appear in the display.
3. Place the baby on the scales.
4. Read off the measured result.
Tare off additional
weight (TARE) You can use the TARE function to prevent the weighing
result from being affected by an additional weight (e.g.
a towel or pad on the weighing surface).
ATTENTION!
Incorrect measurement with force shunt
If an additional weight (e.g. large towel) is in
contact with the surface on which the scales
are standing, the weight will not be measured
correctly.
Make sure that any additional weight is only
placed on the weighing surface of the scales.
1. Place the additional weight on the scales.
2. Hold down the arrow key (hold/tare) until "NET"
appears in the display.
3. Wait until the display stops flashing and is replaced
by 0.000.
4. Place the baby on the scales.
5. Read off the measured result.
The additional weight has been automatically
deducted.
6. To disable the TARE function, press the arrow key
(hold/tare) until "NET" no longer appears in the
display or switch off the scales.
NOTE:
The maximum weight that can be displayed is
reduced by the weight of the objects already
placed on the scales.
hold
tare
NET
hold
tare

English
Operation • 14
Continuous display of
measured result (HOLD) If you activate the HOLD function, the weighing value
will continue to be displayed after the baby has been
removed. This allows you to attend to the child before
noting down the weight.
1. Place the baby on the scales.
2. Briefly press the arrow key (hold/tare).
The display will flash until a stable weight is meas-
ured. The weighing value will then be displayed
continuously. The symbol (non-calibratable func-
tion) and the message "HOLD" will be displayed.
3. To disable the HOLD function, briefly press the
arrow key (hold/tare).
The symbol and the message "HOLD" will no
longer be displayed.
NOTE:
If the Autohold function is activated, continuous
display of the weighing value will take place
automatically. see "Activate Autohold function
(Ahold)" on page 48.
Transmit measured
results to a radio
receiver
If the scales are integrated in a seca 360° wireless net-
work, you can transmit the measured results to
receive-ready equipment (wireless printer, PC with
wireless USB module) at the touch of a button.
Press the Enter key (send/print).
–
Press key briefly: Send measured results to
all receive-ready equipment
–
Hold down: Print out measured result using
wireless printer
Automatic switchover
of weighing range The scales are equipped with two weighing ranges.
Weighing range 1 ( ) offers a more precise weight
indication with a reduced load-bearing capacity.
Weighing range 2 ( ) allows you to take advantage
of the maximum load-bearing capacity of the scales.
When the scales are switched on, weighing range 1 is
activated. If a specific weighing value is exceeded, the
scales will automatically switch to weighing range 2.
To switch back to weighing range 1 proceed as
follows:
Remove all loads on the scales.
Weighing range 1 is activated again.
hold
tare
hold
tare
send
print

15
•
hold
tare
Switch off scales Press the Start key.
NOTE:
When in battery mode, the scales will switch off
automatically after a short period if no load is
placed on them.
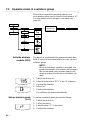
6.2
Use additional functions
Additional functions are available in the menu for the
scales. This allows you to configure the scales perfectly
to your own needs.
* The menu item "rF" is described in section “Operate
scales in a wireless group" on page 52.
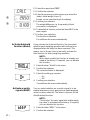
Navigate in the menu 1. Switch on the scales.
2. Hold down the Enter key and the arrow key simul-
taneously.
The last menu item selected is shown in the display
(here: Autohold "Ahold").
3. Keep pressing the arrow key until the required
menu item appears in the display (here: attenuation
"Fil").
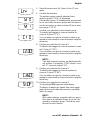
Autohold
on
Fil
on
on
hold send
tare print
hold
tare

English
Operation • 16
4. Confirm your selection with the Enter key.
The current selection for the menu item or a sub-
menu is displayed (here level "0").
5. To change your selection or call up another sub-
menu, keep pressing the arrow key until the re-
quired selection is displayed (here: level "2").
6. Confirm the selection with the Enter key.
You will leave the menu automatically.
7. To make further selections, call up the menu again
and proceed as described above.
NOTE:
If no key is pressed for approx. 24 seconds, you
will leave the menu automatically.
Use differential function
(BMIF) You can use the BMIF function (BMIF: Breast Milk
Intake Function) to determine the quantity of food con-
sumed by a baby during a meal. To do to, save the cur-
rent weight. After the meal call up the stored weight
again and reweigh the baby. The scales will calculate
the difference, i.e. the quantity of food consumed.
1. Switch on the scales.
2. Place the baby on the scales before the meal.
The current weight is displayed.
3. Select the item BMIF in the menu.
The "Differential value function" symbol appears.
4. Confirm the selection.
5. Select the menu item Sto.
The "Select memory location" symbol appears.
6. Confirm the selection.
Sto 1 appears in the display.
The "Select memory location" symbol appears.
Arrows can be seen flashing in the display.
7. Select one of three memory locations (here: 2).
8. Confirm your selection.
The current weighing value is stored.
9. After the meal place the baby on the scales again.
10. Select the item BMIF (Breast Milk Intake Function)
in the menu.
11. Confirm the selection.
send
print
hold
tare
send
print

17
•
12. Select the menu item CALC.
13. Confirm the selection.
14. Select the memory location where you stored the
baby's initial weight (here: 2).
Arrows can be seen flashing in the display.
15. Confirm your selection.
The weight difference, i.e. the quantity of food
consumed, is displayed.
16. To disable this function, select the item BMIF in the
menu again.
17. Confirm your selection.
The function is disabled.
You will leave the menu automatically.
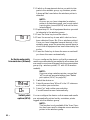
Activate Autohold
function (Ahold) If you activate the Autohold function, the measured
result for each weighing operation will continue to be
displayed after the baby has been removed. This
means you no longer have to manually activate the
Hold function for every weighing operation.
NOTE:
With certain models this function is already acti-
vated at the factory. If required, you can disable
this function.
1. Select the item "Ahold" in the menu.
2. Confirm the selection.
The current selection is displayed.
3. Select the setting you require:
–
On
–
Off
4. Confirm your selection.
You will leave the menu automatically.
Activate acoustic
signals (BEEP) You can select whether an acoustic signal is to be
emitted whenever a key is pressed or a stable weighing
value has been attained. The latter is relevant for the
Hold/Autohold function.
NOTE:
The function "Acoustic signal with stable weigh-
ing value" is activated at the factory. If required,
you can disable this function.
1. Select the item "BEEP" in the menu.
2. Confirm the selection.

English
Operation • 18
3. Select a menu item:
–
Press: Acoustic signal whenever a key is
pressed
–
Hold: Acoustic signal with a stable weighing
value.
4. Confirm your selection.
The current selection is displayed.
5. Select the setting you require:
–
On
–
Off
6. Confirm your selection.
You will leave the menu automatically.
7. If you also wish to activate the acoustic signal for
the second function, repeat this procedure.
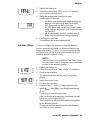
Select attenuation (Fil) You can use attenuation (Fil = filter) to reduce any inter-
ference during weighing (e.g. caused by patient moving).
1. Select the item "Fil" in the menu.
2. Confirm the selection.
The current selection is displayed.
3. Select an attenuation level.
–
0: low attenuation
–
1: moderate attenuation
–
2: high attenuation
4. Confirm the selection.
You will leave the menu automatically.
Restore factory settings
(RESET) You can restore the factory settings for the following
functions:
Function
Factory setting
Autohold (Ahold)
depending on
model
Acoustic signal (Press)
off
Acoustic signal (Hold)
on
Attenuation (Fil)
0
Stored value Breast Milk Intake
Function (BMIF)
0 kg
Wireless module (SYS)
off
Autosend (Asend)
off
Autoprint (APrt)
off

19
•
NOTE:
The wireless module is switched off when
restoring the factory settings. Data for existing
wireless groups remains in the memory. These
groups do not need to be set up again.
1. Select the item "Reset" in the menu.
2. Confirm the selection.
You will leave the menu automatically.
3. Switch the scales off.
The factory settings are restored and will be availa-
ble when the scales are next switched on.
7.
SECA 360° WIRELESS NETWORK
7.1
Introduction
This device is equipped with a wireless module. The
wireless module allows measured results to be trans-
mitted wirelessly for analysis and documentation. Data
can be transmitted to the following equipment devices:
•
seca wireless printer
•
PC with seca USB wireless module
seca wireless groups The seca 360° wireless network operates with wireless
groups. A wireless group is a virtual group of transmit-
ters and receivers. If you wish to operate several trans-
mitters and receivers of the same type, up to 3 wireless
groups (0, 1, 2) can be set up with this device.
The set-up of several wireless groups ensures the relia-
ble transmission of measured values with the correct
address when using more than one examination room
each with similar equipment.
The maximum distance between transmitters and
receivers is approx. 10 metres. This range may be
reduced under certain local conditions, e.g. thickness
and type of wall partitions.

English
seca 360° wireless Network • 20
The following combination of devices is possible per
wireless group:
•
1 set of baby scales
•
1 set of personal scales
•
1 length measuring device
•
1 seca wireless printer
•
1 PC with seca USB wireless module
Channels The devices communicate with each other within each
wireless group via three channels (C1, C2, C3). This
ensures reliable, troublefree data transmission.
When you set up a wireless group with the scales, the
device will suggest three channels guaranteeing opti-
mum data transmission. We recommend accepting the
channel numbers suggested.
You can also select the channel numbers (0 - 99) man-
ually, for example if you want to set up more than one
wireless group.
The channels must be sufficiently far apart to ensure
troublefree data transmission. We recommend a spac-
ing of at least 30. Each channel number may only be
used for one channel.
Example of configuration; channel numbers when
setting up 3 wireless groups within one surgery:
•
Wireless group 0: C1=_0, C2= 30, C3=60
•
Wireless group 1: C1=10, C2=40, C3=70
•
Wireless group 2: C1=20, C2=50, C3=80
Detection of equipment
devices If you wish to set up a wireless group with the scales,
they will search for other active devices from the
seca 360° wireless system. The devices detected are
shown as modules in the display on the scales (e.g.
MO 3). The meaning of the numbers is as follows:
•
1: Personal scales
•
2: Length measuring device
•
3: Wireless printer
•
4: PC with seca USB wireless module
•
7: Baby scales
•
5, 6 and 8-12: Reserved for system expansion
C1
C2
C3
La pagina si sta caricando...
La pagina si sta caricando...
La pagina si sta caricando...
La pagina si sta caricando...
La pagina si sta caricando...
La pagina si sta caricando...
La pagina si sta caricando...
La pagina si sta caricando...
La pagina si sta caricando...
La pagina si sta caricando...
La pagina si sta caricando...
La pagina si sta caricando...
La pagina si sta caricando...
La pagina si sta caricando...
La pagina si sta caricando...
La pagina si sta caricando...
-
 1
1
-
 2
2
-
 3
3
-
 4
4
-
 5
5
-
 6
6
-
 7
7
-
 8
8
-
 9
9
-
 10
10
-
 11
11
-
 12
12
-
 13
13
-
 14
14
-
 15
15
-
 16
16
-
 17
17
-
 18
18
-
 19
19
-
 20
20
-
 21
21
-
 22
22
-
 23
23
-
 24
24
-
 25
25
-
 26
26
-
 27
27
-
 28
28
-
 29
29
-
 30
30
-
 31
31
-
 32
32
-
 33
33
-
 34
34
-
 35
35
-
 36
36


