Yamaha DVR-S120 Manuale del proprietario
- Categoria
- Ricevitori AV
- Tipo
- Manuale del proprietario
Questo manuale è adatto anche per

YAMAHA ELECTRONICS CORPORATION, USA 6660 ORANGETHORPE AVE., BUENA PARK, CALIF. 90620, U.S.A.
YAMAHA CANADA MUSIC LTD. 135 MILNER AVE., SCARBOROUGH, ONTARIO M1S 3R1, CANADA
YAMAHA ELECTRONIK EUROPA G.m.b.H. SIEMENSSTR. 22-34, 25462 RELLINGEN BEI HAMBURG, F.R. OF GERMANY
YAMAHA ELECTRONIQUE FRANCE S.A. RUE AMBROISE CROIZAT BP70 CROISSY-BEAUBOURG 77312 MARNE-LA-VALLEE CEDEX02, FRANCE
YAMAHA ELECTRONICS (UK) LTD. YAMAHA HOUSE, 200 RICKMANSWORTH ROAD WATFORD, HERTS WD18 7GQ, ENGLAND
YAMAHA SCANDINAVIA A.B. J A WETTERGRENS GATA 1, BOX 30053, 400 43 VÄSTRA FRÖLUNDA, SWEDEN
YAMAHA MUSIC AUSTRALIA PTY, LTD. 17-33 MARKET ST., SOUTH MELBOURNE, 3205 VIC., AUSTRALIA
DVD HOME THEATER SOUND SYSTEM
DVX-S120
(DVR-S120+NX-S120+NX-C120+NX-SW120)
OWNER’S MANUAL
U B
DVD RECEIVER
DVR-S120
Printed in Malaysia WB85310-1
cv_DVX-S120_UB.p65 03.8.19, 7:44 PM1

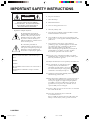
• Explanation of Graphical Symbols
The lightning flash with arrowhead
symbol, within an equilateral triangle, is
intended to alert you to the presence of
uninsulated “dangerous voltage” within
the product’s enclosure that may be of
sufficient magnitude to constitute a risk of
electric shock to persons.
The exclamation point within an
equilateral triangle is intended to alert you
to the presence of important operating and
maintenance (servicing) instructions in
the literature accompanying the appliance.
IMPORTANT SAFETY INSTRUCTIONS
1 Read these instructions.
2 Keep these instructions.
3 Heed all warnings.
4 Follow all instructions.
5 Do not use this apparatus near water.
6 Clean only with dry cloth.
7 Do not block any ventilation openings. Install in accordance
with the manufacturer’s instructions.
8 Do not install near any heat sources such as radiators, heat
registers, stoves, or other apparatus (including amplifiers) that
produce heat.
9 Do not defeat the safety purpose of the polarized or
grounding-type plug. A polarized plug has two blades with
one wider than the other. A grounding type plug has two
blades and a third grounding prong. The wide
blade or the third prong are provided for your safety. If the
provided plug does not fit into your outlet, consult an
electrician for replacement of the obsolete outlet.
10 Protect the power cord from being walked on or pinched
particularly at plugs, convenience receptacles, and the point
where they exit from the apparatus.
11 Only use attachments/accessories specified by the manufacturer.
12 Use only with the cart, stand, tripod, bracket,
or table specified by the manufacturer, or
sold with the apparatus. When a cart is used,
use caution when moving the cart/apparatus
combination to avoid injury from tip-over.
13 Unplug this apparatus during lightning storms or when
unused for long periods of time.
14 Refer all servicing to qualified service personnel. Servicing is
required when the apparatus has been damaged in any way,
such as power-supply cord or plug is damaged, liquid has
been spilled or objects have fallen into the apparatus, the
apparatus has been exposed to rain or moisture, does not
operate normally, or has been dropped.
15 Be sure to allow spaces of at least 20 cm above, 10 cm behind
and on both sides the unit.
16 Do not place the following objects on this unit:
A vessel with water in it.
If the vessel falls by vibrations and water spills, it may cause
damage to the unit, and/or you may get an electric shock.
CAUTION: TO REDUCE THE RISK OF
ELECTRIC SHOCK, DO NOT REMOVE
COVER (OR BACK). NO USER-SERVICEABLE
PARTS INSIDE. REFER SERVICING TO
QUALIFIED SERVICE PERSONNEL.
RISK OF ELECTRIC SHOCK
DO NOT OPEN
CAUTION
IMPORTANT
Please record the serial number of this unit in the space
below.
MODEL:
Serial No.:
The serial number is located on the rear or the bottom of
this unit.
Retain this Owner’s Manual in a safe place for future
reference.
I CAUTION
DVX-S120_UB.p65 03.8.5, 1:29 PM2

We Want You Listening For A Lifetime
YAMAHA and the Electronic Industries Association’s Consumer
Electronics Group want you to get the most out of your equipment
by playing it at a safe level. One that lets the sound come through
loud and clear without annoying blaring or distortion – and, most
importantly, without affecting your sensitive hearing.
Since hearing damage from loud sounds is often
undetectable until it is too late, YAMAHA and the
Electronic Industries Association’s Consumer
Electronics Group recommend you to avoid prolonged
exposure from excessive volume levels.
1. IMPORTANT NOTICE : DO NOT MODIFY THIS
UNIT!
This product, when installed as indicated in the instructions
contained in this manual, meets FCC requirements.
Modifications not expressly approved by Yamaha may void
your authority, granted by the FCC, to use the product.
2. IMPORTANT :
When connecting this product to accessories and/or another
product use only high quality shielded cables. Cable/s
supplied with this product MUST be used. Follow all
installation instructions. Failure to follow instructions could
void your FCC authorization to use this product in the USA.
3. NOTE :
This product has been tested and found to comply with the
requirements listed in FCC Regulations, Part 15 for Class
“B” digital devices. Compliance with these requirements
provides a reasonable level of assurance that your use of this
product in a residential environment will not result in harmful
interference with other electronic devices.
This equipment generates/uses radio frequencies and, if not
installed and used according to the instructions found in the
users manual, may cause interference harmful to the
operation of other electronic devices.
Compliance with FCC regulations does not guarantee that
interference will not occur in all installations. If this product is
found to be the source of interference, which can be determined
by turning the unit “OFF” and “ON”, please try to eliminate the
problem by using one of the following measures:
Relocate either this product or the device that is being affected
by the interference.
Utilize power outlets that are on different branch (circuit breaker
or fuse) circuits or install AC line filter/s.
In the case of radio or TV interference, relocate/reorient the
antenna. If the antenna lead-in is 300 ohm ribbon lead, change
the lead-in to coaxial type cable.
If these corrective measures do not produce satisfactory results,
please contact the local retailer authorized to distribute this type
of product. If you can not locate the appropriate retailer, please
contact Yamaha Electronics Corp., U.S.A. 6660 Orangethorpe
Ave, Buena Park, CA 90620.
The above statements apply ONLY to those products distributed
by Yamaha Corporation of America or its subsidiaries.
FCC INFORMATION (for US customers)
English
CAUTION II
DVX-S120_UB.p65 03.8.5, 1:29 PM3

CAUTION: READ THIS BEFORE OPERATING YOUR UNIT.
DVR-S120
This unit is not disconnected from the AC power source as long
as it is connected to the wall outlet, even if this unit itself is
turned off. This state is called the standby mode. In this state,
this unit is designed to consume a very small quantity of power.
FOR CANADIAN CUSTOMERS
To prevent electric shock, match wide blade of plug to wide slot
and fully insert.
This Class B digital apparatus complies with Canadian ICES-
003.
DANGER
When this unit is plugged to the wall outlet, do not place your eyes
close to the opening of the disc tray and other openings to look into
inside.
The laser component in this product is capable of emitting
radiation exceeding the limit for Class 1.
DVR-S120
The name plate is located on the bottom of the unit.
WARNING
TO REDUCE THE RISK OF FIRE OR ELECTRIC SHOCK,
DO NOT EXPOSE THIS APPLIANCE TO RAIN OR
MOISTURE.
■ For U.K. customers
If the socket outlets in the home are not suitable for the plug supplied
with this appliance, it should be cut off and an appropriate 3 pin plug
fitted. For details, refer to the instructions described below.
Note
• The plug severed from the mains lead must be destroyed, as a plug
with bared flexible cord is hazardous if engaged in a live socket
outlet.
■ Special Instructions for U.K. Model
IMPORTANT
THE WIRES IN MAINS LEAD ARE COLOURED IN
ACCORDANCE WITH THE FOLLOWING CODE:
Blue: NEUTRAL
Brown: LIVE
As the colours of the wires in the mains lead of this apparatus
may not correspond with the coloured markings identifying the
terminals in your plug, proceed as follows:
The wire which is coloured BLUE must be connected to the
terminal which is marked with the letter N or coloured BLACK.
The wire which is coloured BROWN must be connected to the
terminal which is marked with the letter L or coloured RED.
Making sure that neither core is connected to the earth terminal
of the three pin plug.
1 To assure the finest performance, please read this manual
carefully. Keep it in a safe place for future reference.
2 Install this sound system in a well ventilated, cool, dry, clean
place with at least 10 cm on the top, 10 cm on the left and right,
and 10 cm at the back of DVR-S120, and 20 cm on the top, 20
cm on the left and right, and 20 cm at the back of NX-SW120
— away from direct sunlight, heat sources, vibration, dust,
moisture, and/or cold.
3 Locate this unit away from other electrical appliances, motors,
or transformers to avoid humming sounds.
4 Do not expose this unit to sudden temperature changes from
cold to hot, and do not locate this unit in a environment with
high humidity (i.e. a room with a humidifier) to prevent
condensation inside this unit, which may cause an electrical
shock, fire, damage to this unit, and/or personal injury.
5 Avoid installing this unit where foreign object may fall onto
this unit and/or this unit may be exposed to liquid dripping or
splashing. On the top of this unit, do not place:
– Other components, as they may cause damage and/or
discoloration on the surface of this unit.
– Burning objects (i.e. candles), as they may cause fire,
damage to this unit, and/or personal injury.
– Containers with liquid in them, as they may fall and liquid
may cause electrical shock to the user and/or damage to
this unit.
6 Do not cover this unit with a newspaper, tablecloth, curtain, etc.
in order not to obstruct heat radiation. If the temperature inside
this unit rises, it may cause fire, damage to this unit, and/or
personal injury.
7 Do not plug in this unit to a wall outlet until all connections are
complete.
8 Do not operate this unit upside-down. It may overheat, possibly
causing damage.
9 Do not use force on switches, knobs and/or cords.
10 When disconnecting the power cord from the wall outlet, grasp
the plug; do not pull the cord.
11 Do not clean this unit with chemical solvents; this might
damage the finish. Use a clean, dry cloth.
12 Only voltage specified on this unit must be used. Using this
unit with a higher voltage than specified is dangerous and may
cause fire, damage to this unit, and/or personal injury.
YAMAHA will not be held responsible for any damage
resulting from use of this unit with a voltage other than
specified.
13 To prevent damage by lightning, disconnect the power cord
from the wall outlet during an electrical storm.
14 Do not attempt to modify or fix this unit. Contact qualified
YAMAHA service personnel when any service is needed. The
cabinet should never be opened for any reasons.
15 When not planning to use this unit for long periods of time (i.e.
vacation), disconnect the AC power plug from the wall outlet.
16 Be sure to read the “Solutions to Common Problems” section
on common operating errors before concluding that this unit is
faulty.
17 Before moving this unit, press STANDBY/ON to set this unit
in standby mode, and disconnect the AC power plug from the
wall outlet.
18 Do not place much pressure against the Subwoofer net. It may
break the net or the unit may fall, resulting in injury.
19 Do not place anything fragile beside the Subwoofer, as air
pressure is produced that may break it, result in malfunction or
cause injury.
20 Condensation will form when the surrounding temperature
changes suddenly. Disconnect the power cord from the outlet,
then leave the unit alone.
21 When using the unit for a long time, the unit may become
warm. Turn the power off, then leave the unit alone for cooling.
III CAUTION
DVX-S120_UB.p65 03.8.5, 1:29 PM4

CAUTION
Use of controls or adjustments or performance of procedures
other than those specified herein may result in hazardous
radiation exposure.
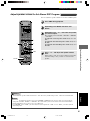
● The name plate is located on the bottom of the unit.
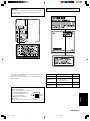
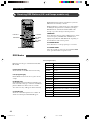
This product is a DVD home theater sound system consisting of the
components shown on the table.
Please check to make sure that all of the components listed in the
table are included.
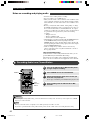
NX-SW120
VOLTAGE SELECTOR
(Korea, Asia and General models only)
The VOLTAGE SELECTOR on the
rear panel of this unit must be set
for your local main voltage
BEFORE plugging into the AC
main supply.
Voltages are 110V-120V, 220V-240V AC, 50/60 Hz.
110V
–
120V
220V
–
240V
VOLTAGE
SELECTOR
Model name Category No. of pcs
DVR-S120 DVD receiver 1
NX-S120 Satellite Speaker 4
(for front/surround)
NX-C120 Center speaker 1
NX-SW120 Subwoofer 1
English
CAUTION IV
DVX-S120_UB.p65 03.8.5, 1:29 PM5

2
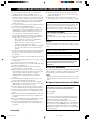
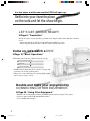
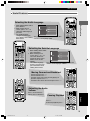
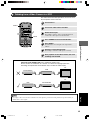
In a few steps, a whole new world of DVD will open up.
Settle into your favorite place
on the sofa and let the show begin.
LET’S GET THINGS READY!
➡Page 6, “Preparation”
Decide on a place for the speakers, perform a few simple connections, and that’s all there
is to it.
• Connecting Speakers and TV to CinemaStation couldn’t be easier.
• Connecting the Speaker Cables with one touch colored connectors.
Come on, let’s watch a DVD!
➡Page 10, “Basic Operations”
Transform your room into a home theater in 3 steps.
Double and triple your enjoyment by
CONNECTING OTHER EQUIPMENT.
➡Page 46, “Using Other Equipment”
• Enhance the feeling of movement with DSP Programs when you play video games.
• Listen to and record CD-R and MiniDisc media.
• View and dub video media.
Connect Speakers and TV
Play a disc
Select a sound field
• Sound fields to match the movie you are viewing and
experience the feeling of being there.
• Progressive scan technology for enjoying high-quality
video even on a large screen.
001DVX-S120-en 03.8.5, 1:39 PM2

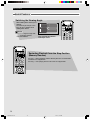
3
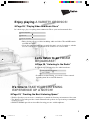
Enjoy playing A VARIETY OF DISCS!
➡Page 28, “Playing Video and Music Discs”
In 3 short steps, play everything from commercial CDs to your own homemade discs.
It’s time to TAKE YOUR LISTENING
EXPERIENCE UP A NOTCH!
➡Page 53, “Creating the Best Listening Space”
• With the Speakers you can create a sound space to match the listening environment of the room.
• The Matrix 6.1 Decoder provides virtual surround back speakers for experiencing a remarkable
acoustic presence.
• SILENT CINEMA provides an incredible listening presence with headphones.
Let’s listen to an FM/AM
BROADCAST!
➡Page 38, “Listening to the Radio”
In 2 quick steps you can enjoy live radio broadcasts.
• Enjoy playing all types of discs including audio and video CDs and MP3 music
recorded on CD-Rs.
• Create the sound and ambience to match the music you are listening to, whether
it be the excitement of a nightclub or the acoustics of a concert hall.
• In addition to Auto Tuning, you can use various controls
including Auto Preset for FM channels.
Connect Speakers
Play a disc
Select a sound field
Connect Speakers and Antennas
Select a channel
001DVX-S120-en 03.8.5, 1:39 PM3

4
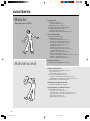
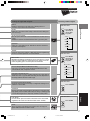
CONTENTS
Basic
Advanced
Playing back a DVD
Advanced Features
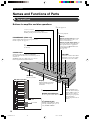
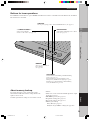
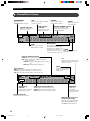
Names and Functions of Parts Page 18
Top and Front Page 18
CinemaStation Display Page 20
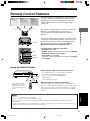
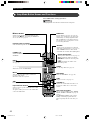
Remote Control Features Page 21
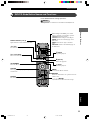
Amp Mode Button Names and Functions Page 22
DVD/CD Mode Button Names and Functions Page 23
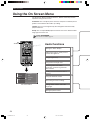
Using the On Screen Menu Page 24
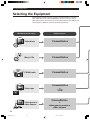
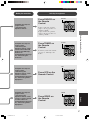
Selecting the Media Device
Selecting the Equipment Page 26
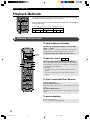
Playing Video and Music Discs
Playback Methods Page 28
Selecting a Scene or Tune Page 28
Customizing Playback Order (Program Play) Page 31
Repeating a Disc or Track (Repeat Play) Page 34
Using a Disc Menu Page 36
MP3 Playback Features Page 37
Preparation
Introduction Page 6
About this Manual Page 6
Supplied Accessories Page 6
Preparing the Remote Control Page 7
Preparing the Speakers Page 7
Placing the Speakers Page 7
Connecting the Speakers and TV Page 8
Basic Operations
Viewing a DVD Page 10
Useful Features Page 13
Selecting the Audio Language Page 13
Selecting the Subtitle Language Page 13
Moving Forward and Backward Page 13
Adjusting the Audio Volume Page 13
Pausing Playback Page 13
Switching the Viewing Angle Page 14
Restarting Playback from the Stop Position
(Memory Resume) Page 14
Enhancing the Sound Presence Page 15
Turning off the Sound Page 15
Controlling the DVDs Your Children Can View Page 15
Enhancing Video Quality Page 15
Answers to Common Problems Page 15
Sound Presence
Finding the Best DSP Effect Page 16
001DVX-S120-en 03.8.5, 1:39 PM4

5
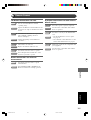
Listening to the Radio
Connecting the Antennas Page 38
Connecting the FM Antenna Page 38
Connecting the AM Loop Antenna Page 38
Listening to the Radio Page 39
Selecting the Radio Tuner Page 39
Selecting Radio Stations Page 39
Setting Channels in Advance (Preset) Page 41
Selecting a Preset Station (Preset Tuning) Page 43
Changing the Order of Preset Stations Page 43
Receiving RDS Stations
(U.K. and Europe models only) Page 44
Using Other Equipment
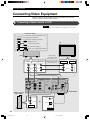
Connecting Video Equipment Page 46
Connecting a Game Console or VCR Page 46
Operating a VCR Page 48
Playing a Video Game or Operating
a Video Camera Page 48
Dubbing from a Video Camera to a VCR Page 49
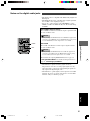
Connecting Audio Equipment Page 50
Connecting a CD or MD Recorder Page 50
Recording Audio from CinemaStation Page 52
Creating the Best Listening Space
Placing the Speakers (NX-P120) Page 53
Placing the Center Speaker Page 53
Placing the Subwoofer Page 53
Placing the Front and Surround Speakers Page 54
Using Commercially Available Speakers
or Cables Page 56
Adjusting the Speaker Volume Level Page 58
Adjusting the Speaker Balance with a Test Tone Page 58
Adjusting the Speaker Volume Level
During Playback Page 60
Setting the Speaker Size Page 62
Setting the Speaker Mode Page 62
More Information about DSP (Surround)
Effects
Selecting DSP Program Effects Page 64
Using Matrix 6.1 Page 64
Using All Speakers for CD or Video playback Page 66
Using Front Speakers Only for DSP Program
(Virtual Cinema DSP) Page 68
Using a DSP Program with Headphones
(SILENT CINEMA) Page 69
Using a DSP Program with Low Volume
(Night Listening) Page 70
Changing the Delay Time of a DSP Program Page 71
Reproducing the Original Dolby and DTS Sound Page 73
Reproducing Stereo Sound Page 74
Types of Input Signals
Types of Input Signals Page 75
Checking Sound Information
(Input Signal Information Display) Page 75
Switching Input Modes Page 77
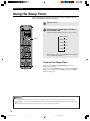
Additional Features
Using the Sleep Timer Page 78
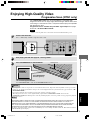
Enjoying High-Quality Video Page 79
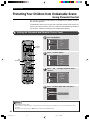
Protecting Your Children
from Undesirable Scene Page 80
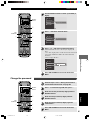
Setting the Password and Parental
Control Level Page 80
Locking a Disc Page 82
Operating Other Equipment with the
CinemaStation Remote Control
Storing Manufacturer Codes
in the Remote Control Page 83
Setting the Manufacturer Code Page 83
Available Operations Page 84
Manufacturer Code List Page 86
Using the SET MENU
Using the SET MENU Page 88
SET MENU List Page 88
Navigating the SET MENU Page 89
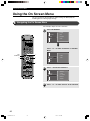
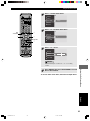
Using the On Screen Menu
Using the On Screen Menu Page 92
Navigating the On Screen Menu Page 92
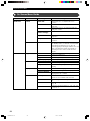
On Screen Menu Guide Page 94
Appendix
Solutions to Common Problems Page 96
General Problems Page 96
Disc Playback Page 99
Radio Reception Page 100
Remote Control Page 101
Information Page 102
Glossary Page 105
Index Page 107
Specifications Page 109
CONTENTS
English
001DVX-S120-en 03.8.5, 1:39 PM5

6
Preparation
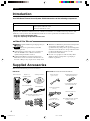
Supplied Accessories
Remote Control
Make sure all of the following accessories are in the box.
System Control Cable
(5 m (1))
Batteries (2)
(AA, R06, UM-3)
AM Loop Antenna
Indoor FM Antenna
Speaker Cables (Surround: 15 m (2),
Front, Center: 5 m (3))
DVR-S120
NX-P120: NX-S120, NX-C120, NX-SW120
Video Pin Cable
Subwoofer Cable
(1 pin, 5 m, (1))
Screws (M4 ✕ 10) (Front,
Surround Speakers (4))
Mounting Brackets (Front,
Surround Speakers (4))
Non-Skid Pads
(Subwoofer, 1 Set (4))
Fasteners (Center (2))
Non-Skid Pads (Front, Surround
Speakers, 2 Sets (16))
About this Manual
● explains additional operating tips that you
may find useful.
● indicates an operation that you should
definitely perform.
● In this manual, operations that can be performed on
either the DVD Receiver or Remote Control are
explained using the Remote Control.
● In this manual, Remote Control descriptions and
illustrations are based on models other than those in
the U.K. or Europe. Any exceptions are clearly stated.
Introduction
Your DVD Home Theater Sound System DVX-S120 consists of the following components.
DVD Receiver (DVR-S120) 1 unit
Speaker Set (NX-P120) Satellite Speakers (Front, Surround) (NX-S120) 4 units
Center Speaker (NX-C120) 1 unit
Subwoofer (NX-SW120) 1 unit
● This Owner’s Manual was printed before final product
development. After printing, some product
specifications may change due to operational upgrades
and other reasons. In this case, the specifications of the
product itself will take precedence over the
specifications in this manual.
● In some cases, graphics or terms used may differ
slightly from the actual product or packaging to
facilitate explanation.
Explanations in this Owner’s Manual are based on DVX-S120 (DVD Receiver (DVR-S120) and Speaker Set (NX-
P120)). If you use speakers other than NX-P120, make sure to set the speaker size and volume level in advance.
→Page 62, “Setting the Speaker Size”
→Page 58, “Adjusting the Speaker Volume Level”
Advice
Please...
TV
CH
CINEMA
CH
POWER
POWER
AUDIO
/
DTS
SELECT
NIGHT
SW
TV CH
TV INPUT
SLEEP
PRESET PRESET
A B C D E
CENTER
SURR
SHIFT
STEREOMATRIX 6.1
A-B
REPEAT
ANGLE
SUBTITLE
DVR-S120 WB56650
ON SCREEN MENU
TEST
RETURN
STATUS
TV VOL
VOLUME
MUTE
AMP
DVD/CD
VCR
VIDEO
TUNER
MOVIE MUSIC SPORTS GAME
SET MENU
ENTER
002DVX-S120-en 03.8.5, 1:39 PM6

B asic
7
Preparation
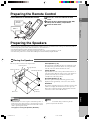
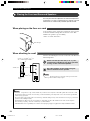
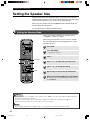
Preparing the Remote Control
Put the batteries in the Remote Control.
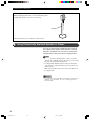
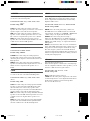
Preparing the Speakers
The Front Speakers, Surround Speakers, Center Speaker and Subwoofer have special roles based on the type of sound each produces.
• The Front Speakers produce front channel sound (stereo) and sound effects.
• The Surround Speakers produce surround sound and sound effects.
• The Center Speaker produces sound oriented toward the center of the screen such as dialog or vocals.
• The Subwoofer produces bass sounds and the LFE signal contained in Dolby Digital and DTS.
• You can secure the Center Speaker, Surround Speakers or
Subwoofer in place using fasteners or non-skid pads. You can
hang the Front and Surround Speakers from the wall or attach
them to optional speaker stands.
See page 53, “Placing the Speakers (NX-P120)”.
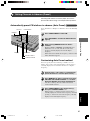
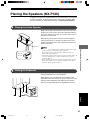
Placing the Speakers
Place the speakers as shown in the diagram below.
• If the television (monitor) image is distorted, place the
speakers away from the television.
Front Speakers (L, R)
Place the Front Left and Right Speakers an equal distance from
the ideal listening position. The distance of each speaker from
each side of the video monitor should be the same.
Center Speaker
Align the front face of the center speaker with the front face of
your video monitor. Place the speaker as close to the monitor as
possible (such as directly over or under the monitor) and
centrally between the front speakers.
Surround Speakers (L, R)
Place these speakers behind your listening position, facing
slightly inwards, approximately 1.8 m (6 feet) above the floor.
Subwoofer
The position of the Subwoofer is not so critical, because low bass
sounds are not highly directional. But it is better to place the
Subwoofer near the Front Speakers. Turn it slightly toward the
center of the room to reduce wall reflections.
Press the h mark and slide off the back
cover.
Insert the two supplied batteries (AA, R06,
UM-3) into the battery compartment.
Close the back cover.
Center Speaker
Front Speaker (L)
Front Speaker (R)
Surround Speaker (R)
1.8 m
(6 feet)
Surround
Speaker (L)
Subwoofer
Advice
Note
Check +/-
polarity
Press h
English
Preparation
002DVX-S120-en 03.8.5, 1:39 PM7

88
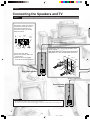
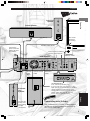
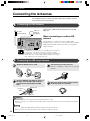
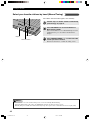
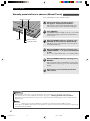
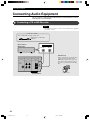
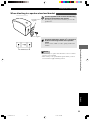
Connecting the Speakers and TV
Connect the power cord after connecting the speakers and TV.Please ...
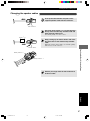
Connect the cable core with the
color band near the tip to the +
connector. Be careful, if you
reverse the cables, the sound
will be unnatural.
32
Cable
core
Color
band
Lever
1 Press the lever down.
2 Insert the speaker cable core
into the hole.
3 Release the lever and the
lever will snap back into place.
1
Speaker Cable (Red)
Connect the plug to the jack of the same color.
Insert it firmly.
Red, green, white: Face the tab upwards and insert.
Gray, blue: Face the tab downwards and insert.
Tab
Red
Green
White
Blue
Tab
Gray
Speaker Cable (Gray)
Surround Right
Speaker
Front Right Speaker
Please
• Do not allow the speaker cable cores to touch each other.
• Do not use excessive force when inserting plugs, connectors or jacks as they can be damaged.
Preparation
Please ...
003DVX-S120-en 03.8.19, 7:03 PM8

9
DIGITAL
AUDIO
VIDEOS VIDEO
IN
VCR
OUT
AM
ANT
VCR
OUT
VCR
IN
VIDEO
IN
Y
P
B
P
R
FM
ANT
GND
MONITOR
OUT
MONITOR
OUT
(DVD ONLY)
MONITOR
OUT
(DVD ONLY)
SUBWOOFER
SPEAKERS
CENTER FRONT
SURROUND
FRONT
SURROUND
OUT
VCR
IN
VIDEO
IN
COMPONENT
VIDEO
AUDIO
R
LR
L
SYSTEM
CONNECTOR
75 UNBAL
OUT
OPTICAL
SPEAKER IMPEDANCE: 6 MIN.
AV MONITOR OUT
(DVD ONLY)
INPUT
SYSTEM
CONNECTOR
VIDEO IN
VIDEO
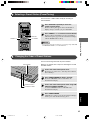
9
Surround
Left
Speaker
Front Left
Speaker
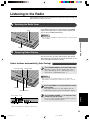
Center Speaker
Speaker Cable (Green)
Speaker Cable (White)
TV
Connect the
power cord after
making all other
connections.
Turn off the
TV before
connecting.
Video Pin Cable
DVD Receiver
Speaker
Cable
(Blue)
System Control
Cable
Subwoofer
Cable
Connect to the S-video or
Y/P
B/PR jack on the TV.
Connect the
power cord
after making
all other
connections.
Use a commercially available S-video cable to
connect the S VIDEO MONITOR OUTPUT to
your TV’s S-video input.
U
s
e
f
u
l
t
i
p
Preparation
Preparation
AV MONITOR OUT
(U. K. and Europe models only)
If your monitor has only one jack for video
input, you can use CinemaStation’s SCART
output jack for connecting directly to the
monitor. This connection provides the best
picture quality. See page 95 when the
screen does not appear properly.
Subwoofer
Connecting with S-video
English
003DVX-S120-en 03.8.19, 8:46 PM9

10
POWER
TV
POWER
POWER
AUDIO
/
DTS
SELECT
NIGHT
SW
TV CH
TV INPUT
A B C D E
CENTER
SURR
SHIFT
STEREOMATRIX 6.1
A-B
REPEAT
ANGLE
SUBTITLE
DVR-S120 WB56650
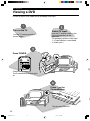
Basic Operations
Viewing a DVD
It’s time to play a DVD. Select a disc and begin from step 1.
Turn on the TV.
Use the TV remote control or
power switch.
Switch TV Input.
Use the TV remote control or the
input switch button on the
television.
For example, switch to video input
1 if CinemaStation is connected
to video input 1.
Press POWER.
CinemaStation turns on.
The CinemaStation Display lights
up.
Press f on the
CinemaStation.
The disc tray slides out.
004DVX-S120-en 03.8.5, 1:41 PM10

11
Basic Operations
DVD/CD
CINEMA
AMP
DVD/CD
VCR
VIDEO
TUNER
MOVIE MUSIC SPORTS GAME
English
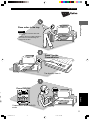
Basic Operations
Place a disc in the tray.
• Place the disc with the label side
facing up.
• Hold the disc by its edge and hole in
the center to avoid touching the
surface of the disc.
Please ...
Press f on the
CinemaStation.
The disc tray slides in.
Press DVD/CD.
CinemaStation enters DVD/CD
mode.
004DVX-S120-en 03.8.5, 1:41 PM11

12
Basic Operations
POWER
A B C D E
CHCH
TV
CH
SLEEP
PRESET PRESET
A
B
C
D
E
ON SCREEN MENU
TEST
RETURN
STATUS
TV VOL
VOLUME
SET MENU
ENTER
NIGHT
SW
TV CH
TV INPUT
SLEEP
PRESET PRESET
A B C D E
CENTER
SURR
SHIFT
ON SCREEN MENU
SET MENU
TV
POWER
POWER
AUDIO
/
DTS
SELECT
NIGHT
SW
TV CH
TV INPUT
ABCDE
CENTER
SURR
SHIFT
STEREOMATRIX 6.1
A-B
REPEAT
ANGLE
SUBTITLE
DVR-S120 WB56650
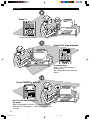
Press p.
The DVD starts playing.
Press s to stop playback.
To change discs
Press f on CinemaStation to
eject the disc.
Set another disc in the tray and
press f.
Press POWER to turn off.
Eject the disc before turning off
the power.
After finished playing, press f on CinemaStation to
eject the disc. Then press f once more to close the
disc tray.
004DVX-S120-en 03.8.5, 1:41 PM12

13
Basic Operations
13
Basic Operations
Basic Operations
Handy Features
TV
CHCH
POWER
POWER
AUDIO
/
DTS
SELECT
NIGHT
SW
TV CH
TV INPUT
SLEEP
PRESET PRESET
A B C D E
CENTER
SURR
SHIFT
STEREOMATRIX 6.1
A-B
REPEAT
ANGLE
SUBTITLE
DVR-S120 WB56650
ON SCREEN MENU
TEST
RETURN
STATUS
TV VOL
VOLUME
SET MENU
ENTER
TV
CHCH
POWER
POWER
AUDIO
/
DTS
SELECT
NIGHT
SW
TV CH
TV INPUT
SLEEP
PRESET PRESET
A B C D E
CENTER
SURR
SHIFT
STEREOMATRIX 6.1
A-B
REPEAT
ANGLE
SUBTITLE
DVR-S120 WB56650
ON SCREEN MENU
TEST
RETURN
STATUS
TV VOL
VOLUME
SET MENU
ENTER
CHCH
NIGHT
SW
TV CH
TV INPUT
SLEEP
PRESET PRESET
A B C D E
CENTER
SURR
SHIFT
A-B
REPEAT
ON SCREEN MENU
RETURN
STATUS
SET MENU
ENTER
CH
CINEMA
CH
TEST
RETURN
STATUS
TV VOL
VOLUME
MUTE
AMP
DVD/CD
VCR
VIDEO
TUNER
MOVIE MUSIC SPORTS GAME
SET
MENU
ENTER
CHCH
NIGHT
SW
TV CH
TV INPUT
SLEEP
PRESET PRESET
A B C D E
CENTER
SURR
SHIFT
A-B
REPEAT
ON SCREEN MENU
RETURN
STATUS
SET MENU
ENTER
English
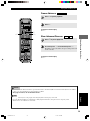
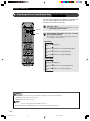
Useful Features
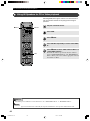
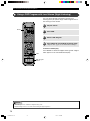
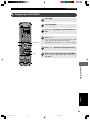
Selecting the Audio Language
1 While holding down SHIFT,
press AUDIO.
2 While viewing the TV
screen, press h or g to
select the audio language
you want.
The audio language
changes each time you
press AUDIO while holding
down SHIFT.
This selection is available when the DVD disc
contains multi-language audio.
Selecting the Subtitle Language
1 While holding down SHIFT,
press SUBTITLE.
2 While viewing the TV
screen, press h or g to
select the subtitle lan-
guage you want. Select
“None” to turn off the
subtitle.
The subtitle language
changes each time you
press SUBTITLE while
holding down SHIFT.
This selection is available when the DVD disc
contains multi-language subtitles.
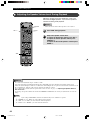
Moving Forward and Backward
To fast reverse: Press e.
To fast forward: Press r.
To move to the start of the currently playing or
previous chapter: Press t.
To move to the start of the next chapter: Press y.
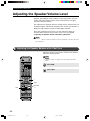
Adjusting the Audio
Volume
Press + to increase the
volume and - to decrease.
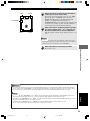
Pausing Playback
Press d.
To resume playback press w.
1 ja
2 ja
3 en
Audio
2 ja
Sub-title
1 ja
3 en
004DVX-S120-en 03.8.6, 2:25 PM13

1414
Basic Operations
Handy FeaturesHandy Features
TV
POWER
POWER
AUDIO
/
DTS
SELECT
NIGHT
SW
TV CH
TV INPUT
SLEEP
PRESET PRESET
A B C D E
CENTER
SURR
SHIFT
STEREOMATRIX 6.1
A-B
REPEAT
ANGLE
SUBTITLE
DVR-S120 WB56650
TV
CHCH
POWER
POWER
AUDIO
/
DTS
SELECT
NIGHT
SW
TV CH
TV INPUT
SLEEP
PRESET PRESET
A B C D E
CENTER
SURR
SHIFT
STEREOMATRIX 6.1
A-B
REPEAT
ANGLE
SUBTITLE
DVR-S120 WB56650
ON SCREEN MENU
TEST
RETURN
STATUS
TV VOL
VOLUME
SET MENU
ENTER
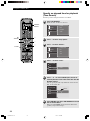
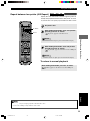
Useful Features
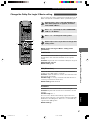
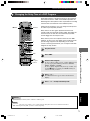
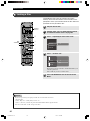
Switching the Viewing Angle
While holding down SHIFT, press
ANGLE.
The video angle changes each
time you press ANGLE while
holding down SHIFT.
Restarting Playback from the Stop Position
(Memory Resume)
Pressing a during playback enables Memory Resume. CinemaStation
memorizes the stop position.
Pressing w starts playing back the disc from the stop position.
• You can change the angle with
h, g, or Number buttons,
instead of ANGLE.
Advice
2
4
Angle
3
5
This selection is available
when the DVD disc contains
multi-angle content.
004DVX-S120-en 03.8.6, 2:25 PM14

15
Basic Operations
15
Basic Operations
Basic Operations
Try It Out!
CH
CINEMA
CH
TEST
RETURN
STATUS
TV VOL
VOLUME
MUTE
AMP
DVD/CD
VCR
VIDEO
TUNER
MOVIE MUSIC SPORTS GAME
SET
MENU
ENTER
English
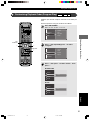
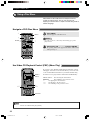
Useful Features
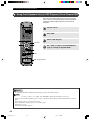
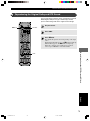
Enhancing the Sound Presence
CinemaStation is loaded with a variety of DSP Programs, so you can
experience from the raw excitement of a rock concert to the breathtaking
space of a cinemagraphic spectacle.
See page 64, “More Information about DSP (Surround) Effects”.
Turning off the
Sound
Press MUTE on the Remote
Control.
Press it again to turn on the
sound.
Controlling the
DVDs Your Children
Can View
You can set the Parental Control
level and lock discs.
See page 80, “Protecting Your
Children from Undesirable
Scene”.
Enhancing Video Quality
CinemaStation can use progressive image playback to render the full beauty of DVD
video.
You can connect a television that has component video input jacks to CinemaStation’s
COMPONENT VIDEO jacks and enjoy progressive scan imaging.
See page 79, “Enjoying High-Quality Video”.
Answers to Common Problems
I cannot change the audio
or subtitle language
The disc may have only one audio and
one subtitle language.
I followed each step correctly but the disc
doesn’t play.
Some discs have a Disc Menu or DVD Menu.
Your settings may change if you use this type of menu.
No subtitles appear
Check the disc jacket to make sure
subtitles are available.
004DVX-S120-en 03.8.5, 1:41 PM15

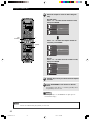
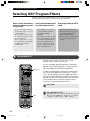
16
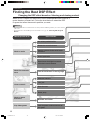
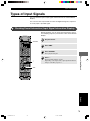
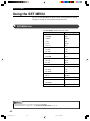
• Experiment with different sound field effects until you find the DSP Program that you feel best matches
your source.
• CinemaStation has other DSP Programs not listed below. See page 64, “Selecting DSP Program
Effects”.
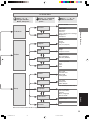
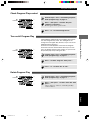
Sound Presence
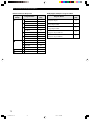
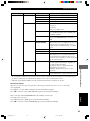
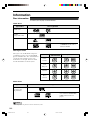
Finding the Best DSP Effect
Changing the DSP effect based on listening and viewing content
Select a DSP Program for the movie or music and experience the sound of a
movie theater or concert hall. Follow the chart below to select the DSP
Program that offers the acoustic qualities you want.
Advice
What do you want to do? Next selection
Watch a movie
Watch live entertain-
ment
Listen to music
Watch a sports
broadcast
Play video games
An action-packed thriller
Romantic or comic drama
Popular science fiction with loads
of effects
Grand spectacle
Experience the digital surround
sound of a movie theater
Feel the excitement on the big stage
Classical concert
Live jazz
Rock Concert
Home party
Baseball and soccer
Feel the power and momentum of
the game
005DVX-S120-en 03.8.19, 7:04 PM16
La pagina si sta caricando...
La pagina si sta caricando...
La pagina si sta caricando...
La pagina si sta caricando...
La pagina si sta caricando...
La pagina si sta caricando...
La pagina si sta caricando...
La pagina si sta caricando...
La pagina si sta caricando...
La pagina si sta caricando...
La pagina si sta caricando...
La pagina si sta caricando...
La pagina si sta caricando...
La pagina si sta caricando...
La pagina si sta caricando...
La pagina si sta caricando...
La pagina si sta caricando...
La pagina si sta caricando...
La pagina si sta caricando...
La pagina si sta caricando...
La pagina si sta caricando...
La pagina si sta caricando...
La pagina si sta caricando...
La pagina si sta caricando...
La pagina si sta caricando...
La pagina si sta caricando...
La pagina si sta caricando...
La pagina si sta caricando...
La pagina si sta caricando...
La pagina si sta caricando...
La pagina si sta caricando...
La pagina si sta caricando...
La pagina si sta caricando...
La pagina si sta caricando...
La pagina si sta caricando...
La pagina si sta caricando...
La pagina si sta caricando...
La pagina si sta caricando...
La pagina si sta caricando...
La pagina si sta caricando...
La pagina si sta caricando...
La pagina si sta caricando...
La pagina si sta caricando...
La pagina si sta caricando...
La pagina si sta caricando...
La pagina si sta caricando...
La pagina si sta caricando...
La pagina si sta caricando...
La pagina si sta caricando...
La pagina si sta caricando...
La pagina si sta caricando...
La pagina si sta caricando...
La pagina si sta caricando...
La pagina si sta caricando...
La pagina si sta caricando...
La pagina si sta caricando...
La pagina si sta caricando...
La pagina si sta caricando...
La pagina si sta caricando...
La pagina si sta caricando...
La pagina si sta caricando...
La pagina si sta caricando...
La pagina si sta caricando...
La pagina si sta caricando...
La pagina si sta caricando...
La pagina si sta caricando...
La pagina si sta caricando...
La pagina si sta caricando...
La pagina si sta caricando...
La pagina si sta caricando...
La pagina si sta caricando...
La pagina si sta caricando...
La pagina si sta caricando...
La pagina si sta caricando...
La pagina si sta caricando...
La pagina si sta caricando...
La pagina si sta caricando...
La pagina si sta caricando...
La pagina si sta caricando...
La pagina si sta caricando...
La pagina si sta caricando...
La pagina si sta caricando...
La pagina si sta caricando...
La pagina si sta caricando...
La pagina si sta caricando...
La pagina si sta caricando...
La pagina si sta caricando...
La pagina si sta caricando...
La pagina si sta caricando...
La pagina si sta caricando...
La pagina si sta caricando...
La pagina si sta caricando...
La pagina si sta caricando...
La pagina si sta caricando...
-
 1
1
-
 2
2
-
 3
3
-
 4
4
-
 5
5
-
 6
6
-
 7
7
-
 8
8
-
 9
9
-
 10
10
-
 11
11
-
 12
12
-
 13
13
-
 14
14
-
 15
15
-
 16
16
-
 17
17
-
 18
18
-
 19
19
-
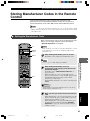
 20
20
-
 21
21
-
 22
22
-
 23
23
-
 24
24
-
 25
25
-
 26
26
-
 27
27
-
 28
28
-
 29
29
-
 30
30
-
 31
31
-
 32
32
-
 33
33
-
 34
34
-
 35
35
-
 36
36
-
 37
37
-
 38
38
-
 39
39
-
 40
40
-
 41
41
-
 42
42
-
 43
43
-
 44
44
-
 45
45
-
 46
46
-
 47
47
-
 48
48
-
 49
49
-
 50
50
-
 51
51
-
 52
52
-
 53
53
-
 54
54
-
 55
55
-
 56
56
-
 57
57
-
 58
58
-
 59
59
-
 60
60
-
 61
61
-
 62
62
-
 63
63
-
 64
64
-
 65
65
-
 66
66
-
 67
67
-
 68
68
-
 69
69
-
 70
70
-
 71
71
-
 72
72
-
 73
73
-
 74
74
-
 75
75
-
 76
76
-
 77
77
-
 78
78
-
 79
79
-
 80
80
-
 81
81
-
 82
82
-
 83
83
-
 84
84
-
 85
85
-
 86
86
-
 87
87
-
 88
88
-
 89
89
-
 90
90
-
 91
91
-
 92
92
-
 93
93
-
 94
94
-
 95
95
-
 96
96
-
 97
97
-
 98
98
-
 99
99
-
 100
100
-
 101
101
-
 102
102
-
 103
103
-
 104
104
-
 105
105
-
 106
106
-
 107
107
-
 108
108
-
 109
109
-
 110
110
-
 111
111
-
 112
112
-
 113
113
-
 114
114


Yamaha DVR-S120 Manuale del proprietario
- Categoria
- Ricevitori AV
- Tipo
- Manuale del proprietario
- Questo manuale è adatto anche per
in altre lingue
- English: Yamaha DVR-S120 Owner's manual
- Deutsch: Yamaha DVR-S120 Bedienungsanleitung
- Nederlands: Yamaha DVR-S120 de handleiding
- dansk: Yamaha DVR-S120 Brugervejledning
- svenska: Yamaha DVR-S120 Bruksanvisning
- Türkçe: Yamaha DVR-S120 El kitabı
- română: Yamaha DVR-S120 Manualul proprietarului
Documenti correlati
-
Yamaha RDX-E700 Manuale del proprietario
-
-
-
-
-
Yamaha DVX-S100 Manuale del proprietario
-
-
-
-
Altri documenti
-
Sony KD-100ZD9 Manuale utente
-
Panasonic SCVK825D Istruzioni per l'uso
-
TEAC TU-1000 Manuale del proprietario
-
-
Technics SCHDA800 Manuale del proprietario
-
Haier 21F7A Manuale del proprietario
-
-
Packard Bell DVD Player 160 Manuale utente
-
Rosen Entertainment Systems AV7000 Manuale utente
-
JVC Computer Drive VR-D0U Manuale utente