
PUB. DIM-1104-000D
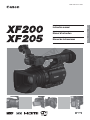
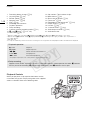
Caméscope HD
Français
HD Camcorder
Instruction manual
English
Manuel d'instruction
Videocámera HD
Manual de Instrucciones
Español
COPY

2
Important Usage Instructions
WARNING
TO REDUCE THE RISK OF FIRE OR ELECTRIC SHOCK, DO NOT EXPOSE THIS PRODUCT TO RAIN OR
MOISTURE.
WARNING
TO REDUCE THE RISK OF ELECTRIC SHOCK AND TO REDUCE ANNOYING INTERFERENCE, USE THE
RECOMMENDED ACCESSORIES ONLY.
COPYRIGHT WARNING:
Unauthorized recording of copyrighted materials may infringe on the rights of copyright owners and be
contrary to copyright laws.
The Mains plug is used as the disconnect device. The Mains plug shall remain readily operable to
disconnect the plug in case of an accident.
CAUTION:
• Danger of explosion if the wrong type of batteries are attached. Use only the same type of batteries.
• Do not expose batteries or product to excessive heat such as the inside of a car under direct sunlight, fire, etc.
CA-930 identification plate is located on the bottom.
CAUTION:
TO REDUCE THE RISK OF ELECTRIC
SHOCK, DO NOT REMOVE COVER (OR
BACK). NO USER-SERVICEABLE
PARTS INSIDE. REFER SERVICING TO
QUALIFIED SERVICE PERSONNEL.
CAUTION
RISK OF ELECTRIC SHOCK
DO NOT OPEN
The lightning flash with arrowhead symbol, within an
equilateral triangle, is intended to alert the user to
the presence of uninsulated “dangerous voltage”
within the product’s enclosure, that may be of
sufficient magnitude to constitute a risk of electric
shock to persons.
The exclamation point, within an equilateral triangle,
is intended to alert the user to the presence of
important operating and maintenance (servicing)
instructions in the literature accompanying the
product.
COPY

3
English
FCC NOTICE
HD Camcorder, XF200 / XF205 Systems.
This device complies with Part 15 of the FCC Rules. Operation is subject to the following two conditions:
(1) This device may not cause harmful interference, and (2) this device must accept any interference
received, including interference that may cause undesired operation.
Note: This equipment has been tested and found to comply with the limits for class B digital device,
pursuant to Part 15 of the FCC Rules. These limits are designed to provide reasonable protection against
harmful interference in a residential installation. This equipment generates, uses and can radiate radio
frequency energy and, if not installed and used in accordance with the instructions, may cause harmful
interference to radio communications. However, there is no guarantee that interference will not occur in a
particular installation. If this equipment does cause harmful interference to radio or television reception,
which can be determined by turning the equipment off and on, the user is encouraged to try to correct the
interference by one or more of the following measures:
• Reorient or relocate the receiving antenna.
• Increase the separation between the equipment and receiver.
• Connect the equipment into an outlet on a circuit different from that to which the receiver is connected.
• Consult the dealer or an experienced radio/TV technician for help.
Use of shielded cable is required to comply with class B limits in Subpart B of Part 15 of FCC Rules.
Do not make any changes or modifications to the equipment unless otherwise specified in the manual.
If such changes or modifications should be made, you could be required to stop operation of the
equipment.
Model ID0038 (including WLAN Module Model RF400, FCC ID: AZD400)
This device complies with Industry Canada license-exempt RSS standard(s). Operation is subject to the
following two conditions: (1) this device may not cause interference, and (2) this device must accept any
interference, including interference that may cause undesired operation of the device.
This transmitter must not be co-located or operated in conjunction with any other antenna or transmitter.
The available scientific evidence does not show that any health problems are associated with using low
power wireless devices. There is no proof, however, that these low power wireless devices are absolutely
safe. Low power wireless devices emit low levels of radio frequency energy (RF) in the microwave range
while being used. Whereas high levels of RF can produce health effects (by heating tissue), exposure of low-
level RF that does not produce heating effects causes no known adverse health effects. Many studies of
low-level RF exposures have not found any biological effects. Some studies have suggested that some
biological effects might occur, but such findings have not been confirmed by additional research. This model
has been tested and found to comply with FCC/IC radiation exposure limits set forth for an uncontrolled
equipment and meets the FCC radio frequency (RF) Exposure Guidelines and RSS-102 of the IC radio
frequency (RF) Exposure rules.
Compliance with FCC requirement 15.407(c) Data transmission is always initiated by software, which is the
passed down through the MAC, through the digital and analog baseband, and finally to the RF chip. Several
special packets are initiated by the MAC. These are the only ways the digital baseband portion will turn on
the RF transmitter, which it then turns off at the end of the packet. Therefore, the transmitter will be on only
while one of the aforementioned packets is being transmitted. In other words, this device automatically
discontinues transmission in case of either absence of information to transmit or operational failure.
Frequency Tolerance: 25 ppm
Canon U.S.A., Inc.
One Canon Park, Melville, NY 11747, USA
Tel No. 1-800-OK-CANON (1-800-652-2666)
COPY

4
Important Safety Instructions
REGIONS OF USE
XF200 / XF205 are in compliance (as of June 2014) with the radio signal regulations of the regions listed below. For
details on other regions where they can be used, make inquiries with the contacts listed on the back cover of this
instruction manual.
CAN ICES-3(B)/NMB-3(B)
REGIONS
Canada, Hong Kong S.A.R., South Korea, Taiwan, USA
Model
ID0038: XF200 / XF205
In these safety instructions the word “apparatus”
refers to the Canon HD Camcorder XF200 / XF205
and all its accessories.
1. Read these instructions.
2. Keep these instructions.
3. Heed all warnings.
4. Follow all instructions.
5. Do not use this apparatus near water.
6. Clean only with dry cloth.
7. Do not install near any heat sources such as
radiators, heat registers, stoves, or other
apparatus (including amplifiers) that produce
heat.
8. Do not defeat the safety purpose of the polarized
or grounding-type plug. A polarized plug has two
blades with one wider than the other.
A grounding type plug has two blades and a third
grounding prong. The wide blade or the third
prong are provided for your safety. If the provided
plug does not fit into your outlet, consult an
electrician for replacement of the obsolete outlet.
9. Protect the power cord from being walked on or
pinched particularly at plugs, convenience
receptacles, and the point where they exit from
the apparatus.
10. Only use attachments/accessories specified by
the manufacturer.
11. Unplug this apparatus during lightning storms or
when unused for long periods of time.
12. Refer all servicing to qualified service personnel.
Servicing is required when the apparatus has
been damaged in any way, such as power-supply
cord or plug is damaged, liquid has been spilled
or objects have fallen into the apparatus, the
apparatus has been exposed to rain or moisture,
does not operate normally, or has been dropped.
COPY

5
English
Trademark Acknowledgements
• SD, SDHC and SDXC Logos are trademarks of SD-3C, LLC.
• CompactFlash is a trademark of SanDisk Corporation.
• The CF Logo is a trademark of CompactFlash Association.
• Microsoft and Windows are trademarks or registered trademarks of Microsoft Corporation in the United
States and/or other countries.
• Apple, App Store, Mac OS, Final Cut Pro are trademarks of Apple Inc., registered in the U.S. and other
countries.
• IOS is a trademark or registered trademark of Cisco in the U.S. and other countries and is used under license.
• Google, Android, Google Play, are trademarks of Google Inc.
• Avid, Media Composer and NewsCutter are trademarks or registered trademarks of Avid Technology, Inc. or
its subsidiaries in the United States and/or other countries.
• Wi-Fi is a registered trademark of the Wi-Fi Alliance.
• Wi-Fi Certified, WPA, WPA2, and the Wi-Fi Certified logo are trademarks of the Wi-Fi Alliance.
• WPS as used on the camcorder's settings, onscreen displays and in this manual signifies Wi-Fi Protected
Setup.
• The Wi-Fi Protected Setup Identifier Mark is a mark of the Wi-Fi Alliance.
• JavaScript is a trademark or registered trademark of Oracle Corporation, its affiliates or subsidiaries in the
United States and other countries.
• HDMI, the HDMI logo and High-Definition Multimedia Interface are trademarks or registered trademarks of
HDMI Licensing LLC in the United States and other countries.
• Other names and products not mentioned above may be trademarks or registered trademarks of their
respective companies.
• This device incorporates exFAT technology licensed from Microsoft.
• ANY USE OF THIS PRODUCT OTHER THAN CONSUMER PERSONAL USE IN ANY MANNER THAT
COMPLIES WITH THE MPEG-2 STANDARD FOR ENCODING VIDEO INFORMATION FOR PACKAGED
MEDIA IS EXPRESSLY PROHIBITED WITHOUT A LICENSE UNDER APPLICABLE PATENTS IN THE MPEG-2
PATENT PORTFOLIO, WHICH LICENSE IS AVAILABLE FROM MPEG LA, L.L.C., 250 STEELE STREET,
SUITE 300, DENVER, COLORADO 80206.
• This product is licensed under AT&T patents for the MPEG-4 standard and may be used for encoding MPEG-
4 compliant video and/or decoding MPEG-4 compliant video that was encoded only (1) for a personal and
noncommercial purpose or (2) by a video provider licensed under the AT&T patents to provide MPEG-4
compliant video. No license is granted or implied for any other use for MPEG-4 standard.
COPY

6
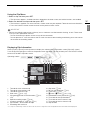
Highlights of the XF200 / XF205
The Canon HD Camcorder XF200 / XF205 is a compact-sized and highly portable camcorder that offers
superior video quality. The camcorder features a 1/2.84-in. CMOS sensor and allows you to record in two
formats (MXF on CF cards or MP4 on SD cards). The following are some of the many features that will help you
turn your creative vision into reality.
HD Recording
1/2.84-in. CMOS sensor and DIGIC DV 4 image
processor
The HD CMOS PRO sensor can capture video at an
effective pixel count of 2,910,000 pixels. Combined
with the advanced DIGIC DV 4 image processor and
the 20x wide-angle lens, it can deliver a center
resolution of 900 TV lines. Furthermore, thanks to
Canon’s high-sensitivity and noise reduction
technologies, you can get excellent video quality
with minimal noise even when recording in low-light
situations.
MXF and MP4 formats
You can choose the movie format according to your
workflow needs. You can record in MXF format
using the MPEG-2 Long GOP codec, in MP4 format
using the MPEG-4 AVC/H.264 codec, or in both
formats simultaneously. MXF clips are recorded as
Material eXchange Format (MXF files), compatible
with all major non-linear (NLE) editing software.
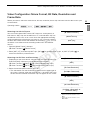
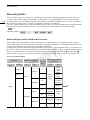
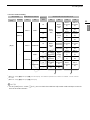
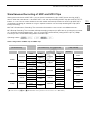
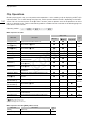
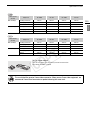
Flexible video and audio configuration
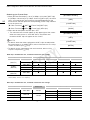
For MXF clips, the camcorder offers 3 resolution
sizes (1920x1080, 1440x1080 or 1280x720), 4
frame rate options and 3 bit rate options for a total
of 16 video configurations (A 55). Audio is
recorded as linear PCM audio using 2 or 4 channels
(A 98).
For MP4 clips, the camcorder offers 3 resolution
sizes (1920x1080, 1280x720 or 640x360), 3 frame
rate options and 5 bit rate options for a total of 8
possible video configurations (A 55).
Operability and Adaptability
Freely customizable compact design
The camcorder offers maximum operability for a
single camera operator. It features 3 separate rings
for independent focus, zoom and iris operation. The
camcorder’s side grip can be easily adjusted up to
120 degrees to let you use whatever camera angle
you need (A 35). Additionally, gain, shutter and iris
controls can be adjusted manually or automatically
giving you the freedom to decide to what extent you
want to control every aspect of the image.
Improved displays
The camcorder features a 3.5-in. OLED display
(equivalent to 1,230,000 dots) that excels in color
reproduction, contrast and responsiveness and is
easy to use even in bright outdoors. The viewfinder,
on the other hand, offers a high-resolution LCD
screen (also equivalent to 1,230,000 dots) with a
wide angle of view of approx. 28.2°. The viewfinder
can be tilted 68° vertically to ensure a comfortable fit
in various shooting conditions.
Recording media
The camcorder records MXF clips to CF cards and
MP4 clips to SD cards. It features two CF card slots
that you can use to record continuously, one after
the other, using relay recording (A 42), or
simultaneously using double slot recording (A 42).
You can even record MP4 clips to the SD card while
recording an MXF clip on one or both CF cards
(A 123).
Work with major NLE software
The Canon XF Utility software and various XF
plugins are available as free downloads from your
local Canon Web site. Canon XF Utility allows you
to easily save, manage and play back your MXF
clips, while the XF plugins let you smoothly link them
to major NLE software* to continue your editing
workflow. For details, refer to
Saving MXF Clips
(A 168).
The supplied software Data Import Utility allows
you to save MP4 clips to a computer and even join
split MP4 files into a single file for editing. For details,
refer to
Saving MP4 Clips
(A 170).
*Refer to
Saving Clips to a Computer
(A 168) for details
on compatible software.
Pro-level remote operation
The camcorder can be used with the optional
RC-V100 Remote Controller for remote operation of
many advanced functions, including iris, gain and
even custom picture settings.
COPY

7
English
Versatile Artistic Expression
Special recording modes
The special recording modes (A 118) give you
more creative control over your recordings. You can
create a slow motion or fast motion effect in your
recordings, record a certain number of frames at a
set interval (ideal for nature shots and other subjects
with little movement) or record a certain number of
frames every time you press a button (ideal for stop
motion animation).
Custom picture settings
With custom picture settings (A 132), you can
enjoy unparalleled image control to deliver the “look”
you want by adjusting parameters, such as gamma
and sharpness.
Advanced Professional Features and
Flexibility
Wired and Wi-Fi network functions (A 173)
You can connect the camcorder to other devices via
wired (Ethernet) connection or Wi-Fi to enjoy a
variety of functions. For example, you can transfer
recordings to an FTP server or use the Web browser
on a connected device to remotely operate the
camcorder (Browser Remote) or to play back the
recordings on the camcorder (Playback via
Browser). Also, using the IP streaming function
(A 194), you can broadcast the camcorder’s live
video over IP to a compatible decoder connected to
the same network.
Pro-level connectivity
The camcorder offers two terminals for professional
level connectivity. Use the 3G/HD-SDI terminal to
output the uncompressed HD video signal along
with embedded audio and SMPTE time code (LTC)
in a format that can be used for external recording.
Meanwhile, the MON. terminal offers the best video
output for an external monitor, including the option
to overlay the camcorder’s onscreen displays.
Genlock synchronization (A 94), the TIME CODE
terminal (A 95, 96) and GENLOCK/SYNC OUT
terminal allow the camcorder to be part of any multi-
camera shooting setup.
Infrared recording
Record in darkness using infrared recording
(A 126). With the built-in infrared light, you can
record nocturnal animals in their natural environment
or other such scenes.
Customization
The camcorder features several customization
options. You can assign often-used functions to
assignable buttons (A 129) so that you can call up
those functions with the press of a single button.
You can also register frequently-used menu settings
in an easy-to-access personal menu (My Menu,
A 30). Custom functions (A 141) and custom
onscreen displays (A 142) give you even more
freedom to control many aspects of the camcorder’s
operation. Save custom picture and menu settings
to an SD card so that you can transfer your setting
preferences to other XF200 / XF205 camcorders in
order to use them in the same way.
Other Functions
• Direct setting mode (A 57)
Change main camera functions while checking
the image on the screen using only the joystick.
•Assistance functions
Peaking and magnification (A 84) can be helpful
when you use manual focus, onscreen markers
(A 88) can be very useful to help you frame your
video, and zebra patterns (A 89) can give you a
reference point to avoid overexposures.
• Video scopes (A 108)
Check the brightness of the image using the
waveform monitor, the color of the image using
the vectorscope, or the focus using the edge
monitor.
• Intelligent System
When using battery packs compatible with
Intelligent System, the camcorder will display an
estimate, in minutes, of the remaining recording/
playback time using the battery pack (A 25). You
can also check the battery life indicator and other
information on the [Battery/Hour Meter] status
screen (A 217).
• Multiple audio recording options (A 98)
The camcorder offers 2- or 4-channel linear PCM
audio recording for MXF clips and 2-channel AAC
audio recording for MP4 clips. You can use the
camcorder’s built-in microphone, external
microphones with a ∅ 3.5 mm mini-stereo plug
(MIC terminal), or external audio input sources
with an XLR plug (INPUT 1/INPUT 2 terminals with
+48 V phantom power supply). The camcorder
even has a convenient microphone holder with
cable clamp for external microphones.
• Metadata and GPS information (A 111, 114)
You have the option to add various metadata
fields to your MXF clips. Some of the information
requires using Canon XF Utility or the Browser
Remote application. Additionally, you can connect
the optional GP-E2 GPS Receiver to the
camcorder to automatically add GPS information
to your recordings. Using Canon XF Utility you
can then organize or search MXF clips by GPS
information.
COPY

8
1. Introduction 11
About this Manual 11
Conventions Used in this Manual 11
Supplied Accessories 13
Names of Parts 14
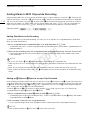
WL-D6000 Wireless Controller 21
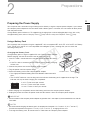
2. Preparations 23
Preparing the Power Supply 23
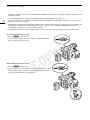
Using a Battery Pack 23
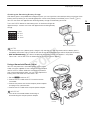
Using a Household Power Outlet 25
Turning the Camcorder On and Off 26
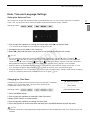
Date, Time and Language Settings 27
Setting the Date and Time 27
Changing the Time Zone 27
Displaying the Date and Time while Recording 28
Changing the Language 28
Using the Menus 29
Selecting an Option from the Menu 29
Using the Customized Submenu (My Menu) 30
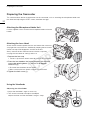
Preparing the Camcorder 32
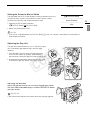
Attaching the Microphone Holder Unit 32
Attaching the Lens Hood 32
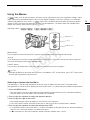
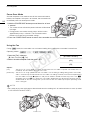
Using the Viewfinder 32
Using the OLED Panel 33
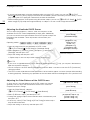
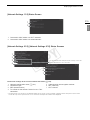
Adjusting the Viewfinder/OLED Screen 34
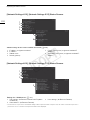
Adjusting the Color Balance of the OLED
Screen 34
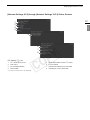
Setting the Screen to Black & White 35
Adjusting the Grip Unit 35
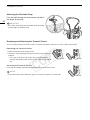
Attaching the Shoulder Strap 36
Removing and Attaching the Terminal Covers 36
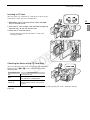
Using a Tripod 37
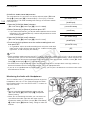
Preparing Recording Media 38
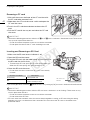
Inserting a CF Card 39
Checking the Status of the CF Card Slots 39
Removing a CF card 40
Inserting and Removing an SD Card 40
Initializing the Recording Media 41
Switching Between the CF Card Slots 41
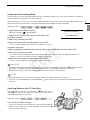
Selecting the CF Card Recording Method 42
Checking the Available Recording Time on a
Recording Media 43
Recovering Data on a Recording Media 43
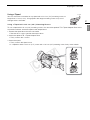
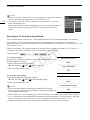
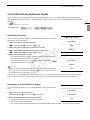
Remote Operation of the Camcorder 44
Using the Supplied Wireless Controller 44
Using the Optional RC-V100 Remote
Controller 45
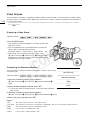
3. Recording 47
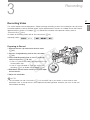
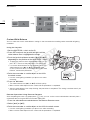
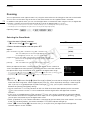
Recording Video 47
Preparing to Record 47
Recording 48
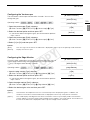
Remote Operation Using Browser Remote 50
Onscreen Displays 51
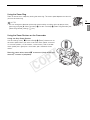
Power Save Mode 54
Using the Fan 54
Video Configuration: Movie Format, Bit Rate,
Resolution and Frame Rate 55
Changing Main Camera Functions with the
Joystick 57
Using the Direct Setting Mode 57
Shutter Speed 58
Automatic Shutter 59
Manual Shutter 60
Flicker Reduction 61
Gain 62
Selecting the Gain Level 62
Automatic Gain Control (AGC) 62
Manual Gain 63
Aperture 65
Automatic Aperture 65
Manual Aperture 66
ND Filter 67
Exposure Compensation - AE Shift 67
Light Metering Mode 68
White Balance 69
Auto White Balance (AWB) 70
Preset White Balance/Color Temperature 71
Custom White Balance 72
Zooming 74
Selecting the Zoom Mode 74
Using the Zoom Ring 75
Using the Zoom Rockers on the Camcorder 75
Remote Operation 78
Soft Zoom Control 79
Using Optional Conversion Lenses 80
Table of Contents
COPY

9
English
Adjusting the Focus 81
Autofocus (AF) Mode 81
Manual Focus (MF) 83
Push AF 85
Detecting and Focusing On Faces 85
Focus Limit and Macro Shooting 86
Image Stabilizer 87
Onscreen Markers and Zebra Patterns 88
Displaying Onscreen Markers 88
Displaying Zebra Patterns 89
Setting the Time Code 90
Selecting the Running Mode 90
Selecting Drop or Non-Drop Frame 91
Putting the Time Code Display on Hold 91
Setting the User Bit 93
Synchronizing with an External Device 94
Connecting an External Device 94
Reference Video Signal Input (Genlock
Synchronization) 94
Time Code Signal Input 95
Reference Video Signal Output 96
Time Code Signal Output 96
Recording Audio 98
Audio Settings and Recorded Audio Channels 98
Selecting the Number of Recorded Audio
Channels 100
Connecting an External Microphone or External
Audio Input Source to the Camcorder 100
Using the Built-in Microphone or MIC
Terminal 101
Using the INPUT 1/INPUT 2 Terminals 103
Adjusting the Audio Level 105
Monitoring the Audio with Headphones 106
Colors Bars/Audio Reference Signal 107
Recording Color Bars 107
Recording an Audio Reference Signal 107
Video Scopes 108
Displaying a Video Scope 108
Configuring the Waveform Monitor 108
Configuring the Vectorscope 109
Configuring the Edge Monitor 109
Adding Marks to MXF Clips while Recording 110
Adding Shot Marks while Recording 110
Adding an $ Mark or % Mark to the Last Clip
Recorded 110
Using Metadata 111
Setting a User Memo Created with Canon XF
Utility 111
Setting a User Memo Using Browser
Remote 112
Recording GPS Information (Geotagging) 114
Reviewing a Recording 116
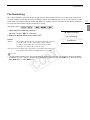
File Numbering 117
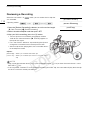
Special Recording Modes 118
Interval Recording Mode 118
Frame Recording Mode 119
Slow & Fast Motion Mode 120
Pre-recording Mode 122
Simultaneous Recording of MXF and MP4
Clips 123
Recording in MP4 Backup Recording Mode 124
Infrared Recording 126
Activating Infrared Mode 126
Using the Infrared Light 126
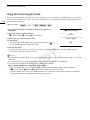
Using the Focal Length Guide 128
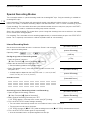
4. Customization 129
Assignable Buttons 129
Changing the Assigned Function 129
Using an Assignable Button 130
Custom Picture Settings 132
Selecting Custom Picture Files 132
Editing a Custom Picture File’s Settings 133
Renaming Custom Picture Files 133
Protecting Custom Picture Files 133
Transferring Custom Picture Files 134
Embedding Custom Picture Settings in a
Recording 135
Available Custom Picture Settings 135
Customizing Functions and Onscreen
Displays 141
Customizing Functions 141
Customizing Onscreen Displays 142
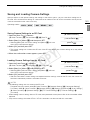
Saving and Loading Camera Settings 143
Saving Camera Settings to an SD Card 143
Loading Camera Settings from an SD Card 143
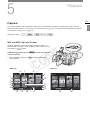
5. Playback 145
Playback 145
MXF and MP4 Clip Index Screens 145
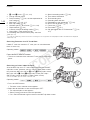
Playing Back Clips 147
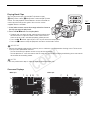
Onscreen Displays 147
Playback Controls 148
Adjusting the Volume 149
COPY

10
Clip Operations 150
Using the Clip Menu 151
Displaying Clip Information 151
Adding $ Marks or % Marks 152
Deleting $ Marks or % Marks 153
Copying Clips 153
Deleting Clips 154
Deleting the User Memo and GPS
Information 155
Copying a Custom Picture File Embedded in a
Clip 155
Displaying an Index Screen of Shot Marks 155
Displaying a Frame Index Screen of a Single
Clip 156
Adding Shot Marks 157
Deleting Shot Marks 157
Changing a Clip’s Thumbnail 158
6. External Connections 159
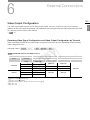
Video Output Configuration 159
Recording Video Signal Configuration and Video
Output Configuration by Terminal 159
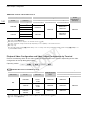
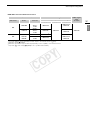
Playback Video Configuration and Video Output
Configuration by Terminal 160
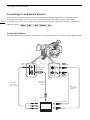
Connecting to an External Monitor 162
Connection Diagram 162
Using the 3G/HD-SDI Terminal 163
Using the MON. Terminal 163
Using the HDMI OUT Terminal 164
Using the AV OUT Terminal 164
SD Output 165
Superimposing Onscreen Displays to Appear on
an External Monitor 165
Audio Output 166
Selecting the Audio Channel 166
Synchronizing the Video with the Audio being
Monitored 167
Selecting the Output Level of the AV OUT
Terminal 167
Saving Clips to a Computer 168
Saving MXF Clips 168
Saving MP4 Clips 170
Connecting the Camcorder to a Computer 171
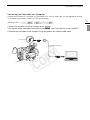
7. Network Functions 173
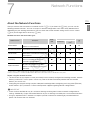
About the Network Functions 173
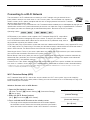
Connecting to a Wi-Fi Network 175
Wi-Fi Protected Setup (WPS) 175
Searching for Access Points 176
Manual Setup 178
Camera Access Point 178
Configuring the IP Address Settings 179
Saving the Configuration 179
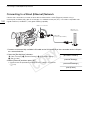
Connecting to a Wired (Ethernet) Network 180
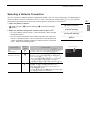
Selecting a Network Connection 181
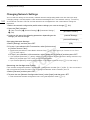
Changing Network Settings 182
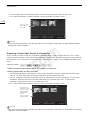
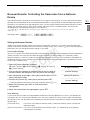
Browser Remote: Controlling the Camcorder from
a Network Device 183
Setting Up Browser Remote 183
Starting Browser Remote 184
Real-Time Proxy Transfer 189
FTP File Transfer 190
Preparations 190
FTP Transfer in Mode 191
FTP Transfer in Mode 192
IP Streaming 194
Preparations 194
Streaming Video over IP 195
Playback via Browser 197
8. Photos 199
Taking Photos 199
Taking Photos in Mode 199
Capturing Photos in Mode 199
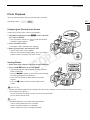
Photo Playback 201
Displaying the [Photos] Index Screen 201
Viewing Photos 201
Deleting Photos 202
9. Additional Information 203
Menu Options 203
Displaying the Status Screens 213
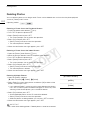
Troubleshooting 223
List of Messages 228
Handling Precautions 233
Maintenance/Others 236
Optional Accessories 237
Specifications 240
Index 245
COPY

1
11
English
Introduction
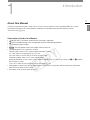
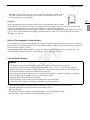
About this Manual
Thank you for purchasing the Canon XF200 / XF205. Please read this manual carefully before you use the
camcorder and retain it for future reference. Should the camcorder fail to operate correctly, refer to
Troubleshooting
(A 223).
Conventions Used in this Manual
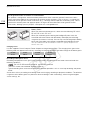
• IMPORTANT: Precautions related to the camcorder’s operation.
• NOTES: Additional topics that complement the basic operating procedures.
• A: Reference page number.
• : Text that applies only to the model shown in the icon.
• The following terms are used in this manual.
“Screen” refers to the OLED screen and the viewfinder screen.
“CF card” refers to a CompactFlash (CF) card.
“SD card” refers to an SD, SDHC or SDXC memory card.
“Recording media” refers to CF cards and SD cards.
When not specified, “access lamps” refers to either or both of the CF card access lamps (CF2/CF3) and the
SD card access lamp.
“Press SET” refers to pressing down the joystick itself (A 29).
• Photographs in the manual are simulated pictures taken with a still camera. Some screenshots have been
altered to make them easier to read.
• Illustrations in the manual show the XF205.
COPY

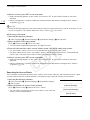
About this Manual
12
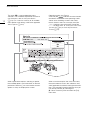
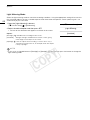
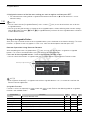
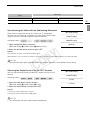
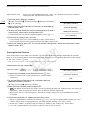
Operating modes and Format
A full icon (like ) indicates that the function
described can be used in the operating mode
shown or for recordings made in the movie
format shown in the icon; an empty icon (like
) indicates that the function cannot be
used. For details refer to
Turning the C am corder
On and Off
(A 26) or
Selecting the Movie
Format
(A 55).
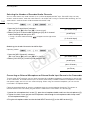
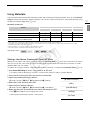
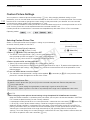
When a function requires the use of the menu,
the quick reference shows the submenus and,
when applicable, the default setting for the menu
item. The example illustration indicates that you
can find the function by selecting the
[w Other Functions] menu and then the [Fan]
menu item.
The arrow > is used to abbreviate menu
selections. For a detailed explanation on how to
use the menus, refer to
Using the Menus
(A 29). For a concise summary of all available
menu options and settings, refer to the appendix
Menu Options
(A 203).
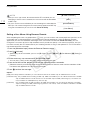
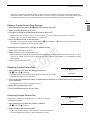
When a procedure requires selecting an option,
the available options are listed within or after the
procedure. Brackets [ ] are used to refer to menu
options as they are displayed on screen.
COPY

13
Supplied Accessories
English
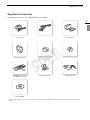
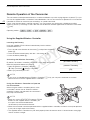
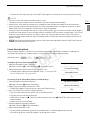
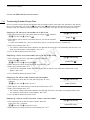
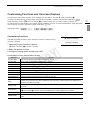
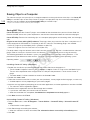
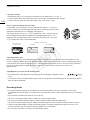
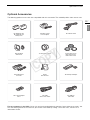
Supplied Accessories
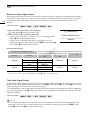
The following accessories are supplied with the camcorder.
* The Data Import Utility Software Guide (PDF file) is included in the CD-ROM. For details about the software, refer to this Software
Guide.
CA-930 Compact Power Adapter
(incl. power cord)
DC-930 DC Cable BP-955 Battery Pack
(incl. terminal cover)
Lens Hood with Lens Barrier Lens Cap Eye cup
WL-D6000 Wireless Controller
(incl. CR2025 Lithium Battery)
Microphone Holder Unit SS-1200 Shoulder Strap
Data Import Utility
Software CD-ROM*
COPY

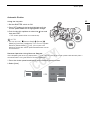
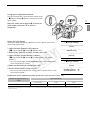
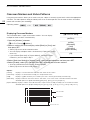
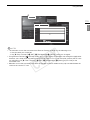
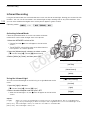
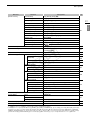
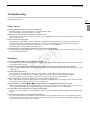
Names of Parts
14
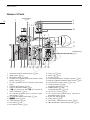
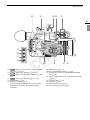
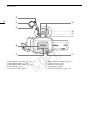
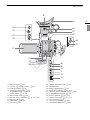
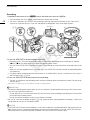
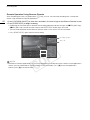
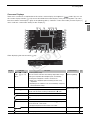
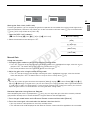
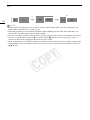
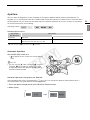
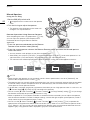
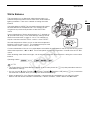
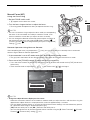
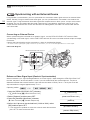
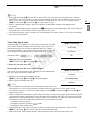
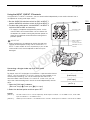
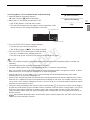
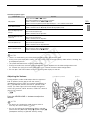
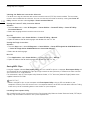
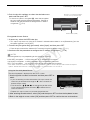
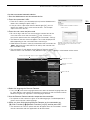
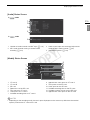
Names of Parts
1
8
9
10
11
12
13 14 15 16 17
18
19
20
21 23
22 24
25
26
27 28
234
5 6 7
Operation panel
햲
(A 20)
Operation panel
햳
(A 20)
1 Protective cover for audio controls (A 98)
2 Strap mount (A 36)
3 INFRARED switch (A 126)
4 ZOOM SPEED (zoom speed of the handle's zoom
rocker) switch (A 75)
5 CF card slot covers for CF card slots A (left) and B
(right)
6 POWER SAVE button (A 54)
7 Exhaust ventilation outlet (A 54)
8CF2 (CF card slot A) and CF3 (CF card slot B)
access indicators (A 39)
9 CF card release buttons for CF card slots A (left)
and B (right) (A 40)
10 CF card slots A (left) and B (right) (A 39)
11 Q switch (A 26)
12 Power indicator (A 26)
13 Lens hood (A 32)
14 Lens barrier switch (A 47)
15 Focus ring (A 83)
16 Zoom ring (A 75)
17 Iris ring (A 66)
18 PUSH AF (momentary autofocus) button (A 85)
19 IRIS (ND) (aperture mode/ND filter) switch (A 65)
20 FOCUS (focus mode) switch (A 81, 83)
21 PEAKING button (A 84) /
Assignable button 1 (A 129)
22 ZEBRA button (A 89)/
Assignable button 2 (A 129)
23 FULL AUTO switch (A 49)
24 CF card slot cover switches for CF card slots A
(left) and B (right) (A 39)
25 SHUTTER switch (A 58)
26 GAIN switch (A 62)
27 WHITE BAL. (white balance) switch (A 69)
28 Å (white balance adjustment) button (A 72)
COPY

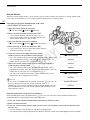
15
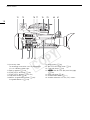
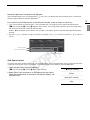
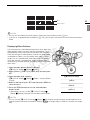
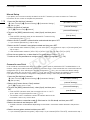
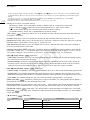
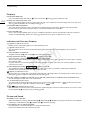
Names of Parts
English
29
33 34 35 36 37
38
40
39 4241
30
31
32
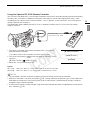
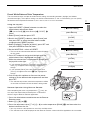
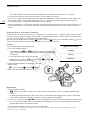
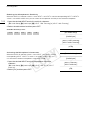
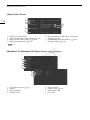
29 GENLOCK/SYNC OUT (synchronization)
terminal (A 94, 96)
30 TIME CODE terminal (A 95, 96)
31 MON. (monitor output) terminal (A 162,
163)
32 3G/HD-SDI terminal (A 162, 163)
33 Strap mount (A 36)
34 REMOTE terminal (A 45)
For connecting the optional RC-V100 Remote
Controller or commercially available remote
controllers.
35 USB terminal (A 171)
36 MIC (microphone) terminal (A 101)
37 Attachment sockets for the microphone holder
unit (A 32)
38 INPUT 1 (right) and INPUT 2 (left) terminals (XLR)
(A 103)
39 Air intake vent (A 54)
40 Grip belt (A 35)
41 Adjustable grip unit (A 35)
42 Lens hood lock screw (A 32)
COPY

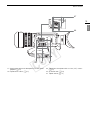
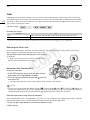
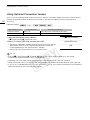
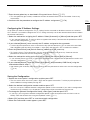
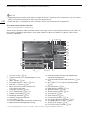
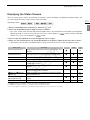
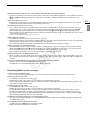
Names of Parts
16
43
48
49
50
51
52
44
45
46
47
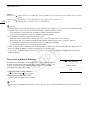
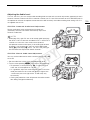
43 Microphone lock screw (A 100)
44 Microphone holder (A 100)
45 Microphone cable clamp (A 100)
46 Lens barrier (A 47)
47 Instant AF sensor (A 81)
48 Built-in stereo microphone (A 101)
49 Front tally lamp (A 48)
50 Remote sensor (A 44)
51 Infrared light (A 126)
52 START/STOP button (A 48, 123)
COPY

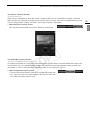
17
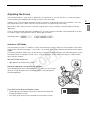
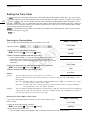
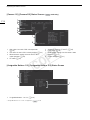
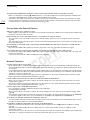
Names of Parts
English
53
61
63
64
65
62
68
69
70
71
72
73
54
55
56
57
58
59
60
66
67
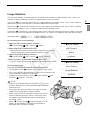
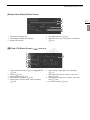
53 MENU button (A 29)
54 Joystick (A 29)/SET button (A 29)
55 CANCEL button (A 29)
56 POWERED IS button (A 87)/
Assignable button 3 (A 129)
57 OLED screen (A 33, 34)
58 SD card slot cover (A 40)
59 SD card access indicator (A 48, 123, 199)
60 SD card slot (A 40)
61 Viewfinder (A 32, 34)
62 Eye cup (A 33)
63 Dioptric adjustment lever (A 33)
64 Viewfinder unit
65 Battery compartment (A 24)
66 START/STOP button (A 48, 123)
67 UNLOCK (unlock the grip) switch (A 35)
68 × (headphone) terminal (A 106)
69 AV OUT terminal (A 162, 164)
70 HDMI OUT terminal (A 162, 164)
71 DC IN terminal (A 25)
72 LAN access indicator (A 180)
73 LAN terminal (Ethernet) (A 180)
COPY

Names of Parts
18
74
82 83 85 86
84
75 76 77 78 79 80 81
74 Accessory shoe
For attaching accessories such as the optional
VL-10Li II Battery Video Light.
75 Built-in speaker (A 149)
76 START/STOP lock lever (A 48)
77 START/STOP button (A 48, 123)
78 Grip zoom rocker (A 75)
79 MAGN. (magnification) button (A 84)/
Assignable button 4 (A 129)
80 Strap mount (A 36)
81 BATTERY RELEASE lever (A 24)
82 Front tally lamp (A 48)
83 – dials for CH1 (left) and CH2 (right)
(A 105)
84 Rear tally lamp (A 48)
85 Handle zoom rocker (A 77)
86 Handle socket for 0.64 cm (1/4") screws
COPY


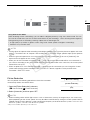
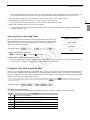
Names of Parts
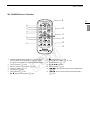
20
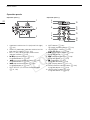
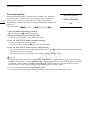
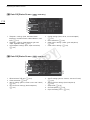
Operation panels
Operation panel 햲 Operation panel 햳
1
2
3
5
4
10
11
12
13
14
15
6
7
8
9
1 Audio level switches for CH1 (left) and CH2 (right)
(A 105)
2 AUDIO IN (audio input) selection switches for CH1
(left) and CH2 (right) (A 101, 103)
3 INPUT 1 (left) / INPUT 2 (right) audio source
selection switches (A 103)
4 Ò (play/pause) button (A 147)/
Assignable button 6 (A 129)
5 Ø (fast reverse playback) button (A 148)/
Assignable button 5 (A 129)
6 Ú (skip backward) button (A 148)/
Assignable button 8 (A 129)
7 SLOT SELECT (CF card slot selection) button
(A 41, 146)
8INDEX button (A 146)/
u (review recording) button (A 116)
9 HEADPHONE+ button (A 149)/
Assignable button 11 (A 129)
10 × (fast playback) button (A 148)/
Assignable button 7 (A 129)
11 Ù (skip forward) button (A 148)/
Assignable button 10 (A 129)
12 Ñ (stop) button (A 147)/
Assignable button 9 (A 129)
13 DISP. (display) button (A 51, 147)
14 WFM (waveform monitor) button (A 108)/
Assignable button 13 (A 129)
15 HEADPHONE- button (A 149)/
Assignable button 12 (A 129)
COPY
La pagina si sta caricando...
La pagina si sta caricando...
La pagina si sta caricando...
La pagina si sta caricando...
La pagina si sta caricando...
La pagina si sta caricando...
La pagina si sta caricando...
La pagina si sta caricando...
La pagina si sta caricando...
La pagina si sta caricando...
La pagina si sta caricando...
La pagina si sta caricando...
La pagina si sta caricando...
La pagina si sta caricando...
La pagina si sta caricando...
La pagina si sta caricando...
La pagina si sta caricando...
La pagina si sta caricando...
La pagina si sta caricando...
La pagina si sta caricando...
La pagina si sta caricando...
La pagina si sta caricando...
La pagina si sta caricando...
La pagina si sta caricando...
La pagina si sta caricando...
La pagina si sta caricando...
La pagina si sta caricando...
La pagina si sta caricando...
La pagina si sta caricando...
La pagina si sta caricando...
La pagina si sta caricando...
La pagina si sta caricando...
La pagina si sta caricando...
La pagina si sta caricando...
La pagina si sta caricando...
La pagina si sta caricando...
La pagina si sta caricando...
La pagina si sta caricando...
La pagina si sta caricando...
La pagina si sta caricando...
La pagina si sta caricando...
La pagina si sta caricando...
La pagina si sta caricando...
La pagina si sta caricando...
La pagina si sta caricando...
La pagina si sta caricando...
La pagina si sta caricando...
La pagina si sta caricando...
La pagina si sta caricando...
La pagina si sta caricando...
La pagina si sta caricando...
La pagina si sta caricando...
La pagina si sta caricando...
La pagina si sta caricando...
La pagina si sta caricando...
La pagina si sta caricando...
La pagina si sta caricando...
La pagina si sta caricando...
La pagina si sta caricando...
La pagina si sta caricando...
La pagina si sta caricando...
La pagina si sta caricando...
La pagina si sta caricando...
La pagina si sta caricando...
La pagina si sta caricando...
La pagina si sta caricando...
La pagina si sta caricando...
La pagina si sta caricando...
La pagina si sta caricando...
La pagina si sta caricando...
La pagina si sta caricando...
La pagina si sta caricando...
La pagina si sta caricando...
La pagina si sta caricando...
La pagina si sta caricando...
La pagina si sta caricando...
La pagina si sta caricando...
La pagina si sta caricando...
La pagina si sta caricando...
La pagina si sta caricando...
La pagina si sta caricando...
La pagina si sta caricando...
La pagina si sta caricando...
La pagina si sta caricando...
La pagina si sta caricando...
La pagina si sta caricando...
La pagina si sta caricando...
La pagina si sta caricando...
La pagina si sta caricando...
La pagina si sta caricando...
La pagina si sta caricando...
La pagina si sta caricando...
La pagina si sta caricando...
La pagina si sta caricando...
La pagina si sta caricando...
La pagina si sta caricando...
La pagina si sta caricando...
La pagina si sta caricando...
La pagina si sta caricando...
La pagina si sta caricando...
La pagina si sta caricando...
La pagina si sta caricando...
La pagina si sta caricando...
La pagina si sta caricando...
La pagina si sta caricando...
La pagina si sta caricando...
La pagina si sta caricando...
La pagina si sta caricando...
La pagina si sta caricando...
La pagina si sta caricando...
La pagina si sta caricando...
La pagina si sta caricando...
La pagina si sta caricando...
La pagina si sta caricando...
La pagina si sta caricando...
La pagina si sta caricando...
La pagina si sta caricando...
La pagina si sta caricando...
La pagina si sta caricando...
La pagina si sta caricando...
La pagina si sta caricando...
La pagina si sta caricando...
La pagina si sta caricando...
La pagina si sta caricando...
La pagina si sta caricando...
La pagina si sta caricando...
La pagina si sta caricando...
La pagina si sta caricando...
La pagina si sta caricando...
La pagina si sta caricando...
La pagina si sta caricando...
La pagina si sta caricando...
La pagina si sta caricando...
La pagina si sta caricando...
La pagina si sta caricando...
La pagina si sta caricando...
La pagina si sta caricando...
La pagina si sta caricando...
La pagina si sta caricando...
La pagina si sta caricando...
La pagina si sta caricando...
La pagina si sta caricando...
La pagina si sta caricando...
La pagina si sta caricando...
La pagina si sta caricando...
La pagina si sta caricando...
La pagina si sta caricando...
La pagina si sta caricando...
La pagina si sta caricando...
La pagina si sta caricando...
La pagina si sta caricando...
La pagina si sta caricando...
La pagina si sta caricando...
La pagina si sta caricando...
La pagina si sta caricando...
La pagina si sta caricando...
La pagina si sta caricando...
La pagina si sta caricando...
La pagina si sta caricando...
La pagina si sta caricando...
La pagina si sta caricando...
La pagina si sta caricando...
La pagina si sta caricando...
La pagina si sta caricando...
La pagina si sta caricando...
La pagina si sta caricando...
La pagina si sta caricando...
La pagina si sta caricando...
La pagina si sta caricando...
La pagina si sta caricando...
La pagina si sta caricando...
La pagina si sta caricando...
La pagina si sta caricando...
La pagina si sta caricando...
La pagina si sta caricando...
La pagina si sta caricando...
La pagina si sta caricando...
La pagina si sta caricando...
La pagina si sta caricando...
La pagina si sta caricando...
La pagina si sta caricando...
La pagina si sta caricando...
La pagina si sta caricando...
La pagina si sta caricando...
La pagina si sta caricando...
La pagina si sta caricando...
La pagina si sta caricando...
La pagina si sta caricando...
La pagina si sta caricando...
La pagina si sta caricando...
La pagina si sta caricando...
La pagina si sta caricando...
La pagina si sta caricando...
La pagina si sta caricando...
La pagina si sta caricando...
La pagina si sta caricando...
La pagina si sta caricando...
La pagina si sta caricando...
La pagina si sta caricando...
La pagina si sta caricando...
La pagina si sta caricando...
La pagina si sta caricando...
La pagina si sta caricando...
La pagina si sta caricando...
La pagina si sta caricando...
La pagina si sta caricando...
La pagina si sta caricando...
La pagina si sta caricando...
La pagina si sta caricando...
La pagina si sta caricando...
La pagina si sta caricando...
La pagina si sta caricando...
La pagina si sta caricando...
La pagina si sta caricando...
La pagina si sta caricando...
La pagina si sta caricando...
La pagina si sta caricando...
La pagina si sta caricando...
La pagina si sta caricando...
La pagina si sta caricando...
La pagina si sta caricando...
La pagina si sta caricando...
La pagina si sta caricando...
La pagina si sta caricando...
La pagina si sta caricando...
La pagina si sta caricando...
La pagina si sta caricando...
La pagina si sta caricando...
La pagina si sta caricando...
La pagina si sta caricando...
-
 1
1
-
 2
2
-
 3
3
-
 4
4
-
 5
5
-
 6
6
-
 7
7
-
 8
8
-
 9
9
-
 10
10
-
 11
11
-
 12
12
-
 13
13
-
 14
14
-
 15
15
-
 16
16
-
 17
17
-
 18
18
-
 19
19
-
 20
20
-
 21
21
-
 22
22
-
 23
23
-
 24
24
-
 25
25
-
 26
26
-
 27
27
-
 28
28
-
 29
29
-
 30
30
-
 31
31
-
 32
32
-
 33
33
-
 34
34
-
 35
35
-
 36
36
-
 37
37
-
 38
38
-
 39
39
-
 40
40
-
 41
41
-
 42
42
-
 43
43
-
 44
44
-
 45
45
-
 46
46
-
 47
47
-
 48
48
-
 49
49
-
 50
50
-
 51
51
-
 52
52
-
 53
53
-
 54
54
-
 55
55
-
 56
56
-
 57
57
-
 58
58
-
 59
59
-
 60
60
-
 61
61
-
 62
62
-
 63
63
-
 64
64
-
 65
65
-
 66
66
-
 67
67
-
 68
68
-
 69
69
-
 70
70
-
 71
71
-
 72
72
-
 73
73
-
 74
74
-
 75
75
-
 76
76
-
 77
77
-
 78
78
-
 79
79
-
 80
80
-
 81
81
-
 82
82
-
 83
83
-
 84
84
-
 85
85
-
 86
86
-
 87
87
-
 88
88
-
 89
89
-
 90
90
-
 91
91
-
 92
92
-
 93
93
-
 94
94
-
 95
95
-
 96
96
-
 97
97
-
 98
98
-
 99
99
-
 100
100
-
 101
101
-
 102
102
-
 103
103
-
 104
104
-
 105
105
-
 106
106
-
 107
107
-
 108
108
-
 109
109
-
 110
110
-
 111
111
-
 112
112
-
 113
113
-
 114
114
-
 115
115
-
 116
116
-
 117
117
-
 118
118
-
 119
119
-
 120
120
-
 121
121
-
 122
122
-
 123
123
-
 124
124
-
 125
125
-
 126
126
-
 127
127
-
 128
128
-
 129
129
-
 130
130
-
 131
131
-
 132
132
-
 133
133
-
 134
134
-
 135
135
-
 136
136
-
 137
137
-
 138
138
-
 139
139
-
 140
140
-
 141
141
-
 142
142
-
 143
143
-
 144
144
-
 145
145
-
 146
146
-
 147
147
-
 148
148
-
 149
149
-
 150
150
-
 151
151
-
 152
152
-
 153
153
-
 154
154
-
 155
155
-
 156
156
-
 157
157
-
 158
158
-
 159
159
-
 160
160
-
 161
161
-
 162
162
-
 163
163
-
 164
164
-
 165
165
-
 166
166
-
 167
167
-
 168
168
-
 169
169
-
 170
170
-
 171
171
-
 172
172
-
 173
173
-
 174
174
-
 175
175
-
 176
176
-
 177
177
-
 178
178
-
 179
179
-
 180
180
-
 181
181
-
 182
182
-
 183
183
-
 184
184
-
 185
185
-
 186
186
-
 187
187
-
 188
188
-
 189
189
-
 190
190
-
 191
191
-
 192
192
-
 193
193
-
 194
194
-
 195
195
-
 196
196
-
 197
197
-
 198
198
-
 199
199
-
 200
200
-
 201
201
-
 202
202
-
 203
203
-
 204
204
-
 205
205
-
 206
206
-
 207
207
-
 208
208
-
 209
209
-
 210
210
-
 211
211
-
 212
212
-
 213
213
-
 214
214
-
 215
215
-
 216
216
-
 217
217
-
 218
218
-
 219
219
-
 220
220
-
 221
221
-
 222
222
-
 223
223
-
 224
224
-
 225
225
-
 226
226
-
 227
227
-
 228
228
-
 229
229
-
 230
230
-
 231
231
-
 232
232
-
 233
233
-
 234
234
-
 235
235
-
 236
236
-
 237
237
-
 238
238
-
 239
239
-
 240
240
-
 241
241
-
 242
242
-
 243
243
-
 244
244
-
 245
245
-
 246
246
-
 247
247
-
 248
248
-
 249
249
-
 250
250


in altre lingue
- English: Canon XF-200 User guide