
USER´S MANUAL
BEDIENUNGSANLEITUNG
MANUEL D´UTILISATION
MANUAL DE USUARIO
INSTRUKCJA OBSŁUGI
MANUALE D´USO
EVOS® W7
LED WASH-BEAM MOVING HEAD WITH SINGLE PIXEL CONTROL
CLEW7

CONTENTS / INHALTSVERZEICHNIS / CONTENU / CONTENIDO / TREŚĆ / CONTENUTO
ENGLISH
SAFETY INFORMATION 3
INTRODUCTION 4
CONNECTIONS, OPERATING AND DISPLAY ELEMENTS 5
OPERATION 6
W-DMX™ 7
W-DMX™ STATUS 7
CONTROL MENU (CONTROL) 8
SYSTEM SETTINGS (SETTINGS) 19
DEVICE INFORMATION (INFO) 22
SERVICE MENU (SERVICE) 22
QUICK-LIGHT 23
BEAM SHAPER 24
INSTALLATION AND MOUNTNG 25
DMX TECHNOLOGY 25
TECHNICAL DATA 26
MANUFACTURER´S DECLARATIONS 27
DMX CONTROL 158
DEUTSCH
SICHERHEITSHINWEISE 29
EINFÜHRUNG 31
ANSCHLÜSSE, BEDIEN- UND ANZEIGEELEMENTE 31
BEDIENUNG 33
W-DMX™ 34
W-DMX™ STATUS 34
KONTROLLMENÜ (STEUERUNG) 34
SYSTEMEINSTELLUNGEN (EINSTELLUNGEN) 45
GERÄTSINFORMATIONEN (INFO) 47
SERVICEMENÜ (SERVICE) 48
QUICK LIGHT 50
BEAM SHAPER 50
INSTALLATION UND MONTAGE 51
DMX TECHNIK 51
TECHNISCHE DATEN 52
HERSTELLERERKLÄRUNGEN 54
DMX STEUERUNG 158
FRANCAIS
MESURES PRÉVENTIVES 55
INTRODUCTION 57
RACCORDEMENTS, ÉLÉMENTS DE COMMANDE
ET D’AFFICHAGE 57
UTILISATION 59
W-DMX™ 60
W-DMX™ STATUT 60
PANNEAU DE COMMANDE (CONTRÔLE) 60
PARAMÈTRES DU SYSTÈME (SETTINGS) 71
INFORMATIONS SUR L’APPAREIL (INFO) 73
MENU DE SERVICE (SERVICE) 74
QUICK LIGHT 75
BEAM SHAPER 76
INSTALLATION ET MONTAGE 77
TECHNIQUE DMX 77
CARACTÉRISTIQUES TECHNIQUES 78
DÉCLARATIONS 79
PILOTAGE DMX 158
ESPAÑOL
MEDIDAS DE SEGURIDAD 81
INTRODUCCIÓN 83
CONEXIONES, ELEMENTOS DE MANDO Y VISUALIZACIÓN 83
FUNCIONAMIENTO 85
W-DMX™ 86
ESTADO W-DMX™ 86
MENÚ DE CONTROL (CONTROL) 86
CONFIGURACIÓN DEL SISTEMA (SETTINGS) 97
INFORMACIÓN DEL EQUIPO (INFO) 99
MENÚ DE SERVICIO (SERVICIO) 100
QUICK-LIGHT 101
BEAM SHAPER 102
INSTALACIÓN Y MONTAJE 103
TECNOLOGÍA DMX 103
DATOS TÉCNICOS 104
DECLARACIONES DEL FABRICANTE 105
CONTROL DMX 158
POLSKI
ŚRODKI OSTROŻNOŚCI 107
WPROWADZENIE 109
PRZYŁĄCZA, ELEMENTY OBSŁUGI I WSKAŹNIKI 109
OBSŁUGA 111
W-DMX™ 112
W-DMX™ STATUS 112
MENU STEROWANIA (CONTROL) 112
USTAWIENIA SYSTEMU (USTAWIENIA) 123
INFORMACJE DOTYCZĄCE ROZWOJU (INFO) 125
MENU SERWISOWE (SERVICE) 126
QUICK-LIGHT 127
BEAM SHAPER 128
USTAWIANIE I MONTAŻ 129
TECHNIKA DMX 129
DANE TECHNICZNE 130
DEKLARACJE PRODUCENTA 131
STEROWANIE DMX 158
ITALIANO
MISURE PRECAUZIONALI 133
INTRODUZIONE 135
COLLEGAMENTI, ELEMENTI DI COMANDO
E DI VISUALIZZAZIONE 135
UTILIZZO 137
W-DMX™. 138
STATO W-DMX 138
MENU DI CONTROLLO (CONTROLLO) 138
IMPOSTAZIONI DI SISTEMA (IMPOSTAZIONI) 149
INFORMAZIONI SUL DISPOSITIVO (INFO) 151
MENU ASSITENZA (INFO) 152
QUICK LIGHT 153
BEAM SHAPER 154
INSTALLAZIONE E MONTAGGIO 155
TECNOLOGIA DMX 155
DATI TECNICI 156
DICHIARAZIONI DEL FABBRICANTE 157
CONTROLLO DMX 158

3
DMX DEUTSCHFRANCAIS
ESPAÑOL ENGLISH
ITALIANO POLSKI
ENGLISH
YOU HAVE MADE THE RIGHT CHOICE!
This device was developed and produced under the highest standards of quality in order to ensure smooth operation for many years. Please
read these operating instructions carefully so that you can use your new Cameo Light product quickly and optimally. You can find more
information on Cameo Light on our website WWW.CAMEOLIGHT.COM.
SAFETY INFORMATION
1. Please read through these instructions carefully.
2. Store all information and instructions in a secure location.
3. Follow the instructions.
4. Heed all warnings. Do not remove any safety warnings or other information from the device.
5. Use the device only in the intended manner.
6. Use only stable and suitable stands and/or mounts (for fixed installations). Make sure that wall mounts are properly installed and secured.
Make sure that the device is securely installed and will not fall.
7. During installation, heed all safety provisions that apply in your country.
8. Do not install and operate the device in the vicinity of heaters, heat reservoirs, ovens, or other heat sources. Make sure that the device is
installed in such a way that it is sufficiently cooled and will not overheat.
9. Do not place any ignition sources, e.g. candles, on the device.
10. Do not block the ventilation slits.
11. The device was designed to be used only in interior spaces, do not operate the device in the direct vicinity of water (this does not apply
to specialty outdoor devices – in this case, please note the special instructions given in the following). Do not bring the device into contact
with combustible materials, fluids, or gases.
12. Make sure that no water can drop or splash into the device. Do not place any containers filled with fluids, such as vases or drinking
vessels, onto the device.
13. Ensure that no objects can fall into the device.
14. Operative the device using only those accessories recommended and specified by the manufacturer.
15. Do not open the device, and do not modify it.
16. After connecting the device, inspect all cable paths in order to avoid damage or accidents, such as those caused by tripping over said cables.
17. During transport, ensure that the device will not fall and potentially cause material damage and personal harm.
18. If your device no longer functions properly, fluids or objects have made their way into the device interior, or the device is otherwise
damaged, switch it off immediately and remove it from the power outlet (provided the device is active).
This device is to be repaired only by authorized specialists.
19. Use a dry towel to clean the device.
20. Follow all laws on disposal applicable in your country. Please separate plastic and paper or cardboard when disposing of the packaging.
21. Plastic bags must be kept out of reach of children.
FOR DEVICES CONNECTED TO A POWER SUPPLY:
22. ATTENTION: If the device power cable is equipped with a ground pin, it must be inserted into an outlet with a grounding conductor. Never
disable the grounding conductor of a power cable.
23. Do not immediately switch on the device when it has been exposed to stark temperature deviations (for example after transport).
Humidity and condensation could damage the device. Switch on the device only when it has reached room temperature.
24. Before you connect the device to the outlet, first ensure that voltage and frequency of the power supply complies with the values given
on the device. If the device has a voltage selector switch, connect the device to the outlet only if the device values comply with the values of
the power supply. If the provided power cable or power adapter does not fit your power outlet, contact an electrician.
25. Do not step on the power cable. Make sure that live cables, in particular those at the power socket or at the power adapter and the
device socket, are not bent.
26. With regard to the device cables, always make sure that the power cable or power adapter is always freely accessible. Always separate
the device from the power supply when the device is not in use or when you would like to clean the device. Always unplug the power cable
and power adapter from the power outlet using the plug or adapter, not the cord. Never touch the power cable and power adapter with wet hands.
27. If possible, do not switch the device on and off quickly because this may impair the service life of the device.
28. IMPORTANT INFO: Replace fuses only with fuses of the same type and value. If a fuse trips repeatedly, please contact an authorized
service center.
29. In order to completely separate the device from the power supply, remove the power cable or power adapter from the outlet.
30. If your device is equipped with a Volex power cord, release the correct Volex device connector before removing the cord. However, this
also means that the device may slide and fall when removing the power cord, which may cause personal harm and/or material damage.
Therefore, always lay cables carefully.
31. Remove the power cable and power adapter from the outlet when there is a risk of lighting or when you no longer want to use the device.
32. The device may only be installed when it carries no voltage (separate the power plug from the power supply).
33. Dust and other debris within the device may damage it. The device should be serviced or cleaned regularly by qualified specialists
depending on the environmental conditions (dust, nicotine, smoke, etc.) in order to avoid overheating.
34. The distance to combustible materials must be at least 0.5 m.
35. Power cables for powering multiple devices must have a core cross-section of at least 1.5 mm². In the EU, lines must be H05VV-F or
similar. Adam Hall provides suitable cables. Using these cables, you can connect multiple devices via the Power Out connection with the
Power In connection of another device. Ensure that the total power consumption of all connected devices does not exceed the specified
value (printed on the device). Be sure to keep power lines as short as possible.

4
DMX
ITALIANO
POLSKI
ESPAÑOL
FRANCAIS
DEUTSCHENGLISH
36. The appliance is not to be used by persons (including children) with reduced physical, sensory or mental capabilities, or lack of
experience and knowledge.
37. Children must be instructed not to play with the device.
38. If the power cord of the device is damaged, do not use the device. The power cord must be replaced by an adequate cable or assembly
from an authorized service center.
CAUTION:
To reduce the risk of electric shock, do not remove cover (or back). There are no user serviceable
parts inside. Maintenance and repairs should be exclusively carried out by qualified service
personnel.
The warning triangle with lightning symbol indicates dangerous uninsulated voltage inside the unit, which may cause an
electrical shock.
The warning triangle with exclamation mark indicates important operating and maintenance instructions.
Warning! This symbol indicates a hot surface. Certain parts of the housing can become hot during operation. After use, wait for
a cool-down period of at least 10 minutes before handling or transporting the device.
Warning! This device is designed for use below 2000 metres in altitude.
Warning! This product is not intended for use in tropical climates.
Caution! Intense LED light source! Risk of eye damage. Do not look into the light source.
CAUTION! IMPORTANT INFORMATION ABOUT LIGHTING PRODUCTS!
1. The product has been developed for professional use in the field of event technology and is not suitable as household lighting.
2. Do not stare, even temporarily, directly into the light beam.
3. Do not look at the beam directly with optical instruments such as magnifiers.
4. Stroboscope effects may cause epileptic seizures in sensitive people! People with epilepsy should definitely avoid places where
strobes are used.
INTRODUCTION
MOVING HEAD EVOS® W7
CLEW7
CONTROL FUNCTIONS
16-channel, 18-channel, 23-channel, 33-channel, 43-channel and 87-channel DMX functions
Art-Net4
sACN
Kling-Net
W-DMX™
RDM-enabled
Master/slave operation
Standalone functions
FEATURES
19 x 40 W RGBW LEDs. Zoom function. Strobe. Pan and tilt motors with 16-bit resolution. Automatic position correction. Temperature-con-
trolled fan. 3- and 5-pin DMX connections. Network connections. Neutrik powerCON TRUE1 mains connection. 2 Omega mounting brackets
and beam shaper included. Operating voltage 100–240 V AC. Power consumption 900 W
The spotlight features the RDM standard (remote device management). Remote device management allows the user to view status and
configuration of RDM terminals via an RDM-capable controller.

5
DMX DEUTSCHFRANCAIS
ESPAÑOL ENGLISH
ITALIANO POLSKI
1 POWER IN
Neutrik powerCON TRUE1 mains input socket. Operating voltage 100–240 V AC/50–60Hz. A suitable mains cable with powerCON TRUE1
plug is included.
2 FUSE
Fuse holder for 5 x 20 mm micro fuses. IMPORTANT: Replace the fuse only with a fuse of the same type and value. In the event of repeated
fuse failure, please contact an authorised service centre.
3 DMX IN
Male 3-pin and 5-pin XLR sockets for connection to a DMX control device (e.g. DMX console).
4 DMX OUT
Female 3-pin or 5-pin XLR sockets for sending the DMX control signal.
5 NET
RJ45 network connections for connecting to an Art-Net, sACN or KlingNet network and for connecting further Art-Net, sACN or KlingNet-ca-
pable devices to the network. Use CAT-5e or better cables to set up the network.
6 NET STATUS LEDS
Yellow status LED lights up = network connection.
Green status LED flashes = control signal is present.
7 W-DMX™ ANTENNA
The antenna for control via W-DMX™ remains in the holder (= operating position) during operation.
8 LC DISPLAY
The illuminated LCD display shows the currently activated mode (main display), the menu items in the selection menu and the numerical
value or operating mode in certain menu items. If there is no input for approx. one minute, the display automatically returns to the main
display. Note on the main display in operating modes with external control: As soon as the control signal is interrupted, the characters in the
display begin to flash. When there is a control signal again, the flashing stops.
The battery-powered display can be activated, even if the device is not connected to the mains. To do this, press the encoder for approx-
imately 5 seconds. You can now access device information and change and save system settings without mains connection. The external
control of the spotlight is not activated in this case. For this reason, the display shows that there is no DMX signal even if a DMX signal is
available at the device.
9 ROTARY-PUSH ENCODER
Rotary-push encoder for navigating in the editing menu and for adjusting system settings and changing values in the corresponding menu
items. Starting from the main display, press the encoder to enter the main menu. Select the individual menu items in the main menu (Con-
trol, Settings, Info, etc.) and in the sub-menus by turning the encoder and confirm the selection by pressing the encoder. Change the value
or status in a menu item by turning the encoder and confirm the change by pressing the encoder.
CONNECTIONS, OPERATING AND DISPLAY ELEMENTS
9 10 11 12 13
8
L
J
I
H
G
F
E
D
C
B
A
134567
2
受控正本:
M
N
EK-QR-RD-024-(--)
No.
1
2
3
4
区域 修改内容 日期
批准
审核
制图
图号
型号
图名
编码
类别 版次
受控副本:
单位章:
图框版次
成品机
第1页共1页
190529杨胜飘
AH-M19QZ-0001
AH-M19QZ
三视图
1100300165
一版
362
422
482.5
257
193
140
140
Ø225
冯金芳 19.05.29
EVOS® W7
NET DMX IN / OUT DMX IN / OUT
FUSE
T10AL / 250 V POWER IN
POWER IN: 100-240 V AC 50-60 Hz
POWER CONSUMPTION: 900 W · WEIGHT: 19 KG
PANTONE: 429C
PANTONE: 429C
PANTONE: 429C
1
2
44 33
55
6
7
9 10 11 12 13
8
L
J
I
H
G
F
E
D
C
B
A
134567
2
受控正本:
M
N
EK-QR-RD-024-(--)
No.
1
2
3
4
区域 修改内容 日期
批准
审核
制图
图号
型号
图名
编码
类别 版次
受控副本:
单位章:
图框版次
成品机
第1页共1页
190529杨胜飘
AH-M19QZ-0001
AH-M19QZ
三视图
1100300165
一版
362
422
482.5
257
193
140
140
Ø225
冯金芳 19.05.29
EVOS® W7
NET DMX IN / OUT DMX IN / OUT
FUSE
T10AL / 250 V POWER IN
POWER IN: 100-240 V AC 50-60 Hz
POWER CONSUMPTION: 900 W · WEIGHT: 19 KG
PANTONE: 429C
PANTONE: 429C
PANTONE: 429C
98

6
DMX
ITALIANO
POLSKI
ESPAÑOL
FRANCAIS
DEUTSCHENGLISH
10 PAN LOCK
Mechanical locking device used to prevent the rotation of the head in the horizontal direction during transport. Disconnect the unit from the
mains, move the head parallel to the base (4 possible positions) and push the locking lever in the direction of the pan rotation axis to lock it
in position. Unlock the device before startup.
11 TILT LOCK
Mechanical locking device used to prevent the rotation of the head in the vertical direction during transport (5 possible positions). Discon-
nect the unit from the mains and slide the locking lever in the direction of the tilt rotation axis, moving the head of the unit vertically until
one of the 5 locking positions is found and the locking lever engages. Unlock the device before startup.
10
11
LOCK
LOCK
UNLOCK
UNLOCK
Main Menu
Control
Settings
Info
Service
Quick-Light
Control
DMX
W-DMX
Art-Net
sACN
Art-Net+DMX
sACN+DMX
Kling-Net+DMX
Slave
Scenes
Control
DMX
W-DMX
Art-Net
sACN
Art-Net+DMX
sACN+DMX
Kling-Net+DMX
Slave
Scenes
Control
DMX
W-DMX
Art-Net
sACN
Art-Net+DMX
sACN+DMX
Kling-Net+DMX
Slave
Scenes
Control
DMX
W-DMX
Art-Net
sACN
Art-Net+DMX
sACN+DMX
Kling-Net+DMX
Slave
Scenes
Control
DMX
W-DMX
Art-Net
sACN
Art-Net+DMX
sACN+DMX
Kling-Net+DMX
Slave
Scenes
Control
DMX
W-DMX
Art-Net
sACN
Art-Net+DMX
sACN+DMX
Kling-Net+DMX
Slave
Scenes
Control
DMX
W-DMX
Art-Net
sACN
Art-Net+DMX
sACN+DMX
Kling-Net+DMX
Slave
Scenes
Control
DMX
W-DMX
Art-Net
sACN
Art-Net+DMX
sACN+DMX
Kling-Net+DMX
Slave
Scenes
Control
DMX
W-DMX
Art-Net
sACN
Art-Net+DMX
sACN+DMX
Kling-Net+DMX
Slave
Scenes
Mode
Slave
(Scene x)
030°C
!
030°C
Mode: Art-Net (sACN)+DMX
Universe:
IP:
Main Address:
Pixel Address:
0
192.168.000.150
001
001
!
030°C
Mode: Kling-Net+DMX
Main Address: 001
!
030°C
Mode: Art-Net (sACN)
Universe:
IP:
DMX Address:
87CH
0
192.168.000.150
001
!
001
87CH
030°C
!
OPERATION
PLEASE NOTE
As soon as the spotlight is correctly connected to the power supply, the following will be displayed in succession: "Welcome to Cameo", the
model name and the software version. After this process, the lamp is ready for operation and starts in the previously enabled mode.
MAIN DISPLAY
The main display shows different information relevant to the various operating modes.
DMX and W-DMX operating modes Art-Net and sACN operating modes
Temperature of the LED unit Temperature of the LED unit
Operating mode and DMX mode
DMX start address and DMX mode
Universe
Warning
IP address
DMX address
W-DMX status W-DMX status

7
DMX DEUTSCHFRANCAIS
ESPAÑOL ENGLISH
ITALIANO POLSKI
Main Menu
Control
Settings
Info
Service
Quick-Light
Control
DMX
W-DMX
Art-Net
sACN
Art-Net+DMX
sACN+DMX
Kling-Net+DMX
Slave
Scenes
Control
DMX
W-DMX
Art-Net
sACN
Art-Net+DMX
sACN+DMX
Kling-Net+DMX
Slave
Scenes
Control
DMX
W-DMX
Art-Net
sACN
Art-Net+DMX
sACN+DMX
Kling-Net+DMX
Slave
Scenes
Control
DMX
W-DMX
Art-Net
sACN
Art-Net+DMX
sACN+DMX
Kling-Net+DMX
Slave
Scenes
Control
DMX
W-DMX
Art-Net
sACN
Art-Net+DMX
sACN+DMX
Kling-Net+DMX
Slave
Scenes
Control
DMX
W-DMX
Art-Net
sACN
Art-Net+DMX
sACN+DMX
Kling-Net+DMX
Slave
Scenes
Control
DMX
W-DMX
Art-Net
sACN
Art-Net+DMX
sACN+DMX
Kling-Net+DMX
Slave
Scenes
Control
DMX
W-DMX
Art-Net
sACN
Art-Net+DMX
sACN+DMX
Kling-Net+DMX
Slave
Scenes
Control
DMX
W-DMX
Art-Net
sACN
Art-Net+DMX
sACN+DMX
Kling-Net+DMX
Slave
Scenes
Mode
Slave
(Scene x)
030°C
!
030°C
Mode: Art-Net (sACN)+DMX
Universe:
IP:
Main Address:
Pixel Address:
0
192.168.000.150
001
001
!
030°C
Mode: Kling-Net+DMX
Main Address: 001
!
030°C
Mode: Art-Net (sACN)
Universe:
IP:
DMX Address:
87CH
0
192.168.000.150
001
!
001
87CH
030°C
!
Warning
Pixel address
Operating mode Art-Net / sACN + DMX Operating mode Kling-Net + DMX
Temperature of the LED unit Temperature of the LED unit
Operating modeOperating mode
Main addressUniverse
IP address
Main address
W-DMX status W-DMX status
Main Menu
Control
Settings
Info
Service
Quick-Light
Control
DMX
W-DMX
Art-Net
sACN
Art-Net+DMX
sACN+DMX
Kling-Net+DMX
Slave
Scenes
Control
DMX
W-DMX
Art-Net
sACN
Art-Net+DMX
sACN+DMX
Kling-Net+DMX
Slave
Scenes
Control
DMX
W-DMX
Art-Net
sACN
Art-Net+DMX
sACN+DMX
Kling-Net+DMX
Slave
Scenes
Control
DMX
W-DMX
Art-Net
sACN
Art-Net+DMX
sACN+DMX
Kling-Net+DMX
Slave
Scenes
Control
DMX
W-DMX
Art-Net
sACN
Art-Net+DMX
sACN+DMX
Kling-Net+DMX
Slave
Scenes
Control
DMX
W-DMX
Art-Net
sACN
Art-Net+DMX
sACN+DMX
Kling-Net+DMX
Slave
Scenes
Control
DMX
W-DMX
Art-Net
sACN
Art-Net+DMX
sACN+DMX
Kling-Net+DMX
Slave
Scenes
Control
DMX
W-DMX
Art-Net
sACN
Art-Net+DMX
sACN+DMX
Kling-Net+DMX
Slave
Scenes
Control
DMX
W-DMX
Art-Net
sACN
Art-Net+DMX
sACN+DMX
Kling-Net+DMX
Slave
Scenes
Mode
Slave
(Scene x)
030°C
!
030°C
Mode: Art-Net (sACN)+DMX
Universe:
IP:
Main Address:
Pixel Address:
0
192.168.000.150
001
001
!
030°C
Mode: Kling-Net+DMX
Main Address: 001
!
030°C
Mode: Art-Net (sACN)
Universe:
IP:
DMX Address:
87CH
0
192.168.000.150
001
!
001
87CH
030°C
!
Note on the main display in operating modes with external control: As soon as the control signal is interrupted, the characters in the display
begin to flash. When there is a control signal again, the flashing stops.
Warning: If the warning symbol (triangle with exclamation mark) appears in the display, there is an error with one or more components of
the device. Which components are affected can be seen in the Info Menu under Error Info. If the error cannot be rectified by a restart or
reset, please contact an authorised service centre.
Slave and Scene operating mode
Temperature of the LED unit
Operating mode
Warning
W-DMX status
W-DMX™
To pair a W-DMX receiver with a W-DMX compatible transmitter, the Reset command must be executed in the receiver menu under Connect
(select and confirm Reset). The receiver is now in pairing standby and waiting for a pairing request from a transmitter. Start the pairing by
selecting Link in the menu of the transmitter and confirm; the pairing now takes place automatically. In the same way, several receivers
can be paired simultaneously or one after the other to a transmitter (e.g. for master/slave operation). A W-DMX connection is always
maintained until the connection is disconnected by means of the Reset command in the receiver or the Unlink command in the transmitter,
regardless of whether a device has been disconnected from the power supply in the meantime.
W-DMX™ STATUS
W-DMX de-
activated
W-DMX
activated as
receiver, not
paired
W-DMX
activated
as receiver
and paired,
transmitter
is switched
off or out of
range
W-DMX
activated as
receiver and
paired, no
DMX signal
W-DMX
activated
as receiver
and paired,
DMX signal
available
W-DMX
activated as
transmitter
with G4s
standard,
DMX signal
available
W-DMX activated
as transmitter
with G3 standard,
no DMX signal
W-DMX
activated as
transmitter with
G4s standard,
no DMX signal
W-DMX activated
as transmitter with
G4s standard, no
DMX signal

8
DMX
ITALIANO
POLSKI
ESPAÑOL
FRANCAIS
DEUTSCHENGLISH
Main Menu
Control
Settings
Info
Service
Quick-Light
Control
DMX
W-DMX
Art-Net
sACN
Art-Net+DMX
sACN+DMX
Kling-Net+DMX
Slave
Scenes
Control
DMX
W-DMX
Art-Net
sACN
Art-Net+DMX
sACN+DMX
Kling-Net+DMX
Slave
Scenes
Control
DMX
W-DMX
Art-Net
sACN
Art-Net+DMX
sACN+DMX
Kling-Net+DMX
Slave
Scenes
Control
DMX
W-DMX
Art-Net
sACN
Art-Net+DMX
sACN+DMX
Kling-Net+DMX
Slave
Scenes
Control
DMX
W-DMX
Art-Net
sACN
Art-Net+DMX
sACN+DMX
Kling-Net+DMX
Slave
Scenes
Control
DMX
W-DMX
Art-Net
sACN
Art-Net+DMX
sACN+DMX
Kling-Net+DMX
Slave
Scenes
Control
DMX
W-DMX
Art-Net
sACN
Art-Net+DMX
sACN+DMX
Kling-Net+DMX
Slave
Scenes
Control
DMX
W-DMX
Art-Net
sACN
Art-Net+DMX
sACN+DMX
Kling-Net+DMX
Slave
Scenes
Control
DMX
W-DMX
Art-Net
sACN
Art-Net+DMX
sACN+DMX
Kling-Net+DMX
Slave
Scenes
Mode
Slave
(Scene x)
030°C
!
030°C
Mode: Art-Net (sACN)+DMX
Universe:
IP:
Main Address:
Pixel Address:
0
192.168.000.150
001
001
!
030°C
Mode: Kling-Net+DMX
Main Address: 001
!
030°C
Mode: Art-Net (sACN)
Universe:
IP:
DMX Address:
87CH
0
192.168.000.150
001
!
001
87CH
030°C
!
CONTROL MENU (Control)
The control menu enables selection of the various operating modes and their setting options in the relevant sub-menus. DMX address, DMX
operating mode, universe, IP address and subnet mask are set in each operating mode for all operating modes, where relevant.
DMX OPERATION VIA XLR CABLE
Starting from the main display, press the rotary push encoder to enter the main menu. Select the Control menu by turning the encoder and
pressing the encoder. Turn the encoder to select DMX and press the encoder again to confirm. Information on the sub-menu items in the
DMX menu and the corresponding setting options can be found in the table below.
DMX
Select by turning the encoder, confirm by pressing, change value or status by turning, confirm by pressing. Return with .
Address Setting the DMX start address 001–512
Channel mode Selecting the DMX mode
16CH / 18CH / 23CH /
33CH / 43CH / 87CH
Wireless Activate (select G3 or G4s) or deactivate (Disable) the sending of
the DMX signal via W-DMX, set the W-DMX standard (G3 / G4s) and
establish a connection (Link) with another W-DMX device or disconnect
(Unlink).
Send mode
G3
G4s
Disable
Connect
Link
Unlink

9
DMX DEUTSCHFRANCAIS
ESPAÑOL ENGLISH
ITALIANO POLSKI
Main Menu
Control
Settings
Info
Service
Quick-Light
Control
DMX
W-DMX
Art-Net
sACN
Art-Net+DMX
sACN+DMX
Kling-Net+DMX
Slave
Scenes
Control
DMX
W-DMX
Art-Net
sACN
Art-Net+DMX
sACN+DMX
Kling-Net+DMX
Slave
Scenes
Control
DMX
W-DMX
Art-Net
sACN
Art-Net+DMX
sACN+DMX
Kling-Net+DMX
Slave
Scenes
Control
DMX
W-DMX
Art-Net
sACN
Art-Net+DMX
sACN+DMX
Kling-Net+DMX
Slave
Scenes
Control
DMX
W-DMX
Art-Net
sACN
Art-Net+DMX
sACN+DMX
Kling-Net+DMX
Slave
Scenes
Control
DMX
W-DMX
Art-Net
sACN
Art-Net+DMX
sACN+DMX
Kling-Net+DMX
Slave
Scenes
Control
DMX
W-DMX
Art-Net
sACN
Art-Net+DMX
sACN+DMX
Kling-Net+DMX
Slave
Scenes
Control
DMX
W-DMX
Art-Net
sACN
Art-Net+DMX
sACN+DMX
Kling-Net+DMX
Slave
Scenes
Control
DMX
W-DMX
Art-Net
sACN
Art-Net+DMX
sACN+DMX
Kling-Net+DMX
Slave
Scenes
Mode
Slave
(Scene x)
030°C
!
030°C
Mode: Art-Net (sACN)+DMX
Universe:
IP:
Main Address:
Pixel Address:
0
192.168.000.150
001
001
!
030°C
Mode: Kling-Net+DMX
Main Address: 001
!
030°C
Mode: Art-Net (sACN)
Universe:
IP:
DMX Address:
87CH
0
192.168.000.150
001
!
001
87CH
030°C
!
Main Menu
Control
Settings
Info
Service
Quick-Light
Control
DMX
W-DMX
Art-Net
sACN
Art-Net+DMX
sACN+DMX
Kling-Net+DMX
Slave
Scenes
Control
DMX
W-DMX
Art-Net
sACN
Art-Net+DMX
sACN+DMX
Kling-Net+DMX
Slave
Scenes
Control
DMX
W-DMX
Art-Net
sACN
Art-Net+DMX
sACN+DMX
Kling-Net+DMX
Slave
Scenes
Control
DMX
W-DMX
Art-Net
sACN
Art-Net+DMX
sACN+DMX
Kling-Net+DMX
Slave
Scenes
Control
DMX
W-DMX
Art-Net
sACN
Art-Net+DMX
sACN+DMX
Kling-Net+DMX
Slave
Scenes
Control
DMX
W-DMX
Art-Net
sACN
Art-Net+DMX
sACN+DMX
Kling-Net+DMX
Slave
Scenes
Control
DMX
W-DMX
Art-Net
sACN
Art-Net+DMX
sACN+DMX
Kling-Net+DMX
Slave
Scenes
Control
DMX
W-DMX
Art-Net
sACN
Art-Net+DMX
sACN+DMX
Kling-Net+DMX
Slave
Scenes
Control
DMX
W-DMX
Art-Net
sACN
Art-Net+DMX
sACN+DMX
Kling-Net+DMX
Slave
Scenes
Mode
Slave
(Scene x)
030°C
!
030°C
Mode: Art-Net (sACN)+DMX
Universe:
IP:
Main Address:
Pixel Address:
0
192.168.000.150
001
001
!
030°C
Mode: Kling-Net+DMX
Main Address: 001
!
030°C
Mode: Art-Net (sACN)
Universe:
IP:
DMX Address:
87CH
0
192.168.000.150
001
!
001
87CH
030°C
!
DMX OPERATION VIA W-DMX
Starting from the main display, press the rotary-push encoder to enter the main menu. Select the Control menu by turning the encoder and
pressing the encoder. Turn the encoder to select W-DMX and press the encoder again to confirm. See the table below for information on the
sub-menu items in the W-DMX menu and the relevant setting options.
W-DMX
Select by turning the encoder, confirm by pressing, change value or status by turning, confirm by pressing. Return with .
Address Setting the DMX start address 001–512
Channel mode Selecting the DMX mode
16CH / 18CH / 23CH /
33CH / 43CH / 87CH
Wireless Select reception options:
1. Backup by XLR = If W-DMX is interrupted, XLR takes over (cable
connection required).
2. Send to XLR = Forward the DMX signal via DMX OUT (XLR)
3. Wireless Only = Reception exclusively via W-DMX, no backup, no
forwarding of the DMX signal.
Receive mode
Backup by XLR
Send to XLR
Wireless Only
Reset = Terminate the connection to all W-DMX devices and put them
on pairing standby.
Connect
Reset
Main Menu
Control
Settings
Info
Service
Quick-Light
Control
DMX
W-DMX
Art-Net
sACN
Art-Net+DMX
sACN+DMX
Kling-Net+DMX
Slave
Scenes
Control
DMX
W-DMX
Art-Net
sACN
Art-Net+DMX
sACN+DMX
Kling-Net+DMX
Slave
Scenes
Control
DMX
W-DMX
Art-Net
sACN
Art-Net+DMX
sACN+DMX
Kling-Net+DMX
Slave
Scenes
Control
DMX
W-DMX
Art-Net
sACN
Art-Net+DMX
sACN+DMX
Kling-Net+DMX
Slave
Scenes
Control
DMX
W-DMX
Art-Net
sACN
Art-Net+DMX
sACN+DMX
Kling-Net+DMX
Slave
Scenes
Control
DMX
W-DMX
Art-Net
sACN
Art-Net+DMX
sACN+DMX
Kling-Net+DMX
Slave
Scenes
Control
DMX
W-DMX
Art-Net
sACN
Art-Net+DMX
sACN+DMX
Kling-Net+DMX
Slave
Scenes
Control
DMX
W-DMX
Art-Net
sACN
Art-Net+DMX
sACN+DMX
Kling-Net+DMX
Slave
Scenes
Control
DMX
W-DMX
Art-Net
sACN
Art-Net+DMX
sACN+DMX
Kling-Net+DMX
Slave
Scenes
Mode
Slave
(Scene x)
030°C
!
030°C
Mode: Art-Net (sACN)+DMX
Universe:
IP:
Main Address:
Pixel Address:
0
192.168.000.150
001
001
!
030°C
Mode: Kling-Net+DMX
Main Address: 001
!
030°C
Mode: Art-Net (sACN)
Universe:
IP:
DMX Address:
87CH
0
192.168.000.150
001
!
001
87CH
030°C
!
OPERATION VIA ART-NET
Starting from the main display, press the rotary-push encoder to enter the main menu. Select the Control menu by turning the encoder and
pressing the encoder. Turn the encoder to select Art-Net and press the encoder again to confirm. See the table below for information on the
sub-menu items in the Art-Net menu and the relevant setting options.

10
DMX
ITALIANO
POLSKI
ESPAÑOL
FRANCAIS
DEUTSCHENGLISH
Art-Net
Select by turning the encoder, confirm by pressing, change value or status by turning, confirm by pressing. Return with .
Address Setting the DMX start address 001–512
Channel mode Selecting the DMX mode
16CH / 18CH / 23CH /
33CH / 43CH / 87CH
Network
Settings
Network settings:
IP address: 1. Set block, con-
firm, Set 2nd block, confirm ...
Subnet mask: 1. Set block, con-
firm, Set 2nd block, confirm ...
IP Address xxx.xxx.xxx.xxx
Subnet Mask xxx.xxx.xxx.xxx
Universe 000–254
Universe Group 000–127
Send to DMX The Art-Net control signal can
be forwarded in the defined
universe to DMX OUT (Art-Net
to DMX), to W-DMX (Art-Net to
W-DMX) or to both (Art-Net to
DMX and W-DMX). The function
is deactivated by means of
“Disable”.
Disable
Current Universe
(alternative to “User
Universe”)
Art-Net to DMX
Art-Net to DMX
and W-DMX
Send mode
G3
G4s
Connect
Link
Unlink
The Art-Net control signal can
be forwarded in any universe
from 000 to 254 (Select
Universe) to DMX OUT (Art-Net
to DMX), to W-DMX (Art-Net to
W-DMX) or to both (Art-Net to
DMX and W-DMX).
User Universe
(alternative to
“Current Universe”)
Select Universe 000–254
Sending Options
Art-Net to DMX
Art-Net to DMX
and W-DMX
Send
mode
G3
G4s
Connect
Link
Unlink
Art-Net to
W-DMX
Send
mode
G3
G4s
Connect
Link
Unlink

11
DMX DEUTSCHFRANCAIS
ESPAÑOL ENGLISH
ITALIANO POLSKI
Main Menu
Control
Settings
Info
Service
Quick-Light
Control
DMX
W-DMX
Art-Net
sACN
Art-Net+DMX
sACN+DMX
Kling-Net+DMX
Slave
Scenes
Control
DMX
W-DMX
Art-Net
sACN
Art-Net+DMX
sACN+DMX
Kling-Net+DMX
Slave
Scenes
Control
DMX
W-DMX
Art-Net
sACN
Art-Net+DMX
sACN+DMX
Kling-Net+DMX
Slave
Scenes
Control
DMX
W-DMX
Art-Net
sACN
Art-Net+DMX
sACN+DMX
Kling-Net+DMX
Slave
Scenes
Control
DMX
W-DMX
Art-Net
sACN
Art-Net+DMX
sACN+DMX
Kling-Net+DMX
Slave
Scenes
Control
DMX
W-DMX
Art-Net
sACN
Art-Net+DMX
sACN+DMX
Kling-Net+DMX
Slave
Scenes
Control
DMX
W-DMX
Art-Net
sACN
Art-Net+DMX
sACN+DMX
Kling-Net+DMX
Slave
Scenes
Control
DMX
W-DMX
Art-Net
sACN
Art-Net+DMX
sACN+DMX
Kling-Net+DMX
Slave
Scenes
Control
DMX
W-DMX
Art-Net
sACN
Art-Net+DMX
sACN+DMX
Kling-Net+DMX
Slave
Scenes
Mode
Slave
(Scene x)
030°C
!
030°C
Mode: Art-Net (sACN)+DMX
Universe:
IP:
Main Address:
Pixel Address:
0
192.168.000.150
001
001
!
030°C
Mode: Kling-Net+DMX
Main Address: 001
!
030°C
Mode: Art-Net (sACN)
Universe:
IP:
DMX Address:
87CH
0
192.168.000.150
001
!
001
87CH
030°C
!
Main Menu
Control
Settings
Info
Service
Quick-Light
Control
DMX
W-DMX
Art-Net
sACN
Art-Net+DMX
sACN+DMX
Kling-Net+DMX
Slave
Scenes
Control
DMX
W-DMX
Art-Net
sACN
Art-Net+DMX
sACN+DMX
Kling-Net+DMX
Slave
Scenes
Control
DMX
W-DMX
Art-Net
sACN
Art-Net+DMX
sACN+DMX
Kling-Net+DMX
Slave
Scenes
Control
DMX
W-DMX
Art-Net
sACN
Art-Net+DMX
sACN+DMX
Kling-Net+DMX
Slave
Scenes
Control
DMX
W-DMX
Art-Net
sACN
Art-Net+DMX
sACN+DMX
Kling-Net+DMX
Slave
Scenes
Control
DMX
W-DMX
Art-Net
sACN
Art-Net+DMX
sACN+DMX
Kling-Net+DMX
Slave
Scenes
Control
DMX
W-DMX
Art-Net
sACN
Art-Net+DMX
sACN+DMX
Kling-Net+DMX
Slave
Scenes
Control
DMX
W-DMX
Art-Net
sACN
Art-Net+DMX
sACN+DMX
Kling-Net+DMX
Slave
Scenes
Control
DMX
W-DMX
Art-Net
sACN
Art-Net+DMX
sACN+DMX
Kling-Net+DMX
Slave
Scenes
Mode
Slave
(Scene x)
030°C
!
030°C
Mode: Art-Net (sACN)+DMX
Universe:
IP:
Main Address:
Pixel Address:
0
192.168.000.150
001
001
!
030°C
Mode: Kling-Net+DMX
Main Address: 001
!
030°C
Mode: Art-Net (sACN)
Universe:
IP:
DMX Address:
87CH
0
192.168.000.150
001
!
001
87CH
030°C
!
OPERATION VIA SACN
Starting from the main display, press the rotary-push encoder to enter the main menu. Select the Control menu by turning the encoder and
pressing the encoder. Turn the encoder to select sACN and press the encoder again to confirm. Information on the sub-menu items in the
sACN menu and the corresponding setting options can be found in the table below.
sACN
Select by turning the encoder, confirm by pressing, change value or status by turning, confirm by pressing. Return with .
Address Setting the DMX start address 001–512
Channel mode Selecting the DMX mode
16CH / 18CH / 23CH /
33CH / 43CH / 87CH
Network
Settings
Network settings:
IP address: 1. Set block, con-
firm, Set 2nd block, confirm ...
Subnet mask: 1. Set block, con-
firm, Set 2nd block, confirm ...
IP Address xxx.xxx.xxx.xxx
Subnet Mask xxx.xxx.xxx.xxx
Universe 000–254
Universe Group 000–127

12
DMX
ITALIANO
POLSKI
ESPAÑOL
FRANCAIS
DEUTSCHENGLISH
Send to DMX The sACN control signal can
be forwarded in the defined
universe to DMX OUT (sACN
to DMX), to W-DMX (sACN to
W-DMX) or to both (sACN to
DMX and W-DMX). The function
is deactivated by means of
“Disable”.
Disable
Current Universe
(alternative to “User
Universe”)
sACN to DMX
sACN to DMX and
W-DMX
Send mode
G3
G4s
Connect
Link
Unlink
sACN to W-DMX
Send mode
G3
G4s
Connect
Link
Unlink
The sACN control signal can be
forwarded in any universe from
000 to 254 (Select Universe)
to DMX OUT (sACN to DMX),
to W-DMX (sACN to W-DMX)
or to both (sACN to DMX and
W-DMX).
User Universe
(alternative to “Cur-
rent Universe”)
Select Universe 000–254
Sending Options
sACN to DMX
sACN to DMX
and W-DMX
Send mode
G3
G4s
Connect
Link
Unlink
sACN to
W-DMX
Send mode
G3
G4s
Connect
Link
Unlink

13
DMX DEUTSCHFRANCAIS
ESPAÑOL ENGLISH
ITALIANO POLSKI
Main Menu
Control
Settings
Info
Service
Quick-Light
Control
DMX
W-DMX
Art-Net
sACN
Art-Net+DMX
sACN+DMX
Kling-Net+DMX
Slave
Scenes
Control
DMX
W-DMX
Art-Net
sACN
Art-Net+DMX
sACN+DMX
Kling-Net+DMX
Slave
Scenes
Control
DMX
W-DMX
Art-Net
sACN
Art-Net+DMX
sACN+DMX
Kling-Net+DMX
Slave
Scenes
Control
DMX
W-DMX
Art-Net
sACN
Art-Net+DMX
sACN+DMX
Kling-Net+DMX
Slave
Scenes
Control
DMX
W-DMX
Art-Net
sACN
Art-Net+DMX
sACN+DMX
Kling-Net+DMX
Slave
Scenes
Control
DMX
W-DMX
Art-Net
sACN
Art-Net+DMX
sACN+DMX
Kling-Net+DMX
Slave
Scenes
Control
DMX
W-DMX
Art-Net
sACN
Art-Net+DMX
sACN+DMX
Kling-Net+DMX
Slave
Scenes
Control
DMX
W-DMX
Art-Net
sACN
Art-Net+DMX
sACN+DMX
Kling-Net+DMX
Slave
Scenes
Control
DMX
W-DMX
Art-Net
sACN
Art-Net+DMX
sACN+DMX
Kling-Net+DMX
Slave
Scenes
Mode
Slave
(Scene x)
030°C
!
030°C
Mode: Art-Net (sACN)+DMX
Universe:
IP:
Main Address:
Pixel Address:
0
192.168.000.150
001
001
!
030°C
Mode: Kling-Net+DMX
Main Address: 001
!
030°C
Mode: Art-Net (sACN)
Universe:
IP:
DMX Address:
87CH
0
192.168.000.150
001
!
001
87CH
030°C
!
Main Menu
Control
Settings
Info
Service
Quick-Light
Control
DMX
W-DMX
Art-Net
sACN
Art-Net+DMX
sACN+DMX
Kling-Net+DMX
Slave
Scenes
Control
DMX
W-DMX
Art-Net
sACN
Art-Net+DMX
sACN+DMX
Kling-Net+DMX
Slave
Scenes
Control
DMX
W-DMX
Art-Net
sACN
Art-Net+DMX
sACN+DMX
Kling-Net+DMX
Slave
Scenes
Control
DMX
W-DMX
Art-Net
sACN
Art-Net+DMX
sACN+DMX
Kling-Net+DMX
Slave
Scenes
Control
DMX
W-DMX
Art-Net
sACN
Art-Net+DMX
sACN+DMX
Kling-Net+DMX
Slave
Scenes
Control
DMX
W-DMX
Art-Net
sACN
Art-Net+DMX
sACN+DMX
Kling-Net+DMX
Slave
Scenes
Control
DMX
W-DMX
Art-Net
sACN
Art-Net+DMX
sACN+DMX
Kling-Net+DMX
Slave
Scenes
Control
DMX
W-DMX
Art-Net
sACN
Art-Net+DMX
sACN+DMX
Kling-Net+DMX
Slave
Scenes
Control
DMX
W-DMX
Art-Net
sACN
Art-Net+DMX
sACN+DMX
Kling-Net+DMX
Slave
Scenes
Mode
Slave
(Scene x)
030°C
!
030°C
Mode: Art-Net (sACN)+DMX
Universe:
IP:
Main Address:
Pixel Address:
0
192.168.000.150
001
001
!
030°C
Mode: Kling-Net+DMX
Main Address: 001
!
030°C
Mode: Art-Net (sACN)
Universe:
IP:
DMX Address:
87CH
0
192.168.000.150
001
!
001
87CH
030°C
!
OPERATION VIA ART-NET AND DMX
The operating mode Art-Net+DMX offers the possibility of controlling the LEDs and the head movement separately via Art-Net and DMX.
Here it is possible to select whether the LEDs are controlled via Art-Net and the head movement is controlled via DMX, or vice versa. Select-
ing this mode automatically activates the 87-channel DMX mode.
Starting from the main display, press the rotary-push encoder to enter the main menu. Select the Control menu by turning the encoder and
pressing the encoder. Turn the encoder to select Art-Net+DMX from the menu and confirm again by pressing the encoder. Information on
the sub-menu items in the Art-Net+DMX menu and the corresponding setting options can be found in the table below.
Art-Net + DMX
Select by turning the encoder, confirm by pressing, change value or status by turning, confirm by pressing. Return with .
Address Setting the DMX start addresses Main and Pixel
Main Address 001–502
Pixel Address 001–437
Signal Selecting the control signal for Pixel Control
Art-Net > Pixel
DMX > Pixel
Pixel Control Main Address with Master Dimmer (Yes) or without Master Dimmer (No)
Master Dimmer
Yes
No
RGB or RGBW Pixel Control Pixel Mode
RGB
RGBW
Network Settings Network settings:
IP address: 1. Set block, confirm, Set 2nd block, confirm ...
Subnet mask: 1. Set block, confirm, Set 2nd block, confirm ...
IP Address xxx.xxx.xxx.xxx
Subnet Mask xxx.xxx.xxx.xxx
Select universe and universe group Universe 000–254
Universe Group 000–127
DMX settings DMX control via XLR cable (XLR Only) or W-DMX (Wireless Only). If “XLR
First” is selected, W-DMX serves as backup; if “Wireless First” is selected,
control via XLR cable serves as backup.
Receive mode
XLR Only
XLR First
Wireless First
Wireless Only
Reset = Terminate the connection to all W-DMX devices and put them on
pairing standby.
Connect
Reset

14
DMX
ITALIANO
POLSKI
ESPAÑOL
FRANCAIS
DEUTSCHENGLISH
Main Menu
Control
Settings
Info
Service
Quick-Light
Control
DMX
W-DMX
Art-Net
sACN
Art-Net+DMX
sACN+DMX
Kling-Net+DMX
Slave
Scenes
Control
DMX
W-DMX
Art-Net
sACN
Art-Net+DMX
sACN+DMX
Kling-Net+DMX
Slave
Scenes
Control
DMX
W-DMX
Art-Net
sACN
Art-Net+DMX
sACN+DMX
Kling-Net+DMX
Slave
Scenes
Control
DMX
W-DMX
Art-Net
sACN
Art-Net+DMX
sACN+DMX
Kling-Net+DMX
Slave
Scenes
Control
DMX
W-DMX
Art-Net
sACN
Art-Net+DMX
sACN+DMX
Kling-Net+DMX
Slave
Scenes
Control
DMX
W-DMX
Art-Net
sACN
Art-Net+DMX
sACN+DMX
Kling-Net+DMX
Slave
Scenes
Control
DMX
W-DMX
Art-Net
sACN
Art-Net+DMX
sACN+DMX
Kling-Net+DMX
Slave
Scenes
Control
DMX
W-DMX
Art-Net
sACN
Art-Net+DMX
sACN+DMX
Kling-Net+DMX
Slave
Scenes
Control
DMX
W-DMX
Art-Net
sACN
Art-Net+DMX
sACN+DMX
Kling-Net+DMX
Slave
Scenes
Mode
Slave
(Scene x)
030°C
!
030°C
Mode: Art-Net (sACN)+DMX
Universe:
IP:
Main Address:
Pixel Address:
0
192.168.000.150
001
001
!
030°C
Mode: Kling-Net+DMX
Main Address: 001
!
030°C
Mode: Art-Net (sACN)
Universe:
IP:
DMX Address:
87CH
0
192.168.000.150
001
!
001
87CH
030°C
!
OPERATION VIA SACN AND DMX
The operating mode sACN+DMX offers the possibility of controlling the LEDs and the head movement separately via sACN and DMX. Here
it is possible to select whether the LEDs are controlled via sACN and the head movement is controlled via DMX, or vice versa. Selecting this
mode automatically activates the 87-channel DMX mode.
Starting from the main display, press the rotary-push encoder to enter the main menu. Select the Control menu by turning the encoder and
pressing the encoder. Turn the encoder to select sACN+DMX from the menu and confirm again by pressing the encoder. Information on the
sub-menu items in sACN+DMX menu and the corresponding setting options can be found in the table below.
sACN + DMX
Select by turning the encoder, confirm by pressing, change value or status by turning, confirm by pressing. Return with .
Address Setting the DMX start addresses Main and Pixel
Main Address 001–502
Pixel Address 001–437
Signal Selecting the control signal for Pixel Control
sACN > Pixel
DMX > Pixel
Pixel Control Main Address with Master Dimmer (Yes) or without Master Dimmer (No)
Master Dimmer
Yes
No
RGB or RGBW Pixel Control Pixel Mode
RGB
RGBW
Network Settings Network settings:
IP address: 1. Set block, confirm, Set 2nd block, confirm ...
Subnet mask: 1. Set block, confirm, Set 2nd block, confirm ...
IP Address xxx.xxx.xxx.xxx
Subnet Mask xxx.xxx.xxx.xxx
Select universe and universe group Universe 000–254
Universe Group 000–127
DMX settings DMX control via XLR cable (XLR Only) or W-DMX (Wireless Only). If “XLR
First” is selected, W-DMX serves as backup; if “Wireless First” is selected,
control via XLR cable serves as backup.
Receive mode
XLR Only
XLR First
Wireless First
Wireless Only
Reset = Terminate the connection to all W-DMX devices and put them on
pairing standby.
Connect
Reset

15
DMX DEUTSCHFRANCAIS
ESPAÑOL ENGLISH
ITALIANO POLSKI
Main Menu
Control
Settings
Info
Service
Quick-Light
Control
DMX
W-DMX
Art-Net
sACN
Art-Net+DMX
sACN+DMX
Kling-Net+DMX
Slave
Scenes
Control
DMX
W-DMX
Art-Net
sACN
Art-Net+DMX
sACN+DMX
Kling-Net+DMX
Slave
Scenes
Control
DMX
W-DMX
Art-Net
sACN
Art-Net+DMX
sACN+DMX
Kling-Net+DMX
Slave
Scenes
Control
DMX
W-DMX
Art-Net
sACN
Art-Net+DMX
sACN+DMX
Kling-Net+DMX
Slave
Scenes
Control
DMX
W-DMX
Art-Net
sACN
Art-Net+DMX
sACN+DMX
Kling-Net+DMX
Slave
Scenes
Control
DMX
W-DMX
Art-Net
sACN
Art-Net+DMX
sACN+DMX
Kling-Net+DMX
Slave
Scenes
Control
DMX
W-DMX
Art-Net
sACN
Art-Net+DMX
sACN+DMX
Kling-Net+DMX
Slave
Scenes
Control
DMX
W-DMX
Art-Net
sACN
Art-Net+DMX
sACN+DMX
Kling-Net+DMX
Slave
Scenes
Control
DMX
W-DMX
Art-Net
sACN
Art-Net+DMX
sACN+DMX
Kling-Net+DMX
Slave
Scenes
Mode
Slave
(Scene x)
030°C
!
030°C
Mode: Art-Net (sACN)+DMX
Universe:
IP:
Main Address:
Pixel Address:
0
192.168.000.150
001
001
!
030°C
Mode: Kling-Net+DMX
Main Address: 001
!
030°C
Mode: Art-Net (sACN)
Universe:
IP:
DMX Address:
87CH
0
192.168.000.150
001
!
001
87CH
030°C
!
Main Menu
Control
Settings
Info
Service
Quick-Light
Control
DMX
W-DMX
Art-Net
sACN
Art-Net+DMX
sACN+DMX
Kling-Net+DMX
Slave
Scenes
Control
DMX
W-DMX
Art-Net
sACN
Art-Net+DMX
sACN+DMX
Kling-Net+DMX
Slave
Scenes
Control
DMX
W-DMX
Art-Net
sACN
Art-Net+DMX
sACN+DMX
Kling-Net+DMX
Slave
Scenes
Control
DMX
W-DMX
Art-Net
sACN
Art-Net+DMX
sACN+DMX
Kling-Net+DMX
Slave
Scenes
Control
DMX
W-DMX
Art-Net
sACN
Art-Net+DMX
sACN+DMX
Kling-Net+DMX
Slave
Scenes
Control
DMX
W-DMX
Art-Net
sACN
Art-Net+DMX
sACN+DMX
Kling-Net+DMX
Slave
Scenes
Control
DMX
W-DMX
Art-Net
sACN
Art-Net+DMX
sACN+DMX
Kling-Net+DMX
Slave
Scenes
Control
DMX
W-DMX
Art-Net
sACN
Art-Net+DMX
sACN+DMX
Kling-Net+DMX
Slave
Scenes
Control
DMX
W-DMX
Art-Net
sACN
Art-Net+DMX
sACN+DMX
Kling-Net+DMX
Slave
Scenes
Mode
Slave
(Scene x)
030°C
!
030°C
Mode: Art-Net (sACN)+DMX
Universe:
IP:
Main Address:
Pixel Address:
0
192.168.000.150
001
001
!
030°C
Mode: Kling-Net+DMX
Main Address: 001
!
030°C
Mode: Art-Net (sACN)
Universe:
IP:
DMX Address:
87CH
0
192.168.000.150
001
!
001
87CH
030°C
!
OPERATION VIA KLING-NET AND DMX
The operating mode Kling-Net+DMX offers the possibility of controlling the LEDs via Kling-Net and the head movement separately via DMX.
Selecting this mode automatically activates the 87-channel DMX mode.
Starting from the main display, press the rotary-push encoder to enter the main menu. Select the Control menu by turning the encoder and
pressing the encoder. Turn the encoder to select Kling-Net+DMX from the menu and confirm again by pressing the encoder. Information on
the sub-menu items in the Kling-Net+DMX menu and the corresponding setting options can be found in the table below.
Kling-Net + DMX
Select by turning the encoder, confirm by pressing, change value or status by turning, confirm by pressing. Return with .
Address Setting the DMX start address
Main Address 001–502
Pixel Control RGB or RGBW Pixel Control
Pixel Mode
RGB
RGBW
DMX settings DMX control via XLR cable (XLR Only) or W-DMX (Wireless Only). If “XLR
First” is selected, W-DMX serves as backup; if “Wireless First” is selected,
control via XLR cable serves as backup.
Receive mode
XLR Only
XLR First
Wireless First
Wireless Only
Reset = Terminate the connection to all W-DMX devices and put them on
pairing standby.
Connect
Reset

16
DMX
ITALIANO
POLSKI
ESPAÑOL
FRANCAIS
DEUTSCHENGLISH
Main Menu
Control
Settings
Info
Service
Quick-Light
Control
DMX
W-DMX
Art-Net
sACN
Art-Net+DMX
sACN+DMX
Kling-Net+DMX
Slave
Scenes
Control
DMX
W-DMX
Art-Net
sACN
Art-Net+DMX
sACN+DMX
Kling-Net+DMX
Slave
Scenes
Control
DMX
W-DMX
Art-Net
sACN
Art-Net+DMX
sACN+DMX
Kling-Net+DMX
Slave
Scenes
Control
DMX
W-DMX
Art-Net
sACN
Art-Net+DMX
sACN+DMX
Kling-Net+DMX
Slave
Scenes
Control
DMX
W-DMX
Art-Net
sACN
Art-Net+DMX
sACN+DMX
Kling-Net+DMX
Slave
Scenes
Control
DMX
W-DMX
Art-Net
sACN
Art-Net+DMX
sACN+DMX
Kling-Net+DMX
Slave
Scenes
Control
DMX
W-DMX
Art-Net
sACN
Art-Net+DMX
sACN+DMX
Kling-Net+DMX
Slave
Scenes
Control
DMX
W-DMX
Art-Net
sACN
Art-Net+DMX
sACN+DMX
Kling-Net+DMX
Slave
Scenes
Control
DMX
W-DMX
Art-Net
sACN
Art-Net+DMX
sACN+DMX
Kling-Net+DMX
Slave
Scenes
Mode
Slave
(Scene x)
030°C
!
030°C
Mode: Art-Net (sACN)+DMX
Universe:
IP:
Main Address:
Pixel Address:
0
192.168.000.150
001
001
!
030°C
Mode: Kling-Net+DMX
Main Address: 001
!
030°C
Mode: Art-Net (sACN)
Universe:
IP:
DMX Address:
87CH
0
192.168.000.150
001
!
001
87CH
030°C
!
Main Menu
Control
Settings
Info
Service
Quick-Light
Control
DMX
W-DMX
Art-Net
sACN
Art-Net+DMX
sACN+DMX
Kling-Net+DMX
Slave
Scenes
Control
DMX
W-DMX
Art-Net
sACN
Art-Net+DMX
sACN+DMX
Kling-Net+DMX
Slave
Scenes
Control
DMX
W-DMX
Art-Net
sACN
Art-Net+DMX
sACN+DMX
Kling-Net+DMX
Slave
Scenes
Control
DMX
W-DMX
Art-Net
sACN
Art-Net+DMX
sACN+DMX
Kling-Net+DMX
Slave
Scenes
Control
DMX
W-DMX
Art-Net
sACN
Art-Net+DMX
sACN+DMX
Kling-Net+DMX
Slave
Scenes
Control
DMX
W-DMX
Art-Net
sACN
Art-Net+DMX
sACN+DMX
Kling-Net+DMX
Slave
Scenes
Control
DMX
W-DMX
Art-Net
sACN
Art-Net+DMX
sACN+DMX
Kling-Net+DMX
Slave
Scenes
Control
DMX
W-DMX
Art-Net
sACN
Art-Net+DMX
sACN+DMX
Kling-Net+DMX
Slave
Scenes
Control
DMX
W-DMX
Art-Net
sACN
Art-Net+DMX
sACN+DMX
Kling-Net+DMX
Slave
Scenes
Mode
Slave
(Scene x)
030°C
!
030°C
Mode: Art-Net (sACN)+DMX
Universe:
IP:
Main Address:
Pixel Address:
0
192.168.000.150
001
001
!
030°C
Mode: Kling-Net+DMX
Main Address: 001
!
030°C
Mode: Art-Net (sACN)
Universe:
IP:
DMX Address:
87CH
0
192.168.000.150
001
!
001
87CH
030°C
!
SLAVE MODE (Slave)
Starting from the main display, press the rotary-push encoder to enter the main menu. Select the Control menu by turning the encoder and
pressing the encoder. Turn the encoder to select Slave and press the encoder again to confirm. Information on the sub-menu items in the
Slave menu and the corresponding setting options can be found in the table below. Connect the slave and the master unit (same model,
same software version) with a DMX cable (Master DMX OUT – Slave DMX IN) or via W-DMX and enable the standalone mode Scenes on the
master unit. The slave unit will now follow the master unit.
Slave
Select by turning the encoder, confirm by pressing, change value or status by turning, confirm by pressing. Return with .
Input Settings DMX control via XLR cable (XLR Only) or W-DMX (Wireless Only). If “XLR
First” is selected, W-DMX serves as backup; if “Wireless First” is selected,
control via XLR cable serves as backup.
Receive mode
XLR Only
XLR First
Wireless First
Wireless Only
Reset = Terminate the connection to all W-DMX devices and put them on
pairing standby.
Connect
Reset

17
DMX DEUTSCHFRANCAIS
ESPAÑOL ENGLISH
ITALIANO POLSKI
Main Menu
Control
Settings
Info
Service
Quick-Light
Control
DMX
W-DMX
Art-Net
sACN
Art-Net+DMX
sACN+DMX
Kling-Net+DMX
Slave
Scenes
Control
DMX
W-DMX
Art-Net
sACN
Art-Net+DMX
sACN+DMX
Kling-Net+DMX
Slave
Scenes
Control
DMX
W-DMX
Art-Net
sACN
Art-Net+DMX
sACN+DMX
Kling-Net+DMX
Slave
Scenes
Control
DMX
W-DMX
Art-Net
sACN
Art-Net+DMX
sACN+DMX
Kling-Net+DMX
Slave
Scenes
Control
DMX
W-DMX
Art-Net
sACN
Art-Net+DMX
sACN+DMX
Kling-Net+DMX
Slave
Scenes
Control
DMX
W-DMX
Art-Net
sACN
Art-Net+DMX
sACN+DMX
Kling-Net+DMX
Slave
Scenes
Control
DMX
W-DMX
Art-Net
sACN
Art-Net+DMX
sACN+DMX
Kling-Net+DMX
Slave
Scenes
Control
DMX
W-DMX
Art-Net
sACN
Art-Net+DMX
sACN+DMX
Kling-Net+DMX
Slave
Scenes
Control
DMX
W-DMX
Art-Net
sACN
Art-Net+DMX
sACN+DMX
Kling-Net+DMX
Slave
Scenes
Mode
Slave
(Scene x)
030°C
!
030°C
Mode: Art-Net (sACN)+DMX
Universe:
IP:
Main Address:
Pixel Address:
0
192.168.000.150
001
001
!
030°C
Mode: Kling-Net+DMX
Main Address: 001
!
030°C
Mode: Art-Net (sACN)
Universe:
IP:
DMX Address:
87CH
0
192.168.000.150
001
!
001
87CH
030°C
!
Main Menu
Control
Settings
Info
Service
Quick-Light
Control
DMX
W-DMX
Art-Net
sACN
Art-Net+DMX
sACN+DMX
Kling-Net+DMX
Slave
Scenes
Control
DMX
W-DMX
Art-Net
sACN
Art-Net+DMX
sACN+DMX
Kling-Net+DMX
Slave
Scenes
Control
DMX
W-DMX
Art-Net
sACN
Art-Net+DMX
sACN+DMX
Kling-Net+DMX
Slave
Scenes
Control
DMX
W-DMX
Art-Net
sACN
Art-Net+DMX
sACN+DMX
Kling-Net+DMX
Slave
Scenes
Control
DMX
W-DMX
Art-Net
sACN
Art-Net+DMX
sACN+DMX
Kling-Net+DMX
Slave
Scenes
Control
DMX
W-DMX
Art-Net
sACN
Art-Net+DMX
sACN+DMX
Kling-Net+DMX
Slave
Scenes
Control
DMX
W-DMX
Art-Net
sACN
Art-Net+DMX
sACN+DMX
Kling-Net+DMX
Slave
Scenes
Control
DMX
W-DMX
Art-Net
sACN
Art-Net+DMX
sACN+DMX
Kling-Net+DMX
Slave
Scenes
Control
DMX
W-DMX
Art-Net
sACN
Art-Net+DMX
sACN+DMX
Kling-Net+DMX
Slave
Scenes
Mode
Slave
(Scene x)
030°C
!
030°C
Mode: Art-Net (sACN)+DMX
Universe:
IP:
Main Address:
Pixel Address:
0
192.168.000.150
001
001
!
030°C
Mode: Kling-Net+DMX
Main Address: 001
!
030°C
Mode: Art-Net (sACN)
Universe:
IP:
DMX Address:
87CH
0
192.168.000.150
001
!
001
87CH
030°C
!
STANDALONE OPERATION (Scenes)
Similar to when using a DMX control unit, the standalone operating mode Scenes makes it possible to set pan, tilt, dimmer, RGBW, zoom,
pan/tilt macros etc. directly on the device with values from 000 to 255. A total of 8 individual scenes (Scene 1–8) can be created, edited,
saved and recalled. Starting from the main display, press the rotary-push encoder to enter the main menu. Select the Control menu by
turning the encoder and pressing the encoder. Turn the encoder to select Scenes and press the encoder again to confirm. Information on
the sub-menu items in the Scenes menu and the corresponding setting options can be found in the tables Scenes and Edit Scene below.
Scenes
Select by turning the encoder, confirm by pressing, change value or status by turning, confirm by pressing. Return with .
Run Scene Start scene
Scene 1–8
Record Scene Record a scene from an external controller
Scene 1–8
Edit Scene Edit scene (see table Edit Scene)
Scene 1–8
Master/Alone Output scene as control signal to a slave unit via XLR,
Wireless or XLR and Wireless
Master
XLR
Wireless Send mode
G3
G4s
Connect
Link
Unlink
XLR+Wireless Send mode
G3
G4s
Connect
Link
Unlink
Output Scene as control signal (Stand Alone No)
Do not output Scene as control signal (Stand Alone Yes)
Stand Alone
No
Yes
Copy to Slave Transfer scenes 1 to 8 via XLR cable to one or more slave
units (same model, same software version). Carry out
procedure with Yes. The scene memory of the slave units
is overwritten. Cancel the operation with No.
No
Yes

18
DMX
ITALIANO
POLSKI
ESPAÑOL
FRANCAIS
DEUTSCHENGLISH
Edit Scene
Pan 000 – 255 0% -> 100%
Tilt 000 – 255 0% -> 100%
Dimmer 000 – 255 Master dimmer 0% -> 100%
Red 000 – 255 0% -> 100%
Green 000 – 255 0% -> 100%
Blue 000 – 255 0% -> 100%
White 000 – 255 0% -> 100%
Zoom 000 – 255 Narrow -> wide
Pixel Pattern 000 – 005 Off
006 – 010 Pattern 1 (4 Dots CW)
011 – 015 Pattern 2 (Circle 2-Step in > out)
016 – 020 Pattern 3 (Circle 2-Step Color Change in > out)
021 – 025 Pattern 4 (Clock Hand – CW)
026 – 030 Pattern 5 (Ventilator – CW)
031 – 035 Pattern 6 (Bow Runs Left >)
036 – 040 Pattern 7 (Bow Runs Down >)
041 – 045 Pattern 8 (3-Line to 2-Line)
046 – 050 Pattern 9 (Diamond Change)
051 – 055 Pattern 10 (Small Circle 2 Dots Run)
056 – 060 Pattern 11 (Circle 3-Step in > out)
061 – 065 Pattern 12 (2 Dots Running on Outer Circle)
066 – 070 Pattern 13 (2 Dots – running on outer circle)
071 – 075 Pattern 14 Even/Odd
076 – 080 Pattern 15 Random Single Dots Jump
081 – 085 Pattern 16 Random Single Dots Fade
086 – 090 Pattern 17 Raindrop Jump Random
091 – 095 Pattern 18 Raindrop Fade Random
096 – 100 Pattern 19 All Pattern
101 – 255 All LEDs On
Pattern Speed 000 – 005 Pattern Stop
006 – 127 Pattern speed, slow -> fast, forward
128 – 255 Pattern speed, fast -> slow, backward
Pan/Tilt Macro
(starts from current pan/tilt position)
000 – 005 off
006 – 040 Pan, small -> large
041 – 075 Tilt, small -> large
076 – 110 Pan/Tilt, small -> large
111 – 145 Pan/Tilt, inverse small -> large
146 – 180 Circle, small -> large
181 – 215 Circle, inverse small -> large
216 – 255 Random, small -> large
Pan/Tilt Speed 000 – 255 Pan movement speed, fast -> slow

19
DMX DEUTSCHFRANCAIS
ESPAÑOL ENGLISH
ITALIANO POLSKI
Main Menu
Control
Settings
Info
Service
Quick-Light
Main Menu
Control
Settings
Info
Service
Quick-Light
Settings
Display
Signal Fail
Dimmer
Color Calibration
Pan/Tilt Motors
Fan Settings
Auto Lock
Default
Info
Firmware
Temperature
Fan Speed
Runtime
RDM UID, MAC, NET
DMX Values
Error Info
DMX Tables
Main Menu
Control
Settings
Info
Service
Quick-Light
Service
Reset
Test
Password
Main Menu
Control
Settings
Info
Service
Quick-Light
Quick-Light
Pan
Tilt
Dimmer
Hue
Saturation
Color Temperature
Zoom
SYSTEM SETTINGS (settings)
Starting from the main display, press the rotary-push encoder to enter the main menu. Turn the encoder to select the System Settings
menu and press the encoder.
This will take you to the sub-menu for configuring the sub-menu items, see table:
Settings (bold = factory setting)
Select by turning the encoder, confirm by pressing, change value or status by turning, confirm by pressing. Return with .
Display Display settings
Flip
Floor Use No display rotation
Rig Use Display is rotated through 180° (e.g. for overhead
installation)
Off after 1 min.
1 Minute Off Deactivation of display illumination after approx. 1
minute without input
Always On Display lighting permanently on
Intensity 001–010 Display brightness
Contrast 001–010 Display Contrast
Signal Fail Operating status
on control signal
interruption
Hold Latest
Value
Last command is
retained
Run Scene 1 activates Scene 1
Blackout activates blackout

20
DMX
ITALIANO
POLSKI
ESPAÑOL
FRANCAIS
DEUTSCHENGLISH
Dimmer Selection of
dimmer curve,
dimming
behaviour and
PWM frequency
Curve
Linear Light intensity increases linearly with DMX value
Exponential Light intensity can be finely adjusted at lower
DMX values and broadly adjusted at higher DMX
values
Logarithmic Light intensity can be broadly adjusted at lower
DMX values and finely adjusted at higher DMX
values
S-Curve Light intensity can be finely adjusted at lower
and higher DMX values and broadly adjusted at
medium DMX values
Response
LED Response Lamp responds abruptly to changes in DMX value
Halogen Response Spotlight behaves like a halogen spotlight with
soft brightness changes
PWM
800 Hz, 1200 Hz,
2000 Hz, 3600 Hz,
12 kHz, 25 kHz
Color
Calibration
color calibration
User Calibration
Red Balance 125–255 User-defined calibration of R, G, B and W
Green Balance 125–255
Blue Balance 125–255
White Balance 125–255
Raw R, G, B and W with
maximum brightness
The raw mode is always active with pixel control
Factory Cali-
bration
Factory calibration of R,
G, B and W
Pan/Tilt
Motors
Device head
settings
Pan/Tilt Speed 000–255
Pan Reverse
Normal Does not reverse pan direction
Reversed Reverses pan direction
Tilt Reverse
Normal Does not reverse tilt direction
Reversed Reverses tilt direction
Sensors
ON Automatic position correction is enabled
OFF Automatic position correction is disabled
Move In Black
OFF No blackout during head movement
ON Blackout during head movement
Fan Set-
tings
Fan control
Automatic The fan speed is automatically adjusted to the temperature in the device head
Normal Reduced maximum fan speed, resulting in slightly reduced brightness if
necessary
Silent Consistently low fan speed with reduced brightness if necessary
La pagina si sta caricando...
La pagina si sta caricando...
La pagina si sta caricando...
La pagina si sta caricando...
La pagina si sta caricando...
La pagina si sta caricando...
La pagina si sta caricando...
La pagina si sta caricando...
La pagina si sta caricando...
La pagina si sta caricando...
La pagina si sta caricando...
La pagina si sta caricando...
La pagina si sta caricando...
La pagina si sta caricando...
La pagina si sta caricando...
La pagina si sta caricando...
La pagina si sta caricando...
La pagina si sta caricando...
La pagina si sta caricando...
La pagina si sta caricando...
La pagina si sta caricando...
La pagina si sta caricando...
La pagina si sta caricando...
La pagina si sta caricando...
La pagina si sta caricando...
La pagina si sta caricando...
La pagina si sta caricando...
La pagina si sta caricando...
La pagina si sta caricando...
La pagina si sta caricando...
La pagina si sta caricando...
La pagina si sta caricando...
La pagina si sta caricando...
La pagina si sta caricando...
La pagina si sta caricando...
La pagina si sta caricando...
La pagina si sta caricando...
La pagina si sta caricando...
La pagina si sta caricando...
La pagina si sta caricando...
La pagina si sta caricando...
La pagina si sta caricando...
La pagina si sta caricando...
La pagina si sta caricando...
La pagina si sta caricando...
La pagina si sta caricando...
La pagina si sta caricando...
La pagina si sta caricando...
La pagina si sta caricando...
La pagina si sta caricando...
La pagina si sta caricando...
La pagina si sta caricando...
La pagina si sta caricando...
La pagina si sta caricando...
La pagina si sta caricando...
La pagina si sta caricando...
La pagina si sta caricando...
La pagina si sta caricando...
La pagina si sta caricando...
La pagina si sta caricando...
La pagina si sta caricando...
La pagina si sta caricando...
La pagina si sta caricando...
La pagina si sta caricando...
La pagina si sta caricando...
La pagina si sta caricando...
La pagina si sta caricando...
La pagina si sta caricando...
La pagina si sta caricando...
La pagina si sta caricando...
La pagina si sta caricando...
La pagina si sta caricando...
La pagina si sta caricando...
La pagina si sta caricando...
La pagina si sta caricando...
La pagina si sta caricando...
La pagina si sta caricando...
La pagina si sta caricando...
La pagina si sta caricando...
La pagina si sta caricando...
La pagina si sta caricando...
La pagina si sta caricando...
La pagina si sta caricando...
La pagina si sta caricando...
La pagina si sta caricando...
La pagina si sta caricando...
La pagina si sta caricando...
La pagina si sta caricando...
La pagina si sta caricando...
La pagina si sta caricando...
La pagina si sta caricando...
La pagina si sta caricando...
La pagina si sta caricando...
La pagina si sta caricando...
La pagina si sta caricando...
La pagina si sta caricando...
La pagina si sta caricando...
La pagina si sta caricando...
La pagina si sta caricando...
La pagina si sta caricando...
La pagina si sta caricando...
La pagina si sta caricando...
La pagina si sta caricando...
La pagina si sta caricando...
La pagina si sta caricando...
La pagina si sta caricando...
La pagina si sta caricando...
La pagina si sta caricando...
La pagina si sta caricando...
La pagina si sta caricando...
La pagina si sta caricando...
La pagina si sta caricando...
La pagina si sta caricando...
La pagina si sta caricando...
La pagina si sta caricando...
La pagina si sta caricando...
La pagina si sta caricando...
La pagina si sta caricando...
La pagina si sta caricando...
La pagina si sta caricando...
La pagina si sta caricando...
La pagina si sta caricando...
La pagina si sta caricando...
La pagina si sta caricando...
La pagina si sta caricando...
La pagina si sta caricando...
La pagina si sta caricando...
La pagina si sta caricando...
La pagina si sta caricando...
La pagina si sta caricando...
La pagina si sta caricando...
La pagina si sta caricando...
La pagina si sta caricando...
La pagina si sta caricando...
La pagina si sta caricando...
La pagina si sta caricando...
La pagina si sta caricando...
La pagina si sta caricando...
La pagina si sta caricando...
La pagina si sta caricando...
La pagina si sta caricando...
La pagina si sta caricando...
La pagina si sta caricando...
La pagina si sta caricando...
La pagina si sta caricando...
La pagina si sta caricando...
La pagina si sta caricando...
La pagina si sta caricando...
La pagina si sta caricando...
La pagina si sta caricando...
La pagina si sta caricando...
La pagina si sta caricando...
La pagina si sta caricando...
La pagina si sta caricando...
La pagina si sta caricando...
La pagina si sta caricando...
La pagina si sta caricando...
La pagina si sta caricando...
La pagina si sta caricando...
La pagina si sta caricando...
La pagina si sta caricando...
La pagina si sta caricando...
La pagina si sta caricando...
La pagina si sta caricando...
-
 1
1
-
 2
2
-
 3
3
-
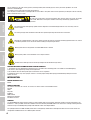 4
4
-
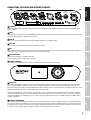 5
5
-
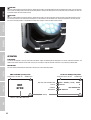 6
6
-
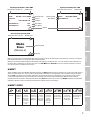 7
7
-
 8
8
-
 9
9
-
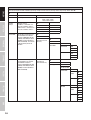 10
10
-
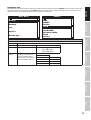 11
11
-
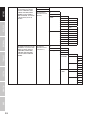 12
12
-
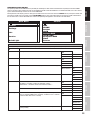 13
13
-
 14
14
-
 15
15
-
 16
16
-
 17
17
-
 18
18
-
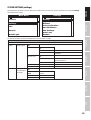 19
19
-
 20
20
-
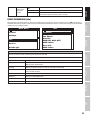 21
21
-
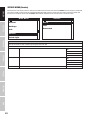 22
22
-
 23
23
-
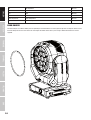 24
24
-
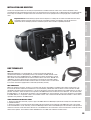 25
25
-
 26
26
-
 27
27
-
 28
28
-
 29
29
-
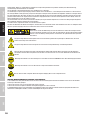 30
30
-
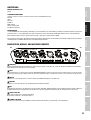 31
31
-
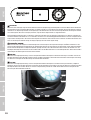 32
32
-
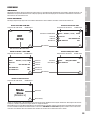 33
33
-
 34
34
-
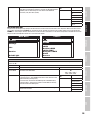 35
35
-
 36
36
-
 37
37
-
 38
38
-
 39
39
-
 40
40
-
 41
41
-
 42
42
-
 43
43
-
 44
44
-
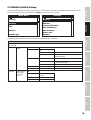 45
45
-
 46
46
-
 47
47
-
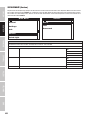 48
48
-
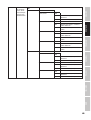 49
49
-
 50
50
-
 51
51
-
 52
52
-
 53
53
-
 54
54
-
 55
55
-
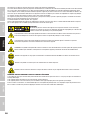 56
56
-
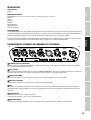 57
57
-
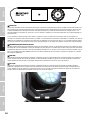 58
58
-
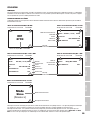 59
59
-
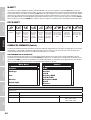 60
60
-
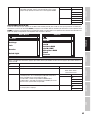 61
61
-
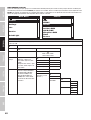 62
62
-
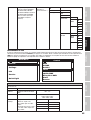 63
63
-
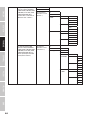 64
64
-
 65
65
-
 66
66
-
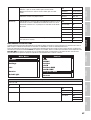 67
67
-
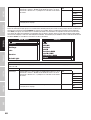 68
68
-
 69
69
-
 70
70
-
 71
71
-
 72
72
-
 73
73
-
 74
74
-
 75
75
-
 76
76
-
 77
77
-
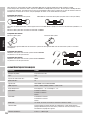 78
78
-
 79
79
-
 80
80
-
 81
81
-
 82
82
-
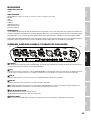 83
83
-
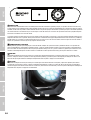 84
84
-
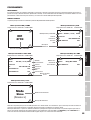 85
85
-
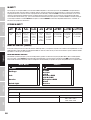 86
86
-
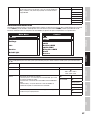 87
87
-
 88
88
-
 89
89
-
 90
90
-
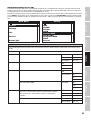 91
91
-
 92
92
-
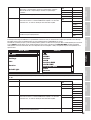 93
93
-
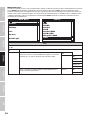 94
94
-
 95
95
-
 96
96
-
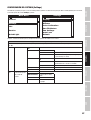 97
97
-
 98
98
-
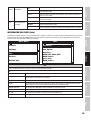 99
99
-
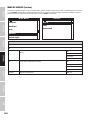 100
100
-
 101
101
-
 102
102
-
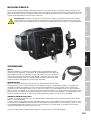 103
103
-
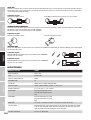 104
104
-
 105
105
-
 106
106
-
 107
107
-
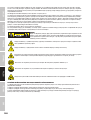 108
108
-
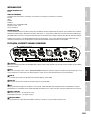 109
109
-
 110
110
-
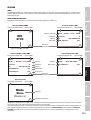 111
111
-
 112
112
-
 113
113
-
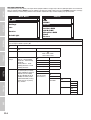 114
114
-
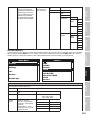 115
115
-
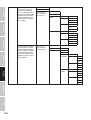 116
116
-
 117
117
-
 118
118
-
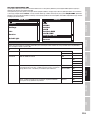 119
119
-
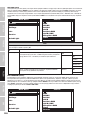 120
120
-
 121
121
-
 122
122
-
 123
123
-
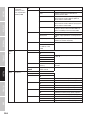 124
124
-
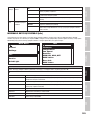 125
125
-
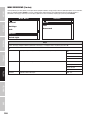 126
126
-
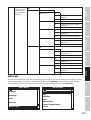 127
127
-
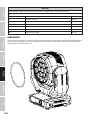 128
128
-
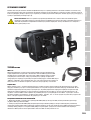 129
129
-
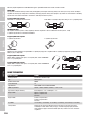 130
130
-
 131
131
-
 132
132
-
 133
133
-
 134
134
-
 135
135
-
 136
136
-
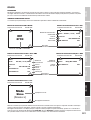 137
137
-
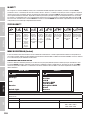 138
138
-
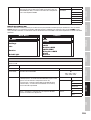 139
139
-
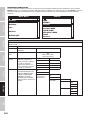 140
140
-
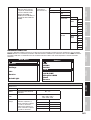 141
141
-
 142
142
-
 143
143
-
 144
144
-
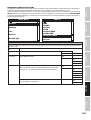 145
145
-
 146
146
-
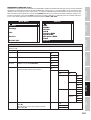 147
147
-
 148
148
-
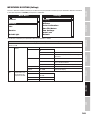 149
149
-
 150
150
-
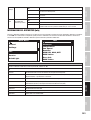 151
151
-
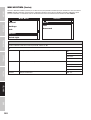 152
152
-
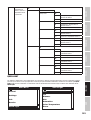 153
153
-
 154
154
-
 155
155
-
 156
156
-
 157
157
-
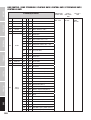 158
158
-
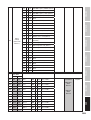 159
159
-
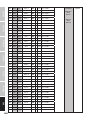 160
160
-
 161
161
-
 162
162
-
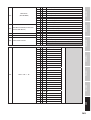 163
163
-
 164
164
-
 165
165
-
 166
166
-
 167
167
-
 168
168
-
 169
169
-
 170
170
-
 171
171
-
 172
172
-
 173
173
-
 174
174
-
 175
175
-
 176
176
-
 177
177
-
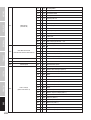 178
178
-
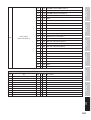 179
179
-
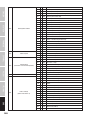 180
180
-
 181
181
-
 182
182
-
 183
183
-
 184
184


in altre lingue
- français: Cameo EVOS® W7 Manuel utilisateur
- español: Cameo EVOS® W7 Manual de usuario
- Deutsch: Cameo EVOS® W7 Benutzerhandbuch
- polski: Cameo EVOS® W7 Instrukcja obsługi
Documenti correlati
-
Cameo EVOS® W7 IP Manuale utente
-
-
-
-
-
-
-
-
-
Altri documenti
-
ProLights DIGIDRIVERIP Manuale utente
-
-
Elation EZ KLING Manuale utente
-
Elation PROTEUS RAYZOR 760 Manuale utente
-
 DTS Synergy 5 Spot Manuale utente
-
-
-
-
-
soundsation 4LEDKIT-DJ Manuale utente
