
LX1750
PJ Network Guide
020-000640-01

PJ Network Manager for Windows
SNMP Manager Software
This is the manual for the PJ Network Manager software.
This software is Windows-compliant, but non-Mac-compliant.
Read this manual thoroughly to operate the PJ Network Manager software.
First, read the user manual of the projector to understand the basic opera-
tion of the projector and the safety instructions.
The safety instructions in the user manual should be followed strictly.
TQBJ0657
ENGLISH
User Manual
020-000640-01 Rev.1 (11-2013)

2
PJ Network Manager for Windows
020-000640-01 Rev.1 (11-2013)
Contents ..................................................................................2
Chapter 1 Introducing ..........................................................3
Introducing ......................................................................................................................................................3
SNMP ...................................................................................................................................................................3
Trademarks .......................................................................................................................................................3
Operating Environment ...........................................................................................................................4
Chapter 2 Set up ....................................................................5
PJ Network Manager installation ........................................................................................................6
PJ Network Manager un-installation ................................................................................................6
Chapter 3 Basic Operation ...................................................7
Launching and quitting PJ Network Manager ...........................................................................8
Name of status window ...........................................................................................................................8
Quitting PJ Network Manager ..............................................................................................................9
Menu tree .........................................................................................................................................................9
What's Target ..................................................................................................................................................9
Name of the button on the tool bar .............................................................................................10
Icon display for the target....................................................................................................................10
Addition of the target ............................................................................................................................11
Editing the target ......................................................................................................................................11
Deletion of the target .............................................................................................................................11
Setting up the warning value ...........................................................................................................12
Starting target monitoring ..................................................................................................................12
What happens when an abnormality or connection error happens? .....................13
What happens when a predefined event occurs on the target equipment? .....13
What is a Trap? ............................................................................................................................................13
Stopping monitoring the target ......................................................................................................14
Displaying all the status information of the target ..............................................................14
Setting the target group ......................................................................................................................14
Setting the password of Telnet .........................................................................................................15
Setting commands batch processing for multiple targets .............................................15
Setting timer for targets ........................................................................................................................16
Setting default information ................................................................................................................17
Customizing the status list ..................................................................................................................19
Viewing the alert information ...........................................................................................................22
Viewing the event log ............................................................................................................................23
Description of Event, Type, Warning column, Warning value ......................................24
About event treatment .........................................................................................................................26
Viewing the command history .........................................................................................................27
Storing the management file ............................................................................................................28
Information saved to the registry ..................................................................................................28
Registering the target information from the defined file at once ..............................29
Format of the defined file ....................................................................................................................30
Example of the defined file .................................................................................................................30
Login to the target equipment ........................................................................................................31
Contents

3
PJ Network Manager for Windows
020-000640-01 Rev.1 (11-2013)
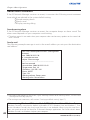
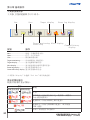
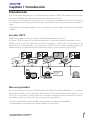
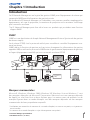
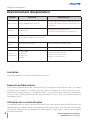
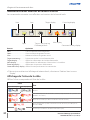
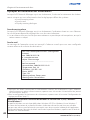
Introducing
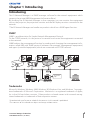
This PJ Network Manager is a SNMP manager software for the network equipment which
supports the private MIB (Management Information Base).
By installing the PJ Network Manager to the computer, you can monitor the equipment
such as the projector, the projection monitor and the flat display monitor connected to the
network.
* The PJ Network Manager can handle our products which has a SNMP agent function.
SNMP
SNMP is an abbreviation for Simple Network Management Protocol.
On the TCP/IP network, it is the protocol to monitor and control the equipment connected
to the network.
SNMP realizes the management function by reading and changing the management infor-
mation called MIB with SNMP protocol between the manager (management equipment)
and agent (controlled equipment) which are connected with TCP/IP network.
Trademarks
Microsoft, Windows, Windows 2000, Windows XP, Windows Vista, and Windows 7 are regis-
tered trademarks of Microsoft Corporation. Macintosh is a registered trademark of Apple,
Inc. in the USA and other countries. Other products or brand names in this manual are reg-
istered trademarks or trademarks of their respective owners.
* Unauthorized use of a part or whole of the contents in this manual is prohibited.
* The contents of this manual are subject to change without notice.
PJ1
PC6
PC4
PJ2
PJ3
PC5
SNMP Manager
Trap
Trap
You received
a trap.
PJ4
Chapter 1 Introducing

4
PJ Network Manager for Windows
020-000640-01 Rev.1 (11-2013)
Operating Environment
Limited condition
The number of agents monitored is up to 200.
Chapter 1 Introducing
Expression/Abbreviation
The OS of the computer and the Web browser described in this manual is Windows 7
Professional and Internet Explorer 9.0. In case of another OS or Web browser, some instruc-
tion procedures may differ from the actual operation depending on your computer envi-
ronment.
Use of this manual
This manual does not provide the description of basic operation and functions for the
computer, web browser, projector and network. For instructions about each piece of
equipment or application software, please refer to the respective manual.
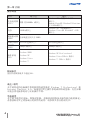
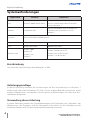
Item Minimum Recommended
CPU Pentium III 400MHz or higher
Pentium 4 2.0GHz or higher for Windows XP
Pentium 4 3.0GHz or higher for Windows Vista
and Windows 7
Memory 128MB or higher
256MB or higher for Windows XP
1GB or higher for Windows Vista and Windows 7
HDD More than 20MB of free disk space
Screen
resolution
SVGA (16 colors or more) XGA True color or more
LAN 10Mbps or more 100Mbps or more
OS
Windows 2000
Windows XP
Windows Vista
Windows 7
Windows XP Professional
Windows Vista (32bit version)
Windows 7 (32bit version)

5
Chapter 2
Set up
2
020-000640-01 Rev.1 (11-2013)

6
PJ Network Manager for Windows
020-000640-01 Rev.1 (11-2013)
Chapter 2 Set up
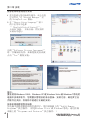
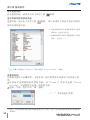
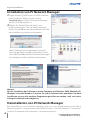
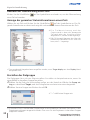
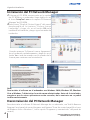
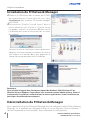
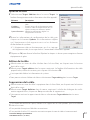
PJ Network Manager installation
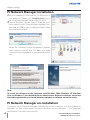
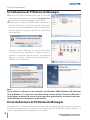
1 Set the supplied CD-ROM into the CD-ROM drive of
your computer. Double click
SetupTool.exe icon in
the "PJ Network Manager" folder of the CD-ROM.
2 Select "[English [United States]" from the pull-
down menu on the "Choose Setup Language" win-
dow and click OK to start installing and then follow
the installation wizards.
When the "Software License Agreement" appears,
read contents carefully and click Yes if you agree
with the license agreement to proceed with install-
ing.
Note:
To install the software on the computer with Windows 2000, Windows XP, Windows
Vista, or Windows 7 you should logon as administrator. Before installation, make sure
that other applications are closed, otherwise proper installation cannot be made.
PJ Network Manager un-installation
To remove the PJ Network Manager software from your computer, use "Add & Remove
Programs" on the control panel. (In case of Windows Vista or Windows 7, use "Programs
and Features" from the control panel.)

7
Chapter 3
Basic Operation
3
020-000640-01 Rev.1 (11-2013)

8
PJ Network Manager for Windows
020-000640-01 Rev.1 (11-2013)
Chapter 3 Basic Operation
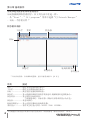
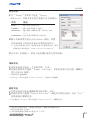
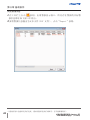
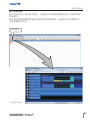
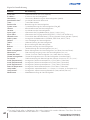
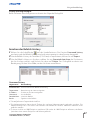
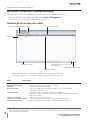
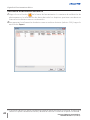
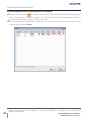
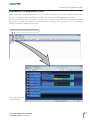
Launching and quitting PJ Network Manager
To launch PJ Network Manager, do one of the following.
- Select "PJ Network Manager" from the menu "Start" - "All programs".
- Double click a management file*
1
.
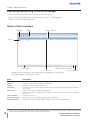
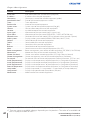
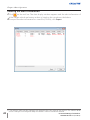
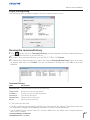
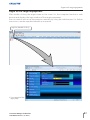
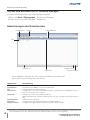
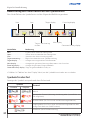
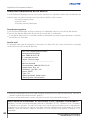
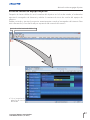
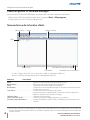
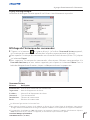
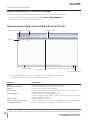
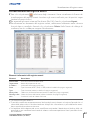
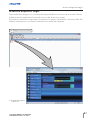
Tool bar
Menu
Status list
Status bar Polling times indication
Event indication
Items Description
Menu .....................................Executes a command with menu selection.
Tool bar ............................... Executes a command assigned to a button.
Target ...................................Network equipment for monitoring.
Status bar ........................... Indicates the status of PJ Network Manager and explaining the command selected
with cursor.
Status list ............................ Indicates the status of targets monitoring.
When some errors are detected, the target name, icon and error items are indicated
with red.
Status column ................ Column of status list.
Polling times indication .........Indicates the times of polling during the monitoring.
Event indication ............Indicates the event (ALERT, TRAP, SYSERR) when the event happened.
Name of status window
Status column
*1 The file in which the Monitor target information and event log information are stored. Refer to item
"Storing the management file" (+p.28) for further details.
* Double clicking the target name launches the web browser and displays
the login window of the target. (+p.31)
Target

9
PJ Network Manager for Windows
020-000640-01 Rev.1 (11-2013)
Quitting PJ Network Manager
Quitting PJ Network Manager
To quit the PJ Network Manager, click the close box on top right of the status window, or
select "Exit" from the "File" menu.
[Note]
* The PJ Network Manager cannot open multiple status windows at the same time.
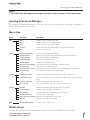
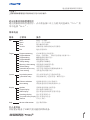
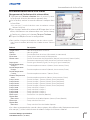
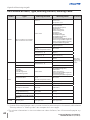
Menu tree
Menu Sub menu Operation
File New Creates a new management file.
Open Opens an existing management file.
Save Saves the active management file.
Save As Saves the active management file with a new file name.
Exit Quits the application.
Target Target monitoring Starts or stops target monitoring.
Target addition Adds a new target. Target information window will appear.
Target editing Edits selected target information.
Target deletion Deletes the selected target.
Group setting Groups the selected targets.
Warning value setting Sets up the warning value of the selected target.
Telnet setting Sets up the password of telnet.
Commands batch processing Sets commands batch processing for multiple selected targets.
Timer setting Sets up the timer for the selected target.
System Target batch registration
Imports target information defined with the external file.
System default setting Sets up the default setting (monitoring information, e-mail informa-
tion).
Column selection Selects display items on the status list.
Font setting Sets up display font type and size on the status list.
Display Update Updates the information on the status list display.
Target display Displays selected target information.
Alert display Displays all of alert information on the status list.
Event log display Displays all the event logs.
Command history display
Displays all of the command history.
Tool bar Switches the tool bar on or off.
Help Version information Displays version of software.
What's Target
Target indicates the network equipment which provides an SNMP agent function.

10
PJ Network Manager for Windows
020-000640-01 Rev.1 (11-2013)
Chapter 3 Basic Operation
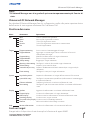
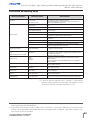
Name of the button on the tool bar
The following commands are assigned to the buttons on the tool bar.
Button Operation
New ..................................................Creates a new management file.
Open ............................................... Opens an existing management file.
Save ................................................. Saves the active management file.
Target monitoring ................. Starts or stops target monitoring.
Target display ........................... Displays selected target information.
Alert display ............................... Displays all of alert information on the status list.
Event log display .................... Displays all the event logs.
Command history display
.. Displays all of the command history.
0 To switch the tool bar display on or off, select "Tool bar" from "Display" menu.
New Save Target display Event log display
Target monitoring
Start/Stop
Open
Alert display
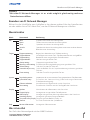
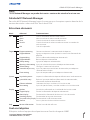
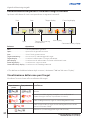
Icon display for the target
Displays icon according to the target condition.
Icon
Condition
Flat display type Projector type
Normal
Abnormal condition (One of the abnormalities, Alert, Trap or System
error is happening on the target.)
Connection error (Target has been disconnected from the network)
Acquisition error (Target has been disconnected from the network, or
does not provide SNMP function.)
Unknown (Target monitoring is not operating)
Command history display

11
PJ Network Manager for Windows
020-000640-01 Rev.1 (11-2013)
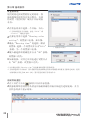
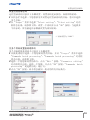
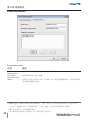
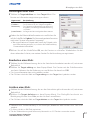
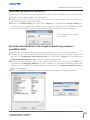
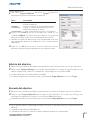
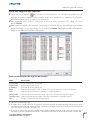
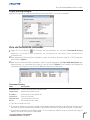
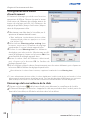
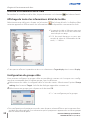
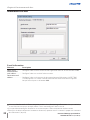
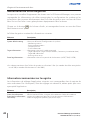
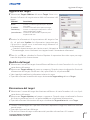
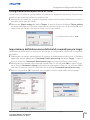
Addition of the target
1 Select Target Addition from Target menu. The target
information registering window appears.
2 Enter target setup information and click Update. The
information set on the target equipment is displayed on
the system information items.
0 When the target equipment is not operating, or it is not the
monitoring equipment, the error dialog "Cannot obtain infor-
mation" will appear.
3 Click OK to close the window. Repeat the above steps to register for other equipment
which is to be managed.
Editing the target
1 To select a target name to edit on the status list, right-click.
2 Select Target editing on the popup menu. In the target information window, edit the
contents, then click OK.
0 The system information cannot be edited.
0 Target editing can be executed by selecting Target editing from Target menu.
Deletion of the target
1 Select a target name to delete on the status list with right-click.
2 Select Target deletion on the popup menu. In the confirmation dialog, click Yes to
delete.
0 Target deletion can be executed by selecting Target deletion from Target menu.
0 It cannot perform the target addition, editing and deletion during the target monitoring.
0 Up to 200 targets can be registered.
0 Up to 255 characters can be used for target name and community.
Items Description
Name ......................... Enter a management name of the target
equipment.
IP address ............... Enter IP address of the target equipment.
Community ........... Enter a community name in the network.
Default name is "public".
System information ..... Displays information set on the network
equipment
Addition of the target

12
PJ Network Manager for Windows
020-000640-01 Rev.1 (11-2013)
Chapter 3 Basic Operation
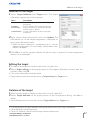
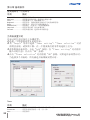
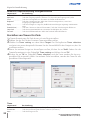
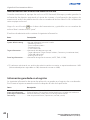
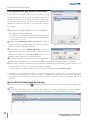
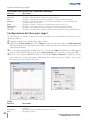
Setting up the warning value
PJ Network Manager provides a function to display
the alert when the use time of the setting item
reaches a specified setting time. The available set-
ting items (use time) depend on the target equip-
ment.
1
Select a target on the status list with right-click.
0 When setting multiple targets together, select tar-
gets by pressing "Shift" or "Control" key.
2 Select Warning value setting on the popup
menu. The setting window will appear as the
right figure.
3 Check Warning time check box. The setting
items are activated. Select a setting item and click
Edit. Another setting window appears.
4 Enter the threshold value of selected item and
then click OK. The setting window will disappear.
5 Set up a warning value for remaining items if avail-
able and then click OK. The setting window will
disappear.
0 To disable the warning value, clear Warning time
check box.
0 When selecting multiple targets, the value set to the lowest target on the status list is displayed as
the current setting time. Up to 99,999 hours can be set for the use time. The warning value is stored
in the management file.
Starting target monitoring
1 Click
on the tool bar to start monitoring the target.
2 PJ Network Manager starts polling the target in sequence from the top of the status list
and displays the results on the status list.
(Example of the set up window)

13
PJ Network Manager for Windows
020-000640-01 Rev.1 (11-2013)
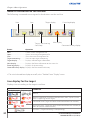
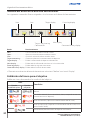
What is a Trap?
Trap is the event predefined by the SNMP agent. If the predefined event ( "When PJ lamp is
off", "When internal PJ power circuit is failed" etc. ) happens, the target sends trap informa-
tion to the SNMP manager.
When happens the alert on the target
What happens when an abnormality or connection error happens?
If an abnormality or connection error happens on the target, PJ Network Manager indicates
target name, icon and status column item with red color to let you know the abnormality.
0 When PJ Network Manager cannot acquire the MIB information of the target equipment, it indi-
cates as Connection Error.
0 The interval of target monitoring is according to the setting of Monitoring interval on System
default setting from System menu.
(+p.17)
0 For the way to give notice of the alert information, refer to Event reception process on System
default setting from System menu.
(+p.17)
What happens when a predefined event occurs on the target
equipment?
During the target monitoring, if the predefined event (trap) happens on the target equip-
ment, the target sends the trap information to PJ Network Manager. This trap information is
displayed on the status list.
The trap information is set up in the SNMP setting items of the target equipment. Projector
has items such as "When PJ lamp is off", "When the life span of lamp is reached", "When
internal PJ power circuit is failed" etc. For further trap information, refer to "SNMP setting" in
the separated network user manual.
0 For the way to give notice of the trap information, refer to Event reception process on System
default setting from System menu.
(+p.17)

14
PJ Network Manager for Windows
020-000640-01 Rev.1 (11-2013)
Chapter 3 Basic Operation
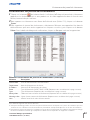
Displaying all the status information of the target
Select a target and click on the tool bar. The following status window appears and dis-
plays all the available status information of the target.
0 The target name and item which have an
abnormality or connection error happen-
ing are indicated with red.
0 When PJ Network Manager cannot
acquire the value of column information,
"---" is displayed.
Stopping monitoring the target
To stop monitoring the target, click again on the tool bar.
0 Projectors with different network passwords cannot be set to the same group. It is necessary
for the projectors in the same group to have the same password.
0 The above procedure can be performed by selecting Target display from Display menu.
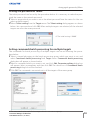
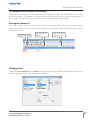
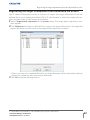
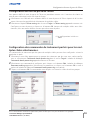
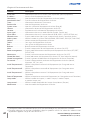
Setting the target group
The target group can be set up by the procedure below. After targets have been grouped,
you can set commands for multiple targets in the same group by batch processing.
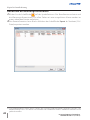
1 Select targets which you want to set from the status list. Select Group setting from
Target menu, the dialog box will appear as in the figure below.
2 Select a group, and then click OK.
0 "---" will not set the group.

15
PJ Network Manager for Windows
020-000640-01 Rev.1 (11-2013)
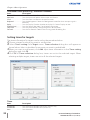
Setting the password of Telnet
The telnet password can be set by the procedure below. It is necessary to make the pass-
word the same as the network password.
1 Select a target which you want to set as the telnet password from the status list. You can
select multiple targets.
2 Select Telnet setting from the Target menu. The Telnet setting dialog appears as shown
below. Set a password and click OK. When multiple targets are selected, all the selected
targets are set as the same password.
Setting up the password of Telnet
0 The initial setting is "0000".
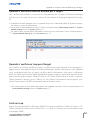
Setting commands batch processing for multiple targets
The commands for batch processing of multiple targets can be set following the proce-
dure below.
1 Select a target belonging to the batch processing group which you want to set, and
select Commands batch processing from Target menu. Commands batch processing
dialog box will appear as shown below.
2 Select a command which you want to set, and click Edit. Parameter editing dialog box
will appear. Select a parameter, and then click OK. The check box of Commands batch
processing dialog box will be checked.
3 Click OK. The commands are carried out to all the targets of the same group.
0 The commands also work for the target which is not set to a group.

16
PJ Network Manager for Windows
020-000640-01 Rev.1 (11-2013)
Chapter 3 Basic Operation
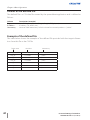
Commands batch processing : Available Command
Items Description
Power ON/OFF ......................... Sets the Power ON or Power OFF.
Input,Source
.............................. Sets the Input and Source. Selects Input and Source.
Screen ....................................... Sets the screen size. Resizes the picture screen.
Background
............................... Sets the background. Selects the background screen for when no input signal is
detected.
Display
........................................ Sets the Display. Decides whether to display On-Screen Displays or not.
Shutter(No show)
.................... Sets the Shutter (No show). Sets black out the image.
Lamp control
............................. Sets the Lamp control. Changes brightness of the screen.
Fan control ................................. Sets the Fan control. Chooses the running speed of cooling fans.
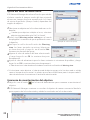
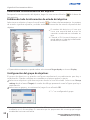
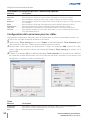
Setting timer for targets
The timer information for targets can be set by the procedure below.
1 Choose a target for which you want to set the timer.
2 Select Timer setting from Target menu. Timer selection dialog box will appear as
shown below. Select a checkbox for an event you want to enable/add.
3 When you want to add events, click Add. Input timer information in the Timer setting
dialog box, and click OK.
4 Click OK of Timer selection dialog box, timers are set to the selected target. When
selecting multiple targets, timers are set to all the selected targets.
Timer
Items Description
Execution date ......................... Sets the Timer execution date. (every day or a day)
Execution time
.......................... Sets the Timer execution time. (hh:mm:ss)
Action ....................................... Sets the events.

17
PJ Network Manager for Windows
020-000640-01 Rev.1 (11-2013)
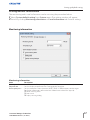
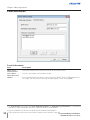
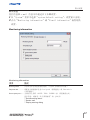
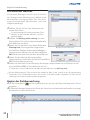
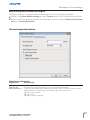
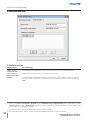
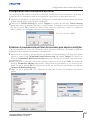
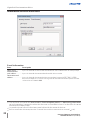
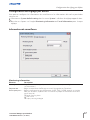
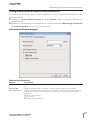
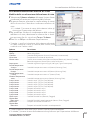
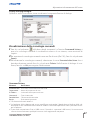
Setting default information
The monitoring and e-mail information can be set using the procedure below.
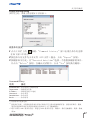
1 Select System default setting from System menu. The setting window will appear.
2 Switch by clicking Monitoring information or E-mail information tab for each setting.
Monitoring information
Items Description
Monitoring interval ................ Sets the interval of the polling in minute unit. (1 to 99 minutes can be set)
Temperature unit
..................... Sets the display temperature unit Centigrade or Fahrenheit.
Event reception process.......... Sets the treatment when the event (ALERT, TRAP, SYSERR) happens on the target.
For further information, refer to the item "About event treatment" (+p.26).
p Sound warning alarm
p Send e-mail
p Display warning dialog
Monitoring information
Setting up default setting

18
PJ Network Manager for Windows
020-000640-01 Rev.1 (11-2013)
Chapter 3 Basic Operation
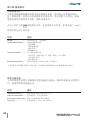
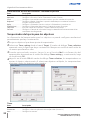
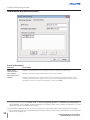
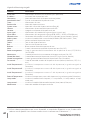
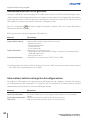
E-mail information
Items Description
SMTP server ..................... Sets the IP address of the SMTP mail server or server host name.
Administrator's
mail address
...................... Set the e-mail address of the administrator.
Destination mail
address ................................ Sets the destination mail address when the event (ALERT, TRAP, SYSERR) happens on
the target. The mail address entering window appears when clicking Add.
E-mail information
0 If Send e-mail check box of Event reception process on Monitoring information is unchecked,
the alert e-mail will not be sent even if you set up the e-mail address.
0 Up to 10 addresses can be set up for the destination mail address.
0 For the contents of the mail, refer to item "About event treatment" (+p.26).

19
PJ Network Manager for Windows
020-000640-01 Rev.1 (11-2013)
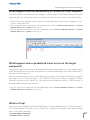
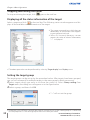
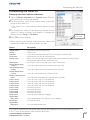
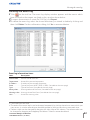
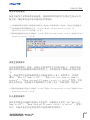
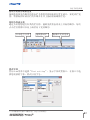
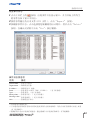
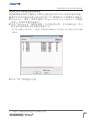
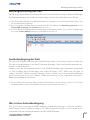
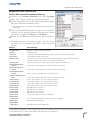
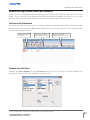
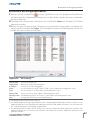
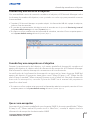
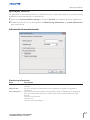
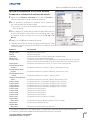
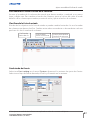
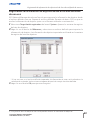
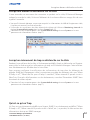
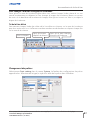
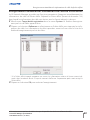
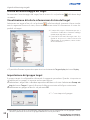
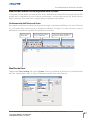
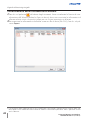
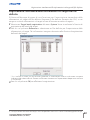
Customizing the status list
Changing the status column indication
1 Select Column selection from System menu. The col-
umn selection window will appear.
2 On the window, check the column name to be indi-
cated on the status list.
0 The mark [*] next to the column name indicates an alert
item.
3 To change the order of the display column on the
status list, select a column you intend to change the
order and click To up or To down.
4 Click OK to close setting.
0
When specifying the column width by numeric value, enter
number (0 to 9999) onto "Column width" text box.
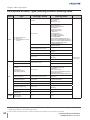
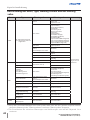
Column Description
*Target name ............................Name of the network equipment
*Group ...........................................Group name
*Connect ......................................Status of connection to the network (Connected, Un-connected)
*Drive time .................................Accumulated use time of the equipment
*Power status ............................ Power status of the equipment (Normal(Power-on), Normal(Standby), Power
Management, Power failure, lamp failure, etc.)
*Input status ..............................Input signal status (Signal, No signal, Signal interrupted)
*Inside Temperature
A status ....................................Status of inside temperature A (Normal, Warning, Error)
*Inside Temperature
B status ....................................Status of inside temperature B (Normal, Warning, Error)
*Inside Temperature
C status ....................................Status of inside temperature C (Normal, Error)
*External Temperature
status.........................................Status of external temperature (Normal, Warning, Error)
*Lamp1 status ..........................Status of Lamp1 (Off, On, Error, Replace)
*Lamp2 status ..........................Status of Lamp2 (Off, On, Error, Replace)
*Lamp3 status ..........................Status of Lamp3 (Off, On, Error, Replace)
*Lamp4 status ..........................Status of Lamp4 (Off, On, Error, Replace)
*Lamp1 time..............................Used time of Lamp1
*Lamp2 time..............................Used time of Lamp2
*Lamp3 time..............................Used time of Lamp3
*Lamp4 time..............................Used time of Lamp4
*Filter status ...............................Status of airfilter (Normal, Clogged)
*Option Box
filter status ............................Status of option box filter (Normal, Error, Clogged)
*Filter time ..................................Use time of airfilter
*Option Box
filter time ................................Use time of option box filter
0
The values in parentheses are typical value and they differ depending on the connected equipment.
0 The [*] next to the column name indicates alert items.
Customizing the status list
Specifies col-
umn width
La pagina si sta caricando...
La pagina si sta caricando...
La pagina si sta caricando...
La pagina si sta caricando...
La pagina si sta caricando...
La pagina si sta caricando...
La pagina si sta caricando...
La pagina si sta caricando...
La pagina si sta caricando...
La pagina si sta caricando...
La pagina si sta caricando...
La pagina si sta caricando...
La pagina si sta caricando...
La pagina si sta caricando...
La pagina si sta caricando...
La pagina si sta caricando...
La pagina si sta caricando...
La pagina si sta caricando...
La pagina si sta caricando...
La pagina si sta caricando...
La pagina si sta caricando...
La pagina si sta caricando...
La pagina si sta caricando...
La pagina si sta caricando...
La pagina si sta caricando...
La pagina si sta caricando...
La pagina si sta caricando...
La pagina si sta caricando...
La pagina si sta caricando...
La pagina si sta caricando...
La pagina si sta caricando...
La pagina si sta caricando...
La pagina si sta caricando...
La pagina si sta caricando...
La pagina si sta caricando...
La pagina si sta caricando...
La pagina si sta caricando...
La pagina si sta caricando...
La pagina si sta caricando...
La pagina si sta caricando...
La pagina si sta caricando...
La pagina si sta caricando...
La pagina si sta caricando...
La pagina si sta caricando...
La pagina si sta caricando...
La pagina si sta caricando...
La pagina si sta caricando...
La pagina si sta caricando...
La pagina si sta caricando...
La pagina si sta caricando...
La pagina si sta caricando...
La pagina si sta caricando...
La pagina si sta caricando...
La pagina si sta caricando...
La pagina si sta caricando...
La pagina si sta caricando...
La pagina si sta caricando...
La pagina si sta caricando...
La pagina si sta caricando...
La pagina si sta caricando...
La pagina si sta caricando...
La pagina si sta caricando...
La pagina si sta caricando...
La pagina si sta caricando...
La pagina si sta caricando...
La pagina si sta caricando...
La pagina si sta caricando...
La pagina si sta caricando...
La pagina si sta caricando...
La pagina si sta caricando...
La pagina si sta caricando...
La pagina si sta caricando...
La pagina si sta caricando...
La pagina si sta caricando...
La pagina si sta caricando...
La pagina si sta caricando...
La pagina si sta caricando...
La pagina si sta caricando...
La pagina si sta caricando...
La pagina si sta caricando...
La pagina si sta caricando...
La pagina si sta caricando...
La pagina si sta caricando...
La pagina si sta caricando...
La pagina si sta caricando...
La pagina si sta caricando...
La pagina si sta caricando...
La pagina si sta caricando...
La pagina si sta caricando...
La pagina si sta caricando...
La pagina si sta caricando...
La pagina si sta caricando...
La pagina si sta caricando...
La pagina si sta caricando...
La pagina si sta caricando...
La pagina si sta caricando...
La pagina si sta caricando...
La pagina si sta caricando...
La pagina si sta caricando...
La pagina si sta caricando...
La pagina si sta caricando...
La pagina si sta caricando...
La pagina si sta caricando...
La pagina si sta caricando...
La pagina si sta caricando...
La pagina si sta caricando...
La pagina si sta caricando...
La pagina si sta caricando...
La pagina si sta caricando...
La pagina si sta caricando...
La pagina si sta caricando...
La pagina si sta caricando...
La pagina si sta caricando...
La pagina si sta caricando...
La pagina si sta caricando...
La pagina si sta caricando...
La pagina si sta caricando...
La pagina si sta caricando...
La pagina si sta caricando...
La pagina si sta caricando...
La pagina si sta caricando...
La pagina si sta caricando...
La pagina si sta caricando...
La pagina si sta caricando...
La pagina si sta caricando...
La pagina si sta caricando...
La pagina si sta caricando...
La pagina si sta caricando...
La pagina si sta caricando...
La pagina si sta caricando...
La pagina si sta caricando...
La pagina si sta caricando...
La pagina si sta caricando...
La pagina si sta caricando...
La pagina si sta caricando...
La pagina si sta caricando...
La pagina si sta caricando...
La pagina si sta caricando...
La pagina si sta caricando...
La pagina si sta caricando...
La pagina si sta caricando...
La pagina si sta caricando...
La pagina si sta caricando...
La pagina si sta caricando...
La pagina si sta caricando...
La pagina si sta caricando...
La pagina si sta caricando...
La pagina si sta caricando...
La pagina si sta caricando...
La pagina si sta caricando...
La pagina si sta caricando...
La pagina si sta caricando...
La pagina si sta caricando...
La pagina si sta caricando...
La pagina si sta caricando...
La pagina si sta caricando...
La pagina si sta caricando...
La pagina si sta caricando...
La pagina si sta caricando...
La pagina si sta caricando...
La pagina si sta caricando...
La pagina si sta caricando...
La pagina si sta caricando...
La pagina si sta caricando...
La pagina si sta caricando...
La pagina si sta caricando...
La pagina si sta caricando...
La pagina si sta caricando...
-
 1
1
-
 2
2
-
 3
3
-
 4
4
-
 5
5
-
 6
6
-
 7
7
-
 8
8
-
 9
9
-
 10
10
-
 11
11
-
 12
12
-
 13
13
-
 14
14
-
 15
15
-
 16
16
-
 17
17
-
 18
18
-
 19
19
-
 20
20
-
 21
21
-
 22
22
-
 23
23
-
 24
24
-
 25
25
-
 26
26
-
 27
27
-
 28
28
-
 29
29
-
 30
30
-
 31
31
-
 32
32
-
 33
33
-
 34
34
-
 35
35
-
 36
36
-
 37
37
-
 38
38
-
 39
39
-
 40
40
-
 41
41
-
 42
42
-
 43
43
-
 44
44
-
 45
45
-
 46
46
-
 47
47
-
 48
48
-
 49
49
-
 50
50
-
 51
51
-
 52
52
-
 53
53
-
 54
54
-
 55
55
-
 56
56
-
 57
57
-
 58
58
-
 59
59
-
 60
60
-
 61
61
-
 62
62
-
 63
63
-
 64
64
-
 65
65
-
 66
66
-
 67
67
-
 68
68
-
 69
69
-
 70
70
-
 71
71
-
 72
72
-
 73
73
-
 74
74
-
 75
75
-
 76
76
-
 77
77
-
 78
78
-
 79
79
-
 80
80
-
 81
81
-
 82
82
-
 83
83
-
 84
84
-
 85
85
-
 86
86
-
 87
87
-
 88
88
-
 89
89
-
 90
90
-
 91
91
-
 92
92
-
 93
93
-
 94
94
-
 95
95
-
 96
96
-
 97
97
-
 98
98
-
 99
99
-
 100
100
-
 101
101
-
 102
102
-
 103
103
-
 104
104
-
 105
105
-
 106
106
-
 107
107
-
 108
108
-
 109
109
-
 110
110
-
 111
111
-
 112
112
-
 113
113
-
 114
114
-
 115
115
-
 116
116
-
 117
117
-
 118
118
-
 119
119
-
 120
120
-
 121
121
-
 122
122
-
 123
123
-
 124
124
-
 125
125
-
 126
126
-
 127
127
-
 128
128
-
 129
129
-
 130
130
-
 131
131
-
 132
132
-
 133
133
-
 134
134
-
 135
135
-
 136
136
-
 137
137
-
 138
138
-
 139
139
-
 140
140
-
 141
141
-
 142
142
-
 143
143
-
 144
144
-
 145
145
-
 146
146
-
 147
147
-
 148
148
-
 149
149
-
 150
150
-
 151
151
-
 152
152
-
 153
153
-
 154
154
-
 155
155
-
 156
156
-
 157
157
-
 158
158
-
 159
159
-
 160
160
-
 161
161
-
 162
162
-
 163
163
-
 164
164
-
 165
165
-
 166
166
-
 167
167
-
 168
168
-
 169
169
-
 170
170
-
 171
171
-
 172
172
-
 173
173
-
 174
174
-
 175
175
-
 176
176
-
 177
177
-
 178
178
-
 179
179
-
 180
180
-
 181
181
-
 182
182
-
 183
183
-
 184
184
-
 185
185
-
 186
186
-
 187
187
-
 188
188


in altre lingue
- English: Christie LX1750 User manual
- français: Christie LX1750 Manuel utilisateur
- español: Christie LX1750 Manual de usuario
- Deutsch: Christie LX1750 Benutzerhandbuch
Documenti correlati
Altri documenti
-
McAfee MANAGEMENT EDITION 2.5 Administrator's Manual
-
Moxa OnCell G3101/G3201 Series Manuale utente
-
-
Yamaha v4 Guida utente
-
Raritan Computer Paragon II Manuale utente
-
Yamaha V3 Guida utente
-
Dell W-Airwave Guida Rapida
-
-
-
WAGO ETHERNET Controller /XTR Manuale utente