APURO CN514-A Manuale utente
- Categoria
- Confezionatrici sottovuoto
- Tipo
- Manuale utente

Model:
CN514-A
Vacuum pack
machine
Instruction manual

2
AU Telephone Helpline: 1300225960
Safety Tips
• Position on a flat, stable surface.
• A service agent/qualified technician should carry out
installation and any repairs if required. Do not remove any
components on this product.
• Consult Local and National Standards to comply with the
following:
- Health and Safety at Work Legislation
- Fire Precautions
- Wiring Regulations
- Building Regulations
• DO NOT immerse the appliance in water.
• The sealing bar becomes hot during use. DO NOT touch the
sealing bar during or immediately after operation.
• Do not turn Off at the plug to halt operation; always use the
Cancel button.
• Do not use the appliance for anything other than its intended
use.
• Only use bags recommended by the supplier/manufacturer
with the appliance.
• Always switch off and disconnect the power supply to the
appliance when not in use.
• Not suitable for outdoor use.
• Keep all packaging away from children. Dispose of the
packaging in accordance to the regulations of local authorities.
• If the power cord is damaged, it must be replaced by an
Apuro agent or a recommended qualified technician in order
to avoid a hazard.
• Apuro recommend that this appliance should be periodically
tested (at least annually) by a Competent Person. Testing
should include, but not be limited to: Visual Inspection,
Polarity Test, Insulation Continuity and Functional Test.

3
AU
Telephone Helpline: 1300225960
• This appliance is not intended for use by persons (including
children) with reduced physical, sensory or mental capabilities,
or lack of experience or knowledge, unless they have been
given supervision or instruction concerning the use of the
appliance by a person responsible for their safety.
• Children should be supervised to ensure that they do not play
with the appliance.
Introduction
Please take a few moments to carefully read through this manual. Correct maintenance and operation of
this machine will provide the best possible performance from your Apuro product.
Pack Contents
The following is included:
• Apuro Vacuum Pack Machine • Instruction manual
Apuro prides itself on quality and service, ensuring that at the time of packaging the contents are
supplied fully functional and free of damage.
Should you find any damage as a result of transit, please contact your Apuro dealer immediately.
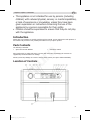
Location of Controls

4
AU Telephone Helpline: 1300225960
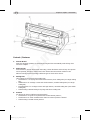
Controls / Features
1. Vacuum & Seal
Starts the automatic operation of vacuuming the bag and then automatically seals the bag when
vacuum is complete.
2. Pulse vacuum
Press this button, and the device starts vacuuming; release the button and it will stop. This process
can be repeated. Then press “manual seal” when desired vacuum has been reached to seal.
Different vacuum pressure according to different types of foods can be chosen.
3. Sealing time
Three settings for choosing the best sealing time:
• Normal button : for dry bags and items without moisture, short sealing time (uses single sealing
bar).
• Middle button: for wet bags or items with a little moisture, extended sealing time (uses single
sealing bar).
• Extended button: for wet bags or items with high moisture, extended sealing time (uses double
sealing bar).
• Default setting is Normal setting for dry bags and shorter sealing time.
4. Pressure
Two buttons for choice of different vacuum pressure:
• Normal button: for goods to be packed under normal vacuum pressure ;
• Gentle button: for soft & crushable items where less vacuum pressure is desired.
• Default setting is normal vacuum pressure.

5
AU
Telephone Helpline: 1300225960
5. Canister
For vacuuming canisters, jar lids, wine stoppers or other accessories through a hose.
6. Manual Seal
This button provides two functions:
• To seal the open end of a bag without vacuuming, i.e. to make a bag from a bag roll
• When the automatic “Vacuum & seal” function is in operation, this button stops the motor pump
and immediately starts to seal the bag so vacuum pressure inside the bag can be controlled by
the operator, to avoid the crushing of delicate items.
7. Hose port
Insert hose for external accessories such as canister and wine stopper.
8. Cancel
Stops the machine when in working mode.
9. Ready Indicators
Shows that the device is on and the lid is closed. If the LED blinks, wait for blinking to stop before
you start next operation.
10. Air intake
Air intake connects with vacuum chamber and pump. Do not cover the intake when placing bag for
vacuum & Seal operation.
11. Vacuum chamber
Position the open end of the bag inside the chamber. Air is drawn out of the bag.
12. Sealing strip
Place the bag to be sealed over this strip. Clean and dry or replace when dirty, distorted or broken.
13. Lower gasket
Clean and dry or replace when dirty, distorted or broken.
14. Upper gasket
Clean and dry or replace when dirty, distorted or broken.
15. Sealing element
Teflon-coated heating element which heats and seals the bag
16. Bag Cutter
17. Front handle
Press down to lock the cover. Pull up to open the cover.
18. LED Indicator
Indicates the status of vacuum or sealing process, and the status of the machine settings.
19. Pressure gauge
Displays vacuum pressure
Operation
The Vacuum Sealer automatically comes on when plugged in.
The Vacuum Sealer is now ready for use.

6
AU Telephone Helpline: 1300225960
Vacuum Packing Food (Automatic Vacuum and Seal)
1. Place the food inside in the bag and remove any excess liquid or food residue.
2. Allow minimum of 25mm-50mm of space at the top of bag to ensure a good seal.
3. Place the open end of the bag across the Sealing Strip, keeping opening within the chamber ring and
close lid. Press down handle, Ready light will illuminate.
4. Select sealing time depending on moisture content of food, select pressure of vacuum depending on
items to be packed
5. For Automatic function press “Vacuum & Seal” button. Indicator light will illuminate.
6. Vacuum pump will engage until required vacuum level is achieved. Machine will automatically go into
seal mode.
7. Manual Seal indicator light will flash as the machine starts to seal.
8. When sealing is complete Vacuum & Seal and manual Seal indicators will switch off. Unlock bag using
handle.
9. Remove bag and inspect bag and seal.
(Note: A good seal will look clear upon inspection. If the seal is spotty, incomplete,
wrinkled, white or milky, remove sealed portion and run vacuum and seal process again.)
10. To abort process, press “Cancel” button. Machine will stop.
Vacuum Packing Food (Using Pulse Function)
1. Place the food inside in the bag and remove any excess liquid or food residue.
2. Allow minimum of 25mm-50mm of space at the top of bag to ensure a good seal.
3. Place the open end of the bag across the Sealing Strip, keeping opening within the chamber ring and
close lid. Press down handle, Ready light will illuminate.
4. Press the Pulse button, vacuuming will start. Release button to stop vacuuming. Repeat until desired
level of Vacuum is achieved.
5. Press Manual Seal button to seal bag
6. Remove bag and inspect bag and seal.
(Note: A good seal will look clear upon inspection. If the seal is spotty, incomplete,
wrinkled, white or milky, remove sealed portion and run vacuum and seal process again.)
7. To abort process, press “Cancel” button. Machine will stop.
Using the “Seal Only” Function
1. Place the open end of the bag across the Sealing Strip, keeping opening within the chamber ring and
close lid. Press down handle, ready light will illuminate.
2. Press the Manual Seal button.
3. Manual Seal Indicator light will illuminate as the machine starts to seal
4. When sealing is complete Manual Seal indicator will switch off. Unlock bag using handle.
5. Remove bag and inspect bag and seal.
(Note: A good seal will look clear upon inspection. If the seal is spotty, incomplete,
wrinkled, white or milky, remove sealed portion and run vacuum and seal process again.)

7
AU
Telephone Helpline: 1300225960
Cleaning, Care & Maintenance
Switch off and disconnect from the power supply before cleaning.
Always allow to cool before cleaning.
WARNING: Do not allow any water to spill into the appliance when cleaning.
• Use warm, soapy water and a damp cloth to clean the appliance.
• Dry thoroughly after cleaning.
• An Apuro dealer or qualified technician should carry out repairs if required.
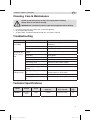
Troubleshooting
Fault Probable Cause Solution
The appliance is
not working
The unit is not switched on Check the unit is plugged in correctly and
switched on
Plug or lead is damaged Call Apuro agent or qualified Technician
Power supply Check power supply
Appliance does
not remove all
the air from the
bag
Open end of bag not completely
inserted
Open lid and reposition bag
Gaskets dirty Clean gaskets
Open end of bag is dirty Clean bag
Bag may be punctured Replace bag
Incorrect bags used Call Vacuum Pack machine supplier
Suction nozzle blocked Clear suction nozzle
Lid is not locked into position
correctly
Ensure lid is locked in position correctly
Bags are not
sealing correctly
Moisture in bag under the sealing
bar
Ensure inside of the bag is dry and free from
moisture where it is to be sealed
Incorrect bags used Call Vacuum Pack machine supplier
End of bag not placed above sealing
bar
Move end of bag over sealing bar
Technical Specifications
Model Voltage Power Vacuum Pressure
(approx.)
Dimensions
h x w x d mm
Weight
(kg)
CN514-A 220-240V~
50Hz
130W -0.90Bar 125 x 400 x 265 3.5

8
AU Telephone Helpline: 1300225960
Electrical Wiring
The plug is to be connected to a suitable mains socket.
This appliance is wired as follows:
• Live wire (coloured brown) to terminal marked L
• Neutral wire (coloured blue) to terminal marked N
If in doubt consult a qualified electrician.
Electrical isolation points must be kept clear of any obstructions. In the event of any emergency
disconnection being required they must be readily accessible.
Compliance
The product must not be disposed of as household waste. To help prevent possible harm to human
health and/or the environment, the product must be disposed of in an approved and environmentally safe
recycling process. For further information on how to dispose of this product correctly, contact the product
supplier, or the local authority responsible for waste disposal in your area.
Apuro parts have undergone strict product testing in order to comply with regulatory
standards and specifications set by international, independent, and federal authorities.
Apuro products have been approved to carry the following symbol:
All rights reserved. No part of these instructions may be produced or transmitted in any form or by any means, electronic,
mechanical, photocopying, recording or otherwise, without the prior written permission of Apuro.
Every effort is made to ensure all details are correct at the time of going to press, however, Apuro reserve the right to
change specifications without notice.

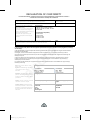
DECLARATION OF CONFORMITY
• Conformiteitsverklaring • Déclaration de conformité • Konformitätserklärung • Dichiarazione di conformità •
• Declaración de conformidad • Declaração de conformidade
Equipment Type • Uitrustingstype • Type d'équipement • Gerätetyp
• Tipo di apparecchiatura • Tipo de equipo • Tipo de equipamento
Model • Modèle • Modell • Modello
• Modelo • Malli
Vacuum Pack Machine Stainless Steel 30CM
CN514-A
Application of Territory Legislation &
Council Directives(s)
Toepassing van Europese Richtlijn(en) •
Application de la/des directive(s) du
Conseil • Anwendbare EU-Richtlinie(n) •
Applicazione delle Direttive
• Aplicación de la(s) directiva(s) del
consejo • Aplicação de directiva(s) do
Conselho
Electrical safety
IEC 60335-1:2010 +A1:2013 +A2:2016
IEC 60335-2-45:2002 +A1:2008 +A2:2011
EN 62233:2008
Electro-Magnetic Compatibility
EN 55014-1:2017
EN 55014-2:2015
EN 61000-3-2:2014
EN 61000-3-3:2013
Producer Name • Naam fabrikant • Nom du producteur • Name des Herstellers
• Nome del produttore • Nombre del fabricante • Nome do fabricante
Apuro
I, the undersigned, hereby declare that the equipment specified above conforms to the above Territory Legislation, Directive(s)
and Standard(s).
Ik, de ondergetekende, verklaar hierbij dat de hierboven gespecificeerde uitrusting goedgekeurd is volgens de bovenstaande
Richtlijn(en) en Standaard(en).
Je soussigné, confirme la conformité de l'équipement cité dans la présente à la / aux Directive(s) et Norme(s) ci-dessus
Ich, der/die Unterzeichnende, erkläre hiermit, dass das oben angegebene Gerät der/den oben angeführten Richtlinie(n) und
Norm(en) entspricht.
Il sottoscritto dichiara che l'apparecchiatura di sopra specificata è conforme alle Direttive e agli Standard sopra riportati.
El abajo firmante declara por la presente que el equipo arriba especificado está en conformidad con la(s) directiva(s) y
estándar(es) arriba mencionadas.
Eu, o abaixo-assinado, declaro que o equipamento anteriormente especificado está em conformidade com a(s) anterior(es)
Directiva(s) e Norma(s)
Date • Data • Date • Datum • Data •
Fecha • Data
30
th
April 2021
Signature • Handtekening • Signature
• Unterschrift Firma • Firma •
Assinatura
Full Name • Volledige naam • Nom et
prénom • Vollständiger Name • Nome
completo • Nombre completo • Nome
por extenso
Ashley Hooper
Josie Holt
Position • Functie • Fonction • Position
• Qualifica • Posición • Função
Technical & Quality Manager
Commercial Manager/ Responsible
Supplier
Producer Address • Adres fabrikant •
Adresse du producteur • Anschrift des
Herstellers • Indirizzo del produttore •
Dirección del fabricante • Morada do
fabricante
Fourth Way,
Avonmouth,
Bristol,
BS11 8TB
United Kingdom
15 Bagdally Road,
Campbelltown
NSW 2560
DocuSign Envelope ID: ABCFC3E3-0B8B-477C-A81C-AF74DAE74898


CN514-A_A5_v2_20210511
-
 1
1
-
 2
2
-
 3
3
-
 4
4
-
 5
5
-
 6
6
-
 7
7
-
 8
8
-
 9
9
-
 10
10
-
 11
11
-
 12
12


APURO CN514-A Manuale utente
- Categoria
- Confezionatrici sottovuoto
- Tipo
- Manuale utente
in altre lingue
- English: APURO CN514-A User manual
Documenti correlati
Altri documenti
-
Buffalo CT014 Manuale del proprietario
-
Buffalo CD969 Manuale del proprietario
-
Buffalo GF439 Manuale del proprietario
-
Polar G604-A Manuale utente
-
Klarstein Food Locker 650 Manuale utente
-
Polar U636-A Manuale utente
-
Solis 574 - Vac Premium Manuale utente
-
Silvercrest SFS 150 B3 Operating Instructions Manual