Roborock Q Revo Manuale utente

Tipo
Manuale utente
Roborock Q Revo
Read this user manual with diagrams carefully before using
this product and store it properly for future reference.
Robotic Vacuum Cleaner User Manual
02
English
English ContentsEnglish 02
Français 13
Deutsch 23
Italiano 33
Español 43
Polski 53
Norsk 63
Svenska 73
03 Safety Information
05 Product Overview
06 Installation
06 Connecting to the App
07 Instructions for Use
09 Routine Maintenance
10 Basic Parameters
11 Common Issues
03
Restrictions
For the purposes of recharging the battery, only use the detachable supply unit roborock EWFD11HRR or EWFD12HRR provided with this
product.
Do not use this product on elevated surfaces without barriers such as the floor of a loft, an open-ended terrace, or on top of furniture.
To prevent blocking the product and to avoid damage to valuables, remove lightweight items (such as plastic bags) and fragile objects (such
as vases) from the floor before cleaning.
Do not use the product to clean hard or sharp objects (such as decoration wastes, glass and nails).
The product must be switched off and the plug must be removed from socket outlet before cleaning or maintaining the product.
If placing the robot into storage, charge it fully and turn it off before placing it in a cool dry place. Recharge it at least every three months to
prevent the battery over discharging.
Do not place any object near the suction inlet of the dock.
Do not put fingers into the seam of the dock to avoid possible injury.
Do not operate the product in a room where an infant or child is sleeping.
Do not carry the robot using vertical bumper, top cover or bumper. Do not move the dock by lifting dock base, water tank handles or dust
container cover.
Make sure the robot is compatible with the dock, otherwise emptying or charging may fail.
Do not use the dock to pick up stones, paper scraps, or other objects that may block the air duct. If the air duct gets blocked, clean it
immediately.
Place the dock on a flat floor away from fire, heat, and water. Avoid narrow spaces or locations where the robot may be suspended in air.
Do not place any object (including children and pets) on the product or dock, or cover it with any item (including dust-proof cover) whether
it is in operation or not.
Do not pick up anything that is burning or smoking, such as cigarettes, matches, or hot ashes.
Do not use the dock to pick up flammable or explosive objects such as fire lighter, gasoline, and toner used in printers or copiers.
Safety Information
WARNING
04
Safety Information
In order to avoid a hazard due to inadvertent resetting of the thermal cut-out, this appliance must not be supplied through an external
switching device, such as a timer, or connected to a circuit that is regularly switched on and off by the utility.
Be sure that the supply voltage meets the requirements listed on the dock.
Only use the power cable provided with the product to prevent potential smoke, heat or fire.
Do not use the product with any type of power adapter, as this may cause danger and void the warranty.
If the dock is placed in an area susceptible to thunderstorms or with unstable voltage, take protection measures.
Unplug the power cable before placing the dock into storage.
Battery and Charging
WARNING
05
Product Overview
A
Press to return to dock/start emptying
Press and hold to start spot cleaning/
wash mop
—Dock
Press and hold to turn the robot on
or off
Press to start cleaning
—Power/Clean
White: Battery level 20%
Red: Battery level < 20%
Pulsing: Charging or starting up
Flashing red: Error
—Power Indicator
A1 Robot (Top View)
Press any button to stop the robot during cleaning
or docking.
Note:
A1-1—Dock Locator
A1-2—Reactive Tech Obstacle Avoidance
Sensor
A2-1—Wall Sensor
A2-2—Omnidirectional Wheel
A2-3—Carpet Sensor
A2-4—Side Brush
A2-5—Main Wheel
A2-6—Main Brush
A2-7—Main Brush Cover Latches
A2-8—Mop Cloths
A2-9—Cliff Sensors
A2 Robot (Bottom View)
A3-1—Vertical Bumper
A3-2—LiDAR Sensor
A3-3—WiFi Indicator
A3-4—Reset Button
A3-5—Dustbin
A3-6—Charging Contacts
A3-7—Mop Wash Sensor
A3-8—Positioning Button
A3-9—Self-Filling Port
A3-10—Automatic Lift and Rotate Mop
Modules
A3-11—Air Outlet
A3-12—Bumper
Off: WiFi disabled
Flashing slowly: Waiting for connection
Flashing quickly: Connecting
Steady: WiFi connected
A3 Robot (Upper Cover Open)
A5 Mop Cloth
A6-1—Dustbin Latch
A6-2—Suction Inlet
A6-3—Washable Filter
A6-4—Air Inlet
A6 Dustbin
A4-1—Hook and Loop Pads
A4-2—Mop Axle
A4 Mop Cloth Mount
Secure the mop cloths in place.Note:
A7 Dock Base
A9 Disposable Dust Bag
A8 Power Cable
A10 Dock
A10-1—Water Tank Handle
A10-2—Water Tank Latch
A10-3—Dirty Water Tank
A10-4—Dust Container Cover
A10-5—Charging Contacts
A10-6—Self-Filling Port
A10-7—Suction Inlet
A10-8—Clean Water Tank
A10-9—Status Indicator Light
Pulsing: Emptying/Mop washing
Red: Dock error
Light off: Powered off/Charging
A10-10—Water Outlet
A10-11—Air Outlet
A10-12—Dock Base
A10-13—Filter
A10-14—Dust Bag Slot
A10-15—Dock Location Beacon
A10-16—Water Level Float
A10-17—Cleaning Tank Filter
A10-18—Cleaning Tank
A11 Power Cable Storage
A11-1—Cable Outlets
A11-2—Power Port
A11-3—Cable Storage Slot
06
B4 Power on and Charge the
Robot
Press and hold the button to power
on the robot. Wait until the power light is
steady, and then place the robot on the
dock to charge. The robot is equipped
with a built-in high-performance lithium-
ion rechargeable battery pack. To maintain
battery performance, keep the robot
charged during normal use.
B4-1—Dock Status Indicator Light turns off, Robot
Power Indicator pulsing: Charging
The robot may not be turned on when the battery
is low. In this case, connect the robot to the dock.
Note:
Connecting to the App
This robot supports both Roborock and
Xiaomi Home apps. Choose the one that
best meets your needs.
Option 1: Search for “Roborock” in the App
Store or Google Play or scan the QR code to
download and install the app.
Download App
When using the robot for the first time, follow it
throughout its whole cleaning route and watch for potential
problems. The robot will be able to clean by itself in future uses.
Note:
Installation
B
B1-1—Tidy cables, hard or sharp objects
(such as nails and glass), and loose
items from the ground and move
any unstable, fragile, precious, or
dangerous items to prevent personal
injury or property damage due to
items becoming tangled in, struck by,
or knocked over by the robot.
B1-2—When using the robot in a raised
area, always use a secure physical
barrier to prevent accidental falls
that may result in personal injury or
property damage.
B1 Important Information
Power cable can exit at either side.Note:
B2-2—Connect the power cable to the back
of the dock, and keep the excess cable
inside the storage slot.
B2-3—Install the mop axles into the robot
in place until you hear a “click”.
B2-4—Click
B2-1—Place the dock on a hard and flat floor.
Attach the base by pressing down
both sides of the base firmly, and then
pressing the connecting part in the
middle until you hear a click.
B2 Assembly
When moving the dock, secure the water tanks to
prevent it from falling off.
Note:
B3 Place the Dock
Keep a space of clearance about 1 m (3.3 ft)
in height, 0.46 m (1.5 ft) in length and 1.2
m (3.9 ft) in width. Place the dock on a hard
and flat floor (wood/tile/concrete etc.), flat
against a wall. Make sure the location has
good WiFi for a better experience with the
mobile app, and then plug it in and make
sure the dock status indicator light is on.
Notes:
If the power cable hangs vertically to the ground, it
may be caught by the robot, causing the dock to be
moved or disconnected.
The dock status indicator light is on when the dock is
powered on, and off when the robot is charging.
The dock status indicator light turns red if an error occurs.
Place the dock on a flat floor away from fire, heat, and
water. Avoid narrow spaces or locations where the robot
may be suspended in the air.
Placing the dock on a soft surface (carpet/mat) may
cause the dock to tilt over and cause problems docking
and departing.
Keep the dock away from direct sunlight or anything
that may block the dock location beacon; otherwise,
the robot may fail to return to the dock.
Do not use the dock without clean water tank, dirty
water tank, dust container cover, disposable dust bag,
or cleaning tank.
Maintain the dock according to the maintenance instructions.
Do not clean the dock with a wet cloth or tissue.
All docks are subject to water-based tests before leaving
the factory. It is normal that a small amount of water
remains in the waterway of the dock.
B3-1—About 1 m (3.3 ft)
B3-2—About 0.46 m (1.5 ft)
B3-3—About 1.2 m (3.9 ft)
07
1. Open the top cover and find the WiFi indicator.
Reset WiFi
Option 2: Search for “Xiaomi Home” in the
App Store or Google Play or scan the QR
code to download and install the app.
Instructions for Use
C
Press and hold the button to turn on the
robot. The power indicator will turn on and
the robot will enter standby mode.
Press and hold the button to turn off the
robot and complete the cleaning cycle.
On/Off
The robot cannot be turned off when it is being
charged.
Note:
2. Press and hold the and buttons until you
hear the “Resetting WiFi” voice alert. The reset
is complete when the WiFi indicator flashes
slowly. The robot will then wait for a connection.
Notes:
The actual process may vary due to ongoing app
updates. Follow the instructions provided in the app.
Only 2.4 GHz WiFi is supported.
If the robot waits more than 30 minutes for a
connection, WiFi will be automatically disabled. If you
want to reconnect, reset the WiFi before proceeding.
Open the Roborock App, tap the “Scan to
Connect” button or the “Search for device”
button, or open the Xiaomi Home app,
tap “+” in the top right corner and add the
device as instructed in the app.
Add Device
If you cannot connect to the robot due to your
router configuration, a forgotten password, or any other
reason, reset the WiFi and add your robot as a new device.
Note:
Remove and open the clean water tank and
fill the tank with water. Close the lid, lock the
latch, and fit the tank back in place.
C1 Filling the Water Tank
Notes:
To prevent corrosion or damage, only use the Roborock
branded floor cleaner in the water tank.
Do not add too much cleaning fluid to prevent the robot
from working improperly due to slipping.
To avoid water tank deformation, do not place hot water
in the tank.
If water marks remain on the water tank, wipe them
clean before reinstallation.
Press the button to start cleaning. The
robot will plan its cleaning route according
to its scan of the room. It splits a room into
zones, first draws out zone edges, and then
fills the zone in a zigzag pattern. In so doing,
the robot cleans all zones one by one,
efficiently cleaning the house.
C2 Starting Cleaning
C2-1—Zone 1 – Cleaned
C2-2—Zone 2 – Cleaned
C2-3—Zone 3 – In Progress
C2-4—Zone 4 – Next Zone
Notes:
To allow the robot to automatically vacuum and return
to the dock, start the robot from the dock. Do not move
the dock during cleaning.
Cleaning cannot start if the battery level is too low.
Allow the robot to charge before starting the cleanup.
If cleaning is completed in less than 10 minutes, the
area will be cleaned twice.
If the battery runs low during the cleaning cycle, the robot
will automatically return to the dock. After charging,
the robot will resume where it left off.
The robot will retract mop cloth mount when cleaning
the carpet. You can also set the carpet as a no-go zone
in the app to avoid it.
Before starting each mopping task, make sure that the
mop cloths have been properly installed.
Spot Cleaning
Press and hold the button to start spot
cleaning in pause mode.
Cleaning range: The robot cleans a 1.5 m
(4.9 ft) x 1.5 m (4.9 ft) square area centered
on itself.
After spot cleaning, the robot will automatically
return to the starting point and enter Standby mode.
Note:
Pause
When the robot is running, press any button
to pause it, press the button to resume
cleaning, press the button to send it back
to the dock.
Placing a paused robot on the dock manually will
end the current cleanup.
Note:
08
Sleep
If the robot is paused for over 10 minutes, it
will go to sleep, and the power indicator will
flash every few seconds. Press any button to
wake the robot up.
Notes:
The robot will not go to sleep when it is charging.
The robot will automatically shut down if left in sleep
mode for more than 12 hours.
DND Mode
The default Do Not Disturb (DND) period is
from 22:00 to 08:00. You can use the app to
disable the DND mode or modify the DND
period. When DND is on, the robot will not
automatically resume cleanup, the power
indicator light will dim, and the volume of
the voice prompts will lower.
Mop Washing
During cleaning, the robot automatically
determines when it should return to the dock
for mop washing and water tank refilling to
maximize its mopping performance. During
cleaning, tap Dock button in the app to send
robot back for mop washing. When the robot
is charging, press and hold the button on
the robot or tap Wash button in the app to
manually start washing. Press any button to
stop washing.
To allow the robot to wash the mop automatically,
start the robot from the dock and do not move the dock
during cleaning.
Note:
Auto-emptying will automatically begin when
the robot returns to the dock after cleaning.
To manually start emptying, press button
on the docked robot or tap Empty button in
the app. Press any button to stop emptying.
Emptying
When auto-emptying has been left unused for a long
period, empty the dustbin manually and make sure
the air inlet is clear for optimal emptying performance.
Auto emptying can be disabled through the app.
Avoid frequent manual emptying.
Notes:
Drying starts automatically after mop washing
or after cleaning are completed. To manually
start or stopping drying, tap the Drying
button in the app.
Drying
Drying duration can be modified in the app.
Auto drying can be disabled through the app.
Notes:
Charging
After cleaning, the robot will automatically
return to the dock to charge. In Pause mode,
press the button to send the robot back
to the dock. The power indicator will pulse
as the robot charges.
If the robot fails to find the dock, it will
automatically return to its starting location. Place the
robot on the dock manually to recharge.
Note:
System Reset
If the robot does not respond when a button
is pressed or cannot be turned off, reset
the system. Press the Reset button, and the
robot will reset automatically.
After resetting the system, scheduled cleaning,
WiFi, etc. will be restored to factory settings.
Note:
Restoring Factory Settings
If the robot does not function properly after
a system reset, switch it on. Press and hold
the button and at the same time, press the
Reset button until you hear the “Restoring
factory settings” voice prompt. The robot will
then be restored to factory settings.
The power indicator of the robot will flash
red and a voice alert will sound. Follow the
voice prompts and instructions in the app
for troubleshooting.
Robot Error
The robot will go to sleep automatically if left in a
malfunctioning state for over 10 minutes.
Placing a malfunctioning robot on the dock manually
will end the current cleanup.
Notes:
The dock status indicator light will be
steady red. Follow the voice prompts and
instructions in the app for troubleshooting.
Dock Error
09
Routine Maintenance
D
* Clean every 2 weeks and replace every 6-12 months
D1-1—Main Brush Cover
D1-2—Latches
D1-3—Main Brush
D1-4—Main Brush Caps
D1-5—Main Brush Bearing
D1-6—Turn over the robot and press the
latches to remove the main brush cover.
D1-7—Pull out the main brush and remove
the main brush bearing. Rotate the
main brush caps in the indicated
unlock direction to remove the caps,
and remove any entangled hair or
dirt at both ends of the main brush.
D1-8—Reinstall the main brush.
D1-9—Reinstall the main brush cover. Make
sure that the four teeth are fully seated
in the slot, and then press on the
main brush cover to lock it.
D1 Main Brush
Notes:
Main brush should be wiped down with wet cloth and
left to dry away from direct sunlight.
Do not use corrosive cleaning fluids or disinfectants to
clean the main brush.
D2 Side Brush
* Clean monthly and replace every 3-6 months
Unscrew the side brush screw. Remove and
clean the side brush. Reinstall the brush
and tighten the screw.
D3-1—Use a tool, such as a small screwdriver,
to pry out the axle and take out the
wheel.
The omnidirectional wheel bracket cannot be removed.Note:
D3 Omnidirectional Wheel
* Clean as required
D3-2—Rinse the wheel and the axle with
water to remove any hair and dirt.
Dry and reattach the wheel, pressing
it firmly in place.
Clean the main wheel with a soft, dry cloth.
D4 Main Wheel
* Clean monthly
D5 Dustbin
D5-1—Open the top cover of the robot and
press the dustbin latch to take out
the dustbin.
* Clean as required
To prevent blockage, only use clean water without
any cleaning liquid.
Note:
D5-2—Open the washable filter and empty
the dustbin.
D5-3—Fill the dustbin with clean water and
reinstall the washable filter. Gently
shake the dustbin, and then pour out
the dirty water.
D5-4—Leave the dustbin and the washable
filter to dry.
D6 Washable Filter
D6-1—Remove the filter.
D6-2—Rinse the filter repeatedly and tap it
to remove as much dirt as possible.
D6-3—Allow 24 hours for the filter to dry
thoroughly and reinstall it.
* Clean every two weeks and replace the filter every 6-12 months
Do not touch the surface of the filter with your
hands, brush, or hard objects to avoid potential damage.
Note:
D7 Mop Cloths
D7-1—Remove the mop cloth from the mop
cloth mount. Clean the mop cloth and
air-dry it.
D7-2—Stick the mop cloth on the mount in
position and firmly.
* Clean as required and replace every 1-3 months
A dirty mop cloth will affect the cleaning performance.
Clean it before use.
Note:
D8 Robot Sensors
Use a soft, dry cloth to wipe and clean all
sensors, including:
D8-1—Dock Locator
D8-2—Reactive Tech Obstacle Avoidance
Sensor
D8-3—Wall Sensor
D8-4—Mop Wash Sensor
D8-5—The Carpet Sensor
D8-6—Four Cliff Sensors
* Clean monthly
10
Model EWFD11HRR or
EWFD12HRR
Rated Input Voltage 220-240VAC
Rated Frequency 50-60Hz
Rated Input
(Dust Collection) 4A
Rated Input
(Non-Dust Collection) 0.55A
Rated Output 20VDC 1.5A
Battery
14.4 V/5200 mAh
(TYP) lithium-ion
battery
D9 Moving Dock
Lift up and move the dock. Do not move the
dock by lifting dock base, water tank handles
or dust container cover directly to prevent the
dock from falling off.
D10 Dirty Water Tank
Open the dirty water tank lid and pour out
the dirty water. Fill the tank with clean water,
close the lid, and shake. Pour out the dirty
water. Close the lid and then re-install.
* Clean as required
D11 Charging Contact Areas
Use a soft dry cloth to wipe the charging
contacts on the robot and the dock.
* Clean monthly
Notes:
The dust bag handle seals the bag on removal to prevent
leakage.
Always install a dust bag before closing the dust container
cover to avoid auto-emptying without the bag. You can
also disable auto-emptying in the app.
D12 Replacing Disposable Dust Bag
D12-1—Remove the dust container cover.
D12-2—Remove the disposable dust bag in the
direction of the arrow and discard it.
* Replace as required
Empty Wash Fill Dock
D12-4—Close the cover of the dust container
and make sure it is securely sealed.
D13 Cleaning Tank
D13-1—Remove the cleaning tank.
D13-2—Rinse the cleaning tank and the filter
with water.
D13-3—Reinstall the cleaning tank.
* Clean as required
Basic Parameters
Robot
The serial number is on a sticker on the underside
of the robot.
Note:
D12-3—Clean around the filter with a dry
cloth. Install a new disposable dust
bag in place along the slot and
unfold the dust bag to maximize
emptying performance.
Model QX0PEA
Battery 14.4 V/5200 mAh (TYP)
lithium-ion battery
Rated Input 20VDC 1.5A
Charging Time Approx. 4 hours
11
Common Issues
Problem Solution
Unable to
power on.
The battery level is low. Put the robot on the charging
dock and charge it before use.
The battery temperature is too low or too high. Only
use the robot within the range of 4-40°C (39-104°F).
Unable to
charge.
Check the power indicator light turns on and both ends
of the power cabel are properly connected.
If contact is poor, clean the contact areas on the charging
dock and the robot.
Slow charging.
When used at high or low temperatures, the robot will
automatically reduce its charging speed to extend
battery life.
The charging contacts may be dirty. Wipe them with a
dry cloth.
Unable to dock.
There are too many obstacles near the charging dock.
Move it to an open area.
The robot is too far from the charging dock. Place it closer
and retry.
The dock locator may be dirty. Wipe them with a dry cloth.
Noise during
cleaning.
The main brush, side brush, main wheels, or omni-directional
wheel may be jammed. Pause the robot and clean them.
The omnidirectional wheel is jammed. Use a screwdriver
to remove it for cleaning.
Unable to
connect to WiFi.
WiFi is disabled. Reset the WiFi and try again.
The WiFi signal is poor. Move the robot to an area with
good WiFi reception.
Abnormal WiFi connection. Reset the WiFi, download
the latest mobile app, and retry.
Unable to connect to WiFi abruptly. There may be an error
with your router settings. Contact Roborock customer
service for additional support.
Is power always
being drawn
when the
robot is on the
charging dock?
The robot will draw power while it is docked to maintain
battery performance, but power consumption is minimal.
Does the robot
need to be
charged for at
least 16 hours
the first three
times it is used?
No. The robot can be used any time after it has been
fully charged.
Cleaning does
not resume after
recharging.
Make sure that the robot is not in DND mode. DND mode
will prevent cleanup.
The robot will not resume cleaning if users press button
to recharge or manually place the robot back to the dock.
The robot
suddenly misses
a certain spot.
The wall sensor, cliff sensors or carpet sensor may be dirty.
Wipe them with a soft dry cloth.
12
Common Issues
The LED status
indicator light
on the dock is
steady red.
Voltage error. Check that local voltage meets the
requirements listed on the dock.
Check clean water tank placement or refill as required.
Check dirty water tank placement or empty as required.
Check that the cleaning tank or cleaning tank filter has
been correctly installed.
Reduced
emptying
performance or
unusual noise
when emptying.
The main brush or main brush cover is not properly
installed. Check and correct installation.
The filter, air duct, suction inlet, air inlet, dustbin or dust
bag is blocked. Clean to remove blockages.
Reduced
mop washing
performance.
The mop cloth is not attached properly. Reinstall.
The floor is dirty. Change the mop washing mode to
“Deep” in the app for better cleaning.
Auto Drying is
not working.
Auto Drying is disabled. Check in-app settings.
Auto drying starts only after mopping or mop washing.
Auto-emptying is
not working.
Auto-emptying is disabled. Check in-app settings.
Dock dust container cover is not installed. Check and install.
Auto-emptying will not be triggered if the robot returns
to the dock without cleaning.
The robot will not auto-empty after returning to the
dock in Do Not Disturb (DND) mode. Adjust cleaning
or DND duration, or start emptying manually.
The mop is not
washed.
The mop will not be washed if not used.
The robot will not return to the dock for mop washing
if it does not start from the dock or no dock is found on
the app map.
Check clean water tank placement or refill as required.
Check dirty water tank placement or empty as required.
Check that the cleaning tank or cleaning tank filter has
been correctly installed.
13
Roborock Q Revo
Manuel d’utilisation de l’aspirateur robot
Lisez attentivement ce manuel d’utilisation et ses schémas avant d’utiliser le produit et
rangez-les soigneusement pour référence future.
Contenu
Français
14 Informations de sécurité
16 Présentation du produit
17 Installation
18 Connexion à l’application
18 Instructions d’utilisation
20 Entretien de routine
22 Paramètres de base
22 Problèmes courants
14
Restrictions
N’utilisez que le bloc d’alimentation détachable Roborock EWFD11HRR ou EWFD12HRR fourni avec ce produit pour recharger la batterie.
N’utilisez pas ce produit sur des surfaces en hauteur sans barrières, par exemple, sur le sol d’une mezzanine, une terrasse ouverte ou le
dessus d’un meuble.
Pour éviter de bloquer le produit et d’endommager des objets de valeur, retirez les objets légers (tels que des sacs plastique) et les objets
fragiles (tels que des vases) du sol avant le nettoyage.
N’utilisez pas le produit pour aspirer des objets durs ou tranchants (tels que des débris de décoration, du verre et des clous).
Avant de nettoyer ou d’entretenir le produit, il doit être éteint et sa fiche doit être débranchée de la prise électrique.
Si vous rangez le robot, rechargez-le complètement et éteignez-le avant de le placer dans un endroit frais et sec. Rechargez-le au moins
tous les trois mois pour éviter que la batterie ne se décharge trop.
Ne placez aucun objet à proximité de l’entrée d’aspiration de la station.
Ne placez pas vos doigts dans la fente de la station pour éviter toute éventuelle blessure.
Ne faites pas fonctionner le produit dans une pièce où un nourrisson ou un enfant dort.
Ne transportez pas le robot à l’aide de son pare-chocs vertical, de son capot supérieur ou de son pare-chocs. Ne déplacez pas la station en
soulevant sa base, les poignées des réservoirs d’eau ou le couvercle du conteneur de poussière.
Assurez-vous que le robot est compatible avec la station, sinon le vidage ou le rechargement risque d’échouer.
N’utilisez pas la station pour recueillir des cailloux, des morceaux de papier ou d’autres objets qui pourraient obstruer le tuyau d’air. Si le
tuyau d’air est obstrué, nettoyez-le immédiatement.
Placez la station sur un sol plat à l’écart du feu, de la chaleur et de l’eau. Évitez les espaces ou lieux étroits où le robot risque d’être suspendu
dans l’air.
Ne placez aucun objet ni aucune personne (enfants et animaux compris) sur le produit ou la station, et ne les recouvrez d’aucun élément
(housse anti-poussière comprise), qu’ils soient en marche ou non.
N’aspirez pas de matières en combustion ou qui dégagent de la fumée, comme des cigarettes, des allumettes ou des cendres chaudes.
N’utilisez pas la station pour recueillir des éléments inflammables ou explosifs, comme des briquets, de l’essence ou du toner utilisé dans
les imprimantes et photocopieuses.
Informations de sécurité
AVERTISSEMENT
15
Informations de sécurité
Afin d’éviter tout risque de remise à zéro involontaire du coupe-circuit thermique, cet appareil ne doit pas être alimenté par un dispositif de
connexion externe, tel qu’un programmateur électrique, ou raccordé à un circuit qui est régulièrement activé et désactivé par le fournisseur
d’électricité.
Veillez à ce que la tension d’alimentation respecte les exigences mentionnées sur la station.
Utilisez uniquement le câble d’alimentation fourni avec le produit pour éviter tout risque de fumée, de chaleur ou d’incendie.
N’utilisez pas le produit avec un adaptateur électrique, quel qu’en soit le type, car cela pourrait entraîner un danger et annuler la garantie.
Si la station est placée dans une zone susceptible d’être sujette à des orages ou à une tension instable, prenez des mesures de protection.
Débranchez le câble d’alimentation avant de ranger la station.
Batterie et rechargement
AVERTISSEMENT
16
Présentation du
produit
A
Appuyez sur ce bouton pour faire
revenir le robot à la station/démarrer
le vidage
Appuyez sur ce bouton et
maintenez-le enfoncé pour démarrer
un nettoyage localisé/laver les
serpillières
—Station
Appuyez sur ce bouton et maintenez-
le enfoncé pour allumer ou éteindre
le robot
Appuyez sur ce bouton pour démarrer
un nettoyage
—Marche/Arrêt/Nettoyage
Blanc : niveau de batterie 20 %
Rouge : niveau de batterie < 20 %
Pulsation : rechargement ou démarrage
Clignotement rouge : erreur
—Voyant d’alimentation
A1 Robot (vue de dessus)
Appuyez sur n’importe quel bouton pour
arrêter le robot lorsqu’il nettoie ou revient à la station.
Remarque :
A1-1—Localisateur de station
A1-2—Capteur d’évitement d’obstacles
Reactive Tech
A2-1—Capteur de murs
A2-2—Roulette omnidirectionnelle
A2 Robot (vue de dessous)
A3-1—Pare-chocs vertical
A3-2—Capteur LiDAR
A3-3—Voyant WiFi
A3-4—Bouton Réinitialiser
A3-5—Bac à poussière
A3-6—Contacts de rechargement
A3-7—Capteur de lavage des serpillières
A3-8—Bouton de positionnement
A3-9—Orifice de remplissage automatique
A3-10—Modules d’élévation et de rotation
automatiques des serpillières
A3-11—Sortie d’air
A3-12—Pare-chocs
Éteint : WiFi désactivé
Lent clignotement : en attente de
connexion
Clignotement rapide : connexion
Fixe : WiFi connecté
A3 Robot (capot supérieur ouvert)
A5 Serpillière
A6-1—Loquet du bac à poussière
A6-2—Entrée d’aspiration
A6-3—Filtre lavable
A6-4—Entrée d’air
A6 Bac à poussière
A4-1—Blocs auto-agrippants
A4-2—Axe de serpillière
A4 Support de serpillière
Fixez les serpillières en place.Remarque :
A7 Base de la station
A9 Sac à poussière jetable
A8 Câble d’alimentation
A10 Station
A10-1—Poignée du réservoir d’eau
A10-2—Loquet du réservoir d’eau
A10-3—Réservoir d’eau sale
A10-4—Couvercle du conteneur de
poussière
A10-5—Contacts de rechargement
A10-6—Orifice de remplissage
automatique
A10-7—Entrée d’aspiration
A10-8—Réservoir d’eau propre
A10-9—Voyant d’état
Pulsation : vidage/lavage des
serpillières
Rouge : erreur de la station
Voyant éteint : éteint/en charge
A2-3—Capteur de tapis
A2-4—Brosse latérale
A2-5—Roulette principale
A2-6—Brosse principale
A2-7—Loquets du cache de la brosse
principale
A2-8—Serpillières
A2-9—Capteurs de vide
17
Lorsque vous utilisez votre robot pour
la première fois, suivez-le attentivement tout au long
de son parcours de nettoyage en prenant garde aux
problèmes potentiels. Le robot pourra nettoyer seul lors
des prochaines utilisations.
Remarque :
B1-2—Lorsque vous utilisez ce robot dans
une zone surélevée, utilisez toujours
une barrière de sécurité physique pour
empêcher les chutes accidentelles qui
pourraient entraîner des blessures ou
des dommages matériels.
B2-3—Installez les axes de serpillière en
place dans le robot jusqu’à ce que
vous entendiez un « déclic ».
B2-4—Déclic
Le câble d’alimentation peut sortir des
deux côtés.
Remarque :
B2-2—Connectez le câble d’alimentation à
l’arrière de la station et laissez l’excès
de câble dans la fente de rangement.
B2-1—Placez la station sur un sol dur et plat.
Fixez la base en appuyant fermement
sur ses deux côtés puis en appuyant
sur la pièce de raccordement qui se
situe au milieu jusqu’à ce que vous
entendiez un déclic.
B2 Assemblage
Lorsque vous déplacez la station, fixez les
réservoirs d’eau pour éviter qu’ils ne tombent.
Remarque :
B3 Placement de la station
Gardez un espace dégagé d’environ 1 m (3,3 pi)
de haut, 0,46 m (1,5 pi) de long et 1,2 m (3,9 pi)
de large. Placez la station sur un sol dur et plat
(bois/carrelage/béton, etc.), à plat contre
un mur. Assurez-vous que le lieu offre une
bonne connexion WiFi pour bénéficier d’une
meilleure expérience avec l’application
mobile, puis branchez la station et assurez-
vous que son voyant d’état est allumé.
Remarques :
Si le câble d’alimentation pend à la verticale vers le sol,
il risque d’être happé par le robot, ce qui peut entraîner
un déplacement ou un débranchement de la station.
Le voyant d’état de la station est allumé lorsqu’elle est
sous tension et éteint lorsque le robot est en charge.
Le voyant d’état de la station devient rouge si une erreur
survient.
Placez la station sur un sol plat à l’écart du feu, de la
chaleur et de l’eau. Évitez les espaces ou lieux étroits
où le robot risque d’être suspendu dans l’air.
Placer la station sur une surface molle (moquette/
tapis) peut entraîner son inclinaison et des problèmes
de départ et de retour à la station du robot.
Gardez la station à l’écart de la lumière directe du
soleil et de tout ce qui pourrait bloquer la balise de
localisation de la station, sinon, le robot risque de ne
pas parvenir à y revenir.
N’utilisez pas la station sans réservoir d’eau propre,
réservoir d’eau sale, couvercle du conteneur de
poussière, sac à poussière jetable ou bac de nettoyage.
Entretenez la station conformément aux consignes
d’entretien. Ne nettoyez pas la station avec un chiffon
ou un tissu humide.
Toutes les stations sont soumises à des tests à l’eau avant
de quitter l’usine. Il est normal qu’une petite quantité d’eau
subsiste dans le passage d’eau de la station.
B3-1—Environ 1 m (3,3 pi)
B3-2—Environ 0,46 m (1,5 pi)
B3-3—Environ 1,2 m (3,9 pi)
A10-10—Sortie d’eau
A10-11—Sortie d’air
A10-12—Base de la station
A10-13—Filtre
A10-14—Fente pour le sac à poussière
A10-15—Balise de localisation de la station
A10-16—Flotteur de niveau d’eau
A10-17—Filtre du bac de nettoyage
A10-18—Bac de nettoyage
Installation
B
B1-1—Rangez les câbles, objets durs ou
pointus/tranchants (tels que des
clous ou du verre) et objets détachés
présents au sol et déplacez tout
objet instable, fragile, précieux
ou dangereux afin d’éviter toute
blessure et tout dommage matériel
dus à des objets qui seraient happés,
heurtés ou renversés par le robot.
B1 Informations importantes
A11 Rangement du câble
d’alimentation
A11-1—Sorties pour le câble
A11-2—Port d’alimentation
A11-3—Fente de rangement du câble
18
B4 Allumage et rechargement
du robot
Appuyez sur le bouton et maintenez-le
enfoncé pour allumer le robot. Patientez
jusqu’à ce que le voyant d’alimentation soit
fixe, puis placez le robot sur la station pour
le recharger. Le robot intègre une batterie
lithium-ion rechargeable très performante.
Dans le cadre d’une utilisation normale,
gardez le robot chargé pour préserver les
performances de la batterie.
B4-1—Le voyant d’état de la station s’éteint et le
voyant d’alimentation du robot présente une
pulsation : en charge
Il est possible que le robot ne s’allume pas
lorsque la batterie est faible. Dans ce cas, connectez le
robot à la station.
Remarque :
Connexion à l’application
Ce robot prend à la fois en charge les
applications Roborock et Xiaomi Home.
Choisissez celle qui correspond le mieux à
vos besoins.
Option 1 : recherchez « Roborock » sur l’App
Store ou sur Google Play ou scannez le code
QR pour télécharger et installer l’application.
Téléchargement de l’application
Option 2 : recherchez « Xiaomi Home » sur l’App
Store ou sur Google Play ou scannez le code QR
pour télécharger et installer l’application.
1. Ouvrez le capot supérieur et recherchez
le voyant WiFi.
Réinitialisation du WiFi
2. Appuyez sur les boutons et et
maintenez-les enfoncés jusqu’à ce que vous
entendiez l’alerte vocale « Réinitialisation
du WiFi ». La réinitialisation est terminée
lorsque le voyant WiFi clignote lentement.
Le robot sera alors en attente de connexion.
Si vous ne parvenez pas à vous connecter au
robot en raison de la configuration de votre routeur, d’un
mot de passe oublié ou de toute autre raison, réinitialisez
le WiFi et ajoutez votre robot comme nouvel appareil.
Remarque :
Ouvrez l’application Roborock, puis appuyez
sur le bouton « Scanner pour connecter » ou
sur le bouton « Rechercher un appareil », ou
ouvrez l’application Xiaomi Home et appuyez
sur le « + » qui se situe dans le coin supérieur
droit. Ajoutez ensuite l’appareil en suivant les
instructions de l’application.
Ajout d’un appareil
Remarques :
Le véritable processus peut varier en raison des mises
à jour continues de l’application. Suivez les instructions
fournies dans l’application.
Seul le WiFi 2,4 GHz est pris en charge.
Si le robot est en attente d’une connexion pendant
plus de 30 minutes, le WiFi sera automatiquement
désactivé. Si vous voulez vous reconnecter, réinitialisez
le WiFi avant de poursuivre.
Instructions
d’utilisation
C
Appuyez sur le bouton et maintenez-le enfoncé
pour allumer le robot. Le voyant d’alimentation
s’allumera et le robot entrera en mode Veille.
Appuyez sur le bouton et maintenez-le
enfoncé pour éteindre le robot et mettre fin
au cycle de nettoyage.
Marche/Arrêt
Le robot ne peut pas être éteint lorsqu’il
est en charge.
Remarque :
Retirez le réservoir d’eau propre, puis
ouvrez-le et remplissez-le d’eau. Refermez le
C1 Remplissage du réservoir d’eau
19
Nettoyage localisé
En mode Pause, appuyez sur le bouton
et maintenez-le enfoncé pour démarrer un
nettoyage localisé.
Zone couverte par le nettoyage : le robot
nettoie une zone carrée de 1,5 m (4,9 pi) x
1,5 m (4,9 pi) autour de lui.
Après le nettoyage localisé, le robot reviendra
automatiquement à son point de départ et entrera en
mode Veille.
Remarque :
Pause
Lorsque le robot est en marche, appuyez
sur n’importe quel bouton pour le mettre en
pause, puis appuyez sur le bouton pour
reprendre le nettoyage ou appuyez sur le
bouton pour le renvoyer à la station.
Si vous placez manuellement le robot en
pause sur sa station, cela mettra fin au nettoyage en cours.
Remarque :
Veille
Si le robot est en pause pendant plus de
10 minutes, il se mettra en veille et son
voyant d’alimentation clignotera toutes les
quelques secondes. Appuyez sur n’importe
quel bouton pour le sortir de veille.
Remarques :
Le robot ne se mettra pas en veille lorsqu’il sera en charge.
Le robot s’éteindra automatiquement s’il reste en mode
Veille pendant plus de 12 heures.
Mode NPD
La période par défaut du mode Ne pas
déranger (NPD) est de 22 h 00 à 08 h 00. Vous
pouvez utiliser l’application pour le désactiver
ou changer sa période. Lorsque le mode
NPD sera activé, le robot ne reprendra pas
automatiquement le nettoyage, la luminosité
du voyant d’alimentation sera réduite et le
volume des annonces vocales sera réduit.
Lavage des serpillières
Durant le nettoyage, le robot détermine
automatiquement à quel moment il doit
revenir à la station pour laver les serpillières
et remplir le réservoir d’eau afin de maximiser
ses performances de nettoyage à la serpillière.
Durant un nettoyage, appuyez sur le bouton
Station de l’application afin de renvoyer le robot
à sa station pour un lavage de ses serpillières.
Lorsque le robot est en charge, appuyez sur le
bouton du robot et maintenez-le enfoncé ou
appuyez sur le bouton Laver dans l’application
pour démarrer manuellement un lavage des
serpillières. Appuyez sur n’importe quel bouton
pour arrêter le lavage des serpillières.
Pour permettre au robot de laver
automatiquement ses serpillières, démarrez-le depuis la
station et ne déplacez pas la station durant le nettoyage.
Remarque :
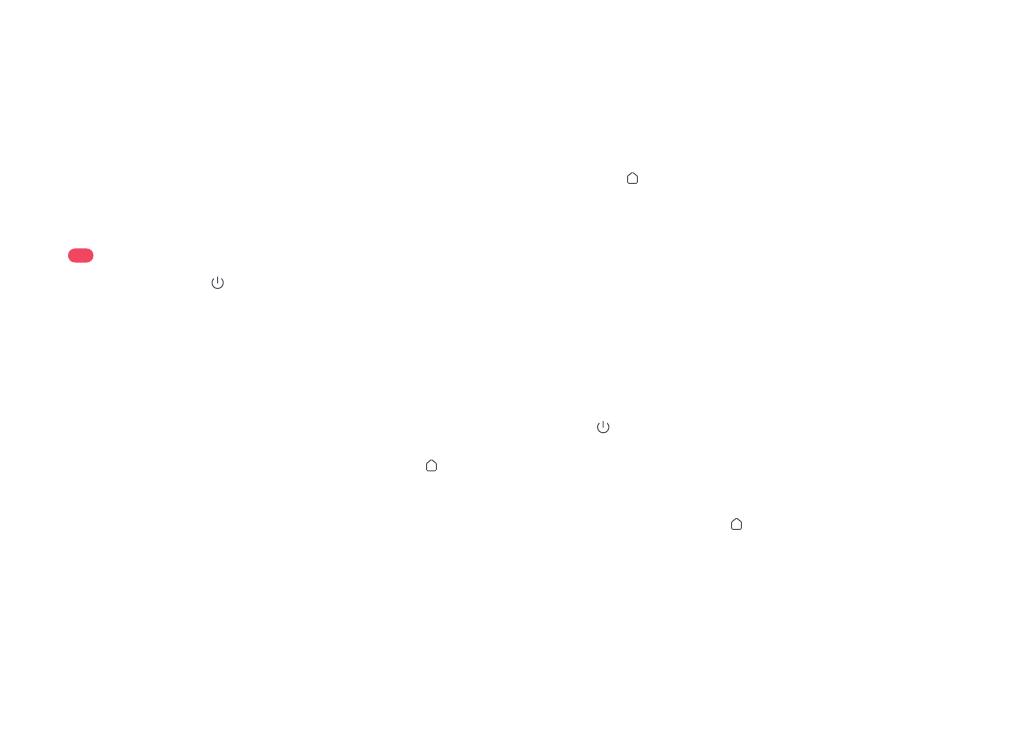
Appuyez sur le bouton pour démarrer un
nettoyage. Le robot planifiera son parcours
de nettoyage en fonction de son analyse
de la pièce. Il divise la pièce en zones,
commence par nettoyer les bords d’une
zone puis la complète en zigzag. Ce faisant,
il nettoie toutes les zones une par une,
nettoyant ainsi efficacement votre logement.
C2 Démarrage du nettoyage
C2-1—Zone 1 - Nettoyée
C2-2—Zone 2 - Nettoyée
C2-3—Zone 3 - En cours
C2-4—Zone 4 - Zone suivante
Remarques :
Pour permettre au robot d’aspirer et de revenir
automatiquement à la station, mettez-le en marche depuis
la station. Ne déplacez pas la station durant le nettoyage.
Le nettoyage ne peut pas démarrer si le niveau de la
batterie est trop faible. Laissez le robot se recharger
avant de démarrer le nettoyage.
Si le nettoyage est terminé en moins de 10 minutes, la
zone sera nettoyée deux fois.
Si le niveau de la batterie devient insuffisant durant le cycle
de nettoyage, le robot reviendra automatiquement à
la station. Après s’être rechargé, le robot reprendra là
où il s’est arrêté.
Remarques :
Pour éviter toute corrosion ou tout dommage, n’utilisez
que du nettoyant pour sols de marque Roborock dans
le réservoir d’eau.
N’ajoutez pas trop de liquide de nettoyage pour éviter tout
fonctionnement incorrect lié à un glissement du robot.
Pour éviter toute déformation du réservoir d’eau, n’y
placez pas d’eau chaude.
Si des traces d’eau subsistent sur le réservoir d’eau,
essuyez-les avant de le réinstaller.
Le robot rétractera son support de serpillière lorsqu’il
nettoiera un tapis. Vous pouvez également définir le tapis
en tant que zone interdite dans l’application pour l’éviter.
Avant le démarrage de chaque tâche de nettoyage à
la serpillière, assurez-vous que les serpillières ont été
correctement installées.
couvercle, verrouillez le loquet et réinstallez
le réservoir en place.
20
Le vidage automatique commencera
automatiquement lorsque le robot reviendra
à la station après le nettoyage. Pour
démarrer manuellement le vidage, appuyez
sur le bouton du robot tandis qu’il est sur
sa station ou appuyez sur le bouton Vider
dans l’application. Appuyez sur n’importe
quel bouton pour arrêter le vidage.
Vidage
Lorsque le vidage automatique n’a pas été utilisé depuis
longtemps, videz le bac à poussière manuellement
et assurez-vous que l’entrée d’air ne présente aucune
obstruction pour que les performances de vidage restent
optimales.
Le vidage automatique peut être désactivé par le biais
de l’application.
Évitez de déclencher fréquemment le vidage manuellement.
Remarques :
Le séchage démarre automatiquement une
fois que le lavage des serpillières ou que le
nettoyage est terminé. Appuyez sur le bouton
Séchage de l’application pour démarrer ou
arrêter manuellement le séchage.
Séchage
La durée du séchage peut être modifiée dans l’application.
Le séchage automatique peut être désactivé par le biais
de l’application.
Remarques :
Rechargement
Une fois le nettoyage terminé, le robot reviendra
automatiquement à sa station pour se recharger.
En mode Pause, appuyez sur le bouton
Le robot reviendra automatiquement à
son point de départ s’il ne parvient pas à retrouver sa
station. Placez manuellement le robot sur sa station
pour le recharger.
Remarque :
Réinitialisation système
Si le robot ne répond pas à la pression sur un
bouton ou ne peut pas être éteint, réinitialisez
le système. Appuyez sur le bouton Réinitialiser
et le robot se réinitialisera automatiquement.
Une fois le système réinitialisé, les paramètres
d’usine des nettoyages planifiés, du WiFi, etc. seront rétablis.
Remarque :
Restauration des paramètres
d’usine
Si le robot ne fonctionne pas correctement
après une réinitialisation système, allumez-
le. Appuyez sur le bouton , maintenez-le
enfoncé, et dans le même temps, appuyez
sur le bouton Réinitialiser jusqu’à ce que vous
entendiez l’annonce vocale « Restauration
des paramètres d’usine ». Les paramètres
d’usine du robot seront alors restaurés.
Le voyant d’alimentation du robot clignotera
en rouge et une alerte vocale se fera
entendre. Suivez les annonces et instructions
vocales de l’application pour le dépannage.
Erreur du robot
Le robot se mettra automatiquement en veille s’il reste
sur un dysfonctionnement pendant plus de 10 minutes.
Si vous placez manuellement le robot sur sa station
alors qu’il présente un dysfonctionnement, cela mettra
fin au nettoyage en cours.
Remarques :
Le voyant d’état de la station restera fixe en
rouge. Suivez les annonces et instructions
vocales de l’application pour le dépannage.
Erreur de la station
pour renvoyer le robot à la station. Lorsque le
robot sera en charge, le voyant d’alimentation
présentera un effet de pulsation.
Entretien de routine
D
* Nettoyer toutes les 2 semaines et remplacer tous les 6 à
12 mois
D1-1—Cache de la brosse principale
D1-2—Loquets
D1-3—Brosse principale
D1-4—Capuchons de la brosse principale
D1-5—Roulement de la brosse principale
D1-6—Retournez le robot et appuyez sur
les loquets pour retirer le cache de la
brosse principale.
D1-7—Tirez sur la brosse principale pour la
sortir et retirez son roulement. Tournez
les capuchons de la brosse principale
dans le sens de déverrouillage indiqué
pour les retirer, puis retirez tous les
poils et toutes les saletés enchevêtrés
aux deux extrémités de la brosse
principale.
D1 Brosse principale
  • Page 1 1
  • Page 2 2
  • Page 3 3
  • Page 4 4
  • Page 5 5
  • Page 6 6
  • Page 7 7
  • Page 8 8
  • Page 9 9
  • Page 10 10
  • Page 11 11
  • Page 12 12
  • Page 13 13
  • Page 14 14
  • Page 15 15
  • Page 16 16
  • Page 17 17
  • Page 18 18
  • Page 19 19
  • Page 20 20
  • Page 21 21
  • Page 22 22
  • Page 23 23
  • Page 24 24
  • Page 25 25
  • Page 26 26
  • Page 27 27
  • Page 28 28
  • Page 29 29
  • Page 30 30
  • Page 31 31
  • Page 32 32
  • Page 33 33
  • Page 34 34
  • Page 35 35
  • Page 36 36
  • Page 37 37
  • Page 38 38
  • Page 39 39
  • Page 40 40
  • Page 41 41
  • Page 42 42
  • Page 43 43
  • Page 44 44
  • Page 45 45
  • Page 46 46
  • Page 47 47
  • Page 48 48
  • Page 49 49
  • Page 50 50
  • Page 51 51
  • Page 52 52
  • Page 53 53
  • Page 54 54
  • Page 55 55
  • Page 56 56
  • Page 57 57
  • Page 58 58
  • Page 59 59
  • Page 60 60
  • Page 61 61
  • Page 62 62
  • Page 63 63
  • Page 64 64
  • Page 65 65
  • Page 66 66
  • Page 67 67
  • Page 68 68
  • Page 69 69
  • Page 70 70
  • Page 71 71
  • Page 72 72
  • Page 73 73
  • Page 74 74
  • Page 75 75
  • Page 76 76
  • Page 77 77
  • Page 78 78
  • Page 79 79
  • Page 80 80
  • Page 81 81
  • Page 82 82
  • Page 83 83
  • Page 84 84

Roborock Q Revo Manuale utente

Tipo
Manuale utente