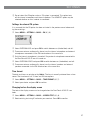
Alcatel OmniTouch 4135 IP Manuale utente
- Categoria
- Apparecchiature per teleconferenze
- Tipo
- Manuale utente

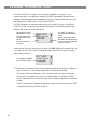
The OmniTouch 4135 IP
User Guide
ENGLISH

2
OmniSound
®
2.0 provides the OmniTouch 4135 IP with the capability to deliver an even
more impressive audio quality. Just like OmniSound full duplex,
®
OmniSound 2.0 uses
®
an omni-directional microphone and three speakers for optimal audio performance.
OmniSound
®
2.0 is enhanced with innovative features – noise suppression minimises
distracting background noise, wideband voice transmission gives 7 kHz during VoIP calls
and an equaliser allows you to adjust sound levels during your meeting.
Alcatel-Lucent hereby declares that this conference unit complies with all essential
requirements and other relevant provisions of Directive 1999/5/EC.
Warning!
do not expose the OmniTouch 4135 IP to rain or moisture.
Warning!
Do not open the case on the OmniTouch 4135 IP.

1
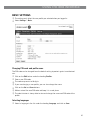
TABLE OF CONTENTS
Description 2
General .................................................. 2
Maintenance .......................................... 2
Connections ........................................... 2
Keypad .................................................. 4
Display screen ........................................ 5
Navigation and selection in menus ........... 6
Answering and making calls 8
Answering calls....................................... 8
Answering calls on hold ........................... 8
Making calls ........................................... 8
Redialling............................................... 8
Calling from the phonebook ..................... 9
During a call 10
Adjusting the speaker volume ..................10
Placing calls on temporary hold ...............10
Ending calls ..........................................10
Secure connection .................................10
Making multi-party calls 11
Adding another party to a call .................11
Making conference group calls ................11
Managing phone lines 12
Switching between lines during multi-
party calls .............................................12
Cutting a line ........................................13
Proles 14
Using a user prole ................................14
Changing the prole name and password .15
Phonebook 16
Searching for contacts ...........................16
Adding contacts ....................................16
Editing contacts ....................................16
Deleting contacts ................................... 17
Deleting all conference groups ................17
Displaying phonebook status ................... 17
External phonebook (LDAP) 18
Search for and call a contact ..................19
Conference guide 20
Making conference group calls ............... 20
Displaying conference group participants .21
Adding a conference group .....................21
Editing a conference group .....................21
Deleting a conference group .................. 22
Deleting all conference groups ............... 22
Displaying conference guide status ......... 22
Recording 23
Starting a recording .............................. 23
Mute function ....................................... 23
Hold .................................................... 23
Ending a recording ................................ 23
Listening to a recording ..........................24
Editing the name of a recording...............24
Deleting a recording .............................. 25
Deleting all recordings ........................... 25
Adjusting the recording indicator ............ 25
Displaying recording feature status ......... 25
Settings 26
Basic settings....................................... 26
Advanced settings ................................ 28
Settings during a call ............................ 29
System ................................................ 30
Checking status .....................................31
Using the web interface 33
Checking network addresses .................. 33
Logging in to the OmniTouch 4135 IP ..... 34
Managing the phonebook ....................... 35
Managing the conference guide .............. 38
Checking the call list ............................. 40
Basic settings........................................41
Restarting the OmniTouch 4135 IP......... 43
Checking status .................................... 44
IP, SIP, URI and IP telephony 45
FAQ and Troubleshooting 47
Optional accessories 48
Technical specications 49

2
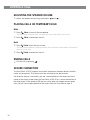
GENERAL
The OmniTouch 4135 IP is a conference phone for IP telephony offering a host of
innovative features:
• OmniSound
®
2.0 audio technology
• IP telephony for exible and affordable telephony
• Conference feature for automatic multi-party dialling.
• Management of lines during a call (dialling new parties, creating a multi-party call,
splitting a multi-party call)
• Recorder capability
• Web interface for simple management of contacts, conference groups and settings
• Power over Ethernet for easy one cable connection with provided network cable.
• Extra microphone connection for wider reception (option)
• Connection for wireless headset or PA system (option)
• Future-proof, can be upgraded with smart functions.
• Two-year guarantee.
The OmniTouch 4135 IP is a future-proof product that is constantly evolving with smart
new features.
MAINTENANCE
Clean the equipment with a soft, dry cloth. Never use liquids.
CONNECTIONS
Please refer to the “OmniTouch 4135 IP Installation Guide” for instructions on how to
connect and register your conference phone.
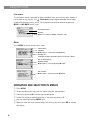
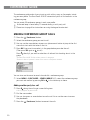
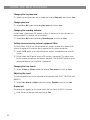
DESCRIPTION

3
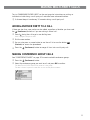
DESCRIPTION
SD memory
card port
Expansion micro-
phone port
Display screenSpeaker Microphone Keypad LEDs
Power supply port
Security lock port
AUX port
Network cable port
Expansion microphone port
LEDs
Flashing blue Incoming call
Steady blue light Call in progress
Flashing red Hold, microphone and
speaker turned off
Steady red light Mute, microphone turned
off

4
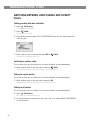
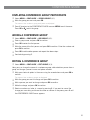
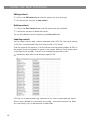
KEYPAD
Some OmniTouch 4135 IP have a different keypad with other symbols. This does
not affect the functions of the buttons.
Writing text
Each button contains letters and characters - more than those shown on the button (see
illustration below). Press the same button repeatedly to change to another character. If
there are two letters under the same button that you want to enter one after the other,
you need to pause slightly before entering the second letter.
Press C to delete the last character you entered.
DESCRIPTION
MENU,
settings menu
UP ARROW
navigation in menus,
display of call list
C
no/end/back,
recording
Increase volume
Decrease volume
Mute
HOLD
OK
yes/conrm choice
Answer/connect
new line
Hang up/end line
CONFERENCE
automatic dialling
of conference
groups
CONTACTS
phonebook
DOWN ARROW
navigation in menus,
display of call list
(blank) . - 1
G H I 4
P Q R S 7
D E F É È 3
M N O Ö Ø Ñ 6
W X Y Z 9
A B C Å Ä Á À 2
J K L 5
T U V Ü Ú 8
0
(blank) . - 1
G H I 4
P Q R S 7
D E F É È 3
M N O Ö Ø Ñ 6
W X Y Z 9
A B C Å Ä Á À 2
J K L 5
T U V Ü Ú 8
0
Alphanumerical buttons, phonebook

5
DESCRIPTION
DISPLAY SCREEN
On Hook
Press to display this screen.
Off Hook
Press to display this screen.
Line status:
Line free (Before account name – telephone not registered)
Line connected (Before account name – telephone registered)
Line on hold (“HOLD” displayed on the screen – all calls on hold)
Line (called party) busy
Own line put on hold by other party
Recording call
Secure connection
Information text displays one of the following:
• Number or name of each phone line
(The name will be displayed if a number is in the phone book)
• Explanation of what you should do (For example ENTER NUMBER)
• Status (For example HOLD when you place all calls on hold)
Date
Time
Display text (can be changed)
Registered
Not registered
Account name (can be changed)
Call duration
Time
Information text (see below)
Phone lines (L1–L4)
Line status (see below)
Secure connection (see page 10)

66
Line menu
The line menu makes it possible to affect individual lines; put a call on hold, connect a
call on hold or cut the line. The (Conference) button toggles between the off hook
screen and line menu during a call. The line menu may also be reached by pressing
MENU > LINE MODE during a call.
Menu
Press MENU to switch to and from a menu.
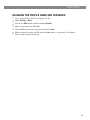
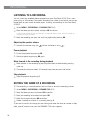
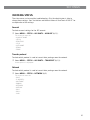
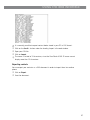
NAVIGATION AND SELECTION IN MENUS
Press MENU.
Select the option you want from the menu using the arrow buttons.
Conrm by pressing OK to select the marked option.
Cancel the setting or go back one level in the menu by pressing C.
Quit the menu by pressing MENU again.
Note that after you have made changes to a setting, you must press OK to activate
the setting.
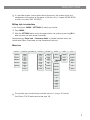
DESCRIPTION
Current menu
Submenu
Marked option – open by pressing OK button
Scrolling list
(indication of where the marked option is in the list or menu)
List of setting options:
Existing settings
Marked option – select by pressing OK button
List of names:
Marked name – select by pressing OK button
Line/number/name
New line
Option for creating or splitting conference calls

77
DESCRIPTION
It is possible to open a menu option directly by pressing the number button that
corresponds to the position of the option in the menu (e.g. 2 to open PHONE BOOK
and then 3 to select EDIT CONTACT).
Writing style in instructions
In the instructions, MENU > SETTINGS (6) means you should:
Press MENU.
Mark the SETTINGS option using the arrow buttons and conrm by pressing OK to
open the menu (or press button number 6).
Correspondingly, Phone book > Conference Guide in the web interface means you
should select Menu Phone book and the Conference Guide tab.
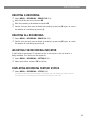
Menu tree
The simplest way to make settings and edit contacts is using a PC and the
OmniTouch 4135 IP web interface (see page 33).
1 2 3 4 5 6 7 8
CONF GUIDE
BASIC
SETTINGS
SETTINGS SYSTEM STATUSRECORDING
DEFAULT
PROFILE 1
PROFILE 2
PROFILE 3
PROFILE 4
PROFILES
PHONE BOOK EXT. PHONE BOOK
SEARCH
CONTACT
ADD
CONTACT
EDIT
CONTACT
ERASE
CONTACT
ERASE
ALL
STATUS
SEARCH
GROUP
ADD
GROUP
EDIT
GROUP
ERASE
GROUP
ERASE
ALL
STATUS
PLAYBACK
FILE
RENAME
FILE
ERASE
FILE
ERASE
ALL
SETTINGS
STATUS
BASIC
ADVANCED
RESTART
REBOOT
FACTORY
RESET
ACCOUNTS
NETWORK
NAT
TRAVERSAL
MEDIA
TIME
DEVICE
LANGUAGE
KEY TONE
RING LEVEL
EQUALIZER
AUX PORT
PA
TIME
FORMAT
SCREEN
TEXT
DEFAULT

8
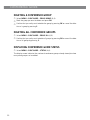
ANSWERING CALLS
A ring tone is heard and the blue LEDs start ashing.
Press to answer.
The LEDs show a steady blue light.
ANSWERING CALLS ON HOLD
If a call is made to the conference phone during another call, you will hear a double
tone, INCOMING CALL will be displayed on the screen and the blue LEDs start ashing.
Press to answer.
The original call will automatically be put on hold.
Press the (Conference) button to connect the calls.
Press to end the new call and (Hold) to reconnect the original call.
Use the line menu (See page 12) to switch between the calls.
MAKING CALLS
Dial the number.
Press .
The number is called and the LEDs show a steady blue light. The duration of the call is shown
on the display screen.
Or:
Press .
Dial the number and press OK to conrm.
The number is called and the LEDs show a steady blue light. The duration of the call is shown
on the display screen.
REDIALLING
Press an arrow button.
The last number that you dialled appears on the display screen.
Use the arrow buttons to scroll through the call list.
Press .
The number you have selected is dialled.
You can delete the call list by scrolling to the end of the list and pressing OK when
the question “CLEAR LIST?” appears.
ANSWERING AND MAKING CALLS

9
CALLING FROM THE PHONEBOOK
Please turn to page 16 for instructions on adding and updating contacts in the phone-
book.
OmniTouch 4135 IP also supports an external phonebook in the form of a catalog
server (LDAP server). Read more on page 18.
Press (Contacts).
The phonebook appears on the display screen. The pre-programmed names appear in alphabeti-
cal order.
Or:
Press and hold down a number button for two seconds.
The phonebook appears on the display screen. The pre-programmed names appear in alphabeti-
cal order, starting with the number button’s rst letter.
Use the arrow buttons to mark the name in the phonebook.
Press .
The number you have selected is dialled.
It is also possible to access the phonebook through MENU > PHONEBOOK >
SEARCH CONTACT. If LDAP is enabled, this is the only way to open the local
phonebook.
ANSWERING AND MAKING CALLS

10
ADJUSTING THE SPEAKER VOLUME
Adjust the speaker volume using the buttons and .
PLACING CALLS ON TEMPORARY HOLD
Mute
Press (Mute) to turn off the microphone.
The LEDs change from blue to red. The other party cannot hear what you are saying.
Press (Mute) to reconnect the call.
Hold
Press (Hold) to put the call on hold.
The LEDs change from blue to ashing red. Both the microphone and the speaker are turned off
and the call is on hold.
Press (Hold) to reconnect the call.
ENDING CALLS
End the call by pressing .
SECURE CONNECTION
The OmniTouch 4135 IP supports secure data connections between devices (authenti-
cation and encryption). This feature must be activated by the administrator.
You know the feature is activated if you see a closed padlock in the lower right-hand
corner of the display screen when the OmniTouch 4135 IP has a secure connection to
the other phone. If the phone or PBX you are calling does not support secure connec-
tions, you will see an open padlock on the screen. See the illustration on page 5.
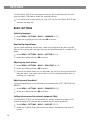
DURING A CALL

11
Turn to “MANAGING PHONE LINES” on the next page for instructions on putting an
individual on hold during a multi-party call and other more advanced features.
A discreet beep is heard every 10 seconds during a multi-party call.
ADDING ANOTHER PARTY TO A CALL
If there are free lines, new parties can be added, regardless of whether you have used
the (Conference) button or if you are making a normal call.
Press during the call to get a new dialling tone.
Calls in progress are put on hold.
Dial the new number.
You can also press an arrow button to use the call list or use the button
(Contacts) to access the phonebook.
Press the (Conference) button to merge all lines into a multi-party call.
MAKING CONFERENCE GROUP CALLS
See “CONFERENCE GUIDE” on page 20 to create and edit conference groups.
Press the (Conference) button.
Select the conference group you want to call and press OK to conrm.
The OmniTouch 4135 IP dials all the contacts in the group.
The box in front of a person’s name lls as soon as that person answers.
MAKING MULTI-PARTY CALLS

12
MANAGING PHONE LINES
SWITCHING BETWEEN LINES DURING MULTI-PARTY
CALLS
Talking privately with one individual
Press (Conference).
The line menu is displayed.
Press (Hold) .
All lines are put on hold.
Alternatively, you can select SPLIT CONFERENCE from the line menu to put the
lines on hold.
Mark a party in the line menu and press OK or (Hold) .
The party is reconnected to the call.
Switching to another caller
This assumes that you are talking with just one individual as described above.
Mark another party in the line menu and press (Hold) .
The rst party is put on hold and the other is connected to the call.
Talking to several parties
This assumes that you are talking with just one individual as described above.
Mark another party in the line menu and press OK.
Both the rst and the second party are connected to the call.
Talking to all parties
This assumes that you are talking with just one individual as described above.
Press (Conference).
All parties are connected to the call.
An alternative way to connect all lines to the call is to select MAKE CONFERENCE
in the line menu.

13
MANAGING PHONE LINES
CUTTING A LINE
Individual lines can be cut out of a multi-party call.
Press (Conference).
The line menu is displayed.
Mark the line you want to cut and press .

14
The OmniTouch 4135 IP gives you the option of using a password to protect contact
information in the phonebook and conference guide. All contacts entered by default can
be accessed by all users and cannot be password protected. All contacts entered by
Admin are also displayed in default mode.
To enter personal contacts, conference groups and settings that are inaccessible to
other users, select user prole and enter the PIN code for the prole. The four personal
user proles each hold up to 1000 contacts and 20 conference groups.
Settings that are unique for each prole are:
• Standard account (If two accounts are registered)
• Language
• Ringtone level
• Keypad tone
• Time format
• Equalizer
• Display text
Contacts and other settings are managed in the same way if you log in with a user
prole, except that the changes you make do not affect other users.
Note the user prole name and PIN code can only be changed via the web interface.
Admin is able to change all user prole names and PIN codes.
USING A USER PROFILE
Select MENU > PROFILES (1).
Mark the prole you want and press OK.
Enter the PIN code for the prole.
The default code is 0000.
Logging out of the prole
Select MENU > PROFILES (1).
Press OK with the LOGOUT option marked.
PROFILES

15
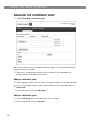
CHANGING THE PROFILE NAME AND PASSWORD
Log in to OmniTouch 4135 IP, see pages 33–34.
Select Settings > Basic.
Click on the Edit button under the heading Proles.
Enter a name and a new PIN code.
Click on Set and save your settings by clicking on Save.
Make a note of the name and PIN code and keep them in a safe place. The adminis-
trator is able to reset the settings.
PROFILES

16
The OmniTouch 4135 IP’s phonebook can hold up to 1000 numbers in each user
prole. See page 9 for making calls via the phonebook.
Please turn to page 4 for instructions on using the keypad to enter text.
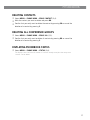
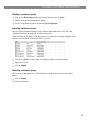
SEARCHING FOR CONTACTS
The simplest way to search for a contact in the address book is to press the button
(Contacts) or hold down an alphanumeric button for two seconds (see page 9).
You can also search for a contact via the PHONEBOOK menu.
Note that the button (Contacts) opens the external LDAP directory instead of
the internal phonebook when LDAP is activated by the Administrator.
Select MENU > PHONE BOOK > SEARCH CONTACT (2,1).
Mark the contact you want.
You can use the arrow buttons to press an alphanumeric button to jump to the rst
name that starts with that letter in the list.
Press OK or to dial the selected contact, C to return to the PHONEBOOK menu
or MENU to exit the menu.
ADDING CONTACTS
Select MENU > PHONE BOOK > ADD CONTACT (2,2).
Enter the name of the contact and press OK to conrm.
Write the number and press OK to conrm.
Press OK to add another contact or MENU to exit the menu.
EDITING CONTACTS
Select MENU > PHONE BOOK > EDIT CONTACT (2,3).
Mark the contact you want to change. Press OK to conrm.
Make the change and press OK to conrm.
Delete a number or a letter in a name by pressing C. If you want to cancel the
change you are making and leave the name or number as they were, press C until
the PHONEBOOK menu appears.
PHONEBOOK

17
DELETING CONTACTS
Select MENU > PHONE BOOK > ERASE CONTACT (2,4).
Mark the contact you want to delete and press OK.
Conrm that you really want to delete the contact by pressing OK or cancel the
deletion of a contact by pressing C.
DELETING ALL CONFERENCE GROUPS
Select MENU > PHONE BOOK > ERASE ALL (2,5).
Conrm that you really want to delete all contacts by pressing OK or cancel the
deletion of a contact by pressing C.
DISPLAYING PHONEBOOK STATUS
Select MENU > PHONE BOOK > STATUS (2,6).
The display screen indicates the number of contacts already stored plus how many more
contacts can be added.
PHONEBOOK

18
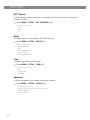
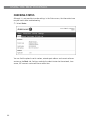
EXTERNAL PHONEBOOK (LDAP)
OmniTouch 4135 IP has support for an external phonebook. This means it can
communicate with a catalog server according to LDAP (Lightweight Directory Access
Protocol). To make the external phonebook accessible, an administrator must activate
and congure the LDAP function in OmniTouch 4135 IP.
An LDAP database can hold thousands of contacts and for this reason, OmniTouch
4135 IP includes a search function to lter the content of the database dynamically,
based on the search characters you enter.
When you nd the right contact, you can open it with OK. When you have done this, you
can choose which of the contact’s telephone numbers you want to ring (for instance,
work, mobile or home).
Please note, the administrator has the option to congure the function in different
ways; this means it may function differently to the way described here.
The administrator can determine in which database eld your search characters
will be used, the number of hits that are to be displayed in OmniTouch 4135 IP
and the information that is to be displayed (name, company, department, telephone
number).
Contact the company’s telephone or network manager for information on how LDAP
is congured for your OmniTouch 4135 IP.
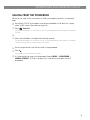
The rst three contacts
that match your search
Selected contact (Use
the arrow keys to scroll
the list)
The search characters
you entered
The number of contacts in
the database that match your
search
(If the > sign is visible before
the number, it means that there
are more contacts available but
they are not shown)
List of telephone numbers
for the selected contact
La pagina si sta caricando...
La pagina si sta caricando...
La pagina si sta caricando...
La pagina si sta caricando...
La pagina si sta caricando...
La pagina si sta caricando...
La pagina si sta caricando...
La pagina si sta caricando...
La pagina si sta caricando...
La pagina si sta caricando...
La pagina si sta caricando...
La pagina si sta caricando...
La pagina si sta caricando...
La pagina si sta caricando...
La pagina si sta caricando...
La pagina si sta caricando...
La pagina si sta caricando...
La pagina si sta caricando...
La pagina si sta caricando...
La pagina si sta caricando...
La pagina si sta caricando...
La pagina si sta caricando...
La pagina si sta caricando...
La pagina si sta caricando...
La pagina si sta caricando...
La pagina si sta caricando...
La pagina si sta caricando...
La pagina si sta caricando...
La pagina si sta caricando...
La pagina si sta caricando...
La pagina si sta caricando...
La pagina si sta caricando...
La pagina si sta caricando...
-
 1
1
-
 2
2
-
 3
3
-
 4
4
-
 5
5
-
 6
6
-
 7
7
-
 8
8
-
 9
9
-
 10
10
-
 11
11
-
 12
12
-
 13
13
-
 14
14
-
 15
15
-
 16
16
-
 17
17
-
 18
18
-
 19
19
-
 20
20
-
 21
21
-
 22
22
-
 23
23
-
 24
24
-
 25
25
-
 26
26
-
 27
27
-
 28
28
-
 29
29
-
 30
30
-
 31
31
-
 32
32
-
 33
33
-
 34
34
-
 35
35
-
 36
36
-
 37
37
-
 38
38
-
 39
39
-
 40
40
-
 41
41
-
 42
42
-
 43
43
-
 44
44
-
 45
45
-
 46
46
-
 47
47
-
 48
48
-
 49
49
-
 50
50
-
 51
51
-
 52
52
-
 53
53


Alcatel OmniTouch 4135 IP Manuale utente
- Categoria
- Apparecchiature per teleconferenze
- Tipo
- Manuale utente
in altre lingue
Altri documenti
-
Konftel 250 Guida utente
-
ZyXEL V-630 Manuale del proprietario
-
Alcatel-Lucent OmniTouch 4135 IP Manuale utente
-
Konftel 300IPx Guida utente
-
-
Konftel 300WX Guida utente
-
Konftel Konftel 300 Manuale utente
-
-
Konftel 300 Manuale utente
-
Unify OpenScape Desk Phone CP200/CP205 SIP Guida utente