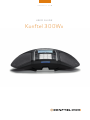
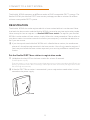
Konftel 300WX Guida utente
- Categoria
- Apparecchiature per teleconferenze
- Tipo
- Guida utente
Questo manuale è adatto anche per

KONFTEL.COM
USER GUIDE
Konftel 300Wx

B
OmniSound
®
– superior sound quality
OmniSound
®
audio technology guarantees that your distance meetings will have
impressive, crystal-clear sound in both directions, known as full duplex. Hypersensitive
microphones with 360° sound pickup and speakers provide powerful sound distribution to
all participants.
OmniSound
®
delivers HD audio on VoIP calls. Also equipped with automatic echo
cancellation and noise suppression, which minimizes annoying background noise, and an
equalizer for personal adjustment of the sound quality. Move freely around the room, talk,
discuss and debate with retained sound quality that is entirely free from irritating sound
clipping, damping or echoes. It’s as close as you can get to natural sound.
DECT conforms to the GAP standard
DECT – Digital Enhanced Cordless Telephone. DECT incorporates encryption for
maximum call security. GAP (Global Access Profile) ensures the interoperability of DECT
equipment of dierent manufacturers.
product is in compliance with Annex V of the Directive 1999/5/EC (R&TTE) and complies
with the requirements set out in the Council Directives 2004/108/EC, 2006/95/EC and
with Directive 2011/65/EU (ROHS).
See www.konftel.com/doc for a complete declaration.
Warning!
Do not expose the Konftel 300Wx, charging stand or batteries to water
or moisture.
Warning!
Do not open the casing of the Konftel 300Wx.
Warning!
Only use the power adapter provided to connect the unit to the mains.
Warning!
Only use the battery provided or a Konftel-recommended replacement battery.
Warning!
Do not attempt to open or modify the battery.
Warning!
Extreme heat, short-circuiting or any attempt to modify the battery may cause
it to ignite or explode.

1
TABLE OF CONTENTS
Description 2
General .......................................................................2
Maintenance .............................................................2
Keypad ........................................................................ 4
Display screen ..........................................................5
Navigation and selection in menus ..................6
General 7
Unpacking .................................................................. 7
Connecting and installing the unit .................. 8
Select connectivity option .................................9
Using a computer ...................................................9
Switching of Konftel 300Wx ............................10
Recharging batteries ............................................11
Connect to a DECT system 12
Registration ............................................................12
Answering and making calls 14
Answering calls ......................................................14
Making calls ............................................................. 14
Making three-way calls (DECT) ......................15
VoIP calls via a computer ...................................15
Calls via mobile phones ...................................... 15
During a call 17
Adjusting the speaker volume ......................... 17
Muting the microphone ..................................... 17
Placing a call on temporary hold .................... 17
Ending calls ............................................................. 17
Switching connections during calls ...............18
Conference guide 19
Creating conference groups ............................19
Making conference group calls .......................19
Making a temporary conference group call
(multi-party call) using the Instant Guide ..20
Displaying conference group participants 20
Editing conference groups ...............................21
Deleting conference groups ............................ 21
Delete all conference groups .......................... 21
Conference guide settings .............................. 22
Displaying conference guide status ............. 22
Phonebook 23
Searching for contacts ......................................23
Adding contacts ................................................... 23
Editing contacts ...................................................23
Deleting contacts ................................................24
Deleting all contacts ..........................................24
Displaying phonebook status .......................... 24
Recording 25
Starting a recording ...........................................25
Mute function ....................................................... 25
Hold ...........................................................................25
Ending a recording .............................................. 25
Listening to a recording .................................... 26
Managing recordings ......................................... 27
Adjusting the recording indicator ................. 27
Displaying recording feature status ............. 27
Settings 28
DECT .........................................................................28
Apperance ..............................................................29
Date and time ........................................................29
Sound....................................................................... 30
Sleep mode .............................................................31
Software ...................................................................31
Checking status ..................................................... 31
Upgrading software 32
Upgrading from a PC ......................................... 32
Technical specifications 33
Konftel DECT base station (accessories) ...34
Service and guarantee 35

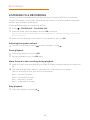
2
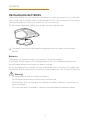
DESCRIPTION
GENERAL
The Konftel 300Wx is a battery-driven wireless conference phone that can be connected
to DECT systems, mobile phones or PCs. It can be connected to a Konftel DECT base
station or any GAP/CAT-iq-compatible DECT system.
The conference phone has a host of innovative features:
• A fully wireless unit that provides talk time of up to 60 hours without having to
recharge.
• OmniSound
®
HD audio technology.
• USB connectivity allows the phone to be used to make VoIP calls.
• The connectivity menu enables you to combine and switch easily between connectiv-
ity technologies – DECT, USB, mobile.
• Conference guide for easy set-up of multiparty calls.
• Record your meetings with an SD memory card so that you can listen to them later
on.
• Expansion microphones can be added to increase the voice pickup range (optional).
• Can be upgraded with smart features, making it future-proof.
• Two-year guarantee.
MAINTENANCE
Clean the equipment with a soft, dry cloth. Never use liquids.

3
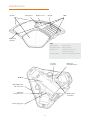
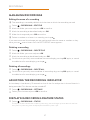
DESCRIPTION
Battery
Expansion
microphone port
Mobile phone
connection
Security
lock port
Power supply port
Expansion
microphone port
Mini USB port for
PC connection
SD memory
card port
Display screenSpeaker Microphone Keypad LEDs
LEDs
Flashing blue Incoming call
Steady blue light Call in progress
Flashing red Hold, microphone and
speaker turned o
Steady red light Mute, microphone turned o

4
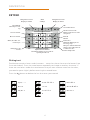
KEYPAD
DESCRIPTION
Writing text
Each button contains letters and characters – more than those shown on the button (see
illustration below). Press the same button repeatedly to change to another character. If
there are two letters under the same button that you want to enter one after the other,
you need to pause slightly before entering the second letter.
Press the
button to delete the last character you entered.
(space) . - 1
G H I 4
P Q R S 7
D E F É È 3
M N O Ö Ø Ñ 6
W X Y Z 9
A B C Å Ä Á À 2
J K L 5
T U V Ü Ú 8
0
Menu
Settings
Navigation in menus
Display of call list
No/end/back
Start/stop record-
ing
Increase volume
Decrease volume
Mute, the caller can
-
not hear you
Hold, puts a call
on hold
Alphanumerical buttons
Hold down a button for 2 seconds to
open the phonebook
OK
Yes/confirm choice
Answer/connect calls
During a call: Press to call a
new person
End call
On/o
Conference
Automatic dialling of con
-
ference groups
One press of this button will
always connect all parties to
a conference call
Connectivity menu
Navigation in menus
Display of call list

5
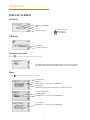
DESCRIPTION
DISPLAY SCREEN
On Hook
O Hook
Connectivity menu
Press to switch to and from this menu.
Menu
Press to switch to and from a menu.
Current menu
Submenu
Marked option – open by pressing OK button
Scrolling list
(indication of where the marked option is in the list or menu)
List of setting options:
Existing settings
Marked option – select by pressing OK button
List of names:
Marked name – select by pressing OK button
Call duration
Recording indicator
Note that USB is automatically activated when connected. The alterna
-
tive USB is only shown during a DECT call when it normaly is disabled.
Signal strength DECT
Date
Time
Battery charging
Mains connected
Fully charged
< 1 hr talk time

6
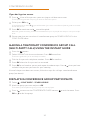
NAVIGATION AND SELECTION IN MENUS
Press .
Select the option you want from the menu using the arrow buttons.
Confirm by pressing OK to select the marked option.
Cancel the setting or go back one level in the menu by pressing .
Quit the menu by pressing again.
Note that after you have made changes to a setting, you must press OK to activate
the setting.
It is possible to open a menu option directly by pressing the number button that cor-
responds to the position of the option in the menu (e.g. 2 to open PHONE BOOK and
then 3 to select EDIT CONTACT).
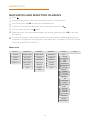
Menu tree
DESCRIPTION
SEARCH CONTACT
PHONE BOOK CONF GUIDE RECORDING STATUS
ADD CONTACT
EDIT CONTACT
ERASE CONTACT
ERASE ALL
STATUS
SEARCH GROUP
ADD GROUP
EDIT GROUP
ERASE GROUP
ERASE ALL
SETTINGS
STATUS
PLAYBACK FILE
RENAME FILE
ERASE FILE
ERASE ALL
SETTINGS
STATUS
OUTGOING
CALL LIST
INCOMING
MISSED
ERASE LISTS
SOUND
APPERANCE
LCD CONTRAST
UPGRADE
SETTINGS
LANGUAGE
KEY TONE
TIME DATE
RING LEVEL
EQUALIZER
MOBILE LEVEL
SCREEN TEXT
DECT
BASE
PARK
MULTIKEY DIALING
ACTIVATE DTMF
G722 CODEC
REGISTER
DE-REGISTER
DATE
DATE FORMAT
TIME
TIME FORMAT
SLEEP MODE
FACTORY RESET

7
GENERAL
UNPACKING
Check that all parts are included in the package. If any parts are missing, please
contact your retailer.
• The Konftel 300Wx conference phone
• Battery
• Charging cradle
• 7.5 metre power cable for charging cradle/Konftel 300Wx
• AC adapter
• 1.5 metre USB cable
• Quick reference guides in dierent languages
Packages with base station also include:
• Konftel DECT Base station
• AC adapter with 1.5 metre cable
• 1.8 metre cable for line connection
• Intermediate plugs for analogue connection
• Quick reference guides in dierent languages

8
GENERAL
CONNECTING AND INSTALLING THE UNIT
Open the battery cover and insert the battery as illustrated.
Connect to a DECT system (see page 12), a mobile phone or a computer as illustrated.
(An optional phone cable is required for connection to mobile phones.)
Place the conference phone in the middle of the table.
Place the conference phone at least 20 cm from the users.
Mini USB port for
PC connection

9
SELECT CONNECTIVITY OPTION
The unit is default set for a DECT connection but it is possible to switch between and
combine all available connectivity options.
Press the key.
Select the connection you want and press OK to confirm.
The box in front of the selected option is filled in which indicates that this connectivity option can be
used for calls.
Press the key again to close the connectivity menu.
Remove a connectivity option in the same way.
If you have selected MOBILE, you connect the call on the mobile phone and via USB
use a software program in the PC (see pages 15 and 16).
You can add another connection or turn o a connection during a call.
The USB connection is automatically activated when the cable is connected. You can
manually switch o USB via this menu in oook.
USING A COMPUTER
When connected to the PC, the Konftel 300Wx acts as a loudspeaker and microphone
when making VoIP calls. To make a VoIP call, use Skype
®
, Microsoft Lync
®
, an online meet-
ing service or some other VoIP (Voice over IP) software.
Connect the Konftel 300Wx to a computer using the USB cable provided.
Check that Konftel 300Wx USB Audio is set as the sound device in the computer’s
settings.
The computer’s operating system normally automatically selects the Konftel 300Wx
as a speaker and microphone. If the Konftel 300Wx is not automatically selected as
the audio device, you may have to open the computer’s settings and select Konftel
300Wx USB Audio.
If you have an active application in the computer that is using the computer’s built-in
speakers, it may be necessary to restart the program to switch to the new speaker
(Konftel 300Wx USB Audio).
The computer only activates the microphone in the Konftel 300Wx if there is a program
running that uses the microphone. This means that the Konftel 300Wx usually acts as a
normal computer speaker and that the audio processing in OmniSound
®
HD only is turned
on when needed.
GENERAL

10
GENERAL
Using the Konftel as a conference unit
When communication software or audio recording software is started on the computer,
the Konftel 300Wx microphone is also activated. OmniSound
®
is now handling full duplex
and echo cancellation. The blue LEDS on the Konftel 300Wx also light up at the same
time.
Note that you might need to turn o the automatic audio processing in some VoIP
software (eg. Skype
®
). The audio processing shall be done by Konftel 300Wx for best
audio quality.
Disabling USB
The USB connection is automatically activated when the USB cable is connected.
If you choose to make a DECT call or answer an incoming DECT call, the USB connection
is automatically put on hold. During the DECT call, you can manually choose to enable and
disable the USB connection in the connectivity menu.
Press the key.
Select USB and press OK to confirm.
Press the key again to close the connectivity menu.
SWITCHING OF KONFTEL 300WX
It is possible to switch o and on the unit.
Press the key for 2 seconds.
Press OK to confirm.
The unit is turned o.
It is possible to switch on the unit by pressing the same button again.

11
RECHARGING BATTERIES
The Konftel 300Wx lets you know when the battery’s remaining capacity is less than one
hour of talk time. An audible signal is emitted and the LEDs flash three times. The battery
recharging symbol on the display screen will also start flashing.
Recharge the Konftel 300Wx by placing it on the charging stand.
The battery can also be recharged by plugging the power cable into the Konftel
300Wx.
Batteries
The battery has a button to display the battery’s remaining capacity.
The Konftel 300Wx comes with a charged battery, but it may need recharging to full
capacity depending on how long it has been in storage.
A fully-charged battery provides talk time of about 60 hours or 20 days of standby time.
The Konftel 300Wx automatically switches to sleep mode after a 40 minutes of inactivity.
Warning!
• Do not attempt to open or modify the battery.
• Do not expose the battery to moisture or extreme heat.
• Extreme heat, short-circuiting or any attempt to modify the battery may cause it to
ignite or explode.
• Only use the battery provided or a Konftel-recommended replacement battery.
GENERAL

12
The Konftel 300Wx connects to dierent makes of GAP-compatible DECT systems. The
Konftel 300Wx plus Konftel DECT base station package provides a solution for oces
without a compatible DECT system.
REGISTRATION
The Konftel 300Wx has to be registered with a base station before it can be used. Note
that both the base station and the Konftel 300Wx have to be put into registration mode.
Here we explain how to register in a Konftel DECT base station. To register your Konftel
300Wx in other makes of base station, simply follow the same procedure. Please refer to
your base station instruction manual or contact your company’s switchboard administra-
tor if you are unsure.
If you have purchased a Konftel 300Wx with a Konftel base station, the conference
phone will already be registered with the base station. You will only need to register if
you have purchased the base station separately or are using a dierent make of base
station.
Put the Konftel DECT base station in registration mode
Hold down the key/LED on the base station for at least 3 seconds.
The LED flashes rapidly.
The base station is now in registration mode. Once registration has been completed, the LED will stop
flashing. If the base station does not identify a DECT phone within 10 minutes, the registration mode
will switch o automatically.
A Konftel DECT Base station is automatically set to registration mode when it is con-
nected to the power supply.
CONNECT TO A DECT SYSTEM
Key and LED

13
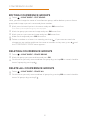
Registering the Konftel 300Wx with a DECT base station
Select > SETTINGS > DECT > REGISTER to start the registration guide in the
Konftel 300Wx.
Please note that you must confirm all your choices by pressing OK.
Select base (1–4).
Four base stations can be registered in the Konftel 300Wx. If no base station has been
programmed, choose no. 1. Numbers being used are indicated by a filled box.
Enter the base station’s security code (PIN code).
The code is 0000 for the Konftel DECT base station. Check with your company’s
switchboard administrator if a dierent DECT system is being used.
The Konftel 300Wx is now in registration mode and is searching for a base station in registration
mode. Wait until you receive confirmation that registration has been completed. (The base station has
to be in registration mode.)
Registration can be interrupted by pressing . If registration was successful, the
word SUCCESS will appear in the display.
The Konftel 300Wx is now ready to use.
Please see page 23 for other menu options and settings.
If registration was not successful
If registration was not successful, the word FAILURE will appear in the display. Possible
reasons for this:
• Incorrect security code (check with your company’s switchboard administrator).
• A PARK code might be needed (check with your company’s switchboard administra-
tor). Activate PARK (
> SETTINGS > DECT > PARK) and try to register again using
your PARK code.
• No base station within range or not activated in registration mode.
CONNECT TO A DECT SYSTEM

14
ANSWERING CALLS
A ring tone is heard and the blue LEDs start flashing.
Press to answer.
The LEDs show a steady blue light. The duration of the call is shown on the display screen.
MAKING CALLS
Dial the number.
Press .
The number is called and the LEDs show a steady blue light. The duration of the call is shown on the
display screen.
Or:
Press .
Dial the number.
The number is called and the LEDs show a steady blue light. The duration of the call is shown on the
display screen.
Redialling
Press an arrow button.
The last number that you dialled appears on the display screen.
Use the arrow buttons to look through previously dialled numbers.
Press .
The number you select is dialled.
Calling from the phonebook
Please turn to page 23 for instructions on adding and updating contacts in the phone-
book.
Press and hold down a number button for two seconds.
The phonebook appears on the display screen. The pre-programmed names appear in alphabetical
order, starting with the number button’s first letter.
Use the arrow buttons to look through the phonebook.
Press .
The contact you select is dialled.
ANSWERING AND MAKING CALLS

15
ANSWERING AND MAKING CALLS
MAKING THREEWAY CALLS DECT
The simplest way to set up a multi-party call is to use the conference guide (see page 19).
You can connect another party to an on-going call as follows. During a call, the
button
acts as Flash/R-pulse, which means it transmits commands to the PBX.
This description applies for DECT calls only.
Press
during a call
.
The calls is put on hold and a second dialling tone is heard.
Dial the second participant’s number and wait for an answer.
Press the button to connect all the meeting participants.
VOIP CALLS VIA A COMPUTER
For these instructions, it is assumed that the computer is turned on, the VoIP software
(e.g. web meeting software or Skype
®
) is running, that the Konftel 300Wx is connected
via the USB cable to the computer and that Konftel 300Wx USB Audio is selected as the
sound device in the computer’s settings.
Making VoIP calls
Make the call (or answer an incoming call) using the computer’s VoIP software.
The microphone is automatically activated and the LEDs show a steady blue light.
Ending a VoIP call
End the call in the computer’s VoIP software.
The Konftel 300Wx now only functions as a speaker for the computer.
CALLS VIA MOBILE PHONES
For these instructions, it is assumed that the Konftel 300Wx is connected to a mobile
phone via a cable (optional accessory).
Select mobile as the telephone connection
Press .
Select MOBILE.
The box in front of MOBILE is filled in which indicates that this connection can be used for call.

16
Deselect the DECT connection in the same way if it is not going to be used.
You can combine all available connectivity options.
Press the key again to close the connectivity menu.
Making calls using a mobile phone
Press to activate Konftel 300Wx.
Dial the number on the mobile phone as you normally would.
The Konftel 300Wx now functions as a speaker and microphone for the mobile phone. The LEDs show
a steady blue light.
Ending calls
End the call on the mobile phone.
Press to inactivate the Konftel 300Wx.
ANSWERING AND MAKING CALLS

17
DURING A CALL
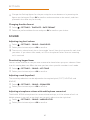
ADJUSTING THE SPEAKER VOLUME
Adjust the speaker volume using the buttons and .
Adjusting the speaker volume when multiple connections are connected
If you have selected multiple connections, you can adjust the volume level for each con-
nection. This is useful if the connections have dierent volume levels.
Press the or key to display the current volume setting.
The current main volume appears on the display screen. Above it are two or three smaller
volume indicators which can be used to adjust the dierent connections.
Increase or decrease the speaker volume for all connections in the normal way using
the
and keys.
Use the arrow keys to mark one of the connections.
Adjust the speaker volume for the selected connection using the keys and .
MUTING THE MICROPHONE
Press to turn o the microphone.
The LEDs change from blue to red. The other party cannot hear what you are saying.
Press to reconnect the call.
PLACING A CALL ON TEMPORARY HOLD
Press to put the call on hold.
The LEDs change from blue to flashing red. Both the microphone and the speaker are turned o and
the call is on hold.
Press to reconnect the call.
ENDING CALLS
End the call by pressing .

18
SWITCHING CONNECTIONS DURING CALLS
Adding a new connection during a call
You can add another connection or switch between connection during a call.
Press the button during the call.
An indicator appears on the display screen in front of the selected connection.
Use the arrow buttons to mark the connection you want to activate and confirm your
choice by pressing OK.
If you selected USB or MOBILE, this connection will open. You then connect the call via the computer
or mobile phone.
If you selected DECT, you will hear a dialling tone. You then dial the number on the Konftel 300Wx or
use the Phonebook.
Press the key again to close the connectivity menu.
Putting a connection on hold during a call
Press the button during the call.
Use the arrow buttons to mark the connection you want to put on hold and press the
button.
The indicator in front of the selected connection starts to flash.
Repeat the above to reconnect the connection.
Press the key again to close the connectivity menu.
Disconnecting a connection during a call
Press the button during the call.
Use the arrow buttons to mark the connection you want to disconnect and confirm
your choice by pressing
.
The indicator in front of the selected connection goes out and the connection is disconnected. The
other calls can continue.
Press the key again to close the connectivity menu.
DURING A CALL
La pagina si sta caricando...
La pagina si sta caricando...
La pagina si sta caricando...
La pagina si sta caricando...
La pagina si sta caricando...
La pagina si sta caricando...
La pagina si sta caricando...
La pagina si sta caricando...
La pagina si sta caricando...
La pagina si sta caricando...
La pagina si sta caricando...
La pagina si sta caricando...
La pagina si sta caricando...
La pagina si sta caricando...
La pagina si sta caricando...
La pagina si sta caricando...
La pagina si sta caricando...
La pagina si sta caricando...
-
 1
1
-
 2
2
-
 3
3
-
 4
4
-
 5
5
-
 6
6
-
 7
7
-
 8
8
-
 9
9
-
 10
10
-
 11
11
-
 12
12
-
 13
13
-
 14
14
-
 15
15
-
 16
16
-
 17
17
-
 18
18
-
 19
19
-
 20
20
-
 21
21
-
 22
22
-
 23
23
-
 24
24
-
 25
25
-
 26
26
-
 27
27
-
 28
28
-
 29
29
-
 30
30
-
 31
31
-
 32
32
-
 33
33
-
 34
34
-
 35
35
-
 36
36
-
 37
37
-
 38
38


Konftel 300WX Guida utente
- Categoria
- Apparecchiature per teleconferenze
- Tipo
- Guida utente
- Questo manuale è adatto anche per
in altre lingue
- English: Konftel 300WX User guide
Documenti correlati
Altri documenti
-
Unify OpenScape Desk Phone CP700/700X SIP Guida utente
-
Topcom Cell Phone 6000 Manuale utente
-
Alcatel OmniTouch 4135 IP Manuale utente
-
 KANDAO Dual-Lens 3D Camera all in one conference Guida utente
-
Alcatel-Lucent 8135S Manuale utente
-
Aastra OpenPhone 26 Manuale utente
-
DETEWE OpenPhone 26 Manuale utente
-
