Trendnet RB-TEW-800MB Guida utente
- Categoria
- Router
- Tipo
- Guida utente
Questo manuale è adatto anche per

TRENDnet User’s Guide
Cover Page

© Copyright 2013 TRENDnet. All Rights Reserved.
TRENDnet User’s Guide
Table of contents
2
Table of Contents
Product Overview ........................................................................... 3
Package Contents .......................................................................................................... 3
Features ......................................................................................................................... 3
Product Hardware Features........................................................................................... 4
Basic Media Bridge and Router Setup .............................................. 5
Application Diagram ...................................................................................................... 5
Getting Started ............................................................................... 6
Installation and Login..................................................................................................... 6
Access to the Management Interface ............................................................................ 8
Using the Wizard ........................................................................................................... 8
Wi-Fi Protected Setup (WPS) ....................................................................................... 10
Network........................................................................................ 11
LAN Setting .................................................................................................................. 11
Wireless ........................................................................................ 11
Basic Wireless Setting .................................................................................................. 11
Connect wireless devices using WPS ........................................................................... 12
Link Status .................................................................................................................... 13
Site Survey ................................................................................................................... 13
QoS, Quality of Service ................................................................................................ 13
Administrator ............................................................................... 14
System Management ................................................................................................... 14
Upload Firmware ......................................................................................................... 14
Settings Management .................................................................................................. 14
Status ........................................................................................................................... 15
Wireless Networking and Security ................................................. 15
How to choose the type of security for your wireless network .................................. 15
Secure your wireless network ..................................................................................... 16
Connect devices to your Media Bridge ........................................................................ 18
Steps to improve wireless connectivity ....................................................................... 18
Media Bridge Maintenance & Monitoring ..................................... 19
Reset your Media Bridge to factory defaults ............................................................... 19
Media Bridge Default Settings ..................................................................................... 20
Backup and restore your media bridge configuration settings ................................... 20
Reboot your media bridge ........................................................................................... 21
Media Bridge Management Page Structure ................................... 22
Technical Specifications ................................................................ 23
Troubleshooting ........................................................................... 24
Appendix ...................................................................................... 25

© Copyright 2013 TRENDnet. All Rights Reserved.
TRENDnet User’s Guide
TEW-800MB
3
Product Overview
TEW-800MB v1.0R
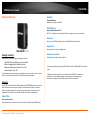
Package Contents
In addition to your media bridge, the package includes:
• CD-ROM (Quick Installation and User’s Guide)
• Multi-Language Quick Installation Guide
• Network cable/Ethernet Cable (1.5m / 5ft.)
• Power Adapter (12V, 2A)
If any package contents are missing or damaged, please contact the retail store, online
retailer, or reseller/distributor from which the product was purchased.
Features
The AC1200 Dual Band Wireless Media Bridge, model TEW-800MB, connects up to four
devices around your entertainment center to a revolutionary Wireless AC network.
Connect a network enabled TV, media player, gaming console, and receiver to the
Gigabit ports. Wireless AC easily handles multiple HD streams simultaneously.
Ease of Use
One Touch Connection
Securely connect to a router at the touch of the Wi-Fi Protected Setup (WPS) button
Security
Encrypted Wireless
Wireless encryption up to WPA2
Performance
Next Generation Wireless AC**
802.11ac* provides uninterrupted HD video streaming in a busy connected home
Dual Band
Connect to an 867 Mbps Wireless AC or a 300 Mbps Wireless N network
Gigabit Ports
Connect devices to the four Gigabit ports
Backward Compatible
Compatible with older Wireless G devices
*For maximum performance of up to 867 Mbps use with a 867 Mbps 802.11ac wireless
router
**Maximum wireless signal rates are referenced from IEEE 802.11 theoretical
specifications. Actual data throughput and coverage will vary depending on
interference, network traffic, building materials and other conditions

© Copyright 2013 TRENDnet. All Rights Reserved.
TRENDnet User’s Guide
TEW-800MB
4
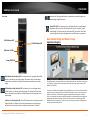
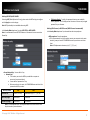
Product Hardware Features
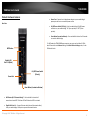
Rear View
• WPS Button (Wi-Fi Protected Setup)* – Push and hold this button for 5
seconds to activate WPS. The Power LED will blink when WPS is activated.
• Gigabit LAN Ports 1-4 – Connect Ethernet cables (also called network cables)
from your media bridge’s LAN ports to your wired network devices.
• Power Port – Connect the included power adapter to your media bridge’s
power port and then to an available power outlet.
• On/Off Power Switch (EU Only) – Push the media bridge’s On/Off power
switch to turn your media bridge “On” (Inner position) or “Off” (Outer
position).
• Reset Button (Located on Bottom) – Press and hold this button for 10 seconds
to reset the media bridge.
*In WPS mode, the TEW-800MB may connect to your router on the default 2.4GHz
band. Please refer to the Manual setting of the Basic Wireless Setting section, for the
5GHz band choice.
Reset Button (Located on Bottom)
Gigabit LAN
Ports 1-4 (Black)
Power Port
WPS Button
On/Off Power Switch
(EU only)

© Copyright 2013 TRENDnet. All Rights Reserved.
TRENDnet User’s Guide
TEW-800MB
5
Front View
5GHz Wireless (Link/Activity) LED: The indicator will turn solid green when 5GHz
wireless is enabled on your media bridge. The indicator will blink when data is
transmitted or received from 5GHz wireless devices connected to your media
bridge.
2.4GHz Wireless (Link/Activity) LED: The indicator will turn solid green when
2.4GHz wireless is enabled on your media bridge. The indicator will blink when
data is transmitted or received from 2.4GHz wireless devices connected to your
media bridge.
LAN Ports 1-4 (Link/Activity) LED: These LED indicators will turn solid green when
Gigabit LAN ports 1-4 (Black) are physically connected to your wired network
devices (which are turned on) with a network or Ethernet cable. These LED
indicators will blink green while data is transmitted or received through your
media bridge’s Gigabit LAN ports.
Power/WPS LED: The indicator will turn solid green when your media bridge is
powered on. Otherwise if this LED indicator is off, there is no power to your
media bridge. The indicator will also blink when WPS is activated. The LED will
stop blinking and will remain solid green once the WPS process is completed.
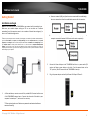
Basic Media Bridge and Router Setup
Application Diagram
The media bridge is connected by Ethernet or network cable with your client devices such as your
TV, DVD player, or game console; connected wirelessly with your router either on the 2.4GHz
(default) or 5GHz band.
The router is installed near the modem (typically supplied by your ISP “Internet Service Provider”)
and is physically connected via Ethernet or network cable from the router’s Internet port to the
modem’s network port. 2.4GHz wireless signals are broadcasted from the router to wireless
clients such as laptops (with wireless capability) and the less congested 5GHz wireless signals are
broadcasted from the router to other wireless client devices such as the media bridge, TEW-
800MB, which connects with your TV, game console, or DVD player, thereby providing Internet
access for all network ready devices.
5GHz Wireless LED
2.4GHz Wireless LED
LAN Ports 1-4 LEDs
Power/WPS LED

© Copyright 2013 TRENDnet. All Rights Reserved.
TRENDnet User’s Guide
TEW-800MB
6
Getting Started
Installation and Login
Note: Do not connect/install the TEW-800MB to your network until instructed to do so.
Make sure your network adapter settings on PC are set to obtain an IP address
automatically and the computer name is not a member of domain but workgroup*, or
refer to the Troubleshooting section.
*
Make sure your computer name is a member of a workgroup, not a member of a domain. Under Windows 7,
go to the Control Panel, then System, then Change Settings; under the computer name tab of the system
properties, select Change in order to set the computer name between the Domain and the Workgroup. In case
your computer name is already under a domain name - In order to have the Computer Name/Domain
Changes, you will have to enter the name and password of an account with permission to remove the
computer from the domain. If you have issues doing so, please consult the IT person who made the domain
name settings on your computer.
1. As illustrated above, connect one end of the provided RJ-45 network cable to one
of the TEW-800MB’s network ports. Connect the other end of the cable to your
computer’s network port**; move on to the next step.
**Other options (make sure all devices are powered on and network cables are
connected correctly):
a. Have one network (LAN) port from the router connect with the media bridge;
have one network port from the media bridge connect with the computer.
b. Have one network port from the media bridge and one network port from the
computer connect with network (LAN) ports on the router respectively.
2. Connect the Power Adapter to the TEW-800MB and then to a power outlet (EU
versions will have a power button on the back. Push the power button to the
“On” position.). Wait 30 seconds for the TEW-800MB to boot up.
3. Plug in the power adapter and verify the Power & LAN port LEDs are lit.

© Copyright 2013 TRENDnet. All Rights Reserved.
TRENDnet User’s Guide
TEW-800MB
7
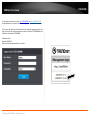
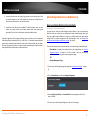
4. Open your web browser and enter http://TEW-800MB/ or http://192.168.10.110/
into the address bar to access the wizard and configuration menu whenever you require.
5. Enter your User Name and Password, select your preferred language, and then click
Login. You can find the unique password on a sticker on the front of TEW-800MB and on
the label on the bottom of TEW-800MB.
User Name: admin
Password: XXXXXXXX
Note: User name and Password are case sensitive.

© Copyright 2013 TRENDnet. All Rights Reserved.
TRENDnet User’s Guide
TEW-800MB
8
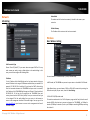
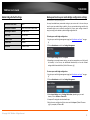
Access to the Management Interface
The wizard will automatically appear after you successfully log in. If you wish not to
continue with the wizard and access to the management interface directly, click Cancel.
Then, the management interface will appear.
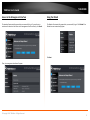
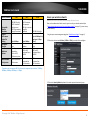
Using the Wizard
The Wizard will automatically appear after you successfully log in. Click Wizard if the
Wizard does not automatically appear.
Click Next

© Copyright 2013 TRENDnet. All Rights Reserved.
TRENDnet User’s Guide
TEW-800MB
9
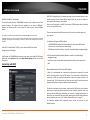
Select Manual Setup and then click Next.
Click Scan
Select the Wireless Network Name for your wireless network and then click Select.
1. Click Next
Select the security mode on your router; then enter your router’s Passphrase/Password
and click Next.
2. Click Apply

© Copyright 2013 TRENDnet. All Rights Reserved.
TRENDnet User’s Guide
TEW-800MB
10
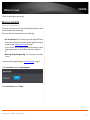
3. Click OK and wait while changes are being applied. Setup is complete. Place
the TEW-800MB in your desired location. Please refer to the “Steps to improve
wireless connectivity” section on page 18 for your location placement.
After the connection between the TEW-800MB and your router is successful,
the IP address of the TEW-800MB will change to a different IP from the default,
192.168.10.110. To find out the IP assigned to the TEW-800MB from your
router, please check the DHCP client (device) list on your router and then type
in the assigned IP of the media bridge from your router in the browser to
access to the management interface of the media bridge. You may type in the
http://tew-800mb
in your browser to access to the management interface of
the media bridge.
Wi-Fi Protected Setup (WPS)
1. Power up the TEW-800MB (On/Off power switch, EU only); wait until the
power LED on the front of the unit lights up.
Press the WPS button on your router for 5 sec, then the WPS button on the
TEW-800MB for another 5 sec.
2. The power button will start blinking. Installation is complete when the power
LED turns solid green. Note: With the WPS installation method, the TEW-
800MB adopts your router's password settings and wireless encryption.
In WPS mode, the TEW-800MB may connect to your router on the default
2.4GHz band. Please refer to the Manual setting of the Basic Wireless Setting
section for the 5GHz band choice.

© Copyright 2013 TRENDnet. All Rights Reserved.
TRENDnet User’s Guide
TEW-800MB
11
Network
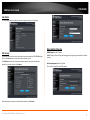
LAN Setting
LAN Connection Type
Choose "Static IP (fixed IP)" if your router does not support DHCP or if for any
other reason you need to assign a fixed address to the media bridge. In this
case, you must also configure the following fields.
IP Address
It’s the IP address of this Media Bridge on the local area network. Assign any
unused IP address in the range of IP addresses available from your network. For
example, 192.168.10.110 is the default. If you chose the DHCP client setting:
After the connection between the TEW-800MB and your router is successful,
the IP address of the TEW-800MB will change to a different IP from the default,
192.168.10.110. To find out the IP assigned to the TEW-800MB from your
router, please check the DHCP client (device) list on your router and then type
in the assigned IP of the media bridge from your router in the browser to
access to the management interface of the media bridge. You may type in the
http://tew-800mb
in your browser to access to the management interface of
the media bridge.
Subnet Mask
The subnet mask of the local area network; it should be the same as your
router has.
Default Gateway
The IP address of the router on the local area network.
Wireless
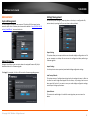
Basic Wireless Setting
You can choose Wi-Fi Protected Setup™ (WPS) or Manual setup.
In WPS mode, the TEW-800MB may connect to your router on the default 2.4GHz band.
Under Manual setup, you can choose a 2.4GHz or 5GHz Wi-Fi connection by entering the
SSID and security key of your router, then click Save Settings.
2.4 GHz 802.11 B/G/N mixed mode
This wireless mode works in the 2.4GHz frequency range and will only allow the use of
wireless B/G/N client devices to connect and access the TEW-800MB, at 11Mbps for
wireless B, 54Mbps for wireless G, and up to 150Mbps transmitting/300Mbps receiving
for wireless N.

© Copyright 2013 TRENDnet. All Rights Reserved.
TRENDnet User’s Guide
TEW-800MB
12
5GHz 802.11 A/N/AC** mixed mode
This wireless mode allows the TEW-8000MB to connect only to devices on the 5GHz
wireless frequency. The highest data rate supported in this mode is 867Mbps*.
However, the wireless router or access point will need to have a similar 867Mbps
feature.
*For maximum performance of up to 867 Mbps use with an 867 Mbps 802.11ac wireless router.
**Maximum wireless signal rates are referenced from IEEE 802.11 theoretical specifications. Actual data
throughput and coverage will vary depending on interference, network traffic, building materials and other
conditions
Under Wi-Fi Protected Setup™ (WPS), you can choose the PBC (Push Button
Configuration) or PIN settings.
In WPS mode, the TEW-800MB may connect to your router on the default 2.4GHz band.
Please refer to the Manual setting of the Basic Wireless Setting section, for the 5GHz
band choice.
Connecting with WPS
WPS (Wi-Fi Protected Setup) is a feature that makes it easy to connect devices to your
wireless network. If your wireless devices support WPS, you can use this feature to
easily add wireless devices to your network.
Note: You will not be able to use WPS if your router’s SSID Broadcast setting is disabled
or if you are using WEP security.
There are two methods the WPS feature can easily connect your wireless devices to
your network.
• Push Button Configuration (PBC) method
- (RECOMMENDED) Hardware Push Button method – with external WPS buttons
located on your router and on your media bridge
- WPS Software/Virtual Push Button - located in the media bridge’s management page
• PIN (Personal Identification Number) Method - located in the media bridge’s
management page
Note: Refer to your wireless device documentation for details on the operation of
WPS.
Recommended Hardware Push Button (PBC) Method
• Note: It is recommended that a wireless key (passphrase or password) is created
before connecting clients using the PBC method. If no wireless key is defined when
connecting via PBC, the router will automatically create an encryption key that is 64
characters long. This 64 character key will then have to be used if you have to connect
computers to the router using the traditional connection method.
To add a wireless device to your network, simply push the WPS button on the wireless
device you are connecting (consult client device User’s Guide for length of time), then
push and hold the WPS button located on your router for 5 seconds and release it. A
blue LED on your router WPS button will flash indicating that the WPS setup process has
been activated on your router. (See “Product Hardware Features” on page 5)
For connecting additional WPS supported devices, repeat this process for each
additional device.

© Copyright 2013 TRENDnet. All Rights Reserved.
TRENDnet User’s Guide
TEW-800MB
13
Link Status
The Status page shows the settings and current operation status of the Station.
Site Survey
Use the Site Survey tool to search for wireless networks around the TEW-800MB bridge.
Click on the Scan button to search for wireless network to join.
Click Refresh to search for the wireless networks around; then select the wireless
network in your choice; then click Connect.
Enter the passphrase in your selected wireless network; click Connect.
QoS, Quality of Service
WMM Support Enable / Disable
WMM® Quality of Service (QoS) technology prioritizes gaming, Internet calls, and video
streams.
No Acknowledgement Enable / Disable
To turn off the prioritization of ACK packets

© Copyright 2013 TRENDnet. All Rights Reserved.
TRENDnet User’s Guide
TEW-800MB
14
Administrator
System Management
You can configure the administrator password. The device URL (host name) can be
entered in place of the IP address you choose and the default is http://192.168.10.110
or http://tew-800mb/ , to access this device.
Upload Firmware
Navigate to the folder on your computer where the unzipped firmware file (.bin) is
located and select it for firmware upgrade.
Click Apply. If prompted, click Yes or OK to start the firmware upgrading process.
Settings Management
You can save system settings by exporting them, as a backup, to a configuration file;
restore them by importing the file, or reset them to factory default.
Export Settings
This option allows you to export and then save the media bridge's configuration to a file
on your computer as a backup. Be sure to save the configuration before performing a
firmware upgrade.
Import Settings
Use this option to restore previously saved media bridge configuration settings.
Load Factory Defaults
This option restores all configuration settings back to the settings that were in effect at
the time the media bridge was shipped from the factory. Any settings that have not
been saved will be lost. If you want to save your media bridge configuration settings,
use the Export Settings option above.
System Reboot
This restarts the media bridge. It is useful for restarting when you are not near the
device.

© Copyright 2013 TRENDnet. All Rights Reserved.
TRENDnet User’s Guide
TEW-800MB
15
Status
You can check system information and network configurations on this page.
Wireless Networking and Security
How to choose the type of security for your wireless network
Setting up wireless security is very important. Leaving your wireless network open and
unsecure could expose your entire network and personal files to outsiders. TRENDnet
recommends reading through this entire section and setting up wireless security on your
router and the media bridge.
There are a few different wireless security types supported in wireless networking each
having its own characteristics which may be more suitable for your wireless network
taking into consideration compatibility, performance, as well as the security strength
along with using older wireless networking hardware (also called legacy hardware).
It is strongly recommended to enable wireless security to prevent unwanted users from
accessing your network and network resources (personal documents, media, etc.).
In general, it is recommended that you choose the security type with the highest
strength and performance supported by the wireless computers and devices in your
network. Please review the security types to determine which one you should use for
your network.
Wireless Encryption Types
• WEP: Legacy encryption method supported by older 802.11b/g hardware. This is
the oldest and least secure type of wireless encryption. It is generally not
recommended to use this encryption standard, however if you have old 802.11 b or
802.11g wireless adapters or computers with old embedded wireless cards(wireless
clients), you may have to set your router to WEP to allow the old adapters to
connect to the router.
Note: This encryption standard will limit connection speeds to 54Mbps.
• WPA: This encryption is significantly more robust than the WEP technology. Much
of the older 802.11g hardware was been upgraded (with firmware/driver upgrades)
to support this encryption standard. Total wireless speeds under this encryption
type however are limited to 54Mbps.
• WPA-Auto: This setting provides the router with the ability to detect wireless
devices using either WPA or WPA2 encryption. Your wireless network will
automatically change the encryption setting based on the first wireless device
connected. For example, if the first wireless client that connects to your wireless
network uses WPA encryption your wireless network will use WPA encryption. Only
when all wireless clients disconnect to the network and a wireless client with WPA2
encryption connects your wireless network will then change to WPA2 encryption.
Note: WPA2 encryption supports 802.11n speeds and WPA encryption will limit
your connection speeds to 54Mbps
• WPA2: This is the most secure wireless encryption available today, similar to WPA
encryption but more robust. This encryption standard also supports the highest
connection speeds. TRENDnet recommends setting your router to this encryption
standard. If you find that one of your wireless network devices does not support
WPA2 encryption, then set your router to either WPA or WPA-Auto encryption.
Note: Check the specifications of your wireless network adapters and wireless
appliances to verify the highest level of encryption supported. Below is brief
comparison chart of the wireless security types and the recommended
configuration depending on which type you choose for your wireless network.

© Copyright 2013 TRENDnet. All Rights Reserved.
TRENDnet User’s Guide
TEW-800MB
16
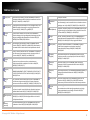
Security Standard
WEP
WPA
WPA2
Compatible
Wireless
Standards
IEEE 802.11a/b/g
(802.11n devices
will operate at
802.11g to connect
using this standard)
IEEE 802.11a/b/g
(802.11n devices
will operate at
802.11g to connect
using this
standard) IEEE 802.11a/b/g/n
Highest
Performance
Under This
Setting
Up to 54Mbps
Up to 54Mbps
Up to 450Mbps (11n)
and up to 1.3Gbps
(11ac)*
Encryption
Strength Low Medium High
Additional
Options
Open System or
Shared Key,
HEX or ASCII,
Different key sizes
TKIP or AES,
Preshared Key or
RADIUS
TKIP or AES,
Preshared Key or
RADIUS
Recommended
Configuration
Open System ASCII
13 characters
TKIP
Preshared Key
8-63 characters
AES
Preshared Key
8-63 characters
*Dependent on the maximum 802.11n/ac data rate supported by the device (150Mbps,
300Mbps, 450Mbps, 867Mbps, or 1.3Gbps)
Secure your wireless network
Wireless (2.4GHz or 5GHz)> Basic Wireless Settings> Wireless Security
After you have determined which security type to use for your wireless network (see
“How to choose the security type for your wireless network
” on page 15), you can set up
wireless security.
1. Log into your router management page (see “Installation and Login
” on page 6).
2. Click on the wireless band Wireless (2.4GHz or 5GHz) you would like to configure.
3. Click on the Security Mode drop-down list to select your wireless security type.

© Copyright 2013 TRENDnet. All Rights Reserved.
TRENDnet User’s Guide
TEW-800MB
17
Selecting WEP-OPEN, WEP-SHARED:
If selecting WEP (Wired Equivalent Privacy), please review the WEP settings to configure
and click Apply to save the changes.
Note: WPS functionality is not available when using WEP.
In the Security Mode drop-down list, select WEP-OPEN or WEP-SHARED.
Note: It is recommended to use WEP-OPEN because it is known to be more secure than
Shared Key.
• Current Network Key - You can define 1 key.
• Network Key 1
o This is where you enter the WEP key needed for a computer to
connect to the router wirelessly
o You can define 1 passwords or 1 key.
o When connecting to the router, the TEW-800MB must match both the
password and the Key number.
Note: It is recommended to use 128-bit format because it is more secure to use a
key that consists of more characters.
• Click here to display - Typically, the password characters are masked for
security purposes. This link displays actual characters of the currently assigned
password for your reference.
Selecting WPA-Personal, or WPA2-Personal (WPA2-Personal recommended):
In the Security Mode drop-down list, make selection and enter passphrase.
• WPA passphrase: Enter the passphrase.
o This is the password or key that is used to connect your computer to the router
wirelessly; now you have the TEW-800MB connect to your router as wireless
client.
Note: 8-63 alphanumeric characters (a,b,C,?,*, /,1,2, etc.)
WEP Key Format HEX ASCII
Character set 0-9 & A-F, a-f only Alphanumeric (a,b,C,?,*, /,1,2, etc.)
64-bit key length 10 characters 5 characters
128-bit key length 26 characters 13 characters

© Copyright 2013 TRENDnet. All Rights Reserved.
TRENDnet User’s Guide
TEW-800MB
18
Connect devices to your Media Bridge
A variety of network devices can connect to your wireless network such as:
• Gaming Consoles
• Internet enabled TVs
• Network media players
• IP cameras
Each device may have its own software utility for searching and connecting to available
wireless networks, therefore, you must refer to the User’s Manual/Guide of your client
device to determine how to search and connect to this router’s wireless network.
Steps to improve wireless connectivity
There are a number of factors that can impact the range of wireless devices. Follow
these tips to help improve your wireless connectivity:
1. Keep the number of obstructions to a minimum. Each obstruction can reduce
the range of a wireless device. Position the wireless devices, the router and the
media bridge, in a manner that will minimize the amount of obstructions
between them.
a. For the widest coverage area, install your router near the center of
your home, and near the ceiling, if possible.
b. Avoid placing the router or the media bridge on or near metal objects
(such as file cabinets and metal furniture), reflective surfaces (such as
glass or mirrors), and masonry walls.
c. Any obstruction can weaken the wireless signal (even non-metallic
objects), so the fewer obstructions between the router and the media
bridge, the better.
d. Place the router or the media bridge in a location away from other
electronics, motors, and fluorescent lighting.
e. Many environmental variables can affect the router and the media
bridge’s performance, so if your wireless signal is weak, place the
router and the media bridge in several locations and test the signal
strength to determine the ideal position.
2. Building materials can have a large impact on your wireless signal. In an indoor
environment, try to position the wireless devices so that the signal passes
through less dense material such as dry wall. Dense materials like metal, solid
wood, glass or even furniture may block or degrade the signal.

© Copyright 2013 TRENDnet. All Rights Reserved.
TRENDnet User’s Guide
TEW-800MB
19
3. Antenna orientation can also have a large impact on your wireless signal. Use
the wireless adapter or the media bridge’s site survey tool to determine the
best antenna orientation for your wireless devices.
4. Interference from devices that produce RF (radio frequency) noise can also
impact your signal. Position your wireless devices away from anything that
generates RF noise, such as microwaves, radios and baby monitors.
If possible, upgrade wireless network interfaces (such as wireless cards in computers)
from older wireless standards to 802.11n or 802.11ac. If a wirelessly networked device
uses an older standard, the performance of the entire wireless network may be slower.
If you are still experiencing low or no signal consider repositioning the wireless devices,
installing additional access points or wireless extenders.
Media Bridge Maintenance & Monitoring
Reset your Media Bridge to factory defaults
Administrator > Settings Management
You may want to reset your media bridge to factory defaults if you are encountering
difficulties with your router and have attempted all other troubleshooting. Before you
reset your media bridge to defaults, if possible, you should backup your media bridge
configuration first; restore configuration after firm upgrade or reset, see “
Backup and
restore your media bridge configuration settings” on page 20.
There are two methods that can be used to reset your media bridge to factory defaults.
• Reset Button – Located on the bottom panel of your media bridge, see “
Product
Hardware Features” on page 4. Use this method if you are encountering
difficulties with accessing your router management page.
OR
• Settings Management Page
1. Log into your media bridge management page (see “Installation and Login
” on page
6).
2. Click on Administrator and click on Settings Management.
3. Under Load Factory Default, click Load Default. When prompted to confirm this
action, click OK.
4. To restore your media bridge configuration: refer to the next page.

© Copyright 2013 TRENDnet. All Rights Reserved.
TRENDnet User’s Guide
TEW-800MB
20
Media Bridge Default Settings
Administrator User Name admin
Administrator Password Please refer sticker or device label
Media Bridge IP Address 192.168.10.110
Subnet Mask 255.255.255.0
Wireless 2.4GHz Enabled
Wireless 5Ghz Disabled
WPS default Wireless 2.4GHz
Backup and restore your media bridge configuration settings
Administrator > Settings Management
You may have added many customized settings to your router and in the case that you
need to reset your media bridge to default, all your customized settings would be lost
and would require you to manually reconfigure all of your router settings instead of
simply restoring from a backed up media bridge configuration file.
To backup your media bridge configuration:
1. Log into your media bridge management page (see “Installation and Login
” on page
6).
2. Click on Administrator and click on Settings Management.
3. Under Export Settings section, click Export.
4. Depending on your web browser settings, you may be prompted to save a file (specify
the location) or the file may be downloaded automatically to the web browser
settings default download folder. (Default Filename: .cfg)
To restore your media bridge configuration:
1. Log into your media bridge management page (see “Installation and Login
” on page
6).
2. Click on Administrator and click on Settings Management.
3. Under Import Settings, next to Settings file location, depending on your web
browser, click on Browse or Choose File.
4. A separate file navigation window should open.
5. Select the router configuration file to restore and click Import. (Default Filename:
.cfg). If prompted, click Yes or OK.
La pagina si sta caricando...
La pagina si sta caricando...
La pagina si sta caricando...
La pagina si sta caricando...
La pagina si sta caricando...
La pagina si sta caricando...
La pagina si sta caricando...
La pagina si sta caricando...
La pagina si sta caricando...
La pagina si sta caricando...
-
 1
1
-
 2
2
-
 3
3
-
 4
4
-
 5
5
-
 6
6
-
 7
7
-
 8
8
-
 9
9
-
 10
10
-
 11
11
-
 12
12
-
 13
13
-
 14
14
-
 15
15
-
 16
16
-
 17
17
-
 18
18
-
 19
19
-
 20
20
-
 21
21
-
 22
22
-
 23
23
-
 24
24
-
 25
25
-
 26
26
-
 27
27
-
 28
28
-
 29
29
-
 30
30


Trendnet RB-TEW-800MB Guida utente
- Categoria
- Router
- Tipo
- Guida utente
- Questo manuale è adatto anche per
in altre lingue
- English: Trendnet RB-TEW-800MB User guide
Documenti correlati
-
Trendnet RB-TEW-809UB Manuale utente
-
-
-
-
-
-
Trendnet TEW-637AP 3.01 Manuale utente
-
Trendnet RB-TEW-805UB Scheda dati
-
-
Trendnet TEW-652BRP Manuale del proprietario
Altri documenti
-
Edimax BR-6208ACD Quick Installation Manual
-
Edimax EW-7811UN Manuale utente
-
Silex BR-500AC Guida utente
-
Longshine IEEE802.11n AP/Router/Client Manuale utente
-
D-Link KA2IR883A1 Manuale utente
-
-
DeLOCK 12535 Scheda dati
-
Kindermann KLICK&SHOW K-FX Wireless Conferencing System Guida utente
-
SonicWALL SonicPoint NF Getting Started Manual
-
Edgewater Networks EdgeMarc 250AE Hardware Installation Manual