Canon EOS C200 Manuale utente
- Categoria
- Videocamere
- Tipo
- Manuale utente
Questo manuale è adatto anche per

Digital Cinema Camera
Instruction Manual
Firmware ver. 1.0.7.1.00
PUB. DIE-0504-000H

2
COPYRIGHT WARNING:
Unauthorized recording of copyrighted materials may infringe on the rights of copyright owners and be
contrary to copyright laws.
Trademark Acknowledgements
• SD, SDHC and SDXC Logos are trademarks of SD-3C, LLC.
• Canon is an authorized licensee of the CFast 2.0™ trademark, which may be registered in various
jurisdictions.
• Microsoft and Windows are trademarks or registered trademarks of Microsoft Corporation in the United
States and/or other countries.
• Apple and macOS are trademarks of Apple Inc., registered in the U.S. and other countries.
• Wi-Fi is a registered trademark of the Wi-Fi Alliance.
• JavaScript is a trademark or registered trademark of Oracle Corporation, its affiliates or subsidiaries in the
United States and other countries.
• HDMI, the HDMI logo and High-Definition Multimedia Interface are trademarks or registered trademarks of
HDMI Licensing Administrator, Inc. in the United States and other countries.
• Other names and products not mentioned above may be trademarks or registered trademarks of their
respective companies.
• This device incorporates exFAT technology licensed from Microsoft.
• This product is licensed under AT&T patents for the MPEG-4 standard and may be used for encoding MPEG-
4 compliant video and/or decoding MPEG-4 compliant video that was encoded only (1) for a personal and
noncommercial purpose or (2) by a video provider licensed under the AT&T patents to provide MPEG-4
compliant video. No license is granted or implied for any other use for MPEG-4 standard.
• THIS PRODUCT IS LICENSED UNDER THE AVC PATENT PORTFOLIO LICENSE FOR THE PERSONAL USE
OF A CONSUMER OR OTHER USES IN WHICH IT DOES NOT RECEIVE REMUNERATION TO (i) ENCODE
VIDEO IN COMPLIANCE WITH THE AVC STANDARD (“AVC VIDEO”) AND/OR (ii) DECODE AVC VIDEO THAT
WAS ENCODED BY A CONSUMER ENGAGED IN A PERSONAL ACTIVITY AND/OR WAS OBTAINED FROM
A VIDEO PROVIDER LICENSED TO PROVIDE AVC VIDEO. NO LICENSE IS GRANTED OR SHALL BE
IMPLIED FOR ANY OTHER USE. ADDITIONAL INFORMATION MAY BE OBTAINED FROM MPEG LA, L.L.C.
SEE HTTP://WWW.MPEGLA.COM

3
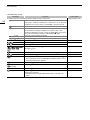
Highlights of the Camera
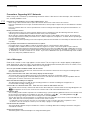
The Canon EOS C200 / EOS C200B Digital Cinema Camera is the latest camera in the highly-respected Cinema
EOS line. Cinema EOS cameras are increasingly relied upon by industry professionals due to their state-of-the-art
technology and the cameras’ high quality. The C200 / C200B continues that tradition by offering many features
that will help you articulate your creative vision.
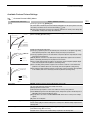
4K Recording System with Cinema Quality
Advanced 4K-compatible Super-35mm-equivalent
CMOS sensor
At the heart of the camera is a Super-35mm-
equivalent CMOS sensor and two DIGIC DV 6 image
processors, which enable the camera to capture
and process video at an effective pixel count of 8.85
megapixels (4096x2160) and offer a center
resolution of 1,800 TV lines
1
. The sensor integrates
noise-reduction technology that allows you to record
video at sensitivity levels from ISO 160 to
ISO 25600
2
.
1
Varies depending on the lens used.
2
The ISO speed range can be extended up to ISO 100 on
one end, and ISO 102400 on the other.
Interchangeable lenses
Enjoy the freedom of using interchangeable lenses
to achieve the look you want. The C200 / C200B
features an EF lens mount allowing you to use over
100 high-quality lenses from the Canon Cinema
Lens series and EF Lens series.
Multiple recording formats
The camera offers you a choice of the recording
format, depending on your project’s requirements.
The camera records 4K RAW data using the newly
developed Cinema RAW Light
3
(hereafter, referred
to as RAW) format, directly to the CFast Card. The
RAW data that the camera records is a proprietary
format and is even suitable as HDR source material.
The second recording format is XF-AVC, which
boasts high compression while maintaining high
video quality. The third recording format is MP4, a
widely-used and versatile format.
3
Please note that the Cinema RAW Light data recorded
by this camera is different from the Cinema RAW data
recorded by other Cinema EOS cameras.
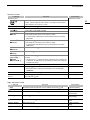
A variety of video and audio configuration options
(A 64)
RAW clips are recorded in 4096x2160 and,
depending on the frame rate, in 12- or 10-bit color
depth. Both MP4 and XF-AVC clips can be recorded
in 3840x2160 or 1920x1080 and in 8-bit color
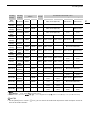
depth. For details on available combinations of
frame size, frame rate and color depth, see the
video configuration settings tables (A 65). The
camera records audio in 4-channel linear PCM or
2-channel MPEG-2 AAC-LC (MP4 clips only). With
such versatile options, the camera is sure to offer
you a configuration that meets your project’s needs
and shooting style.
Recording media
The camera records RAW clips to a CFast 2.0 card
or MP4 clips and XF-AVC clips to an SD card.
Because the camera is equipped with two SD card
slots, you can use two SD cards to continue
recording on the other card when the one being
used becomes full (relay recording) or to record the
same clip simultaneously on both cards to have a
backup recording (double slot recording)
4
(A 51).
While you record primary clips on a CFast card, you
can simultaneously record proxy clips—smaller files
(2048x1080) for offline editing—on an SD card
(A 113).
4
Relay recording and double slot recording are not
available for proxy clips.
Operability and Adaptability
Freely customizable compact design
The modular components, such as the LM-V1 LCD
Monitor
5
, LA-V1 LCD Attachment Unit
5
, HDU-2
Handle Unit
5
and GR-V1 Camera Grip
5
, will let you
expand and adapt the camera’s configuration to
match your shooting conditions (A 36).
5
Supplied accessory for the C200; optional accessory for
the C200B.
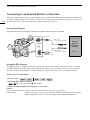
Assignable buttons
The camera and modular units feature a number of
buttons (on the camera’s body, LCD monitor and
camera grip) to which you can assign a large
number of functions (A 125). Assign functions that
you use often to the assignable buttons you find
most convenient to personalize the camera to your
needs and preferences.
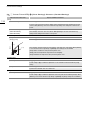
Dual Pixel CMOS AF
The camera features Dual Pixel CMOS AF and offers
various autofocus functions (A 80): Continuous AF,
One-shot AF (to use autofocus only when you
choose) or AF-boosted MF (to let you focus
manually most of the way and let the camera finish
focusing automatically). Using AF-boosted MF the
camera does not perform unreliable focus
adjustments, resulting in a smoother focusing
operation than with continuous AF. The camera can
also focus automatically on people’s faces (Face AF,
A 87) and track moving subjects while keeping
them in focus.

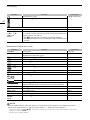
4
You can control a number of AF-related settings
including AF frame size and position, and AF speed.
Even while focusing manually, the Dual Pixel Focus
Guide function (A 82) serves as a visual, intuitive
guide that you can use to check if the image is in
focus and the required adjustment, if it is not. This
can be very helpful to ensure you always get
amazingly sharp 4K video.
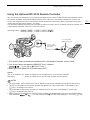
Remote operation
You can attach the optional RC-V100 Remote
Controller to the camera to control it from a
distance. The remote controller lets you control a
wide range of camera settings (A 123).
You can also operate the camera remotely via Wi-Fi
using the Browser Remote application (A 170).
Browser Remote lets you check the live view image
from the camera and adjust main camera settings.
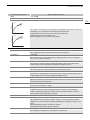
Versatile Artistic Expression
Special recording modes
The special recording modes (A 114) give you
more creative control over your recordings. You can
create a slow motion effect in your recordings,
record a frame at a set interval (ideal for nature shots
and other subjects with little movement) or record a
frame every time you press a button (ideal for stop
motion animation).
Custom picture settings
The improved custom picture menu gives you even
more options to control the “look” of your images.
Select one of the preset picture settings or set the
combination of gamma curve, color space and color
matrix that you wish to use. Then, you can adjust a
number of other image-related parameters in detail.
Other Functions
Save XF-AVC clips with ease
Use the XF Utility software (A 159) to save XF-AVC
clips to a computer. The software even allows you to
organize your clips.
Software for aiding RAW production workflow
Cinema RAW Development (A 160) can develop
the recorded 4K RAW data and export it as a
standard file type such as DPX or OpenEXR. You
can also import an EDL to recreate an edit created
on NLE software. This helps make a smooth
transition to the color grading process.
Assistance functions
The camera offers a number of assistance functions,
such as peaking and magnification (A 82),
onscreen markers (A 90), zebra patterns (A 91)
and B&W image (A 42), that you can display on
the LCD monitor or viewfinder
6
, or output through
the SDI terminal to display on an external monitor.
When using a logarithmic gamma curve, you can
also apply a LUT (A 156) to the displays or video
output for easier monitoring.
6
k
only.
Other improved features
• 5 levels of ND filter (A 71).
• In-camera correction for peripheral illumination
and chromatic aberration (A 39).
• Monaural built-in microphone for note taking.
• Three sets of customizable My Menu submenus
(A 34).
• Menu settings file that can be saved in the camera
or on an SD card to restore all the menu settings
or replicate them perfectly on another C200 /
C200B camera (A 137).
• Improved clip name format with more information
for easier identification and organization of clips
(A 61).
• Battery packs compatible with Intelligent System
for better remaining usage time information.

5
1. Introduction 9
About this Manual 9
Conventions Used in this Manual 9
Supplied Accessories 11
Names of Parts 12
LM-V1 LCD Monitor and LA-V1 LCD Attachment
Unit 17
GR-V1 Camera Grip 18
HDU-2 Handle Unit 19
Microphone Holder 19
4K Workflow Overview 20
Color Grading with the ACES Workflow 21
2. Preparations 23
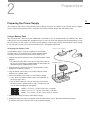
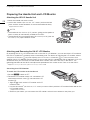
Preparing the Power Supply 23
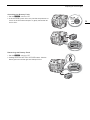
Using a Battery Pack 23
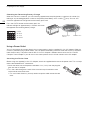
Using a Power Outlet 26
Turning the Camera On and Off 27
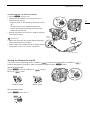
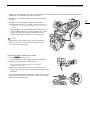
Preparing the Handle Unit and LCD Monitor 28
Attaching the HDU-2 Handle Unit 28
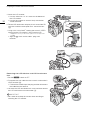
Attaching and Removing the LM-V1 LCD
Monitor 28
Date, Time and Language Settings 31
Setting the Date and Time 31
Changing the Language 32
Using the Menus 33
Selecting an Option from the Menu 33
Using the Customized Submenu (My Menu) 34
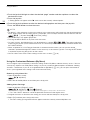
Preparing the Camera 36
Configuring the Modular Units 36
Preparing the Lens 37
Using the LCD Monitor 40
k
Using the Viewfinder 40
Adjusting the LCD Screen or Viewfinder
(
k
only) 41
Using a Tripod 42
Removing and Attaching the GR-V1 Camera
Grip 43
Attaching the Microphone Holder 44
Attaching the Shoulder Strap 44
Removing and Attaching the Terminal Covers 45
Using the Optional EVF-V70 Electronic
Viewfinder 46
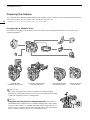
Preparing Recording Media 47
Compatible Recording Media 47
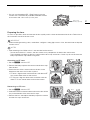
Inserting a CFast Card 48
Removing a CFast card 48
Inserting and Removing an SD Card 49
Initializing Recording Media 50
Switching Between the SD Card Slots 50
Relay Recording and Double Slot Recording 51
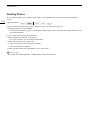
Checking the Remaining Recording Time on
Recording Media 51
Recovering Clips 52
Adjusting the Black Balance 53
3. Recording 55
Recording Video 55
Preparing to Record 55
Recording 56
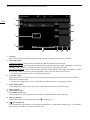
Onscreen Displays 57
Setting the Clip File Name 61
Selecting the File Numbering Method for MP4
Clips and Photos 62
Using the Fan 63
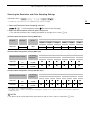
Video Configuration: Video Format,
System Frequency, Frame Rate and
Resolution 64
Selecting the Main Recording Format 64
Selecting the System Frequency 64
Selecting the Frame Rate 64
Selecting the Resolution and Color Sampling
Settings 65
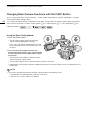
Changing Main Camera Functions with the
FUNC Button 66
Using the Direct Setting Mode 66
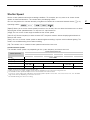
Shutter Speed 67
Changing the Shutter Speed Mode and Value 68
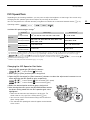
ISO Speed/Gain 69
Changing the ISO Speed or Gain Value 69
Using the Control Dial 70
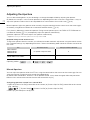
ND Filter 71
Table of Contents

6
Adjusting the Aperture 72
Manual Aperture 72
Momentary Automatic Aperture - Push Auto
Iris 74
Automatic Aperture 74
Exposure Compensation - AE Shift 75
Light Metering Mode 76
White Balance 77
Custom White Balance 77
Color Temperature/Preset White Balance 78
Auto White Balance (AWB) 79
Adjusting the Focus 80
Manual Focus 81
One-Shot AF 84
AF-Boosted MF 84
Continuous AF 85
Changing the AF Frame Size and Position 86
Face Detection 87
Tracking a Specific Subject 88
Zooming 89
Onscreen Markers and Zebra Patterns 90
Displaying Onscreen Markers 90
Displaying Zebra Patterns 91
Setting the Time Code 92
Selecting the Time Code Mode 92
Selecting Drop or Non-Drop Frame 93
Putting the Time Code Display on Hold 93
Setting the User Bit 95
Recording Audio 96
Audio Settings and Recorded Audio Channels 96
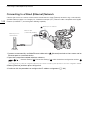
Connecting an External Microphone or External
Audio Input Source to the Camera 98
Setting the Audio Input Type for the
INPUT 1/INPUT 2 Terminals 99
Selecting the Audio Format for Clips 99
Selecting the Audio Input Source for Audio
Channels 100
Adjusting the Audio Recording Level 101
Advanced Audio Input Settings 102
Monitoring the Audio with Headphones 104
Colors Bars/Audio Reference Signal 105
Color Bars 105
Audio Reference Signal 105
Waveform Monitor 106
Displaying the Waveform Monitor 106
Configuring the Waveform Monitor 106
Adding Marks to Recordings 108
Adding a Shot Mark while Recording 108
Adding an $ Mark or % Mark after
Recording 108
Using Metadata 109
Setting a User Memo Created with Canon XF
Utility 109
Entering Information About the Recording 110
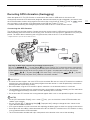
Recording GPS Information (Geotagging) 111
Reviewing a Recording 112
Simultaneous Recording of Proxy Clips 113
Special Recording Modes 114
Slow Motion Recording Mode 114
Pre-recording Mode 115
Frame Recording Mode 116
Interval Recording Mode 117
Continuous Recording 118
Taking Photos 120
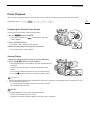
Photo Playback 121
Displaying the [Photos] Index Screen 121
Viewing Photos 121
Deleting Photos 122
Using the Optional RC-V100 Remote
Controller 123
4. Customization 125
Assignable Buttons 125
Changing the Assigned Function 125
Using an Assignable Button 126
Custom Picture Settings 129
Selecting Custom Picture Files 129
Preset Picture Settings 129
Editing a Custom Picture File’s Settings 130
Resetting Custom Picture Files 131
Renaming Custom Picture Files 131
Protecting Custom Picture Files 131
Copying Custom Picture Files 131
Embedding Custom Picture Settings in a
Clip 132
Available Custom Picture Settings 133
Saving and Loading Camera Settings 137
Saving Camera Settings 137
Loading Camera Settings 137

7
5. Playback 139
Playback 139
Clip Index Screen 139
Playing Back Clips 141
Onscreen Displays 141
Playback Controls 143
Adjusting the Volume 143
Clip Operations 144
Using the Clip Menu 144
Displaying Clip Information 145
Adding $ Marks or % Marks 146
Deleting an $ Mark or % Mark from a Clip 146
Adding Shot Marks 147
Deleting All Shot Marks in a Clip from the Index
Screen 147
Deleting Clips 147
Deleting the User Memo and GPS
Information 148
6. External Connections 149
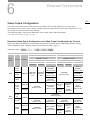
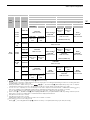
Video Output Configuration 149
Recording Video Signal Configuration and Video
Output Configuration by Terminal 149
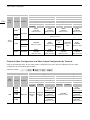
Playback Video Configuration and Video Output
Configuration by Terminal 150
Connecting to an External Monitor or
Recorder 152
Connection Diagram 152
Using the SDI Terminal 152
Using the HDMI OUT Terminal 153
Setting the Scan Mode of the Output Signal 154
Outputting Simultaneously from the HDMI OUT
Terminal and SDI Terminal 155
HDR Output 155
Applying a LUT to Screens/Video Outputs 156
Output by terminal/device and HDR setting 156
Superimposing Onscreen Displays on Screens/
Video Outputs 157
Audio Output 158
Working with Clips on a Computer 159
Saving MP4 Clips 159
Saving XF-AVC Clips 159
Developing RAW Clips 160
7. Network Functions 161
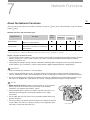
About the Network Functions 161
Connecting to a Wi-Fi Network 162
Camera Access Point 163
Connecting in Infrastructure Mode 164
Wi-Fi Protected Setup (WPS) 165
Searching for Access Points 166
Manual Setup 167
Connecting to a Wired (Ethernet) Network 168
Selecting a Network Connection 169
Checking and Changing Network Settings 169
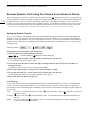
Browser Remote: Controlling the Camera from a
Network Device 170
Setting Up Browser Remote 170
Starting Browser Remote 171
Using Browser Remote 173
FTP File Transfer 182
Preparations 182
Transferring Clips (FTP Transfer) 183
8. Additional Information 185
Menu Options 185
Displaying the Status Screens 196
Troubleshooting 207
List of Messages 212
Handling Precautions and Safety Instructions 217
Maintenance/Others 221
Optional Accessories 222
Specifications 224
Appendix: Compatible Lenses and Functions 230
Reference Tables 231
Index 232

8

1
9
Introduction
About this Manual
Thank you for purchasing the Canon EOS C200 / EOS C200B*. Please read this manual carefully before you use
the camera and retain it for future reference. Should the camera fail to operate correctly, refer to
Troubleshooting
(A 207).
* Availability differs from area to area.
Conventions Used in this Manual
• IMPORTANT: Precautions related to the camera’s operation.
• NOTES: Additional topics that complement the basic operating procedures.
• A: Reference page number.
•
l
: The icon refers to text and illustrations that apply only to the indicated model.
• The following terms are used in this manual.
“Screen” refers to the LCD screen on the LCD monitor
1
and to the viewfinder
2
screen on the camera.
“SD card” refers to an SD, SDHC or SDXC memory card.
“Recording media” refers to CFast cards and SD cards.
“RAW data” refers to the data recorded using Cinema RAW Light.
• Photographs in the manual are simulated pictures taken with a still camera. Some screenshots have been
altered to make them easier to read.
• Illustrations in the manual show the Canon EOS C200 camera with the LM-V1 LCD Monitor
1
, LA-V1 LCD
Attachment Unit
1
, HDU-2 Handle Unit
1
, GR-V1 Camera Grip
1
and Canon EF 50mm f/1.4 USM lens attached.
1
Supplied accessory for the C200; optional accessory for the C200B.
2
l
The C200B is not equipped with a viewfinder but the optional EVF-V70 Electronic Viewfinder can be purchased
separately.

About this Manual
10
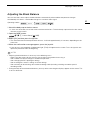
Operating modes
A shaded icon (like ) indicates that the function
described can be used in the operating mode shown
or for recordings made in the movie format shown in
the icon; a non-shaded icon (like ) indicates
that the function cannot be used. For details, refer to
Turning the Camera On and Off
(A 27) and
Selecting
the Main Recording Format
(A 64).
The arrow is used to abbreviate steps in
procedures. For a detailed explanation on how
to use the menus, refer to
Using the Menus
(A 33). For a concise summary of all available
menu options and settings, refer to the appendix
Menu Options
(A 185).
When a procedure requires selecting an option, the
available options are listed within or after the procedure.
Brackets [ ] are used to refer to menu options as they are
displayed on screen.

11
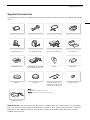
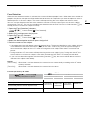
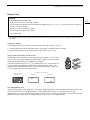
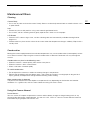
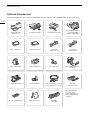
Supplied Accessories
Supplied Accessories
The following accessories are supplied with the camera. Note that some accessories are supplied only with the
C200.
About the lens kit: At the time of purchase, the lens kit is supplied with a lens (model number is on the product
box). Visit your local Canon website to download its instruction manual. Please note that the lens is also sold
separately so the supplied accessories listed in that instruction manual differ slightly from the accessories
supplied with the lens kit.
LM-V1 LCD Monitor
1
LA-V1 LCD Attachment Unit
1
UN-5 Unit Cable
1
HDU-2 Handle Unit
1
Microphone Holder
(incl. M4 fixation bolts (x 2))
GR-V1 Camera Grip
1, 2
(incl. grip attachment ring)
CA-A10 AC Adapter
(incl. power cord and ferrite core)
BP-A30 Battery Pack
(incl. terminal cover)
CG-A20 Battery Charger CA-CP200B Compact Power Adapter
(for the CG-A20; incl. power cord)
Eye Cup
1
Viewfinder Cap
1
Body Cap
2
Thumb Rest
3
Hex wrench (for 0.64 cm, 1/4"
screws), 0.64 cm (1/4") hex socket
head bolt, and bolt retainers (x4)
1
Tape Measure Hook
2
1
k
only.
2
Comes pre-attached to the camera.
3
l
Comes pre-attached to the camera.
SS-1200 Shoulder Strap
1

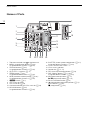
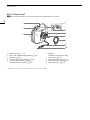
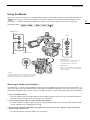
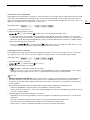
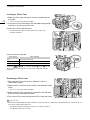
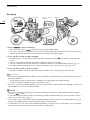
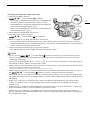
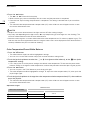
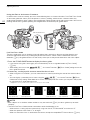
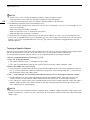
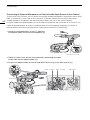
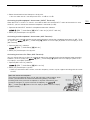
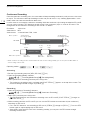
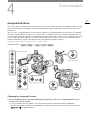
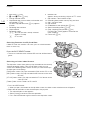
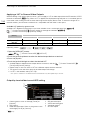
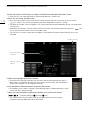
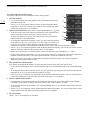
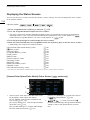
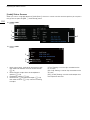
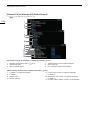
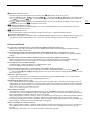
Names of Parts
12
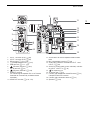
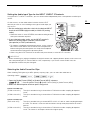
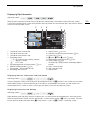
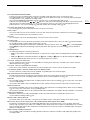
Names of Parts
1
7
8
9
10
11
12
13
14
2
3
4
5
6
15 16 17 18 19 20
1 Tape measure hook and focal plane mark
2 MAGN. (magnification) button (A 83)/
Assignable button Camera 1 (A 125)
3 PEAKING button (A 83)/
Assignable button Camera 2 (A 125)
4 ND FILTER +/– buttons (A 71)
5 ZEBRA button (A 91)/
Assignable button Camera 3 (A 125)
6 WFM (waveform monitor) button (A 106)/
Assignable button Camera 4 (A 125)
7
Q
switch (A 27)
8 CFast card slot cover
9 CFast card slot (A 48)
10 Card release button for CFast card slot (A 48)
11 ISO/GAIN button (A 69)/
Assignable button Camera 5 (A 125)
12 SHUTTER (shutter speed mode) button (A 67)/
Assignable button Camera 6 (A 125)
13 CFast card slot cover switch
14 CFast access indicator
15 Control dial (A 70, 72)
16 REC (start/stop recording) button (A 56)
17 DISP (display) button (A 57, 141)/
Assignable button Camera 7 (A 125)
18 WB (white balance) button (A 77)/
Ò
(play/pause) button (A 141)
19 Exhaust ventilation outlet (A 63)
20 Å (white balance adjustment) button (A 77)/
INDEX button (A 140)/
Ñ
(stop) button (A 141)

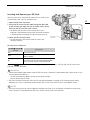
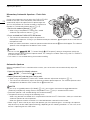
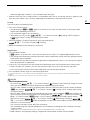
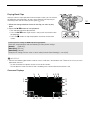
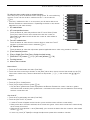
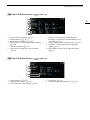
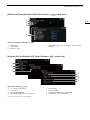
13
Names of Parts
p15
1
2
3
4
5
6
7
9
8
11
12
13
14
15
16
17
18
19
10
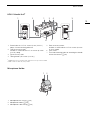
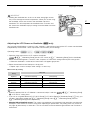
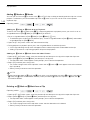
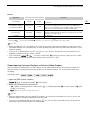
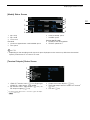
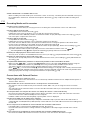
1 INPUT 1 terminal (XLR) (A 98)
2 INPUT 2 terminal (XLR) (A 98)
3 SDI terminal (A 149, 152)
4
×
(headphone) terminal (A 104)
5USB terminal (A 111, 159)
6 (Ethernet) terminal (A 168)
7DC IN terminal (A 26)
8 (Ethernet) indicator (A 168)
9 REMOTE terminal
For connecting the optional RC-V100 Remote
Controller or commercially available remote
controllers.
10 HDMI OUT terminal (A 149, 153)
11 Screw holes for the microphone holder fixation
bolts
12 MIC (microphone) terminal (A 98)
13 Audio input selection switches for INPUT 1 and
INPUT 2 (A 99)
14 ANALOG (analog audio source selection) switches
for INPUT 1/INPUT 2 (A 99)
15 Focal plane mark
16 Air intake vent (A 63)
17 Camera grip attachment thread/Rosette (A 43)
Compliant with ARRI rosettes.
18 Camera grip connection terminal (A 43)
19 Speaker (A 188)

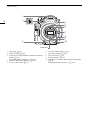
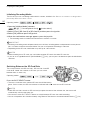
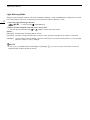
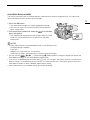
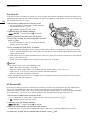
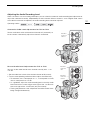
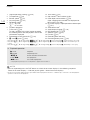
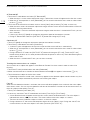
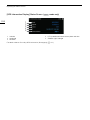
Names of Parts
14
1
4
5
6
7
8
9
10
2
3
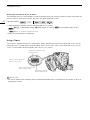
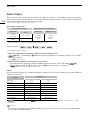
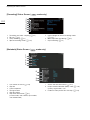
EF lens mount
1 Tally lamp (A 56)
2VIDEO terminal (A 28)
3 PUSH AUTO IRIS (momentary automatic aperture)
button (A 74)/
Assignable button Camera 10 (A 125)
4 Built-in monaural microphone (A 103)
5 EF lens mount index (A 37)
6 EF-S lens mount index (A 37)
7 Lens release button (A 37)
8 EF lens lock pin (A 37)
9 EF lens contacts (A 37)
10 ONE-SHOT AF (focus automatically once) button
(A 84)/
Assignable button Camera 11 (A 125)

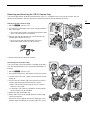
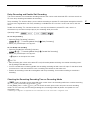
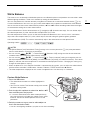
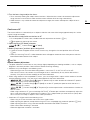
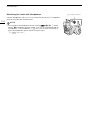
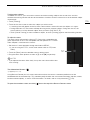
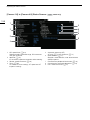
15
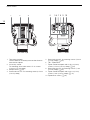
Names of Parts
4
1
2
3
13
14
16
17
18
15
5
6
7
8
9
10
11
12
4
16
17
18
5
6
7
8
9
k
l
1Eye sensor (A 40)
2Viewfinder (A 40, 41)
3 Dioptric adjustment lever (A 40)
4 Tally lamp (A 56)
5 FUNC (main functions) button (A 66)/
Assignable button Camera 8 (A 125)
6 Joystick (A 33)
7 CANCEL button (A 33)
8 MENU button (A 33, 125)
9 Cover for audio controls
10 AUDIO STATUS (display Audio status screen)
button (A 200)/
Assignable button Camera 9 (A 125)
11 Audio level switches for CH1 (top) and CH2
(bottom) (A 101)
12 Audio level dials for CH1 (top) and CH2 (bottom)
(A 101)
13 SD card slot A (left) and B (right) covers (A 48)
14 SD card slots (A 49)
In this manual, SD cards in each slot are referred
to as “SD card A” and “SD card B”, respectively.
15 SD CARD 2 (SD card slot A) and SD CARD 3
(SD card slot B) access indicators (A 49)
16 SLOT SELECT (SD card selection) button (A 50,
140)
17 BATTERY RELEASE button (A 25)
18 Battery compartment (A 25)

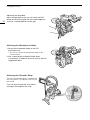
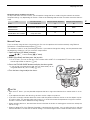
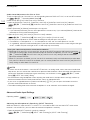
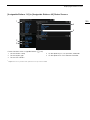
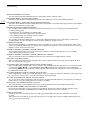
Names of Parts
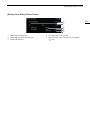
16
123
45 9678 10
1 Tape measure hook
Use the hook to accurately measure the distance
from the focal plane.
2 Accessory socket
For mounting accessories with 1/4"-20 screws
(6.9 mm (0.27 in.) deep).
3 Strap mounts (A 44)
4 Screw holes for 1/4"-20 mounting screws (8.5 mm
(0.33 in.) deep)
5 Screw hole for 3/8"-16 mounting screws (10 mm
(0.39 in.) deep) (A 42)
6 TB-1 Tripod Base
7 Tripod socket for tripods with 0.95 cm (3/8 in.)
screws (5.5 mm (0.22 in.) deep) (A 42)
8 Screw hole for 1/4"-20 mounting screws (7 mm
(0.28 in.) deep) (A 42)
9 Tripod socket for tripods with 0.64 cm (1/4 in.)
screws (5 mm (0.20 in.) deep) (A 42)
10 Tripod base screws (A 42)

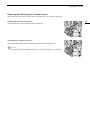
17
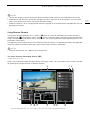
Names of Parts
LM-V1 LCD Monitor
1
and LA-V1 LCD Attachment Unit
1
1
Supplied accessory for the C200; optional accessory for the C200B.
1
8
9
10
2
3
4
5
6
7
1 LCD panel with touch screen (A 40, 41)
2 FUNC (main functions) button (A 66)/
Assignable button Monitor 1 (A 125)
3 MENU button (A 33, 125)
4 Joystick (A 33)
5 MIRROR (invert the displayed image) button
(A 40)
6 CANCEL button (A 33)
7 DISP (display) button (A 57, 141)/
Assignable button Monitor 2 (A 125)
8 Í mark for aligning the LCD monitor’s position
(A 28)
9 Screw hole for 1/4"-20 screws (11.2 mm (0.44 in.)
deep)
10 VIDEO terminal (A 28)
10
9
12
11
13
1
2
3
4
5
7
8
6
1 LCD attachment unit base 1 (A 28)
2 LCD attachment unit mount (A 28)
3 Sockets for the microphone holder (A 44)
4 Cable clamp (A 28)
5 LCD attachment unit lock screw (A 28)
6 LCD attachment base 2 (A 28)
7 LCD attachment unit pivot B (A 28)
8 Í mark for aligning the LCD monitor’s position
(A 28)
9 Pivot base fixation bolt
10 LCD monitor fixation bolt (A 28)
11 LCD attachment unit pivot A (A 28)
12 LCD monitor mount (A 28)
13 LCD attachment unit alignment marks

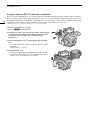
Names of Parts
18
GR-V1 Camera Grip
1
k
At the time of purchase, the camera grip is pre-attached to the camera.
1
Supplied accessory for the C200; optional accessory for the C200B.
1
4
5
6
7
8
9
10
2
3
1 Control dial (A 70, 72)
2 REC (start/stop recording) button (A 56)
3 Grip belt (A 44)
4 Joystick (A 33)/SET button (A 33)
5 FOCUS GUIDE button (A 82)/
Assignable button Grip 1 (A 125)
6 Rosette
Compliant with ARRI rosettes.
7 Lock screw (A 43)
8 Grip attachment ring (A 43)
9 Grip connection cable (A 43)
10 Connection plug (A 43)

19
Names of Parts
HDU-2 Handle Unit
1
1
Supplied accessory for the C200; optional accessory for the C200B.
2
With socket for 0.64 cm (1/4") screws
Microphone Holder
12134 5
67
1 Screw holes for 1/4"-20 screws (6 mm (0.24 in.)
deep; 4 in total on the handle unit.
2 Front accessory mount
2
Includes a screw hole for 1/4"-20 screws (8.8 mm
(0.35 in.) deep)
3 Top accessory shoe
4 Through-holes (∅ 8.8 mm (0.35 in.))
5 Rear accessory mount
Includes a screw hole for 1/4"-20 screws (8.8 mm
(0.35 in.) deep)
6 Lock screw
7 Thru-hole mounting holes for attaching the handle
unit to the camera (A 28)
1
3
2
1 Microphone lock screw (A 98)
2 Microphone holder (A 98)
3 Microphone cable clamp (A 98)

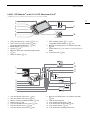
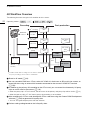
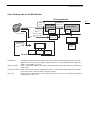
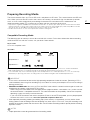
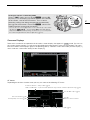
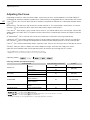
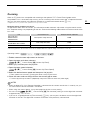
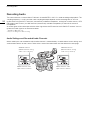
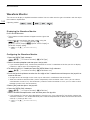
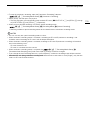
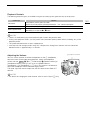
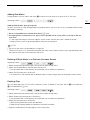
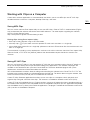
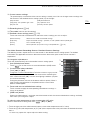
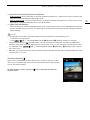
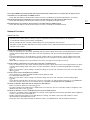
4K Workflow Overview
20
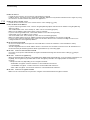
4K Workflow Overview
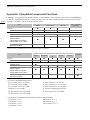
The following illustrates the typical 4K workflow for this camera.
Shoot in 4K mode (A 64).
You can record 4K RAW on a CFast card or 4K YCbCr 4:2:0 data on an SD card in the camera, or
record 4K data using an external 4K recorder connected to the camera’s HDMI OUT terminal
(A 152).
In addition to the primary 4K recording to the CFast card, you can record simultaneously 2K proxy
clips on an SD card in the camera (A 113).
• When the proxy clip is XF-AVC format, the file names of the primary and proxy clips will be similar (A 61).
• When the primary clip is XF-AVC format, proxy clip recording is not available.
After recording on a CFast card, develop the CFast card data using the Cinema RAW Development
software (A 160) to generate full-quality data.
• You can also generate proxy data with the software.
Perform color grading based on the full-quality data.
Operating modes:
Recording Post-production
CFast card
4K RAW
data
SD card
EDL
NLE software
4K recording
(RAW)
Cinema
RAW
Development
Color
grading
External 4K
recorder
2K
2
recording
(MP4 or
XF-AVC)
Full-quality
data
Proxy data
Full-quality
data
Proxy
data
1
For MP4 and XF-AVC recordings, the resolution is 3840x2160.
2
For proxy recordings, the resolution is 2048x1080.
HDMI OUT
terminal
RAW plugin
4K
1
recording
4K recording
(XF-AVC)
YCbCr 4:2:0
data
SD card
Full-quality
data
La pagina sta caricando ...
La pagina sta caricando ...
La pagina sta caricando ...
La pagina sta caricando ...
La pagina sta caricando ...
La pagina sta caricando ...
La pagina sta caricando ...
La pagina sta caricando ...
La pagina sta caricando ...
La pagina sta caricando ...
La pagina sta caricando ...
La pagina sta caricando ...
La pagina sta caricando ...
La pagina sta caricando ...
La pagina sta caricando ...
La pagina sta caricando ...
La pagina sta caricando ...
La pagina sta caricando ...
La pagina sta caricando ...
La pagina sta caricando ...
La pagina sta caricando ...
La pagina sta caricando ...
La pagina sta caricando ...
La pagina sta caricando ...
La pagina sta caricando ...
La pagina sta caricando ...
La pagina sta caricando ...
La pagina sta caricando ...
La pagina sta caricando ...
La pagina sta caricando ...
La pagina sta caricando ...
La pagina sta caricando ...
La pagina sta caricando ...
La pagina sta caricando ...
La pagina sta caricando ...
La pagina sta caricando ...
La pagina sta caricando ...
La pagina sta caricando ...
La pagina sta caricando ...
La pagina sta caricando ...
La pagina sta caricando ...
La pagina sta caricando ...
La pagina sta caricando ...
La pagina sta caricando ...
La pagina sta caricando ...
La pagina sta caricando ...
La pagina sta caricando ...
La pagina sta caricando ...
La pagina sta caricando ...
La pagina sta caricando ...
La pagina sta caricando ...
La pagina sta caricando ...
La pagina sta caricando ...
La pagina sta caricando ...
La pagina sta caricando ...
La pagina sta caricando ...
La pagina sta caricando ...
La pagina sta caricando ...
La pagina sta caricando ...
La pagina sta caricando ...
La pagina sta caricando ...
La pagina sta caricando ...
La pagina sta caricando ...
La pagina sta caricando ...
La pagina sta caricando ...
La pagina sta caricando ...
La pagina sta caricando ...
La pagina sta caricando ...
La pagina sta caricando ...
La pagina sta caricando ...
La pagina sta caricando ...
La pagina sta caricando ...
La pagina sta caricando ...
La pagina sta caricando ...
La pagina sta caricando ...
La pagina sta caricando ...
La pagina sta caricando ...
La pagina sta caricando ...
La pagina sta caricando ...
La pagina sta caricando ...
La pagina sta caricando ...
La pagina sta caricando ...
La pagina sta caricando ...
La pagina sta caricando ...
La pagina sta caricando ...
La pagina sta caricando ...
La pagina sta caricando ...
La pagina sta caricando ...
La pagina sta caricando ...
La pagina sta caricando ...
La pagina sta caricando ...
La pagina sta caricando ...
La pagina sta caricando ...
La pagina sta caricando ...
La pagina sta caricando ...
La pagina sta caricando ...
La pagina sta caricando ...
La pagina sta caricando ...
La pagina sta caricando ...
La pagina sta caricando ...
La pagina sta caricando ...
La pagina sta caricando ...
La pagina sta caricando ...
La pagina sta caricando ...
La pagina sta caricando ...
La pagina sta caricando ...
La pagina sta caricando ...
La pagina sta caricando ...
La pagina sta caricando ...
La pagina sta caricando ...
La pagina sta caricando ...
La pagina sta caricando ...
La pagina sta caricando ...
La pagina sta caricando ...
La pagina sta caricando ...
La pagina sta caricando ...
La pagina sta caricando ...
La pagina sta caricando ...
La pagina sta caricando ...
La pagina sta caricando ...
La pagina sta caricando ...
La pagina sta caricando ...
La pagina sta caricando ...
La pagina sta caricando ...
La pagina sta caricando ...
La pagina sta caricando ...
La pagina sta caricando ...
La pagina sta caricando ...
La pagina sta caricando ...
La pagina sta caricando ...
La pagina sta caricando ...
La pagina sta caricando ...
La pagina sta caricando ...
La pagina sta caricando ...
La pagina sta caricando ...
La pagina sta caricando ...
La pagina sta caricando ...
La pagina sta caricando ...
La pagina sta caricando ...
La pagina sta caricando ...
La pagina sta caricando ...
La pagina sta caricando ...
La pagina sta caricando ...
La pagina sta caricando ...
La pagina sta caricando ...
La pagina sta caricando ...
La pagina sta caricando ...
La pagina sta caricando ...
La pagina sta caricando ...
La pagina sta caricando ...
La pagina sta caricando ...
La pagina sta caricando ...
La pagina sta caricando ...
La pagina sta caricando ...
La pagina sta caricando ...
La pagina sta caricando ...
La pagina sta caricando ...
La pagina sta caricando ...
La pagina sta caricando ...
La pagina sta caricando ...
La pagina sta caricando ...
La pagina sta caricando ...
La pagina sta caricando ...
La pagina sta caricando ...
La pagina sta caricando ...
La pagina sta caricando ...
La pagina sta caricando ...
La pagina sta caricando ...
La pagina sta caricando ...
La pagina sta caricando ...
La pagina sta caricando ...
La pagina sta caricando ...
La pagina sta caricando ...
La pagina sta caricando ...
La pagina sta caricando ...
La pagina sta caricando ...
La pagina sta caricando ...
La pagina sta caricando ...
La pagina sta caricando ...
La pagina sta caricando ...
La pagina sta caricando ...
La pagina sta caricando ...
La pagina sta caricando ...
La pagina sta caricando ...
La pagina sta caricando ...
La pagina sta caricando ...
La pagina sta caricando ...
La pagina sta caricando ...
La pagina sta caricando ...
La pagina sta caricando ...
La pagina sta caricando ...
La pagina sta caricando ...
La pagina sta caricando ...
La pagina sta caricando ...
La pagina sta caricando ...
La pagina sta caricando ...
La pagina sta caricando ...
La pagina sta caricando ...
La pagina sta caricando ...
La pagina sta caricando ...
La pagina sta caricando ...
La pagina sta caricando ...
La pagina sta caricando ...
La pagina sta caricando ...
La pagina sta caricando ...
La pagina sta caricando ...
La pagina sta caricando ...
La pagina sta caricando ...
La pagina sta caricando ...
La pagina sta caricando ...
La pagina sta caricando ...
La pagina sta caricando ...
La pagina sta caricando ...
La pagina sta caricando ...
La pagina sta caricando ...
La pagina sta caricando ...
La pagina sta caricando ...
-
 1
1
-
 2
2
-
 3
3
-
 4
4
-
 5
5
-
 6
6
-
 7
7
-
 8
8
-
 9
9
-
 10
10
-
 11
11
-
 12
12
-
 13
13
-
 14
14
-
 15
15
-
 16
16
-
 17
17
-
 18
18
-
 19
19
-
 20
20
-
 21
21
-
 22
22
-
 23
23
-
 24
24
-
 25
25
-
 26
26
-
 27
27
-
 28
28
-
 29
29
-
 30
30
-
 31
31
-
 32
32
-
 33
33
-
 34
34
-
 35
35
-
 36
36
-
 37
37
-
 38
38
-
 39
39
-
 40
40
-
 41
41
-
 42
42
-
 43
43
-
 44
44
-
 45
45
-
 46
46
-
 47
47
-
 48
48
-
 49
49
-
 50
50
-
 51
51
-
 52
52
-
 53
53
-
 54
54
-
 55
55
-
 56
56
-
 57
57
-
 58
58
-
 59
59
-
 60
60
-
 61
61
-
 62
62
-
 63
63
-
 64
64
-
 65
65
-
 66
66
-
 67
67
-
 68
68
-
 69
69
-
 70
70
-
 71
71
-
 72
72
-
 73
73
-
 74
74
-
 75
75
-
 76
76
-
 77
77
-
 78
78
-
 79
79
-
 80
80
-
 81
81
-
 82
82
-
 83
83
-
 84
84
-
 85
85
-
 86
86
-
 87
87
-
 88
88
-
 89
89
-
 90
90
-
 91
91
-
 92
92
-
 93
93
-
 94
94
-
 95
95
-
 96
96
-
 97
97
-
 98
98
-
 99
99
-
 100
100
-
 101
101
-
 102
102
-
 103
103
-
 104
104
-
 105
105
-
 106
106
-
 107
107
-
 108
108
-
 109
109
-
 110
110
-
 111
111
-
 112
112
-
 113
113
-
 114
114
-
 115
115
-
 116
116
-
 117
117
-
 118
118
-
 119
119
-
 120
120
-
 121
121
-
 122
122
-
 123
123
-
 124
124
-
 125
125
-
 126
126
-
 127
127
-
 128
128
-
 129
129
-
 130
130
-
 131
131
-
 132
132
-
 133
133
-
 134
134
-
 135
135
-
 136
136
-
 137
137
-
 138
138
-
 139
139
-
 140
140
-
 141
141
-
 142
142
-
 143
143
-
 144
144
-
 145
145
-
 146
146
-
 147
147
-
 148
148
-
 149
149
-
 150
150
-
 151
151
-
 152
152
-
 153
153
-
 154
154
-
 155
155
-
 156
156
-
 157
157
-
 158
158
-
 159
159
-
 160
160
-
 161
161
-
 162
162
-
 163
163
-
 164
164
-
 165
165
-
 166
166
-
 167
167
-
 168
168
-
 169
169
-
 170
170
-
 171
171
-
 172
172
-
 173
173
-
 174
174
-
 175
175
-
 176
176
-
 177
177
-
 178
178
-
 179
179
-
 180
180
-
 181
181
-
 182
182
-
 183
183
-
 184
184
-
 185
185
-
 186
186
-
 187
187
-
 188
188
-
 189
189
-
 190
190
-
 191
191
-
 192
192
-
 193
193
-
 194
194
-
 195
195
-
 196
196
-
 197
197
-
 198
198
-
 199
199
-
 200
200
-
 201
201
-
 202
202
-
 203
203
-
 204
204
-
 205
205
-
 206
206
-
 207
207
-
 208
208
-
 209
209
-
 210
210
-
 211
211
-
 212
212
-
 213
213
-
 214
214
-
 215
215
-
 216
216
-
 217
217
-
 218
218
-
 219
219
-
 220
220
-
 221
221
-
 222
222
-
 223
223
-
 224
224
-
 225
225
-
 226
226
-
 227
227
-
 228
228
-
 229
229
-
 230
230
-
 231
231
-
 232
232
-
 233
233
-
 234
234
-
 235
235
-
 236
236
-
 237
237


Canon EOS C200 Manuale utente
- Categoria
- Videocamere
- Tipo
- Manuale utente
- Questo manuale è adatto anche per
in altre lingue
- English: Canon EOS C200 User manual
Documenti correlati
-
Canon EOS C200 Manuale utente
-
Canon EOS C70 Manuale utente
-
Canon EOS C300 Mark II PL Manuale utente
-
Canon EOS C300 Mark II Manuale del proprietario
-
-
Canon EOS C300 Mark III Manuale utente
-
-
-
-
Altri documenti
-
Eizo FDF2304W-IP Manuale del proprietario
-
Panasonic AJ-SDC915 Manuale utente
-
JVC Computer Monitor DT-V1710CG Manuale utente
-
Linksys WVC54GCA Manuale del proprietario
-
Panasonic AG-HCK 10G Manuale utente
-
Clinton Electronics CE-IDX2HDL Guida d'installazione
-
Marshall Electronics Orchid OR-434 Operating Instructions Manual
-
-
Alcatel OneTouch V100 Guida Rapida
-