Gigaset SL910H Guida utente

Categoria
Telefoni
Tipo
Guida utente
Gigaset SL910H / IM1 eng / A31008-M2370-R101-2-4N19 / Cover_front.fm / 6/1/17
SL910H
Congratulations
By purchasing a Gigaset, you have chosen a brand that is fully committed to
sustainability.
This product’s packaging is eco-friendly!
To learn more, visit www.gigaset.com.
Gigaset SL910H / IM1 eng / A31008-M2370-R101-2-4N19 / Cover_front.fm / 6/1/17
de en fr it nl 1
Gigaset SL910H / IM1 eng / A31008-M2370-R101-2-4N19 / overview.fm / 6/2/17
Template Lion A5 (small font), Version 3, 02.04.2012
Gigaset SL910H – with the special "touch"
Please note
To change the display language, proceed as described on page page 20.
Ð
òô
ó
¼ 06:00
V
<
Å Å Å
>
Status bar (£ page 12)
Icons (£page 38) show the telephone’s current settings and oper-
ating status. Touch the status bar to open the
£ status page,
page 12.
v Menu key
Press briefly: open main menus (£ page 12)
Press and hold: activate/deactivate (
£ page 13) keypad and dis-
play lock
a End call/end key
Press briefly: end call/paging, reject internal call, switch off ring tone
for external call, return to idle status
Press and hold: switch handset on/off
Touchscreen/display
Message LED (£ page 10)
Proximity sensor (
£ page 13)
Navigation area
Page position marker ,
Change page
ê/ë.
Å Ä Ä
Handset keys
c Talk key
Press briefly: Dial displayed number, accept call, switch between
earpiece and handsfree mode, open the redial list
Press and hold: assign a line
Mini USB connection socket
Connect wire-bound headset or handset to your PC
(Gigaset QuickSync)
Charging contacts
Idle displays or menu (
£ page 8)
2 de en fr it nl
Gigaset SL910H / IM1 eng / A31008-M2370-R101-2-4N19 / SL910HIVZ.fm / 6/1/17
Template Lion A5 (small font), Version 3, 02.04.2012
Contents
Contents
Gigaset SL910H – with the special "touch" . . . . . . . . . . . . . . . . . . . . . . . . . . . . . . . . . . . . . . . . . . . . . . . . . . . . . . . . . . . . . 1
Safety precautions . . . . . . . . . . . . . . . . . . . . . . . . . . . . . . . . . . . . . . . . . . . . . . . . . . . . . . . . . . . . . . . . . . . . . . . . . . . . . . . . . . . . 3
Getting started . . . . . . . . . . . . . . . . . . . . . . . . . . . . . . . . . . . . . . . . . . . . . . . . . . . . . . . . . . . . . . . . . . . . . . . . . . . . . . . . . . . . . . . 4
Display pages . . . . . . . . . . . . . . . . . . . . . . . . . . . . . . . . . . . . . . . . . . . . . . . . . . . . . . . . . . . . . . . . . . . . . . . . . . . . . . . . . . . . . . . . . 8
Using the telephone . . . . . . . . . . . . . . . . . . . . . . . . . . . . . . . . . . . . . . . . . . . . . . . . . . . . . . . . . . . . . . . . . . . . . . . . . . . . . . . . . 13
Making calls . . . . . . . . . . . . . . . . . . . . . . . . . . . . . . . . . . . . . . . . . . . . . . . . . . . . . . . . . . . . . . . . . . . . . . . . . . . . . . . . . . . . . . . . . 17
Changing phone settings . . . . . . . . . . . . . . . . . . . . . . . . . . . . . . . . . . . . . . . . . . . . . . . . . . . . . . . . . . . . . . . . . . . . . . . . . . . . 20
ECO DECT . . . . . . . . . . . . . . . . . . . . . . . . . . . . . . . . . . . . . . . . . . . . . . . . . . . . . . . . . . . . . . . . . . . . . . . . . . . . . . . . . . . . . . . . . . 23
Network mailbox . . . . . . . . . . . . . . . . . . . . . . . . . . . . . . . . . . . . . . . . . . . . . . . . . . . . . . . . . . . . . . . . . . . . . . . . . . . . . . . . . . . . 23
Multiple handsets . . . . . . . . . . . . . . . . . . . . . . . . . . . . . . . . . . . . . . . . . . . . . . . . . . . . . . . . . . . . . . . . . . . . . . . . . . . . . . . . . . . . 24
Bluetooth devices . . . . . . . . . . . . . . . . . . . . . . . . . . . . . . . . . . . . . . . . . . . . . . . . . . . . . . . . . . . . . . . . . . . . . . . . . . . . . . . . . . . . 25
Contacts (address book) . . . . . . . . . . . . . . . . . . . . . . . . . . . . . . . . . . . . . . . . . . . . . . . . . . . . . . . . . . . . . . . . . . . . . . . . . . . . . 27
Calls list (dependent on base) . . . . . . . . . . . . . . . . . . . . . . . . . . . . . . . . . . . . . . . . . . . . . . . . . . . . . . . . . . . . . . . . . . . . . . . . 31
Calendar . . . . . . . . . . . . . . . . . . . . . . . . . . . . . . . . . . . . . . . . . . . . . . . . . . . . . . . . . . . . . . . . . . . . . . . . . . . . . . . . . . . . . . . . . . . . . 32
Alarm . . . . . . . . . . . . . . . . . . . . . . . . . . . . . . . . . . . . . . . . . . . . . . . . . . . . . . . . . . . . . . . . . . . . . . . . . . . . . . . . . . . . . . . . . . . . . . . 33
Baby phone call . . . . . . . . . . . . . . . . . . . . . . . . . . . . . . . . . . . . . . . . . . . . . . . . . . . . . . . . . . . . . . . . . . . . . . . . . . . . . . . . . . . . . . 34
Screensaver, caller pictures and sounds . . . . . . . . . . . . . . . . . . . . . . . . . . . . . . . . . . . . . . . . . . . . . . . . . . . . . . . . . . . . . . . 35
Synchronising with your PC (Gigaset QuickSync) . . . . . . . . . . . . . . . . . . . . . . . . . . . . . . . . . . . . . . . . . . . . . . . . . . . . . . 36
Display icons . . . . . . . . . . . . . . . . . . . . . . . . . . . . . . . . . . . . . . . . . . . . . . . . . . . . . . . . . . . . . . . . . . . . . . . . . . . . . . . . . . . . . . . . 37
Customer Service & Assistance . . . . . . . . . . . . . . . . . . . . . . . . . . . . . . . . . . . . . . . . . . . . . . . . . . . . . . . . . . . . . . . . . . . . . . . 39
Environment . . . . . . . . . . . . . . . . . . . . . . . . . . . . . . . . . . . . . . . . . . . . . . . . . . . . . . . . . . . . . . . . . . . . . . . . . . . . . . . . . . . . . . . . . 42
Appendix . . . . . . . . . . . . . . . . . . . . . . . . . . . . . . . . . . . . . . . . . . . . . . . . . . . . . . . . . . . . . . . . . . . . . . . . . . . . . . . . . . . . . . . . . . . . 43
Open Source software . . . . . . . . . . . . . . . . . . . . . . . . . . . . . . . . . . . . . . . . . . . . . . . . . . . . . . . . . . . . . . . . . . . . . . . . . . . . . . . 44
Index . . . . . . . . . . . . . . . . . . . . . . . . . . . . . . . . . . . . . . . . . . . . . . . . . . . . . . . . . . . . . . . . . . . . . . . . . . . . . . . . . . . . . . . . . . . . . . . . 45
de en fr it nl 3
Gigaset SL910H / IM1 eng / A31008-M2370-R101-2-4N19 / security.fm / 6/1/17
Template Lion A5 (small font), Version 3, 02.04.2012
Safety precautions
Safety precautions
Read the safety precautions and the user guide before use.
The device cannot be used in the event of a power failure. In case of a power failure it is also not
possible to make emergency calls.
Emergency numbers cannot be dialled if the keypad/display lock is activated!
Do not use the devices in environments with a potential explosion hazard (e.g. paint shops).
The devices are not splashproof. For this reason do not install them in a damp environment such as
bathrooms or shower rooms.
Use only the power adapter indicated on the device.
Whilst charging, the power socket must be easily accessible.
Use only rechargeable batteries that correspond to the specification (see "Specifications"). Never
use a conventional (non-rechargeable) battery or other battery types as this could result in signifi-
cant health risks and personal injury. Rechargeable batteries, which are noticeably damaged, must
be replaced.
Remove faulty devices from use or have them repaired by our Service team, as these could interfere
with other wireless services.
Do not use the device if the display is cracked or broken. Broken glass or plastic can cause injury to
hands and face. Send the device to our Service department to be repaired.
Do not hold the rear of the handset to your ear when it is ringing or when speaker mode is activated.
Otherwise you risk serious and permanent damage to your hearing.
The phone may cause interference in analogue hearing aids (humming or whistling) or cause them
to overload. If you require assistance, please contact the hearing aid supplier.
Using your telephone may affect nearby medical equipment. Be aware of the technical conditions
in your particular environment, e.g. doctor's surgery. If you use a medical device (e.g. a pacemaker),
please contact the device manufacturer. They will be able to advise you regarding the susceptibility
of the device to external sources of high frequency energy (for the specifications of your Gigaset
product see "Specifications").
4 de en fr it nl
Gigaset SL910H / IM1 eng / A31008-M2370-R101-2-4N19 / starting.fm / 6/2/17
Template Lion A5 (small font), Version 3, 02.04.2012
Getting started
Getting started
Checking the package contents
u One Gigaset handset
u One battery cover (rear cover for the handset)
u One battery
u One charger cradle
u One power adapter for the charger cradle
u One user guide
Installing the charger cradle
The charger cradle is designed for use in dry rooms in a temperature range of +5°C to +45°C.
¤ Set up the charger cradle on a flat, non-slip surface.
The phones feet do not usually leave any marks on surfaces. However, due to the multitude of different var-
nishes and polishes used on today's furnishings, the occurrence of marks on the surfaces cannot be com-
pletely ruled out.
Please note:
u Never expose the telephone to the effects of heat sources, direct sunlight or other electrical devices.
u Protect your Gigaset from moisture, dust, corrosive liquids and fumes.
Connecting the charger cradle
Please note
Pay attention to the range of the base. In buildings this is up to 50 m, outdoors up to 300 m. The range
is reduced when ECO DECT (
£ page 23) is activated.
2
1
3
4
¤ Connect the flat plug to the power adapter .
¤ Plug the power adapter into the plug socket .
If you have to remove the plug from the charger cradle
again:
¤ First disconnect the power adapter from the mains
power supply.
¤ Then press the release button and disconnect
the plug .
1
2
3
4
de en fr it nl 5
Gigaset SL910H / IM1 eng / A31008-M2370-R101-2-4N19 / starting.fm / 6/2/17
Template Lion A5 (small font), Version 3, 02.04.2012
Getting started
Setting up the handset for use
The handset’s display and keys are covered with a protective film. Please remove the protective film.
Inserting the battery and closing the battery cover
¤ First, insert battery with the contact surface facing
down .
¤ Then press the battery downwards until it clicks
into place.
¤ First, align the protrusions on the side of the battery
cover with the notches on the inside of the casing.
¤ Then press the cover until it clicks into place.
To reopen the battery cover to replace the battery:
¤ Insert your fingernail into the notch on the bottom of
the battery cover and pull the battery cover upwards.
Caution
Please do not use any touchscreen styli to operate the handset.
Do not use protective cover/film from other manufacturers. This can restrict operability of your handset.
Caution
Use only rechargeable batteries (
£ page 43) recommended by Gigaset Communications GmbH, as
doing otherwise could result in significant health risks and personal injury. For example, the outer cas-
ing of the battery could be destroyed or the battery could explode. The phone could also malfunction
or be damaged as a result of using batteries that are not of the recommended type.
1
2
1
2
6 de en fr it nl
Gigaset SL910H / IM1 eng / A31008-M2370-R101-2-4N19 / starting.fm / 6/2/17
Template Lion A5 (small font), Version 3, 02.04.2012
Getting started
Charging the battery
The battery is supplied with a partial charge. Please charge it completely
before use.
¤ Charge the handset in the charger cradle for 5 hours.
Registering the handset
When your handset has sufficient charge the registration pro-
cess starts. The registration screen is displayed.
Changing the display language:
¤ Menu key v ¤Menu page Settings ¤[ ° Language +
Location].
¤ Touch next to Display Language.
¤ Next to the desired language, touch ( = selected).
¤Confirm with è. ¤Back with .
Registering the handset:
On the base:
¤ Press and hold the registration/paging key
(min. 3 seconds).
On the handset within a minute:
¤ Touch Register.
Or, if the handset is already registered to a base:
¤ Menu key v ¤Menu page Settings
¤[ É Handsets + Base].
¤Touch Register.
The message "Searching for a base which is in registration
mode" appears in the display.
This creates a connection to the base, but it may take some time.
¤If necessary, enter the system PIN of the base (default: 0000). ¤Confirm PIN with è.
The display shows Handset is registering.
Please note
u The handset must only be placed in the designated charger cradle.
u The battery is also charged if the handset is connected via a USB connection to a PC with a power
supply of 500 mA
u The battery may heat up during charging. This is not dangerous.
u After a time, the charge capacity of the battery will decrease for technical reasons.
Please note
The best way to achieve all of the features of the Gigaset SL910H is to register the device to the corre-
sponding base of the Gigaset SL910 or Gigaset SL910A.
If you use the Gigaset SL910H on a different base, features such as the answering machine or call lists
are not available.
5 h
˜
Call List
Â
Contacts
Apr
26
Thursday
¹
V
<
Ä Å Ä
>
Handset not registered
to any base
Register
+
Ø
de en fr it nl 7
Gigaset SL910H / IM1 eng / A31008-M2370-R101-2-4N19 / starting.fm / 6/2/17
Template Lion A5 (small font), Version 3, 02.04.2012
Getting started
After successful registration, the "
Handset registered" message appears. This will start the installation
wizard. If applicable, the values set on the base for the date, time, country, country code and local area code
are displayed.
The installation wizard is described in the user guide for the base.
Exception:
The handset is registered to a base for a Gigaset SL910/SL910A
from an earlier series.
After successful registration, the following message is shown
in the display.
¤ Connect the base to the Internet (see user guide for the
base).
¤ On the handset, touch Update Firmware.
The firmware update can take up to sixminutes, depending on
the quality of your DSL connection.
Caution
If you select the Use with restrictions option, important functions on your phone will not be available.
If you want to complete the firmware update at a later date, you must first reset the base; this action will
reset all the base settings and all handsets will be de-registered.
To reset the base:
¤Remove the power cable from the base ¤Press and hold the registration/paging key
on the base and at the same time reconnect the power cable to the base
¤Press and hold the registra-
tion/paging key until it begins to flash (approx. 10 seconds).
Once the handset has been registered again successfully, the message above is displayed again.
x
UPDATE INFORMATION
Functionality restricted -
update base firmware
Update
Firmware
Use with
restrictions
8 de en fr it nl
Gigaset SL910H / IM1 eng / A31008-M2370-R101-2-4N19 / make_familiar.fm / 6/2/17
Template Lion A5 (small font), Version 3, 02.04.2012
Display pages
Display pages
Idle display
The idle display comprises three pages:
u The dial page (see below)
u The configurable page (
£ page 9)
u The messages page (
£ page 10)
Switch between the menu pages:
u Drag your finger horizontally across the display or
u In the navigation area, touch
ë or ê.
Dial page
Configuring the keyboard/keypad individually
You can change the appearance and behaviour of the keypad shown in the display according to your needs.
The settings do not correspond to the handset keys (cva).
¤ Menu key v ¤Menu page Settings ¤[ g Display and Key-
pad]
¤Scroll to Keypad.
You can configure the following:
u Key Tones: Every time you touch a digit, a confirmation
tone is audible.
u Key Vibration: Every time you touch a digit on the keypad,
the handset vibrates.
u Keypad with R/P: To insert
- a line interruption (flash, R): Press and hold .
- a dialling pause (P): Press and hold .
u Keypad w. Letters: For dialling with letters — sometimes
used for entering service numbers, for example.
¤ You can use the switch on the right to activate or deactivate the relevant function directly. Change (acti-
vate/deactivate) switching: Briefly touch the switch.
Number field
Displays the numbers entered.
Touch
ç briefly: delete the last number entered
Press and hold
ç: delete all numbers
Options bar (
£ page 14)
To dial from call lists, Contacts and speed dial list, as well as inter-
nal calls.
Keypad
Numerical keypad for entering phone numbers. When you
touch a number, it is displayed in the number field.
Ð
ò ô ó ¼ 06:00
V
<
Å Å Å
>
|
ç
1 2 3
ABC DEF
4 5 6
GHI JKL MNO
7 8 9
PQRS TUV WXYZ
* 0 #
˜Â í
å
Calls Contacts QuickDial Internal
[ gDisplay and Keypad] submenu:
Keypad
Key Tones
Key Vibration
Keypad with R/P
Keypad w. Letters
on
off
off
off
#
R
*
P
de en fr it nl 9
Gigaset SL910H / IM1 eng / A31008-M2370-R101-2-4N19 / make_familiar.fm / 6/2/17
Template Lion A5 (small font), Version 3, 02.04.2012
Display pages
Configurable (personal) page
You can customise the configurable page to suit your needs. Bring together the important applications
and numbers, which you can start up or call directly from idle status with a single touch. By default, the date
and time are displayed and quick access to call lists and contacts is possible.
Starting the configuration process
¤ Switch to the configurable page.
¤ Press and hold (approx. 2 seconds) any position on the configurable area on the display.
Compile application/function
A pick list with the available functions/applications is displayed at the top edge of the display. The (arrow)
icon to the right of the pick list shows that you can move the pick list horizontally to display additional selec-
tion options. To do this, place a finger on the pick list and move it in the opposite direction to the arrow.
Additional functions are displayed.
¤ Insert application/function: Drag the function/application using drag&drop from the selection list into
the configurable area.
¤ Remove application/function: Drag the icon for the application/function back to the selection list using
drag&drop.
Completing the configuration process
¤ Press and hold any position on the configurable area on the display, or
¤ Press a briefly.
The settings are saved.
Please note
With the exception of QuickDial, each function can exist in the configurable area only once. You can
collate a maximum of 18 functions, applications or QuickDials.
Please note
A QuickDial is deleted. The related entry in Contacts remains unchanged. The settings for all other
functions (e.g., wake-up time) remain unchanged.
Ð
ò ô ó ¼ 06:00
V
<
Å Å Å
>
Apr
26
Thursday
Contacts
Â
Call List
˜
Configuration mode
Idle status
Configurable
Section
for max. 18
elements
Press and hold
Apr
26
Thursday
Contacts
Â
Call List
˜
Ù
Alarm
2
QuickDial
Á
Room Monitor
Selection
bar
>
1
2
Press and hold
3
1
2
>
>
3
10 de en fr it nl
Gigaset SL910H / IM1 eng / A31008-M2370-R101-2-4N19 / make_familiar.fm / 6/2/17
Template Lion A5 (small font), Version 3, 02.04.2012
Display pages
You can now start/select your desired applications/telephone numbers by briefly touching the correspond-
ing icon.
Selectable applications and functions
Messages page
You can use the messages page to access the following message lists:
u Answering machine list (dependent on base)
u
5 Network mailbox, if your network provider supports this function and the number of the network
mailbox is stored in your telephone
u · Incoming message list (dependent on base)
u Missed calls list (
£ Calls list (dependent on base), page 31)
u Missed appointments list (
£ page 33)
Messages page (example)
The list of missed calls is always displayed. The icon for the network mailbox is displayed, provided the num-
ber is stored in the telephone. The other lists are only displayed if they contain messages.
¤ Touch an icon to open the corresponding list.
Exception: If you touch the icon for the network mailbox, your telephone will dial the number for the
network mailbox (
£ page 25). No list will open on the display.
Date display
Open calendar (
£ page 32)
Time display
Set time
Open call lists (
£ page 31) Set baby phone call (£ page 34)
Set alarm clock (
£ page 33) Open Contacts (£ page 27)
Speed dial (
£ page 30):
Dialling a number
Calendar
Time
˜
Call List
Á
Room Monitor
Ù
Alarm
Â
Contacts
2
QuickDial
Ã
á
Ð
ò ô ó ¼ 06:00
V
<
ÅÅÅ
>
4
19
2
á
Number of new messages
Missed calls
Number of old messages
Network mailbox
Missed appointments/birth-
days
1
de en fr it nl 11
Gigaset SL910H / IM1 eng / A31008-M2370-R101-2-4N19 / make_familiar.fm / 6/2/17
Template Lion A5 (small font), Version 3, 02.04.2012
Display pages
Message pop-up
An advisory tone sounds as soon as a new entry arrives in a list.
If activated (see the base user guide) the message LED on the
left next to the earpiece also flashes and the message pop-up
is displayed. The pop-up may partly conceal the dial page and
the configurable page. New messages are displayed on the
message page as described above.
The number of new messages in each list is displayed beneath
the icons.
¤ Close the pop-up: Touch (top right).
¤ Open the list: Touch the corresponding list icon.
If there are more new messages in other lists, the display will
show the message page (but not the pop-up) when you return
to the idle display.
The messages LED flashes (if activated, see base user guide)
until you have opened all new messages.
List entry (depending on the base)
The following information is displayed in the list entries:
u The list type (in the header)
u Icon for the type of entry.
Call list:
(Missed), (Accepted), š ( Outgoing)The
icon is red for new (unread) entries.
u Caller’s number. If the caller's number is stored in Contacts,
the caller’s name and number type (Home, Office, Mobile)
is displayed instead. For missed calls, the number of calls
from this number is also shown in square brackets.
u Date and time of call (if set).
You have the following options:
¤ Call back a caller: Briefly touch the list entry.
¤ Open the detail view: Next to the entry, touch .
The display shows all the available information.
In the detail view, you can delete the entry or add the num-
ber of the entry to Contacts (
£ page 30).
Deleting lists
You can delete the entire contents of the individual lists:
¤ Menu key v Menu page Settings ¤[ Ê System]
¤(Scroll down if necessary) Clean-up List
¤ Touch next to the list to be deleted ¤ Confirm with Ye s .
Please note
If you press the
c key after you have opened a list, the number for the entry marked by a green dot will
be dialled immediately.
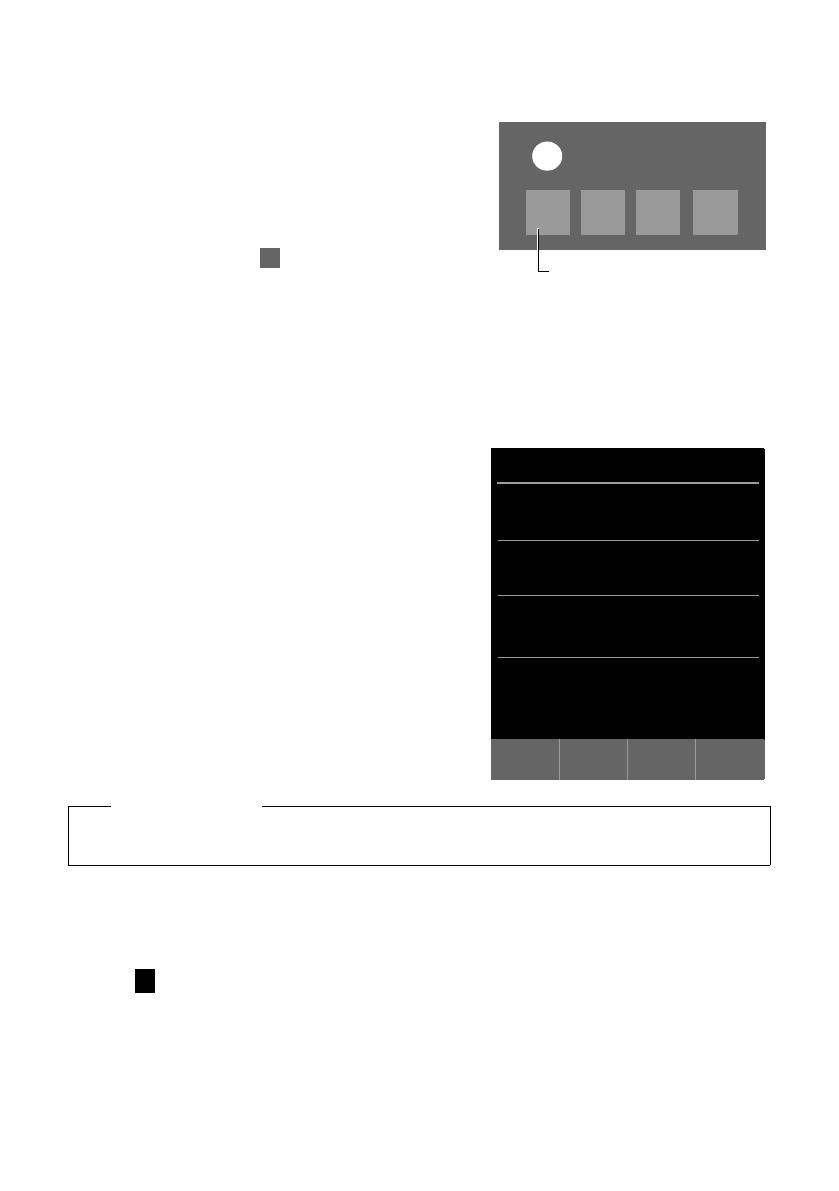
Messages pop-up (example):
x
You received
+
Ã
1
1
·
1
á
1
Answering machine (depending on
the base) and/or network mailbox
x
Call list (example):
L
Call List
ý
Josephine Foster M
š 16:00, Home
Josephine Foster M
[2] 14:20, Mobile
089 666777888 M
Yesterday, 14:20
Martin Grotte M
13.06, 16:10, Office
˜
All
Missed
Accepted
š
Outgoing
ü
12 de en fr it nl
Gigaset SL910H / IM1 eng / A31008-M2370-R101-2-4N19 / make_familiar.fm / 6/2/17
Template Lion A5 (small font), Version 3, 02.04.2012
Display pages
Status bar and status page
The top line in the idle display is called the status bar. It shows the
phone's current settings and operating state (meaning of the icons,
£ page 38).
Status page
You can use the status page to change the settings of the adjacent
components.
¤ Briefly touch the status bar to open the status page.
¤ Briefly touch the switch next to a component to activate/deacti-
vate it ( = activated).
¤ If you touch a list entry, e.g., Alarm, a page (the submenu) will
open where you can adjust the component's settings.
¤ Touch the Show Service Info button to display the service infor-
mation for your handset. You may need the service information
when you contact our hotline.
Press
a or touch in the top display line to return to the idle dis-
play.
Menu pages (dependent on base)
*
Please note
If multiple handsets are registered, the internal number of the handset is displayed in the display status
bar (e.g., INT 1)
*Please note: Applications/settings that are currently unavailable (e.g., because the handset is outside the range of the
base) will not be displayed.
Ð
ò ôó¼06:00
V
>
¹
Max. Range
No Radiation
ò
Bluetooth
ó
Do not disturb
Ù
Alarm
6:00
Show Service Info
off
on
off
on
off
on
off
on
off
on
on
<
Settings
<
Å Å
>
á
Date +
Time
i
Display +
Keypad
»
Bluetooth
ã
Select
Services
Æ
Language +
Location
Î
Handsets +
Base
Ï
System
Ì
Answer
Machine
ª
Tel ephony
Ì
Network
Mailbox
Ë
SMS Service
Centres
Applications
<
Å Å
>
Â
Contacts
¾
Write
Text Message
˜
Call List
Õ
Screensavers
Á
Room
Monitor
Calendar
Ù
Alarm
[
Caller
Pictures
×
Sounds
Menu page "Settings"
Menu page "Applications"
ï
Audio
Settings
de en fr it nl 13
Gigaset SL910H / IM1 eng / A31008-M2370-R101-2-4N19 / make_familiar.fm / 6/2/17
Template Lion A5 (small font), Version 3, 02.04.2012
Using the telephone
Switching from an idle display to the Applications menu page:
¤ Briefly press the v menu key
Switch between the menu pages:
u Drag your finger horizontally across the display or
u In the navigation area, touch
ë or ê.
Returning to the idle display from anywhere in the menu:
¤ Press the a key briefly.
Using the telephone
Switching the handset on/off
¤ To switch off: In idle status, press and hold the end call key a.
¤ To switch on:
-Press and hold the end call key
a.
Or:
- Place the handset in the charger cradle. It will switch on after approximately 35 seconds.
Returning to idle status
¤ Briefly press end call key a.
Or:
¤ If you do not press any key and do not touch the display, the display automatically reverts to idle status
after approximately three minutes.
Keypad and display lock
The keypad and display lock prevents the phone being operated unintentionally. If you touch the display
when the lock is activated, nothing happens. A corresponding message will appear if you press a key.
Activating/deactivating the keypad and display lock
When the handset is in idle status:
¤ Press and hold the v menu key to activate or deactivate the lock.
If a call is signalled on the handset, the keypad/display lock automatically deactivates and you can accept
the call. The key and display lock activates again once the call has finished.
Automatic display lock
During a call, the display is automatically locked with the aid of a proximity sensor if you hold the handset
to your ear (display backlight disappears). This lock is deactivated again when you remove the handset from
your ear.
The sensor is located on the right next to the earpiece (
£ page 1). If you cover it accidentally with your fin-
ger during a call, the display will also be locked.
Please note
The applications/settings shown here apply to operation with a Gigaset SL910/SL910A base. When
operating with another base, not all applications/settings may be available.
Please note
When the keypad lock is active, you cannot call emergency numbers.
14 de en fr it nl
Gigaset SL910H / IM1 eng / A31008-M2370-R101-2-4N19 / make_familiar.fm / 6/2/17
Template Lion A5 (small font), Version 3, 02.04.2012
Using the telephone
Operating the touchscreen
You operate the handset mainly via the display.
Icons, list entries, switches and selection areas shown on the display are sensitive areas. You can set up and
activate functions, enter or dial phone numbers and navigate between the various display screens (pages)
by touching these areas and dragging them across the display.
Selecting functions/list entries
Touch a list entry or the corresponding icon to select the list item (Contacts, submenu, call lists) or to acti-
vate/deactivate a function.
Scrolling in lists and menus (scrolling vertically)
¤ Drag the display in a vertical direction.
If there are more list entries than can be displayed all at once, a drop shadow at the bottom or top edge of
the display indicates the direction in which you have to scroll to view more of the list.
As soon as you scroll in a list, a scroll bar appears on the right side of the display. This shows the size and
position of the visible section of the list.
Scrolling through lists is not continuous, i.e., you have to scroll back to return to the top from the end of the
list.
Options, option slider
Many displays have an options bar at the bottom. This displays all the actions that you can apply in the cur-
rent context (icons used,
£ page 37). There are single-row (e.g., in Contacts) and double-row option sliders
(e.g., during an external call).
¤ Touch an option to execute the corresponding action.
If there are more options available than can be displayed in an options bar at the same time, these addi-
tional options are provided as follows:
u With a one-line options bar, the arrow on the right and/or left next to the options (see image) indi-
cates that further options are available.
¤ Touch the option slider and drag it in the direction of the arrow in order to move the additional
options into the display (scroll horizontally).
u With a two-row option slider, the icon below the option slider indicates that further options are avail-
able.
¤ Touch to display a further option slider that conceals the original option slider.
¤ Touch to hide the additional options again.
>
>
lY :
New Entry First Name Copy List
><
Y: X
First Name Copy List Memory
><
ë
ë
‹hR
Speaker Mute Volume
QSÂ
Keypad Consultation Contacts
>
‰À Ý
Accept Wait.Call Reject Wait.Call Ringback
Œý Q
Speaker Profiles Record Keypad
x
x
de en fr it nl 15
Gigaset SL910H / IM1 eng / A31008-M2370-R101-2-4N19 / make_familiar.fm / 6/2/17
Template Lion A5 (small font), Version 3, 02.04.2012
Using the telephone
Changing the settings
Touch an icon on one of the menu pages to open the corresponding application/function. The display
shows the configurable parameters and user interface elements as well as their current settings (orange in
the display).
Examples:
Switch: Activating/deactivating functions
¤ Briefly touch the switch to activate/deacti-
vate functions such as babyphone call .
The function is activated/deactivated if the
orange-coloured area (On / on) is visible.
Selection fields
If two or three alternative settings are available for one param-
eter, these alternatives are displayed in the form of selection
fields. The current setting appears in orange.
¤ To change it, briefly touch the selection field you require.
Opening the submenu to set a parameter
The icon indicates that another submenu is available.
¤ Briefly touch to open this submenu.
Return to the previous display
¤ You go back to the previous display (step by step) by touching (in the top left of the display).
Entering numbers and text
Touch a character on the display to enlarge it. Keep your finger on the display until you see the desired char-
acter enlarged. As soon as you remove your finger from the display, the character is copied to the text field
in which the cursor is blinking.
When numerous number and/or text fields are displayed (e.g., first name and surname in a Contacts entry),
the first field is automatically activated. You need to touch any subsequent fields to activate them. A field is
activated when the flashing cursor appears in the field.
L
Room Monitor
Off
Sensitivity
k
k
Forward alarm to
Number
1234567890 M
è
Save
Return to the previous display
Low
Internal
Further submenu
Switch: Activate/deactivate
during a call
Current setting
Application parameters
Save changes (optional)
High
External
Selection fields
Off
On
off
on
or
Forward alarm to
Internal External
16 de en fr it nl
Gigaset SL910H / IM1 eng / A31008-M2370-R101-2-4N19 / make_familiar.fm / 6/2/17
Template Lion A5 (small font), Version 3, 02.04.2012
Using the telephone
Correcting incorrect entries
Briefly touch $: The last character you entered is deleted.
Press and hold $: The entire content of the number or text field is deleted.
Entering text
¤ Touch (Shift): Switch between lower and upper case.
Upper case is only activated for the next character.
In Contacts, the first letter and each letter following a space is automatically in upper case.
¤ Touch §123§: Enter a digit/a special character.
¤ Touch More... to display additional special characters, and touch Back to return to the previous dis-
play
¤ Touch §abc§ to return to entering normal characters.
¤ You enter special characters (diacritical characters, e.g., umlauts) by pressing and holding the corre-
sponding initial letter and selecting the required character from the list displayed.
Latin (default) character set:
Greek character set:
Cyrillic character set:
Due to the larger space requirement of the Cyrillic character set, you can also access the following letters
by pressing and holding the bold characters shown below. Touch the required character.
¤ Touch ° (if necessary several times): switch character set/keyboard assignment. The options are:
- Latin (default) character set with the keypad layouts QWERTZ, for Central Europe, QUERTY (American
default) and AZERTY, for the French-speaking area
- Greek character set
- Cyrillic character set
a äáàâãæåą c
çć
e ëéèêę i ïíìî
l ł n ńñ o öóòôõøő s ßś u üúùûű
y ÿý z źż
α ά ε έ η ή ι ίϊΐ ο ό σ ς υ ύϋΰ ω ώ
е эёєийї г ґ ь ъ
ц й x ъ ж э
de en fr it nl 17
Gigaset SL910H / IM1 eng / A31008-M2370-R101-2-4N19 / telefony.fm / 6/2/17
Template Lion A5 (small font), Version 3, 02.04.2012
Making calls
Making calls
Making an external call
¤ Switch to the dial page ¤Enter the number ¤Briefly press c.
Or:
¤ In idle mode, press and hold c ¤Enter the number.
You can cancel dialling by pressing
a.
Dialling with the redial list
¤ In idle mode, briefly press c to open the redial list.
You have the following options:
¤ Press c. The number with the green dot is dialled.
Or:
¤ Touch an entry in the list. This selects the number dis-
played in the entry.
Or:
¤ Next to an entry, touch . The detail view is opened.
- Contacts entry exists:
All numbers for the Contacts entry are displayed:
¤Press c. The preferred number of the Contacts entry
which is marked with a green dot (
£ page 27) is
dialled.
Or:
¤Touch the desired number.
- No Contacts entry exists: Press
c.
Dialling from a call list
¤ Switch to the message page ¤Touch .
You have the following options:
¤ Press c. The number of the entry marked with the green
dot is dialled.
Or:
¤ Briefly touch an entry in the list. This selects the number
displayed in the entry.
Or:
Please note
The redial list contains the last twenty numbers dialled with this handset. You can manage them in the
same way as the message lists on your telephone:
¤ Open the detail view: Next to the entry, touch . The display shows all the available information.
In the detail view, you can delete the entry or add the number of the entry to Contacts (
£ page 30).
Redial list (example):
L
Redial
ý
Josephine Foster M
Home 1234567
Josephine Foster M
Mobile 0171666777
089 666777888 M
Call list (example)
L
Call List
ý
Josephine Foster M
š 16:00, Home
Josephine Foster M
[2] 14:20, Mobile
089 666777888 M
Yesterday, 14:20
18 de en fr it nl
Gigaset SL910H / IM1 eng / A31008-M2370-R101-2-4N19 / telefony.fm / 6/2/17
Template Lion A5 (small font), Version 3, 02.04.2012
Making calls
¤ Next to an entry, touch . The detail view is opened.
¤ Press c. This selects the number displayed in the entry.
Or:
¤ Contacts entry exists: Touch . All numbers for the
Contacts entry are displayed. Touch the desired num-
ber.
Dialling with Contacts
¤ Open Contacts: On the dial page, touch [ œ Contacts].
The list of Contacts entries is displayed.
¤ Scroll through the list to the desired entry.
You have the following options:
¤ Press c. The preferred number (£ page 27) of the entry marked with the green dot is dialled.
Or:
¤ Touch the name in the entry. The preferred number of the entry is dialled.
Or:
¤ Touch next to the entry and then touch the required number in the detail view.
Accepting a call
You have the following options
¤ Press c.
¤ If Auto Answer is activated (£ page 21), remove the handset from the charging cradle.
¤ Accept a call on a Bluetooth headset: £ page 26
¤ Accept a call on a wire-bound headset: Press the talk key (push-to-talk key) on the headset. The headset
must be connected to the handset (
£ page 1).
Accepting/rejecting call waiting
If you receive a call during a conversation, you will hear a call waiting signal and see a corresponding
message on the display. For further information, please refer to your base user guide.
Call display
For calling line identification
The caller's phone number is displayed. The display will also show the number type and the name of the
caller if the caller’s number is stored in your Contacts. If you have assigned a picture to the caller's number
(
£ page 27), it also appears on the display.
No calling line identification
Instead of name and number, the following is displayed:
u External: No number is transferred.
u Withheld: Caller has withheld calling line identification.
u Unavailable: Caller has not requested calling line identification.
Notes on phone number display (CLIP)
(CLIP = Calling LIne Identification Presentation)
The default setting on your phone is set to display the caller's number, £ page 40 or
¢ www.gigaset.com/service
Detail view of an entry (example)
L
Call Info
Missed call from:
Josephine Foster M
Mobile 0171 666777887
Called on:
Monday, 13.08
14:20
  • Page 1 1
  • Page 2 2
  • Page 3 3
  • Page 4 4
  • Page 5 5
  • Page 6 6
  • Page 7 7
  • Page 8 8
  • Page 9 9
  • Page 10 10
  • Page 11 11
  • Page 12 12
  • Page 13 13
  • Page 14 14
  • Page 15 15
  • Page 16 16
  • Page 17 17
  • Page 18 18
  • Page 19 19
  • Page 20 20
  • Page 21 21
  • Page 22 22
  • Page 23 23
  • Page 24 24
  • Page 25 25
  • Page 26 26
  • Page 27 27
  • Page 28 28
  • Page 29 29
  • Page 30 30
  • Page 31 31
  • Page 32 32
  • Page 33 33
  • Page 34 34
  • Page 35 35
  • Page 36 36
  • Page 37 37
  • Page 38 38
  • Page 39 39
  • Page 40 40
  • Page 41 41
  • Page 42 42
  • Page 43 43
  • Page 44 44
  • Page 45 45
  • Page 46 46
  • Page 47 47
  • Page 48 48
  • Page 49 49
  • Page 50 50
  • Page 51 51
  • Page 52 52

Gigaset SL910H Guida utente

Categoria
Telefoni
Tipo
Guida utente

in altre lingue