Schwaiger HGA500 532 Manuale utente
- Categoria
- Sveglie
- Tipo
- Manuale utente

4. Die Alarmsirene bestätigt zusätzlich die Verbindung zwischen Fernbedienung und Alarmsirene
mit einem weiteren kurzen Piepton sowie einem kurzen Aufleuchten der LEDs.
5. Sollten mehrere Fernbedienungen vorhanden sein, wiederholen Sie diesen Vorgang mit jeder
einzelnen.
6. Nun Ist die Alarmsirene für die anschließende Montage bereit.
5. Betrieb
Wichtig!
Drücken Sie immer die Tasten ARM und DISARM gleichzeitig für zwei Sekunden auf einer
der Fernbedienungen, um den Sicherheitsschalter und damit auch die Alarmsirene zu aktivieren/
deaktivieren oder um Einstellung oder den Batteriewechsel vorzunehmen.
Ablauf:
• Drücken Sie die Tasten ARM und DISARM für zwei Sekunden auf einer der Fernbedienungen,
um den Sicherheitsschalter und damit auch die Alarmsirene zu aktivieren.
• Die blauen Status-LEDs erlöschen und rote Status-LED zeigt den aktiven Zustand der
• Alarmsirene an.
• Die Alarmsirene prüft nun ob ein Funksignal von der Zentraleinheit vorhanden ist und zeigt dies
durch einen kurzen Piepton an.
6. Grundfunktionen
Haus-Sicherheits-Code einstellen
Stellen Sie den Haus-Sicherheits-Code Schalter so ein, dass dieser mit dem Hause-Sicher-
heits-Code der Zentraleinheit übereinstimmen.
Ein-/Ausgangsverzögerung
Die Ein-/Ausgangsverzögerungszeit beträgt in der Standardeinstellung 5 Sekunden. Diese kann
mit Hilfe des Schiebeschalter alternativ auf 30 Sekunden eingestellt werden.
Sabotageschalter
Dieses Produkt verfügt über einen Sabotageschalter. Dieser verhindert bei Gewalteinwirkung oder
Entfernen der Sirene einen Ausfall dieser. Hierbei wird sofort ein lauter Alarm ausgelöst.
Einstellen der Alarmdauer
Die Alarmdauer kann über Schiebeschalter im inneren des Produktes eingestellt werden.
Zur Auswahl stehen hier: 1 Minute, 3 Minute, 5 Minuten.
Wichtig! Es muss einer dieser 3 Zeiten ausgewählt sein!
Funktionstest
Überprüfen Sie regelmäßig die ordnungsgemäße Funktion der Sirene.
Gehen Sie hierfür wie folgt vor:
1. Lösen Sie einen Alarm mit der PANIC Tastenkombination auf der Fernbedienung aus.
2. Nun Löst die Zentrale sowie die Außensirene einen lauten Alarm aus.
3. Wichtig! Dieser Alarm kann nur über die Tasten DISARM auf der Fernbedienung oder durch
Eingabe des 4-stelligen PIN Codes über die Zentraleinheit deaktiviert werden.
Vorsicht! Gefahr von Hörschädigungen
Lauter Alarmton! Setzen Sie Ihr Gehör diesem Ton nicht über einen längeren Zeitraum aus, da
sonst schwere Gehörschäden die Folge sein können! Aktivieren Sie den Alarm nicht in direkter
Nähe Ihrer Ohren!
Bedenken Sie zusätzlich den Alarm tagsüber und nicht nachts auszuprobieren, um Nachbarn nicht
unnötig zu belästigen!
7. Technische Daten
Haftungsausschluss
Die Schwaiger GmbH über-
nimmt keinerlei Haftung und
Gewährleistung für Schäden die
aus unsachgemäßer Installation
oder Montage sowie unsachge-
mäßem Gebrauch des Produkts
oder einer Nichtbeachtung der
Sicherheitshinweise resultieren.
Entsorgung
Elektrische und elektronische Geräte sowie Batterien dürfen nicht mit dem Hausmüll entsorgt wer-
den. Der Verbraucher ist gesetzlich verpflichtet, elektrische und elektronische Geräte sowie Batte-
rien am Ende ihrer Lebensdauer an den dafür eingerichteten, öffentlichen Sammelstellen oder an
die Verkaufsstelle zurückzugeben. Einzelheiten dazu regelt das jeweilige Landesrecht. Das Symbol
auf dem Produkt, der Bedienungsanleitung bzw. der Verpackung weist auf diese Bestimmung hin.
EG Konformitätserklärung
Hiermit erklärt die Schwaiger GmbH, dass dieses Produkt den grundlegenden Anforderungen und
anderen relevanten Bestimmungen der Richtlinie 1999/5/EG entspricht. Die Konformitätserklä-
rung finden Sie unter www.schwaiger.de/downloads. Dieses Produkt wurde gemäß der europäi-
schen R&TTE-Richtlinie 1999/5/EC konzipiert, getestet und gefertigt.
GEBRAUCHSANWEISUNG
INSTRUCTIONS
INSTRUCTIONS
DE SERVICE
ISTRUZIONI PER L‘USO
INSTRUCCIONES
INSTRUCTIES
1. Einführung
Herzlichen Glückwunsch und vielen Dank für den Kauf eines Produkts aus der
SECURE-4-YOU Serie. Im Folgenden erhalten Sie nützliche Hinweise zur Handhabung dieses Pro-
dukts. Bitte lesen Sie sich daher die Bedienungsanleitung vollständig und sorgfältig durch.
Allgemeine Sicherheits- & Wartungshinweise
• Dieses Produkt ist für den privaten, nicht gewerblichen Haushaltsgebrauch vorgesehen.
• Bei diesem Produkt handelt es sich um ein elektronisches Produkt, welches nicht in Kinderhände
gehört! Bewahren Sie es deshalb außerhalb der Reichweite von Kindern auf.
• Schützen Sie das Produkt vor Feuchtigkeit, Wasser, Regen, Schnee oder Sprühregen und verwen-
den Sie das Produkt nur in trockenen Umgebungen, wenn nicht speziell hierauf hingewiesen wird.
• Lassen Sie das Produkt nicht fallen und setzen Sie es keinen starken Erschütterungen aus.
• Führen Sie keine Objekte in die Anschlüsse oder Öffnungen des Produkts ein.
• Zerlegen Sie das Produkt nicht in seine Einzelteile. Das Gerät enthält keine vom Benutzer zu
wartenden Teile. Der unsachgemäße Zusammenbau kann zu elektrischen Schlägen oder Fehl-
funktionen führen.
• Reinigen Sie dieses Produkt nur mit einem fusselfreien, maximal leicht feuchtem Tuch und ver-
wenden Sie keine aggressiven Reiniger. Achten Sie hierbei besonders darauf, dass kein Wasser
(keine Flüssig-/ Feuchtigkeit) in das Produkt gelangt.
2. Verpackungsinhalt
• Außensirene
• Montagematerial (Montageschablone, Dübel & Schrauben)
• Bedienungsanleitung & Sicherheitshinweise
Zusätzlich benötigte Batterien: 4x 1,5V LR20 (D)
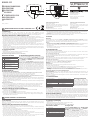
Die Sirene im Detail 3. Bestimmungsgemäßer Gebrauch
Bei diesem Produkt handelt es sich um ein Ergänzungs-
produkt für das Schwaiger „Green Guard“ System. Es
arbeitet nur in Verbindung mit einer Zentraleinheit
(z.B. HG1000 oder HG2000) und kann nicht einzeln ver-
wendet werden.
Das Schwaiger „Green Guard“ System dient der Absi-
cherung und Überwachung Ihres Grundstücks/ Zuhauses.
Mithilfe von unterschiedlichen Sensoren können einzel-
ne Bereiche des Gebäudes wie z.B. der Eingangsbereich
überwacht oder abgesichert werden. Das komplette Sys-
tem wird über die Zentraleinheit gesteuert, welche per
Funk mit den unterschiedlichen Sensoren kommuniziert.
Sobald die Zentraleinheit einen Verstoß über die Sensoren
erkennt löst diese einen Alarm aus. Das Gehäuse der Außensirene besteht aus einem robusten
Kunststoff und ist witterungsbeständig sowie durch einen Manipulationsschalter geschützt.
4. Inbetriebnahme
Montagehinweise zur Außensirene
• Dieses Produkt kann sowohl im Innen- als auch im Außenbereich montiert werden.
• Dieses Produkt ist speziell für die Montage an der Wand entwickelt worden.
• Bringen Sie das Produkt gut sichtbar in nicht direkt erreichbarer Höhe an.
• Achten Sie darauf das die Feder des Sabotageschalters, auf der Rückseite der Sirene,
vollständig eingedrückt ist (Klickgeräusch beim einrasten).
• Prüfen Sie vor der Installation die Eignung des Montageorts und überprüfen Sie das Montage-
material. Vergewissern Sie sich, dass keine elektrischen, Wasser-, Gas- oder sonstigen Leitun-
gen an der Montagestelle vorhanden sind.
• Abhängig von Ihrem Montageort kann für die Montage zusätzliches/anderes Montagezubehör
benötigt werden.
Einlegen der Batterien
1) Entfernen Sie die Schraube der Frontabdeckung (an der unteren Spitze der Sirene) mithilfe
eines Kreuzschlitzschraubenziehers und nehmen Sie anschließend die Frontabdeckung ab.
2) Legen Sie 4x D Batterien (polrichtig) entsprechend der Prägung im Batteriefach ein.
3) Nun können Sie entweder die Frontabdeckung wieder montieren oder das Produkt mit Hilfe
der Funk-Fernbedienung entsprechend anlernen.
Anlernen mithilfe der Funk-Fernbedienung
1. Schieben sie den ON/OFF Schalter im Inneren der Sirene auf die Position ON.
(Alle Status LEDs leuchten auf)
2. Drücken Sie die Taste LEARN im inneren der Sirene.
3. Drücken Sie die Taste DISARM lange auf einer der Fernbedienungen, welche bereits in das
Hautsystem eingelernt wurde. Die Alarmsirene bestätigt einen erfolgreichen Verbindungsauf-
bau zusätzlich mit einem Piepton.
BEDIENUNGSANLEITUNG HGA500 532
BDA_HGA500
HGA500 532
1
3
4
5
3
6
7
1
2
Schwaiger GmbH
Würzburger Straße 17
90579 Langenzenn
Hotline: +49 (0) 9101 702-299
www.schwaiger.de
info@schwaiger.de
HERSTELLERINFORMATION
Sehr geehrter Kunde,
sollten Sie technischen Rat benötigen und Ihr Fach-
händler konnte Ihnen nicht weiterhelfen kontaktieren
Sie bitte unseren technischen Support.
Geschäftszeiten:
Montag bis Freitag: 08:00 - 17:00 Uhr
MANUFACTURER INFORMATION
Dear Customer,
should you require technical advice and
your retailer could not help please contact
our technical support.
Business hours:
Monday to Friday: 08:00 - 17:00
Stromversorgung 4x 1,5 V LR20 (D) – 6,0 V
Betriebsfrequenz 868,35 MHz (+/- 0,5 MHz)
Funkreichweite Max. 250 m (Freifläche)
Haus-Sicherheits-Code Über 4 poligen Jumper
Alarmdauer 1, 3, 5 Minuten
Montageort Außenbereich (Wasserfest)
2. Contents of packaging
• Outdoor siren
• Mounting material (mounting template, dowels and screws)
• Operating instructions and safety instructions
Batteries that are additionally required: 4 x 1.5V LR20 (D)
The sirens in detail 3. Proper use
This product is a supplementary product for the
Schwaiger “Green Guard” system. It only works
in connection with a central unit (e.g. HG1000 or
HG2000) and cannot be used individually.
The Schwaiger “Green Guard” system is used for
the securing and monitoring of your property / home.
With the help of different sensors, individual areas of
the building, such as, for example, the entrance zone,
can be monitored or secured. The entire system is
controlled via the central unit, which communicates
with the various sensors by radio.
1. Introduction
Thank you and congratulations on buying this product from the SECURE-4-YOU series. In the
following you will find useful information about using this product. Please read all the operating
instructions carefully.
General safety & maintenance instructions
• This product is intended for private, non-commercial household use.
• This product is an electronic product, and is not meant to be handled by children! Please keep
it out of the reach of children.
• Protect the product from dampness, water, rain, snow or drizzle. Only use this product in dry
environments, unless specifically indicated.
• Do not drop the product or expose it to strong vibrations.
• Do not insert any object into any openings or connections on the product.
• Do not disassemble the product. The device contains no parts that can be serviced by the user.
Incorrect assembly may result in electric shock or malfunction.
• Clean this product with a slightly damp, lintfree cloth. Do not use any aggressive cleaning
agents. Make sure no water gets into the product when it is being cleaned.
USER MANUAL HGA500 532
1 Sireneneinheit
2 Sabotageschalter
3 POWER-Taste
4 LEARN-Taste
5 Schiebeschalter
Haus-Sicherheits-Code
6 Schiebeschalter Alarmdauer
7 Schiebeschalter
Einschaltverzögerung
1 Siren unit
2 Sabotage switch
3 POWER button
4 LEARN button
5 Slide switch house security code
6 Slide switch alarm duration
7 Slide switch switch-on delay

Switching on/off delay
The on/off delay time in the standard settings is 5 seconds. This can alternatively be set to 30
seconds with the help of the slide switch.
Sabotage switch
This product has a sabotage switch. If force is used or the sirens are removed, this prevents the
failure of these. In this case a loud alarm is set off immediately.
Setting the alarm duration
The duration of the alarm can be set through the slide switch in the interior of the product.
The options for selection here are: 1 minute, 3 minutes, 5 minutes.
Important: One of these three times must be selected.
Functional test
Regularly check the proper functioning of the sirens.
For this, proceed as follows:
1. Set off an alarm with the PANIC combination of buttons on the remote control.
2. Now the centre as well as the outer siren, set off a loud alarm.
3. Important: This alarm can only be deactivated via the DISARM button on the remote control
or by inputting the 4-digit PIN code via the central unit.
Caution! Risk of hearing loss
Loud alarm tone. Do not expose your hearing to this tone over a longer period of time, because
otherwise, severe hearing loss could be the consequence. Do not activate the alarm when it is
very near to your ears.
In addition, always remember to check the alarm in the day and not at night, so that you do not
unnecessarily disturb your neighbours.
7. Technical data
Disclaimer
Schwaiger GmbH gives no guarantees and assumes no liability whatsover for damages arising
from improper installation or assembly as well as from the improper use of the product or a
failure to comply with the safety
instructions.
Disposal
Electrical and electronic de-
vices including batteries must
not be disposed of with house-
hold waste. The user is legally
obliged to return electric and
electronic devices including bat-
teries at the end of their service life to the designated public collection points or to return them to
the original point of sale. Particulars relating to this are regulated by the respective national law.
The symbol on the product, the operating instructions, or the packaging refers to these provisions.
EC Declaration of Conformity
Schwaiger GmbH hereby declares that this product conforms to the basic requirements and oth-
er relevant regulations of the Directive 1999/5/EC. The declaration of conformity is at www.
schwaiger.de/downloads. This product was designed, tested and manufactured in accordance with
the European R&TTE Directive 1999/5/EC.
3. Appuyez sur la touche DISARM pendant un long moment sur l‘une des télécommandes
déjà intégrées dans le système principal. L‘alarme confirme que l‘intégration a réussi avec un
bip bref.
4. L‘alarme confirme de plus la connexion entre la télécommande et l‘alarme sonore par un bip
bref supplémentaire et aussi en faisant clignoter brièvement les LED.
5.
Dans le cas de plusieurs télécommandes présentes, répétez cette procédure pour chacune d‘elles.
6. L‘alarme sonore est maintenant prête à être montée.
5. Fonctionnement
Important !
Appuyez toujours sur les boutons ARM et DISARM simultanément pendant deux secondes sur
l‘une des télécommandes, afin d‘activer/désactiver l‘interrupteur de sécurité et ainsi aussi l‘alarme
sonore ou pour le paramétrage ou pour remplacer la pile.
Processus :
• Appuyez sur les boutons ARM et DISARM simultanément pendant deux secondes sur l‘une
des télécommandes, afin d‘activer l‘interrupteur de sécurité et ainsi aussi l‘alarme sonore.
• Les LED d‘état bleus s‘éteignent et les LED d‘état rouge indiquent que l‘alarme sonore est activée.
• La sirène d‘alarme vérifie maintenant s‘il y a un signal radio émis par l‘unité centrale et indique
cet état par un bref bip.
6. Fonctions de base
Paramétrage du code sécurité maison
Paramétrez l‘interrupteur du code sécurité maison de manière à ce que celui-ci s‘accorde avec le
code sécurité maison de l‘unité centrale.
Retard entrée/sortie
En configuration standard le retard est de 5 secondes. Il peut être aussi réglé sur 30 secondes
avec l‘interrupteur à coulisse.
Interrupteur antisabotage
Ce produit dispose d‘une protection antisabotage. Il l‘empêche de tomber en panne en cas d‘uti-
lisation de la force ou si les sirènes sont enlevées. Dans ce cas une alarme sonore se déclenche
immédiatement.
Réglage de la durée d‘alarme
La durée de l‘alarme peut être réglée avec l‘interrupteur à coulisse qui se trouve à l‘intérieur du
produit. Les options de sélections ici sont les suivantes : 1 minute, 3 minutes, 5 minutes.
Important ! Il faut qu‘une de ces 3 durées soit sélectionnée !
Test de fonctionnement
Vérifiez régulièrement que la sirène fonctionne bien.
Pour cela, procédez comme suit :
1. Déclenchez une alarme avec la combinaison de boutons PANIC sur la télécommande.
2. La centrale ainsi que la sirène extérieure déclenchent maintenant une alarme sonore.
3. Important ! Cette alarme ne peut être désactivée qu‘avec les boutons DISARM sur la
télécommande ou bien en saisissant le code PIN à quatre chiffres sur l‘unité centrale.
Attention ! Risque de lésions auditives
Alarme sonore fort ! N‘exposez pas votre ouïe à ce son pendant un temps prolongé, sinon vous
encourez le risque de dommages auditifs graves ! N‘activez pas l‘alarme à proximité immédiate de
vos oreilles ! N‘oubliez pas non plus de tester l‘alarme pendant la journée et pas pendant la nuit
pour éviter de gêner vos voisins inutilement !
7. Données techniques
Exclusion de responsabilité
Schwaiger GmbH décline toute responsabilité et garantie pour les dommages résultants d’une
mauvaise installation ou assemblage tout comme une mauvaise utilisation du produit ou du
non-respect des consignes de sécurité.
As soon as the central unit recognises a breach through the sensors, this triggers an alarm.
The housing of the outdoor siren consists of a robust plastic and is weather-resistant as well as
protected by a manipulation switch.
4. Commissioning
Assembly instructions for the outdoor siren
• This product can be installed both in indoor and outdoor areas.
• This product is specially designed for mounting on the wall.
• Place the product where it is easily visible and at a height that is not directly reachable.
• Ensure that the spring of the sabotage switch, on the rear side of the siren, is com-
pletely pressed in (clicking noise when snapping in).
• Before installation, check the suitability of the place of assembly and also check the mounting
material. Ensure that no electrical, water, gas or other connections are present at the mounting
location.
• Depending on your mounting location, additional/other mounting accessories may be required
for mounting.
Inserting the batteries
1) Remove the screws of the front cover (on the lower tip of the siren) using a Phillips screw-
driver and then remove the front cover.
2) Place 4 x D batteries (with the correct polarity) accordingly into the battery compartment.
3) Now you can either mount the front cover again or correspondingly addition the product using
the radio remote control system.
Addition with the help of the radio remote control system
1. Push the ON/OFF switch in the interior of the sirens to the ON position.
(All status LEDs light up)
2. Press the LEARN button in the interior of the siren.
3. Press the DISARM button for a long time on one of the remote controls, which was already
added to the main system. The alarm siren additionally confirms the successful establishment
of a connection with a beep.
4. The alarm siren additionally confirms the connection between the remote control and alarm
siren with a further short beep and also the LEDs light up briefly as well.
5. If several remote controls are present, repeat this procedure with each one.
6. Now the alarm siren is ready for the subsequent mounting.
5. Operation
Important:
Always press the ARM and DISARM buttons at the same time for two seconds on one of the
remote controls, in order to activate/deactivate the safety switch and thereby also the alarm siren
or to set or to complete the battery change.
Process:
• Press the ARM and DISARM buttons for two seconds on one of the remote controls, in order
to activate the safety switch and thereby also the alarm siren.
• The blue status LEDs go out and red status LED shows the active state of the alarm siren.
• The alarm siren now checks whether a radio signal from the central unit is present and shows
this through a short beep.
6. Basic functions
Setting house security code
Set the house security code switch so that this agrees with the house security code of the central unit.
1. Introduction
Félicitations et merci beaucoup d’avoir acheté un produit de la série SECURE-4-YOU. Ci-dessous,
vous trouverez des conseils utiles sur la manipulation du produit. Lisez donc les instructions d’uti-
lisation attentivement.
Conditions générales d’utilisation et de sécurité
• Ce produit est destiné à un usage privé, non commercial.
• Ceci est un appareil électronique et ne doit pas être manipulé par des enfants! Veillez donc à le
tenir hors de portée des enfants.
• Protéger le produit de l’humidité, de l’eau, de la pluie, de la neige ou de la bruine. Utilisation
uniquement dans un endroit sec même en l’absence d’indications spécifiques.
• Ne pas faire tomber le produit, ne pas l’exposer à des chocs violents.
• Ne pas insérer d’objets dans les ports et les ouvertures du produit.
• Ne pas démonter le produit. Le dispositif ne contient aucune pièce réparable par l’utilisateur. Un
montage incorrect peut provoquer un choc électrique ou un dysfonctionnement.
• Ne nettoyer le produit qu’avec un chiffon non pelucheux, très légèrement humide. Ne pas utiliser
de nettoyants abrasifs. S’assurer particulièrement que de l’eau ne pénètre pas dans l’appareil.
2. Contenu de l‘emballage
• Alarme extérieure
• Matériel d‘installation (gabarit de montage, chevilles et vis)
• Mode d‘emploi et instructions de sécurité
Piles additionnelles nécessaires : 4x 1,5V LR20 (D)
La sirène en détail 3. Utilisation prévue
Ce produit est un produit complémentaire du système
«Green Guard» de Schwaiger. Il ne fonctionne
qu‘en liaison avec une unité centrale (par ex.
HG1000 ou HG2000) et ne peut être utilisé seul.
Le système „Green Guard“ de Schwaiger sert à proté-
ger et à surveiller votre propriété/maison. À l‘aide de
divers capteurs, des zones individuelles du bâtiment,
par exemple la zone d‘entrée, peuvent être surveillées
ou protégées. Le système complet est commandé par
l‘unité centrale, qui communique avec les différents
capteurs par radio. Dès que l‘unité centrale détecte
une infraction à l‘aide des capteurs, elle déclenche une
alarme. Le boîtier de la sirène extérieure est fabriqué
avec un plastique robuste, il résiste aux intempéries et
comprend une protection anti manipulation.
4. Mise en service
Instructions de montage pour l‘alarme extérieure
• Ce produit peut aussi bien être monté à l‘intérieur qu‘en extérieur.
• Ce produit est spécialement conçu pour être monté contre un mur.
• Positionnez le produit de manière à ce qu‘il soit bien visible et à une hauteur qui ne soit pas
directement accessible.
• Vérifiez que le ressort de l‘interrupteur antisabotage à l‘arrière de la sirène est com-
plètement comprimé (on entend un clic quand on le comprime).
• Assurez-vous avant l‘installation que le lieu de montage est adéquat et vérifiez le matériel de
montage. Assurez-vous qu‘il n‘y a aucun conduit électrique, d‘eau, de gaz ou autre à l‘empla-
cement du montage.
• Selon votre lieu de montage il est possible que des accessoires de montage différents ou sup-
plémentaires s‘avèrent nécessaires.
Introduction des piles
1) Retirez les vis du couvercle avant (sur le bord inférieur de la sirène) avec un tournevis cruci-
forme puis retirez le couvercle avant.
2) Insérez 4 piles D (en respectant les polarités) en suivant le dessin en relief fourni dans le
compartiment à pile.
3) Vous pouvez maintenant soit remonter le couvercle avant ou procéder à l‘intégration du
produit avec la télécommande.
Intégration à l‘aide de la télécommande
1. Appuyez sur l‘interrupteur ON/OFF à l‘intérieur de la Sirène pour le mettre en position ON.
(Tous les LED d‘état s’allument)
2. Appuyez sur la touche LEARN à l‘intérieur de la sirène.
USER MANUAL HGA500 532
MODE D’EMPLOI HGA500 532
Power supply 4 x 1.5 V LR20 (D) – 6.0 V
Operating frequency 868.35 MHz (+/- 0.5 MHz)
Radio range Max. 250 m (open space)
House security code Via 4-polar jumper
Alarm duration 1, 3, 5 minutes
Place of assembly Outdoor area (waterproof)
Alimentation électrique 4x 1,5 V LR20 (D) – 6,0 V
Fréquence de fonctionnement 868,35 MHz (+/- 0,5 MHz)
Portée signal radio Max. 250 m (sans obstacles)
Code sécurité maison sur cavalier à 4 broches
Durée de l'alarme 1, 3, 5 minutes
Lieu de montage Zone extérieur (étanche)
1 Unité alarme
2 Interrupteur antisabotage
3 Bouton POWER
4 Bouton LEARN
5 Interrupteur à coulisse code
sécurité maison
6 Interrupteur à coulisse de la
durée d‘alarme
7 Interrupteur à coulisse du
retard d‘activation

4. La sirena conferma altresì il collegamento tra telecomando e sirena dell‘allarme con un ulteri-
ore segnale acustico e con una breve accensione dei LED.
5. Se esiste più di un telecomando, ripetere questo processo con ogni elemento.
6. A questo punto la sirena di allarme è pronta per il successivo montaggio.
5. Funzionamento
Importante!
Premere sempre contemporaneamente i tasti ARM e DISARM per due secondi su uno dei tele-
comandi, per attivare/disattivare l‘interruttore di sicurezza e quindi anche la sirena dell‘allarme
oppure per effettuare un‘impostazione o procedere alla sostituzione della batteria.
Procedura:
• Premere i tasti ARM e DISARM per due secondi su uno dei telecomandi, per attivare l‘inter-
ruttore di sicurezza e quindi anche la sirena dell‘allarme.
• I LED di stato blu si spegneranno e il LED di stato rosso indicherà lo stato attivo della sirena di allarme.
• Ora la sirena dell‘allarme verificherà se è presente un segnale dall‘unità centrale e ciò sarà
indicato da un breve segnale acustico.
6. Funzioni di base
Impostare il codice di sicurezza della casa
Impostare l‘interruttore del codice di sicurezza della casa in maniera tale che corrisponda al codice
di sicurezza della casa dell‘unità centrale.
Ritardo di input/output
Nell‘impostazione standard il ritardo di input/output è di 5 secondi. In alternativa sarà possibile
impostarlo su 30 secondi utilizzando l‘interruttore a scorrimento.
Interruttore antimanomissione
Questo prodotto dispone di un interruttore antimanomissione. Ciò impedisce che questo cessi di
funzionare in caso di intervento con forza o eliminazione della sirena. In tale caso sarà immedia-
tamente innescato un allarme molto forte.
Impostazione della durata dell‘allarme
La durata dell‘allarme potrà essere impostata tramite l‘interruttore a scorrimento all‘interno del
prodotto. Sono disponibili per la selezione: 1 minuto, 3 minuti, 5 minuti
Importante! Deve essere selezionata una di queste 3 durate!
Test di funzionalità
Controllare regolarmente il corretto funzionamento della sirena.
Procedere come segue:
1. Attivare l‘allarme con la combinazione di tasti PANIC sul telecomando.
2. A questo punto la centrale e la sirena esterna attiveranno un allarme molto intenso.
3. Importante! Questo allarme potrà essere disattivato solo con i tasti DISARM sul telecomando
oppure inserito il PIN a 4 cifre tramite l‘unità centrale.
Attenzione! Rischio di perdita dell‘udito
Suono dell‘allarme molto intenso! Non esporre l‘udito a tale suono per un periodo prolungato,
dal momento che può provocare seri danni all‘udito! Non attivare l‘allarme nelle immediate vici-
nanze delle orecchie! Considerate inoltre che l‘allarme deve essere testato durante il giorno e non
di notte per evitare di occasionare molestie inutili ai vicini!
7. Dati tecnici
Esclusione di
responsabilità
Schwaiger GmbH non si
assume alcuna responsa-
bilità e non fornisce alcuna
garanzia per eventuali dan-
ni derivanti da operazioni
d’installazione o montaggio
non eseguite correttamente, da un uso improprio del prodotto o dalla mancata osservanza delle
disposizioni di sicurezza.
Smaltimento
Gli apparecchi elettrici ed elettronici e le batterie non devono essere gettati nei rifiuti domestici.
In base alla normativa vigente, il consumatore è tenuto a consegnare gli apparecchi elettrici ed
elettronici e le batterie giunti al termine del loro ciclo di vita agli appositi centri di raccolta pubblici
oppure a restituirli al punto vendita. Le modalità secondo cui si svolgono le suddette operazioni
vengono stabilite dalle singole normative nazionali. Il simbolo presente sul prodotto, sul manuale
d’uso e sull’imballaggio fa riferimento a queste disposizioni.
Dichiarazione di conformità CE
Con la presente dichiarazione la ditta Schwaiger GmbH attesta che questo prodotto risponde ai re-
quisiti di base e ad altre disposizioni rilevanti della Direttiva 1999/5/CE. Il testo della dichiarazione
di conformità si può scaricare su www.schwaiger.de/downloads. Questo prodotto è stato ideato,
esaminato e realizzato conformemente alla Direttiva europea R&TTE 1999/5/CE [Direttiva sulle
apparecchiature radio e apparecchiature terminali di telecomunicazione].
Déclaration de conformité CE
Par la présente la société Schwaiger GmbH déclare que le produit correspond aux exigences
fondamentales et autres dispositions d‘importance de la directive 1999/5/CE. Vous trouverez la
déclaration de conformité sous www.schwaiger.de/downloads. Ce produit a été conçu, testé et
fabriqué conformément à la directive R&TTE 1999/5/CE.
3. Uso previsto
Este producto es un producto complementario del sistema «Green Guard» de Schwaiger. Solo
funciona en conexión con una unidad central (p. ej. HG1000 o HG2000) y no se puede
utilizar por separado.
El sistema «Green Guard» de Schwaiger sirve para proteger y vigilar su terreno/hogar. Con ayu-
da de diferentes sensores, se pueden vigilar o proteger zonas individuales del edificio como p. ej.
la zona de entrada. El sistema completo se controla mediante la unidad central que se comunica
con los diferentes sensores de modo inalámbrico. La unidad central dispara una alarma tan pronto
como detecta una infracción con los sensores.
La carcasa de la sirena exterior está hecha de plástico robusto, es resistente a la intemperie y está
protegida con un interruptor antimanipulación.
4. Puesta en marcha
Instrucciones de montaje de la sirena exterior
• Este producto se puede montar tanto en interiores como en exteriores.
• Este producto ha sido especialmente diseñado para montaje mural.
• Coloque el producto de un modo bien visible a una altura a la que no se pueda acceder direc-
tamente.
• Procure que el muelle del interruptor antisabotaje de la parte posterior de la sirena se
encuentre completamente presionado (sonido de clic al encajar).
• Antes de proceder a la instalación, compruebe la idoneidad del lugar de montaje y verifique
el material de montaje. Asegúrese de que no haya conductos eléctricos, de agua, de gas o de
cualquier otro tipo en el lugar de montaje.
• Dependiendo de su lugar de montaje, pueden ser necesarios accesorios de montaje adicionales
o diferentes.
Colocación de las pilas
1) Quite el tornillo de la tapa delantera (en el extremo inferior de la sirena) con ayuda de un
destornillador de estrella y, a continuación, quite la tapa delantera.
2) Coloque 4 pilas D (con la polaridad correcta) conforme a las marcas impresas en el compar-
timento para pilas.
3) Ahora puede volver a montar la tapa delantera o integrar el producto con ayuda del mando a
distancia inalámbrico.
1. Introduzione
Congratulazioni! Grazie per aver acquistato un prodotto della gamma SECURE 4 YOU. Qui di segui-
to forniamo le istruzioni necessarie per l’utilizzo dell’apparecchio, pertanto vi preghiamo di leggere
il presente manuale d’uso attentamente e per intero.
Indicazioni generali di sicurezza e manutenzione
• Questo apparecchio è progettato per l’uso privato in ambito domestico e non per l’uso com-
merciale.
• Si tratta di un prodotto elettronico, non adatto all’utilizzo da parte dei bambini! Si consiglia
quindi di conservarlo fuori dalla portata dei bambini.
• Non esporre l’apparecchio a umidità, acqua, pioggia, neve o pioggerella e utilizzarlo esclusiva-
mente in ambienti asciutti, se non altrimenti specificato.
• Evitare di far cadere l’apparecchio e di sottoporlo a scossoni.
• Non introdurre oggetti nelle aperture dei collegamenti o in altre fessure presenti sul prodotto.
• Non smontare l’articolo in singole parti. L’apparecchio non contiene componenti la cui manu-
tenzione può essere eseguita dall’utente. Un montaggio effettuato in modo non corretto può
causare scosse elettriche o malfunzionamenti.
• Pulire l’apparecchio usando un detergente non aggressivo e un panno umido estremamente
leggero e che non lascia pelucchi. Prestare particolare attenzione a non far penetrate acqua
all’interno del prodotto.
2. Contenuto della confezione
• Sirena esterna
• Materiale per il montaggio (dima per il montaggio, tasselli e viti)
• Istruzioni per l‘uso e avvertenze in materia di sicurezza
Batterie aggiuntive richieste: 4 batterie da 1,5V LR20 (D)
La sirena in dettaglio 3. Uso consentito
Questo prodotto è un prodotto complementare per il sistema Schwaiger „Green Guard“. Fun-
ziona solo in connessione con un‘unità centrale
(ad es. HG1000 oppure HG2000) e non può essere
usato separatamente.
Il sistema Schwaiger „Green Guard“ consente di
proteggere e monitorare la vostra proprietà/casa.
Utilizzando diversi sensori, le singole aree dell‘edifi-
cio, come ad esempio la zona di ingresso, potranno
essere protette o messe in sicurezza. Il sistema com-
pleto è controllato dall‘unità centrale che comunica
via radio con i vari sensori. Una volta che l‘unità cen-
trale rileva una violazione sui sensori, ciò innescherà
un allarme.
La scatola della sirena esterna è realizzata in robusto
materiale plastico ed è resistente agli agenti atmos-
ferici, protetta da un interruttore antimanomissione.
4. Messa in servizio
Avvertenze per il montaggio della sirena esterna
• Questo prodotto può essere montato tanto all‘interno quanto all‘esterno.
• Questo prodotto è specificamente progettato per il montaggio a parete.
• Collocare il prodotto in posizione ben visibile a un‘altezza non raggiungibile direttamente.
• Assicurarsi che la molla dell‘interruttore antimanomissione, sul retro della sirena, sia
completamente premuta (clic quando si preme).
• Prima dell‘installazione verificare l‘adeguatezza della sede di montaggio e controllare il materi-
ale per il montaggio. Assicurarsi che non siano presenti linee elettriche, dell‘acqua o del gas né
altre linee presso il luogo del montaggio.
• In funzione della sede dell‘installazione, potrebbe essere necessario utilizzare altri/diversi ac-
cessori per il montaggio.
Inserimento delle batterie
1) Rimuovere la vite del coperchio anteriore (in corrispondenza della punta inferiore della sirena)
utilizzando un cacciavite a stella e quindi estrarre la vite della copertura anteriore.
2) Inserire quattro batterie D (con la polarità corretta) secondo l‘impronta nel vano batteria.
3) Ora sarà possibile rimontare il coperchio anteriore oppure effettuare l‘addestramento del
prodotto utilizzando il telecomando.
Addestramento utilizzando il telecomando wireless
1. Fare scorrere l‘iinterruttore ON/OFF all‘interno della sirena in posizione ON. (Tutti i LED di
stato si accendono)
2. Premere il tasto LEARN all‘interno della sirena.
3. Premere il tasto DISARM su uno dei telecomandi che sia già stato addestrato nel sistema
principale. La sirena dell‘allarme conferma che la connessione è stata stabilita ed emetterà un
segnale acustico.
Recyclage
Les équipements et batteries électriques et électroniques ne doivent pas être jetés avec les or-
dures ménagères. Le consommateur est légalement tenu de rapporter aux points de collecte
publics prévus à cet effet ou au magasin les équipements électriques et électroniques ainsi que les
batteries en fin de vie. La législation du pays réglemente les pièces. Le symbole sur le produit, le
manuel d’utilisation ou l’emballage indique les dispositions prévues.
1. Introducción
Enhorabuena y gracias por haber adquirido uno de los productos de la serie SECURE-4-YOU.
A continuación encontrará indicaciones útiles para el manejo de este producto. Por favor, lea de-
tenidamente las instrucciones de manejo completas.
Indicaciones generales de seguridad y mantenimiento
• Este producto se ha fabricado para el uso privado no comercial.
• ¡Este es un producto electrónico que debe mantenerse fuera del alcance de los niños!
• Proteja el producto contra la humedad, el agua, la lluvia, la nieve o la llovizna y utilícelo solo en
un ambiente seco aunque no se indique explícitamente.
• No deje caer el producto ni lo someta a fuertes sacudidas.
• No introduzca ningún objeto en los conectores ni en los orificios del producto.
• No desmonte el producto en sus componentes individuales. El aparato no contiene ninguna
pieza que pueda ser mantenida por el usuario. Un montaje indebido puede provocar descargas
eléctricas o fallos de funcionamiento.
• Limpie el producto exclusivamente con un paño ligeramente húmedo y sin hilachas, y no utilice solu-
ciones de limpieza agresivas. Asegúrese de que no penetra agua (líquidos/humedad) en el aparato.
2. Contenido del paquete
• Sirena exterior
• Material de montaje (plantilla de montaje, tacos y tornillos)
• Manual de instrucciones e indicaciones de seguridad
Pilas adicionales necesarias: 4 de 1,5 V LR20 (D)
La sirena en detalle
ISTRUZIONI PER L‘USO HGA500 532
MODE D’EMPLOI HGA500 532
INSTRUCCIONES HGA500 532
1 Unità sirena
2 Interruttore antimanomissione
3 Tasto POWER
4 Pulsante LEARN
5 Interruttore a scorrimento
codice di sicurezza della casa
6 Interruttore a scorrimento
durata dell‘allarme
7 Interruttore a scorrimento
ritardo di attivazione
1 Unidad de sirena
2 Interruptor antisabotaje
3 Botón POWER
4 Botón LEARN
5 Interruptor deslizante de código de seguridad de la casa
6 Interruptor deslizante de duración de la alarma
7 Interruptor deslizante de retardo de conexión
Alimentazione elettrica 4 da 1,5 V LR20 (D) – 6,0 V
Frequenza d'esercizio 868,35 MHz (+/- 0,5 MHz)
Portata wireless Max. 250 m (spazio aperto)
codice di sicurezza della casa Tramite jumper a 4 poli
Durata dell'allarme 1, 3, 5 minuti
Sede di montaggio Area esterna (impermeabile)

5. Bedrijf
Belangrijk!
Druk steeds de toetsen ARM en DISARM gelijktijdig gedurende twee seconden in op één van
de afstandsbedieningen, om de veiligheidsschakelaar en daarmee ook de alarmsirene te active-
ren/desactiveren of om instelling of accuvervanging uit te voeren.
Verloop:
• Druk de toetsen ARM en DISARM gedurende twee seconden in op één van de afstandsbe-
dieningen, om de veiligheidsschakelaar en daarmee ook de alarmsirene te activeren.
• De blauwe status-LED’s gaan uit en de rode status-LED toont de actieve toestand van de
alarmsirene.
• De alarmsirene controleert nu of een radiosignaal van de centrale eenheid voorhanden is en
toont dit door een korte bieptoon.
6. Basisfuncties
Woning-veiligheidscode instellen
Stel de woning-veiligheidscodeschakelaar zodanig in, dat deze overeenstemt met de woning-vei-
ligheidscode van de centrale eenheid.
In-/uitgangsvertraging
De in-/uitgangsvertragingstijd bedraagt in de standaard instelling 5 seconden. Deze kan met
behulp van de schuifschakelaar alternatief op 30 seconden ingesteld worden.
Sabotageschakelaar
Dit product beschikt over een sabotageschakelaar. Deze verhindert bij inwerking met geweld of
verwijderen van de sirene het uitvallen hiervan. Hierbij wordt direct een luid alarm vrijgegeven.
Instellen van de alarmduur
De alarmduur kan via schuifschakelaars binnenin het product ingesteld worden.
Naar keuze staan hier: 1 minuut, 3 minuten, 5 minuten.
Belangrijk! Eén van deze 3 tijden dient geselecteerd te zijn!
Werkingstest
Controleer regelmatig de correcte werking van de sirene.
Ga hiervoor als volgt te werk:
1. Geef met de PANIC toetsencombinatie een alarm vrij op de afstandsbediening.
2. Nu geeft de centrale alsook de buitensirene een luid alarm vrij.
3. Belangrijk! Dit alarm kan enkel via de toetsen DISARM op de afstandsbediening of door
invoeren van de 4-cijferige PIN-code via de centrale eenheid gedesactiveerd worden.
Voorzichtig! Gevaar voor gehoorbeschadiging
Luide alarmtoon! Stel uw gehoor niet gedurende langere tijd bloot aan deze toon, omdat anders
ernstige gehoorschade het gevolg kan zijn! Activeer het alarm niet in de directe nabijheid van
uw oren!
Denk er ook aan het alarm overdag en niet ‘s nachts uit te proberen om buren niet onnodig lastig
te vallen!
7. Technische gegevens
Disclaimer
Schwaiger GmbH aanvaardt geen enkele aansprakelijkheid en garantie voor schade als gevolg
van onjuiste installatie of montage en oneigenlijk gebruik van het product of niet-naleving van de
veiligheidsinstructies.
Afvoer
Elektrische en elektronische apparatuur en batterijen mogen niet worden weggegooid met het
huishoudelijk afval. De consument is wettelijk verplicht om elektrische en elektronische appa-
ratuur en batterijen aan het einde van hun levensduur in te leveren bij het verkooppunt of bij
speciaal daarvoor gecreëerde openbare inzamelpunten. De details van deze regelingen kunnen
per land en regio verschillen. Het symbool op het product, de gebruiksaanwijzing of de verpakking
duidt op deze regeling.
EG-conformiteitsverklaring
Hierbij verklaart Schwaiger GmbH dat dit product voldoet aan de essentiële eisen en andere
relevante bepalingen van richtlijn 1999/5/EG. De conformiteitsverklaring kunt u vinden op www.
schwaiger.de/downloads. Dit product is ontworpen, getest en vervaardigd volgens de Europese
R&TTE-richtlijn 1999/5/EG.
1. Inleiding
Hartelijk gefeliciteerd en bedankt voor de aanschaf van een product uit het serie SECURE-4-You.
Hieronder vindt u nuttige informatie over het gebruik van dit product. Leest u daarom deze ge-
bruiksaanwijzing volledig en zorgvuldig door.
Algemene veiligheids- en onderhoudsinstructies
• Dit product is bestemd voor particulier, niet-commercieel gebruik thuis.
• Het gaat bij dit product om een elektronisch product dat niet thuishoort in de handen van kin-
deren! Bewaar het dus buiten het bereik van kinderen.
• Bescherm het product tegen vocht, water, regen, sneeuw of motregen, en gebruik het product
alleen in droge omgevingen, als hier niet speciaal op wordt gewezen.
• Laat het product niet vallen en stel het niet bloot aan hevige schokken.
• Steek geen voorwerpen van welke aard dan ook in de aansluitingen of openingen van het
product.
• Haal het product niet uit elkaar. Het apparaat bevat geen door de gebruiker te repareren onder-
delen. Onjuiste montage kan een elektrische schok of storingen veroorzaken.
• Reinig dit product alleen met een enigszins vochtige, pluisvrije doek en gebruik geen agressieve
reinigingsmiddelen. Zorg er hierbij vooral voor dat er geen water in het apparaat terecht komt.
2. Verpakkingsinhoud
• Buitensirene
• Montagemateriaal (montagesjabloon, pluggen & schroeven)
• Bedieningshandleiding & veiligheidsinstructies
Extra benodigde accu’s: 4x 1,5V LR20 (D)
De sirene in detail 3. Doelgericht gebruik
Bij dit product gaat het om een vervolledigingspro-
duct voor het Schwaiger „Green Guard“ systeem.
Het werkt enkel in verbinding met een centrale
eenheid (bv. HG1000 of HG2000) en kan niet af-
zonderlijk gebruikt worden.
Het Schwaiger „Green Guard“ systeem dient voor
de beveiliging en bewaking van uw perceel/ woning.
Met behulp van verschillende sensoren kunnen af-
zonderlijke bereiken van het gebouw zoals bv. het
ingangsbereik bewaakt of beveiligd worden. Het
volledige systeem wordt via de centrale eenheid ge-
stuurd, hetwelk per radio met de verschillende sen-
soren communiceert. Zodra de centrale eenheid een
inbreuk herkent via de sensoren, geeft deze een alarm vrij.
De behuizing van de buitensirene bestaat uit robuuste kunststof en is weerbestendig alsook door
een manipulatieschakelaar beschermd.
4. Inbedrijfname
Montage-instructies voor buitensirene
• Dit product kan zowel in het binnen- alsook in het buitenbereik gemonteerd worden.
• Dit product werd speciaal voor montage op de wand ontwikkeld.
• Breng het product goed zichtbaar op niet direct bereikbare hoogte aan.
• Let er op dat de veer van de sabotageschakelaar, aan de achterzijde van de sirene,
volledig ingedrukt is (klikgeluid bij het inklikken).
• Controleer voor de installatie de geschiktheid van de montageplaats en controleer het mon-
tagemateriaal. Vergewis u ervan dat geen elektrische, water-, gas- of andere leidingen aan de
montageplaatsen voorhanden zijn.
• Afhankelijk van uw montageplaats kunnen voor de montage bijkomende/andere montageac-
cessoires nodig zijn.
Plaatsen van de accu’s
1) Verwijder de schroef van de afdekking vooraan (aan het onderste uiteinde van de sirene) met
behulp van een kruiskopschroevendraaier en neem aansluitend de afdekking vooraan af.
2) Plaats 4x D accu’s (in de juiste richting van de polen) overeenkomstig de klemming in het
accuvak.
3) Nu kan u ofwel de afdekking vooraan opnieuw monteren of het product met behulp van de
radiografische afstandsbediening overeenkomstig eigen maken.
Eigen maken met behulp van de radiografische afstandsbediening
1.
Schuif de ON/OFF schakelaar binnenin de sirene op de positie ON. (Alle status-LED’s lichten op)
2. Druk de toets LEARN in het binnenste van de sirene in.
3. Druk de toets DISARM langdurig in op één van de afstandsbedieningen, dewelke reeds in het
hoofdsysteem eigen gemaakt werd. De alarmsirene bevestigt een succesvolle verbindings-
montage door een bieptoon.
4. De alarmsirene bevestigt bijkomend de verbinding tussen afstandsbediening en alarmsirene
door nogmaals een korte bieptoon alsook een kortstondig oplichten van de LED’s.
5. Indien meerdere afstandsbedieningen voorhanden zijn, herhaal dit proces met elke afstands-
bediening afzonderlijk.
6. Nu is de alarmsirene klaar voor de aansluitende montage.
GEBRUIKSAANWIJZING HGA500 532
Prueba de funcionamiento
Revise periódicamente el correcto funcionamiento de la sirena.
Para ello, proceda de la siguiente manera:
1. Dispare una alarma con la combinación de botones PANIC en el mando a distancia.
2. Ahora, la central y la sirena exterior disparan una fuerte alarma.
3. ¡Importante! Esta alarma solo Se puede desactivar con los botones DISARM del mando a
distancia o introduciendo el código PIN de 4 caracteres mediante la unidad central.
¡Cuidado! Peligro de lesiones auditivas
¡Sonido de alarma muy fuerte! ¡No someta sus oídos a este sonido durante un largo período de
tiempo ya que, de lo contrario, podría sufrir graves lesiones auditivas! ¡No active la alarma cerca
de sus oídos!
Recuerde además que la alarma se debe probar durante el día y no durante la noche para no
molestar innecesariamente a los vecinos.
7. Datos técnicos
Exención de
responsabilidad
Schwaiger GmbH no asume
ningún tipo de responsa-
bilidad ni garantía por los
daños producidos por una
instalación, montaje o uso
indebido del producto, así
como por la inobservancia
de las indicaciones de se-
guridad.
Eliminación
Los aparatos eléctricos y electrónicos no deben eliminarse en la basura doméstica. El usuario
tiene la obligación legal de llevar los aparatos eléctricos y electrónicos, así como las pilas que
hayan alcanzado su tiempo de vida útil a los lugares de recogida públicos previstos para ello o
devolverlos al comercio donde los adquirió. La legislación vigente de cada país regula el proce-
dimiento posterior. El símbolo situado en el producto, las instrucciones de manejo y el embalaje
hace referencia a esta legislación.
Declaración de conformidad CE
Mediante la presente, Schwaiger GmbH declara que este aparato cumple con los requisitos básicos
y los demás reglamentos relevantes de la directiva 1999/5/CE. La declaración de conformidad
según la directiva R&TTE 99/5/CE la encontrará en www.schwaiger.de/downloads.
Integrar con ayuda del mando a distancia inalámbrico
1. Deslice del interruptor ON/OFF del interior de la sirena a la posición ON. (Se encienden
todos los LED de estado)
2. Pulse el botón LEARN del interior de la sirena.
3. Mantenga pulsado el botón DISARM en uno de los mandos a distancia que ya estén integra-
dos en el sistema principal. La sirena de alarma confirma adicionalmente el correcto estable-
cimiento de la conexión con un pitido.
4. La sirena de alarma confirma además la conexión entre el mando a distancia y la sirena de
alarma con otro breve pitido así como con un breve encendido de los LED.
5. En caso de que se disponga de varios mandos a distancia, repita este proceso con cada uno
de ellos.
6. Ahora, la sirena de alarma ya está lista para el posterior montaje.
5. Funcionamiento
¡Importante!
Pulse siempre simultáneamente los botones ARM y DISARM durante dos segundos en uno de
los mandos a distancia para activar/desactivar el interruptor de seguridad y, por tanto, también la
sirena de alarma o para proceder a la configuración o al cambio de pilas.
Proceso:
• Pulse los botones ARM y DISARM durante dos segundos en uno de los mandos a distancia
para activar el interruptor de seguridad y, por tanto, también la sirena de alarma.
• Los LED azules de estado se apagan y el diodo LED rojo de estado indica el estado activo de
la sirena de alarma.
• La sirena de alarma comprueba ahora si se dispone de una señal inalámbrica de la unidad cen-
tral y lo indica mediante un breve pitido.
6. Funciones básicas
Configuración del código de seguridad de la casa
Configure el interruptor del código de seguridad de la casa de tal modo que coincida con el código
de seguridad de la casa de la unidad central.
Retardo de entrada/salida
El tiempo de retardo de entrada/salida asciende en la configuración predeterminada a 5 segundos.
Alternativamente, se puede cambiar a 30 segundos utilizando el interruptor deslizante.
Interruptor antisabotaje
Este producto dispone de un interruptor antisabotaje. Impide que falle la sirena en caso de que se
quite o se ejerza violencia sobre ella. En ese caso, se dispara inmediatamente una fuerte alarma.
Configuración de la duración de la alarma
La duración de la alarma se puede configurar con el interruptor deslizante del interior del produc-
to. Se puede elegir entre: 1 minuto, 3 minutos, 5 minutos.
¡Importante! ¡ Se debe seleccionar uno de esos 3 tiempos!
INSTRUCCIONES HGA500 532
Stroomvoorziening 4x 1,5 V LR20 (D) – 6,0 V
Bedrijfsfrequentie 868,35 MHz (+/- 0,5 MHz)
Zendbereik Max. 250 m (openlucht)
Woning-veiligheidscode Via 4-polige jumper
Alarmduur 1, 3, 5 minuten
Montageplaats Buitenbereik (waterbestendig)
1 Sirene-eenheid
2 Sabotageschakelaar
3 POWER-toets
4 LEARN-toets
5 Schuifschakelaar woning-
veiligheidscode
6 Schuifschakelaar alarmduur
7 Schuifschakelaar
inschakelvertraging
Alimentación de corriente 4 de 1,5 V LR20 (D) – 6,0 V
Frecuencia de funcionamiento 868,35 MHz (+/- 0,5 MHz)
Alcance inalámbrico Máx. 250 m (espacio abierto)
Código de seguridad de la casa
Mediante puentes de 4 polos
Duración de la alarma 1, 3, 5 minutos
Lugar de montaje Zona de exterior
(resistente al agua)
-
 1
1
-
 2
2
-
 3
3
-
 4
4


Schwaiger HGA500 532 Manuale utente
- Categoria
- Sveglie
- Tipo
- Manuale utente
in altre lingue
- English: Schwaiger HGA500 532 User manual
- français: Schwaiger HGA500 532 Manuel utilisateur
- español: Schwaiger HGA500 532 Manual de usuario
- Deutsch: Schwaiger HGA500 532 Benutzerhandbuch
- Nederlands: Schwaiger HGA500 532 Handleiding
Documenti correlati
-
Schwaiger HG2000 Manuale utente
-
-
-
-
-
-
-
-
-
Altri documenti
-
Hama 00176590 Short-Manual
-
Ring 5AT3T4 Manuale utente
-
Legrand Netatmo Smart Indoor Siren Guida d'installazione
-
Abus Secvest 2WAY Istruzioni per l'uso
-
Vanderbilt ISRW6-12 Quick Manual
-
-
Marmitek OS826 Manuale utente
-
-
Jablotron Mercury Manuale del proprietario