AXION
Thermal Imaging Monoculars
www.pulsar-vision.com @PulsarNightVision @pulsar.vision Pulsar Night Vision
Operating Instructions
English / Français / Deutsch / Español / Italiano / Русский

Thermal Imaging Monoculars AXION 1-8 English
Operating Instructions
Imageurs Thermiques AXION 9-16 Français
Mode d'emploi
Wärmebildkameras AXION 17-24 Deutsch
Bedienungsanleitung
Generador de imágenes térmico AXION 25-32 Español
Instrucciones de uso
Termovisori AXION 33-40 Italiano
Istruzioni per l'uso
Тепловизор AXION 14 -48 Русский
Инструкция по эксплуатации

SPECIFICATIONS
AXION monoculars can be used for night-time hunting, observation and terrain orientation, and carrying out
rescue operations.
AXION IR-matrix (microbolometer) based thermal imaging monoculars are represented by a number of models
that differ in magnification and lens diameter. These devices are designed for use both at night-time and during
the day in difficult weather conditions (fog, smog, rain), as well as where obstacles are present that impede the
detection of a target (branches, tall grass, dense shrubs etc.). Unlike night-vision devices that are based on
electron-optical converters, thermal vision monoculars do not require an external light source and are resistant
to the effects of bright light.
DELIVERY PACKAGE
SKU#
AXION Model
Microbolometer
Type
Resolution (pixels)
Frame refresh rate (Hz)
Pixel size (microns)
Optical specifications
Optical magnification (x)
Smooth digital zoom (x)
Digital zoom (x)
Relative aperture (D/f)
Minimum focusing Distance (m/y)
Exit pupil diameter (mm/inch)
Angle of field of view (HxV), degrees
Angle of field of view, metres at 100m
Focusing range of eyepiece (dioptres)
Maximum observation distance (m/y) *
Display
Type
Resolution (pixels)
Operational specifications
External power voltage
Battery type
Capacity
Rated Output Voltage
External power supply
Battery charge life in hours ** (at 22°C)
IP code (IEC60529) degree of protection
Stream Vision compatibility
Operating temperature range
Dimensions (mm/inch)
Weight without batteries (kg/oz)
Video recorder
Video/photo resolution (pixels)
Video / photo format
Amount of built-in memory
Wi-Fi channel
Frequency
Standard
Reception range in direct line of sight (m)
77421
XМ30
uncooled
320x240
50
12
4
4-16
2/4
1.2
3/3.28
3.5/0.12
7.3
12.8
±5
1300/1420
AMOLED
1024x768
3 – 4.3V
Li-Ion Battery Pack АPS3
3200 mAh
DC 3.7V
5V (USB)
4
IpХ7
Yes
-25°С ... +40°С/-13F ... +104F
143x41x69/5.63х1.61х2.71
0.25/8.82
1024х768
.mp4/.jpg
16 GB
2.4 Ghz
802.11 b/g/n
15
77422
XМ38
uncooled
320x240
50
12
5.5
5.5-22
2/4
1.2
3/3.28
3.5/0.12
5.8
10.1
±5
1700/1860
AMOLED
1024x768
3 – 4.3V
Li-Ion Battery Pack АPS3
3200 mAh
DC 3.7V
5V (USB)
4
IpХ7
Yes
-25°С ... +40°С/-13F ... +104F
149x49x70/5.87х1.93х2.75
0.27/9.52
1024х768
.mp4/.jpg
16 GB
2.4 Ghz
802.11 b/g/n
15
** For animal object, such as a deer.
* Actual running time depends on the intensity of Wi-Fi use and the built-in video recorder.
Improvements may be made to the design and software of this product to enhance its user features.
The current version of the User's Manual may be found on the website www.pulsar-vision.com
џ Case
џ AXION Thermal Imager
џ APS Battery Charger with power adapter
џ USB cable
џ Quick start guide
џ APS3 rechargeable battery
џ Hand strap
џ Cloth for cleaning optics
џ Warranty card
DESCRIPTION
џ Long detection distance
џ Integration with iOS and Android devices
џ Built-in video recorder
Battery Pack
џ Functional and ergonomic design
Video/audio recording
џ Microbolometer pixel size of 12 microns
џ High magnification
џ Stadiametric rangefinder
џ Lightweight and compact
џ Three observation modes (forest, city and identification)
џ Pixel correction function
џ High-resolution AMOLED display
џ Fully watertight (IPX7 protection class)
џ YouTube Live broadcasting and direct recording on the Internet via a smartphone and the Stream Vision app.
џ Display off function
џ Three calibration modes (manual, semi-automatic and automatic)
џ Wi-Fi Smartphone remote control and surveillance
џ Convenient user interface
џ Observation in eight colour modes
џ Quick-change APS3 Li-ion battery pack
џ Wide operating temperature range (-25 °С – +40°С)
џ Upgradeable software
џ USB charging option
DISTINGUISHING FEATURES
ENGLISH
1

1. Eyepiece dioptre adjustment ring
2. Down/Rec button
3. Menu button
4. Up/Zoom button
5. On/Calibration ON button
LED indicator displaying current status of the device
Device is powered on
Device on / video recording / battery charge <10%
8. MicroUSB connector
LED Indicator Operating Mode
Device on / battery charge <10%
Device on / video recording
6. Lens focus ring
7. Lens cap
9. Battery release button
USING THE RECHARGEABLE BATTERY
AXION thermal imagers are supplied with a
rechargeable APS3 Lithium-ion Battery Pack which
enables the thermal imager to be used for up to 3
hours. The battery should be charged before first use.
Charging the battery
Option 1 (Fig.2) :
џ Install the battery (10) into its slot on the instrument
case (14) by aligning the icons to form a 'dot' on the
device and the battery. (see Fig. 4).
џ Attach a USB cable (15) to the microUSB connector
(8) on the device.
џ Insert the rechargeable battery (10) supplied with
your device, or purchased separately, fully along the
guide rail into the APS charger slot (11).
џ Point A on the battery and Point B on the charger
should be aligned.
џ Connect the other end of the USB cable (15) to the
mains charger (16) or to a USB socket connected to
another power source with rated output of 5V or less.
џ The LED indicator (13) will light up.
џ Attach the microUSB plug on the USB cable (15) to
the microUSB connector on the mains device (16). Plug
the device into a 100–240V power outlet (17).
Note: The PB8I* Power Bank may be used as a charger
(see Item 7).
Attention! AXION thermal imagers require a licence
when exported outside your country.
Option 2 (Fig.3) :
џ Attach the second plug of the microUSB cable to the
socket (12) of the mains charger (11).
џ Two batteries can be charged at the same time – a
second slot is provided for this.
џ Connect the mains charger (16) to the mains power
supply.
COMPONENTS AND CONTROLS
BUTTON OPERATION
123456
7 9 8
LED indicator
Fig.
1
2

Battery completely charged. Can be disconnected from the charger.
Battery charge from 0% to 10%; Charger not connected to the mains power supply.
Battery charge from 60% to 95%.
џ When properly installed, the
battery is locked into the slot with
a special clip.
Battery charge from 20% to 60%.
џ When charging, always use the
charger supplied with your optical
device. The use of a different
charger may cause irreparable
damage to the battery or the charger and may cause the battery to ignite.
LED Indicator * Battery charge status
Battery charge from 10% to 20%.
Battery charge from 0% to 10%; Charger connected to the mains power supply.
џ Where the battery is used in below-zero temperatures, capacity will decrease. This is normal and does not
indicate a defect.
Store the battery out of the reach of children.
Battery defective. Battery should not be used.
Battery charge status (see table).
* The LED indicator displays the current level of charge of the battery for 30 seconds when the APS charger is not
plugged in. When the power is connected, the display shows the current status of the battery constantly, the LEDs
additionally flickering to indicate the battery charging process.
Installation:
џ Insert the battery (10) into the
assigned slot on the device casing
(14), aligning the images on the
instrument and the battery.
џ To remove the battery, press the
Battery Release button (9).
Safety measures:
џ Do not use the charger if it has been modified or damaged.
џ Do not leave a charger with a battery connected to the mains for more than 24 hours after full charge.
џ Do not charge the battery immediately after bringing it from the cold into a warm atmosphere. Wait 30–40
minutes for the battery to warm up.
џ After being stored for a long time, the battery should be partially charged – it should not be fully charged or
completely discharged.
џ Do not expose the battery to high temperatures or naked flame.
џ The battery is not intended to be immersed in water.
џ The battery is equipped with a short circuit protection system. However, situations that may lead to short
circuiting should be avoided.
џ Do not leave the battery unattended during charging.
џ The battery should be charged at a temperature of between 0° C and +45° C, otherwise the battery life will be
significantly reduced.
џ The connecting of third-party devices with an energy consumption greater than permissible is not
recommended.
џ Do not dismantle or deform the battery.
џ Do not subject the battery to shocks or falls.
џ Do not use the battery in temperatures that exceed those shown in the table – this may shorten battery life.
EXTERNAL POWER SUPPLY
џ The device will switch to operation from the external power source, while the APS3 battery will be gradually
recharged.
џ When the external power supply is disconnected, the device switches to the internal power supply without the
device powering off.
External power is supplied from an external source, such as a 5V Power Bank.
џ Attach the external power source to the device's USB connector (8) (Fig. 1)
џ An icon of a battery will appear on the display showing its charge as a percentage.
џ If the device is operated from an external power source and the APS3 battery is not connected, an icon is
displayed .
OPERATION
ATTENTION! The lens of the device must not be pointed at any sources of intense energy, such as laser-emitting
devices or the sun. This may damage the electronic components in the device. Damage caused by failure to
comply with the operating guidelines is not covered under warranty.
Switching on and adjusting the image
џ Remove the lens cover (7). Secure the cover to the strap using the magnet built into the cover.
џ Power up the device by pressing the ON button (5).
џ Adjust the resolution of the icons on the display by rotating the dioptre adjustment ring on the eyepiece (1). In
future, it will not be necessary to rotate the eyepiece dioptre adjustment ring, regardless of distance and other
conditions.
џ To focus on the object being observed, rotate the lens focus ring (6).
џ Adjustment of brightness and contract in the display, as well as turning on the smooth digital zoom, are
described in the FAST ACCESS MENU FUNCTIONS section.
џ Turn the device off after use with a long press of the ON button (5).
CALIBRATING THE SENSOR
џ M mode (manual). Secure the lens cap and briefly press the ON button (5). After completing the calibration
process, remove the lens cap.
Select the required mode in the CALIBRATION section of the menu .
Calibration enables the microbolometer temperature background to be equalised and defects in the image
(such as vertical lines, phantom images etc.) to be eliminated.
There are three calibration modes: manual (M), semi-automatic (SA) and automatic (A).
џ SA mode (semi-automatic). Calibration is engaged by a brief press of the ON button (5). The lens cap need not
be secured (the sensor is closed by an internal shutter).
џ A mode (automatic). The device is calibrated autonomously, in accordance with the software algorithm. The
lens cap need not be secured (the sensor is closed by an internal shutter). In this mode, the device may be
calibrated by the user using the ON button (5) (in semi-automatic mode).
DISCRETE DIGITAL ZOOM
The device's functionality offers the possibility of quickly increasing its base multiplicity (see the table of
technical properties in the Digital Zoom line) by a factor of 2 or 4. Adjust the digital zoom accordingly by pressing
the DOWN button (2).
THE QUICK ACCESS MENU FUNCTIONS
The basic settings (brightness and contrast adjustment, use of the smooth digital zoom function and the
stadiametric rangefinder) are changed via the Quick Access Menu.
џ A short press of the Menu button (3) enables you to switch between functions.
џ Enter the menu with a short press of the Menu button (3).
3

General view of the menu
Tab 1 Tab 2
Menu General SettingMenu Mode
PIP
Off
Hot White
Automatic
10
Calibration
Mode
Selection of calibration mode There are three calibration modes: manual, semi-automatic
and automatic.
џ Press and hold the Menu button (3) to enter the menu.
џ Select the 'Calibration Mode' option.
џ A short press of the Menu button (3) opens the submenu.
Automatic
Semi-automatic
The user independently sets the calibration requirements (according to the image being
observed).
џ A short press of the Menu button (3) confirms the selection.
Manual
Manual calibration. Close the lens cap before beginning calibration.
џ Select one of the calibration modes described below with the UP (4) / DOWN (2) buttons.
Calibration requirements in the automatic mode are determined programmatically, with the
calibration process being started automatically.
MAIN MENU FUNCTIONS
џ Enter the menu with a long press of the Menu button (3).
џ Press the UP (4) / DOWN (2) buttons to move through the menu functions.
џ To exit the menu, press and hold down the Menu button (3).
џ Automatic exit from the menu occurs after 10 seconds of inactivity.
џ When exiting the menu, the cursor location ( ) is remembered only for the duration of the one working session
(i.e. until the device is powered off). The next time the device is powered on and the menu is accessed, the cursor
will be at the first item on the menu.
џ One short press of the Menu button (3) opens a menu item.
џ Menu navigation is be means of scrolling. When the last item on the first tab is reached, navigation moves to
the first item of the second tab.
Note. Current magnification is calculated as the product of the base magnification and the smooth digital zoom
ratio. Example: where the basic device magnification is 3.0x and the smooth digital zoom ratio is x1.7, the actual
magnification is 5,1х (3,0*1,7). The next time the device is turned on, the image is projected onto the display with
the brightness and contrast settings saved from the previous power off.
Brightness – by pressing the UP (4) / DOWN (2) buttons and changing the display brightness value from 00 to
20.
Smooth digital zoom – by pressing the UP (4) / DOWN (2) buttons and changing the digital zoom value from 1.0
to 4.0. The increment size of the digital zoom is 0.1.
To exit the menu, press and hold down the Menu button (3), or wait 10 seconds for automatic selection.
The initial smooth digital zoom factor displayed is equal to x1.0 if the discrete zoom is inactive, x2.0 if is 2x, and
x4.0 if 4x.
Contrast – by pressing the UP (4) / DOWN (2) buttons and changing the display contrast value from 00 to 20.
Stadiametric rangefinder – press the UP (4) / DOWN (2) buttons to change the position of the markings for
determining the distance of the object being observed (see Section 16 for further information on the
rangefinder).
Mode
Identification Mode – A universal mode for application under various observation
conditions.
Selection of observation mode The thermal imager has three automatic operating modes.
Each of these modes includes an optimum combination of parameters (brightness, contrast,
intensity etc.) for ensuring the best image quality under any given observation conditions.
џ A short press of the Menu button (3) opens the menu.
џ Press and hold the Menu button (3) to enter the menu.
џ Select one of the settings described below with the UP (4) / DOWN (2) buttons.
џ Select the ‘Mode’ option.
џ A short press of the Menu button (3) confirms the selection.
Mountains/Rocks – High Contrast Mode This is the optimum mode for observing wildlife
against a background of rocks, and soil in an upland situation.
Forest – Low Contrast Mode This is the optimum mode for observing wildlife against a
background of vegetation.
Colour
Palettes
Violet
Red Monochrome
Ultramarine
Hot Red
Sepia
A black and white palette (cold temperature corresponds to white, and hot temperature to
black).
Rainbow
џ Press and hold the Menu button (3) to enter the menu.
џ A short press of the Menu button (3) opens the menu.
џ Select one of the palettes described below with the UP (4) / DOWN (2) buttons.
Hot White
A black and white palette (cold temperature corresponds to black, and hot temperature to
white).
Colour Palette Selection The principal display mode for an observed image is ‘Hot White’. The
‘Colour Palettes’ menu item allows you to select an alternative palette:
џ Select the ‘Colour Palettes’ option.
Hot Black
џ A short press of the Menu button (3) confirms the selection.
Composition and description of the menu
4

Date
џ To save your chosen date and exit the submenu, press and hold down the Menu button (3).
Setting the Date
џ Enter the 'Date' submenu with a short press of the Menu button (3). The date appears in
dd/mm/yyyy format.
џ Set the required year, month and day with the UP (4) / DOWN (2) buttons. Press the Menu
button (3) to move through the digits.
Time
џ Set the hour by pressing the UP (4) / DOWN (2) buttons.
џ Press the Menu button (3) to move to the minute setting.
џ Set the minute by pressing the UP (4) / DOWN (2) buttons.
џ To save your chosen time and exit the submenu, press and hold down the Menu button (3).
џ Press the Menu button (3) to move to the hour setting.
Setting the Time
џ Enter the 'Time' submenu with a short press of the Menu button (3).
џ Select the time format (24-hour clock or AM/PM) by pressing the UP (4) / DOWN (2) buttons.
Units of
Measurement
M
Y
џ Set the unit of measurement (metres or yards) by pressing the UP (4) / DOWN (2) buttons;
then press the Мenu button (3) .
џ Enter the 'M/Y' submenu with a short press of the Menu button (3).
џ Return to the submenu occurs automatically.
Selecting a unit of measurement
M
Y
Default
Settings
Restore Factory Settings
џ Enter the 'Default Settings' submenu with a short press of the Menu button (3).
џ Confirm your selection with a short press of the Menu button (3).
џ Select the 'YES' option to reset to factory settings or 'NO' to cancel with the UP (4) / DOWN (2)
buttons.
Formatting the
Memory Card
This function enables the device's Flash Card (memory card) to be formatted (all files to be
deleted from its memory).
џ Enter the 'Memory Card Formatting' submenu with a short press of the Menu button (3).
џ Select the 'YES' option to reset to format the memory card or 'NO' to return to the submenu
with the UP (4) / DOWN (2) buttons.
џ The message 'Formatting completed' means that formatting is completed.
џ The message 'Formatting memory card' means that formatting is in progress.
џ If the YES option has been selected, the message 'Format the Memory Card?' will appear
together with options 'YES' and 'NO'. Select YES to format the memory card.
џ If the NO option has been selected, formatting will be cancelled and the submenu will
reappear.
џ Confirm your selection with a short press of the Menu button (3).
Wi-Fi Settings
This option enables you to configure the device to operate on a Wi-Fi network.
Setting
a password
џ Press the Menu button (3) to enter the 'Wi-Fi' submenu.
џ Set your desired password with the UP (4) / DOWN (2) buttons. The UP (4) button increases
the number and the DOWN (2) button reduces the numbers. Press the Menu button (3) to move
through the digits.
This function enables you to set a password to access the device from an external device. This
password is used when linking an external device (e.g. a smartphone) to the device.
џ The default password (12345678) will appear on the screen.
This sub-function enables you to configure the appropriate level of access to your device
made available to the Stream Vision app.
Owner level. A Stream Vision user has full access to all the device's functions.
Guest level. A Stream Vision user is able to view video footage from the device only in real
time.
џ To save the password and exit the submenu, press and hold down the Menu button (3).
Setting
Access Levels
Removal of
Defective Pixels
When using the device, defective (broken) pixels may appear on the sensor: i.e. bright or dark
points of constant brightness that are visible on the image. AXION thermal imagers offer the
possibility of removing any defective pixels on the sensor programmatically, as well as to
cancel any deletion.
џ Select one of the available interface languages (English, French, German, Spanish or
Russian) with the UP (4) / DOWN (2) buttons.
џ Confirm your selection with a short press of the Menu button (3).
џ To save your choice and exit the submenu, press and hold down the Menu button (3).
џ Enter the 'Language' submenu with a short press of the Menu button (3).
Choose Language
PiP Mode
PIP
џ Press and hold the Menu button (3) to enter the menu.
џ A short press of the Menu button (3) switches the mode on/off.
Selection of the Picture in Picture Mode
џ Select the 'PiP Mode' option
PIP
Icon
brightness
џ A short press of the Menu button (3) confirms the selection.
Adjusting icon brightness.
џ Select the brightness level of the pictograms with the UP (4) / DOWN (2) buttons.
џ A short press of the Menu button (3) opens the submenu.
џ Select the 'Icon Brightness' option.
џ Press and hold the Menu button (3) to enter the menu.
General
Settings
This menu item allows you to program the following settings
Language
џ If the YES option has been selected, the message 'Do you want to return to default settings?'
will appear together with options YES and NO. Select YES to format the memory card.
Unit of measurement – metres
Language – English
Mode – forest
Wi-Fi – off (default password)
The following settings will be restored to their factory state before being set by the user:
Colour palette – Hot White
Operating mode – video
Calibration mode – automatic
Note: When resetting to factory settings the date/time settings and the user pixel map are
saved.
Magnification – original value
PiP – off
џ If the NO option has been selected, formatting will be cancelled and the submenu will
reappear.
5

џ Observation mode
џ Calibration mode (when in automatic calibration mode with 3 seconds remaining until automatic calibration, a
countdown timer will appear in place of the calibration icon).
џ Current full magnification
џ Wi-Fi connection
The status bar is located at the bottom of the display and displays information relating to the operational status
of the device, including:
џ USB connection (if the device is connected)
џ Colour palette (displayed only when the Hot Black palette is installed)
џ Current time
џ Battery discharge level (when the device is powered by the rechargeable battery)
џ External power supply indicator (when the device is powered from an external supply)
Note: when calibration is in progress, the display image freezes for the duration of the calibration
SA
11.0x 08:13PM
STATUS BAR
VIDEO RECORDING AND PHOTOGRAPHING AN OBSERVED IMAGE
џ The device is in VIDEO mode as soon as it is turned on.
The built-in recording device operates in two modes:
AXION thermal imagers are equipped with a function for video recording and photographing an observed image
onto the built-in memory card. It is recommended that the date and time be set before using the video recording
and photographing function (see the corresponding menu items).
VIDEO mode . Video recording of an image
Wi-Fi FUNCTION
The device is equipped with wireless communication with external devices (computer, smartphone) via Wi-Fi.
Wi-Fi disconnected
џ Turn on the wireless connection module with a long press of the Up button (4). Wireless operation is displayed
in the status bar in the following way:
Wi-Fi turned on, no connection to the device
Wi-Fi turned on, the device is connected
џ The device is recognised by an external device under the label ‘AXION_XXXX’, where XXXX are the four last digits
of the serial number.
Wi-Fi enabled by the user
Wi-Fi connection process in progress
Connection status Status bar indication
џ After entering the password on an external device (for more detailed information of setting passwords, see the
subsection entitled ‘Setting up Wi-Fi’ in the section, ‘Main Menu Functions’ of the Instructions) and establishing a
connection, the icon in the status bar changes to .
STADIAMETRIC RANGEFINDER
Thermal imagers are fitted with a stadiametric rangefinder that enables the distance to an object to be defined
where its size is known.
џ The stadiametric rangefinder function is accessed by a short press of the Menu button (3) and selecting the
icon .
џ Bars will appear on the display to determine the distance, icons of three objects and digits of the estimated
distance of these three objects.
џ Using the UP (4) and DOWN (2) buttons, align the defective pixel with the fixed cross in the
frame – the pixel should disappear.
џ Where a pixel has been successfully deleted, the word ‘OK’ will appear briefly on the screen.
Return all defective pixels previously disabled by the user to their original state:
џ Select the icon with a short press of the Menu button (3).
џ Open the submenu by pressing the Menu button (3).
џ A short press of the Menu button (3) switches the marker direction from the horizontal to the
vertical and vice versa.
џ Then, by moving the marker across the display, you can delete the next defective tile.
џ A magnifying glass will appear on the right side of the display – an enlarged image with a
fixed cross – that is required to facilitate a search for the defective pixel and to align the
marker with it. There are horizontal and vertical directional arrows to move the marker
with the coordinates along the X and Y axes.
џ Use the UP (4)/DOWN (2) buttons to move the marker to align its centre with the defective pixel.
џ Delete the defective pixel with a short press of the On/Calibration ON button (5).
џ To exit the ‘Delete defective pixels’ function, press and hold down the Menu button (3).
џ Select the icon and press the Menu button (3).
џ Select 'YES' if you want to return to the factory pixel map and 'NO' if you do not.
џ Open the submenu by pressing the Menu button (3).
џ A marker will appear on the left side of the display.
џ Confirm your selection with a short press of the Menu button (3).
Attention! One or two pixels on the imager display in the form of black, bright white or
coloured (blue or red) dots may appear. These are not a defect.
Return to
factory
'pixel map'
џ An icon , ‘>100’ is displayed in the upper left corner which indicates that the device can take more than 100
photographs. Where the number of photographs available is less than 100, the actual number of photographs
available (e.g. 98) is displayed alongside the icon .
Attention: The maximum duration of a video recording file is seven minutes. After this time, the video will be
recorded onto a new file. The number of files is limited by the capacity of the device’s built-in memory. Regularly
monitor the amount of free memory in the built-in memory card, transferring footage and photographs to other
media to free up space on the memory card.
Notes: You can enter and work on the menu during video recording. Recorded videos and photographs are saved
to the device’s built-in memory card in the format: img_xxx.jpg (for photos); video_xxx.mp4 (for video). xxx -
three-digit common file counter (for photos and video). The counter used in the naming of multimedia files is
NOT reset.
џ Stop the video recording by pressing and holding down the Down/REC button (2).
џ An icon is displayed in the upper left corner with the remaining recording time (in hh:mm format), for
example, 5:12.
џ Start video recording with a short press of the Down/REC button (2).
џ Pause the video recording and resume recording with a short press of the Down/REC button (2).
џ To toggle between Video and Photo modes press and hold down the Down/REC button (2).
џ Once video recording has begun, the icon will disappear, with a REC icon appearing in its place and the record
timer showing in MM:SS (minutes:seconds) format;
џ Video files are stored in the built-in memory card after video recording has been turned off.
PHOTO mode . Photographing an image
џ Take a photograph with a short press of the Down/REC button (2). The image freezes for 0.5 seconds and the
image file is saved to the build-in memory card.
џ Switch to PHOTO mode with a long press of the Down/REC button (2).
6

PiP FUNCTION
џ To alter the zoom ratio in the PiP window, briefly press the UP button (4).
џ The remaining image is displayed with the optical zoom value which corresponds to the value of the x1.0
coefficient.
џ A short press of the Menu button (3) switches the mode on/off.
џ When PiP is turned off, the image is displayed with the optical zoom value set for the PiP mode.
џ Press and hold the Menu button (3) to exit the main menu.
џ Select the 'PiP Mode' option
џ When the PiP is turned on, you can control the discrete and smooth zooms. In this instance, the full optical
magnification value will appear only in the separate window.
џ The enlarged image is displayed in a separate window using the full optical zoom value.
џ Press and hold the Menu button (3) to enter the main menu.
Enabling/disabling the PiP function:
PiP (Picture in Picture) enables you to view a magnified digital zoom image
in a separate 'window' simultaneously with the main image.
PIP
6.9x
3.1x
STREAM VISION
AXION thermal imagers support Stream Vision technology, which enables the transmission of an image in real
time from the thermal imager to your smartphone or tablet via Wi-Fi.
Detailed instructions on the operation of Stream Vision technology can be found in a separate booklet or on the
www.pulsar-vision.com website.
Note: the device's design includes the possibility of updating software. Updating is possible via the Stream
Vision app.
TECHNICAL INSPECTION
џ The condition of the rechargeable battery (this should be charged) and the electrical contracts (there should
be no presence of salts or oxidation).
џ The controls should be in working order.
A technical inspection of the device is recommended before each use. Check:
џ The external appearance of the device (there should be no cracks in the casing).
џ The condition of the lens and eyepiece (there should be no cracks, greasy spots, dirt or other deposits).
MAINTENANCE
џ Maintenance should be carried out at least twice a year and consist of the following actions.
џ Wipe the external surfaces of metal and plastic parts free of dust and dirt with a cotton cloth Silicone grease
may be used for this.
џ Clean the electrical contacts of the battery and battery slot on the unit using a non-greasy organic solvent.
џ Check the glass surfaces of the eyepiece and the lens. If necessary, remove dust and sand from the lenses
(preferably using a non-contact method). Cleaning of the external surfaces of the optics should be done with
substances designed specially for this purpose.
џ To switch on the display, press the ON button (5) briefly.
џ When the ON button (5) is held, the display will show 'Display off.' and a countdown.
Then the device will turn off.
This function disables the transfer of images to the display, reducing the intensity of its illumination to a
minimum. This helps prevent inadvertent unmasking. The device will continue to function.
џ When the device is switched on, press and hold the ON button (5). The display will disappear and the message
'Display off.' will appear.
џ When this function is in use, the device switches to standby mode, which allows it to be quickly turned off, if
necessary.
160m
66m
28m
DISPLAY OFF FUNCTION
Hare – height 0.3 m
There are three pre-set values for objects:
џ Go to the relevant item on the menu to select a unit of measurement (metres or yards).
џ A distance value is rounded up or down before appearing on the display to 5 metres for longer distance
readings and 1 metre for shorter distance readings.
џ To exit the rangefinder mode, press the Menu button (3) briefly, or wait 10 seconds for automatic exit.
џ If the distance is not determined within 10 seconds, the information disappears from the display.
џ Place the lower fixed cursor beneath the object and, with the UP (4) / DOWN (2)
navigation buttons, move the upper horizontal cursor relative to the lower
horizontal fixed cursor so that the object is positioned between the cursors. An
automatic recalculation of the distance to the target occurs simultaneously with this movement.
Boar – height 0.7 m
Deer – height 1.7 m
џ Connect one end of the USB cable to the device's microUSB connector (8) and the other end to the port on your
computer.
џ Switch the device on by pressing the ON button (5) (the computer will not detect the device if it is turned off).
џ The device is detected automatically by the computer and no installation of drivers is required.
џ Two connection options will appear on the display:
Use as power
џ Select the connection option with the UP (4) / DOWN (2) buttons.
Use as memory card
џ When this option is selected, the device will be recognised by the computer as a flash card. This option is
designed for working with files that are stored in the device's memory; the device's functions are not accessible,
and the device turns itself off.
Use as power
џ If a video was being recorded at the time of connection, the recording will cease and be saved.
џ When this option is selected, the computer is used by the device as an external power source. An icon will
appear in the status bar . The device will continue to function, and all functions are available.
џ When the USB is disconnected from the device when in Power mode, the device will continue to function on
battery power, where present and sufficiently charged.
Use as memory card
џ A short press of the Menu button (3) confirms the selection.
џ The battery installed in the device will not be charged.
USB CONNECTION
USB connection
Use as power
Use as memory card
Scan the QR codes to download the Stream Vision app:
7

In positive temperature conditions, objects being observed (surroundings and
background) heat up differently because of thermal conductivity, thereby generating
a high temperature contrast. Accordingly, image quality produced by the device will
be higher.
In low-temperature conditions, objects being observed (background) do, as a rule,
cool down to roughly the same temperature, because of which temperature contrast
is substantially reduced and image quality (detail) is poorer. This is a feature of
thermal imaging devices.
By following the link below you can find answers to the most frequently asked
questions about thermal imaging https://www.pulsar-nv.com/glo/support/faq/79
Environment protection first!
Your appliance contains valuable material which can be recovered or recycled.
Leave it at a local civic waste collection point.
Attention! AXION thermal imagers require a licence when exported outside your country.
Electromagnetic compatibility.
This product complies with the requirements of European standard EN 55032: 2015, Class A.
Caution: Operating this product in a residential area may cause radio interference.
TROUBLESHOOTING
Coloured lines
appeared on display
or image has
disappeared.
Wi-Fi signal non-
existent or
interrupted.
Smartphone or tablet
cannot be connected
to the device.
Does not operate
from external power
source.
Malfunction
Thermal imager does
not power up.
Image is unclear, with
vertical lines and
uneven background.
Image is too dark.
Poor image quality /
reduced detection
distances.
When used in low
temperature
conditions, image
quality of the
surroundings is
worse than in
positive temperature
conditions.
Battery completely discharged.
USB cable damaged.
External power source discharged.
Possible reason
The device was exposed to static
electricity during operation.
Calibration required.
The device is in an area with a large
number of Wi-Fi networks that may
cause interference.
Device is outside the area of Wi-Fi
coverage. There are obstacles between
the device and the receiver (e.g.
concrete walls).
Low brightness or contrast level set.
Device password has been changed.
Correction
Replace USB cable.
Adjust brightness or contrast.
Charge external power source (if
necessary).
Charge the battery.
Perform image calibration according to
Section 8 'Operation' of the Instructions.
After exposure to static electricity, the
device may either reboot automatically,
or require turning off and on again.
Delete the network and reconnect using
the device password.
To ensure stable Wi-Fi operation,
relocate the device to an area with fewer
Wi-Fi networks, or into an area with
none.
Relocate the device into direct line of
sight of the Wi-Fi signal.
These problems may occur during observation in difficult weather conditions (snow,
rain, fog etc.).
This table lists all the problems that may arise when operating the device. Carry out the recommended checks
and repairs in the order shown in the table. If a defect should occur that is not listed in the table, or if it is
impossible to repair the defect yourself, the device should be returned for repair.
8

SPECIFICATIONS
Les monoculaires d'imagerie thermique à matrice IR (microbolomètre) AXION sont représentés par plusieurs
modèles qui diffèrent par le grossissement et le diamètre de lentille. Ces appareils sont conçus pour être utilisés
à la fois de nuit et de jour dans des conditions météo difficiles (brouillard, smog, pluie), ainsi qu'aux endroits
avec présence d'obstacles empêchant la détection d'une cible (branches, herbes hautes, arbustes denses, etc.).
A la différence des dispositifs de vision de nuit utilisant des convertisseurs électro-optiques, les monoculaires
de vision thermique n'ont pas besoin d'une source de lumière externe et résistent aux effets d'une lumière
brillante.
Les monoculaires AXION peuvent être utilisés pour la chasse de nuit, l'observation et l'orientation sur le terrain,
et également pour effectuer des opérations de sauvetage.
EMBALLAGE DE LIVRAISON
SKU#
Modèle AXION
Microbolomètre
Type
Résolution (pixels)
Fréquence de rafraîchissement d'image (Hz)
Taille pixels (microns)
Spécifications optiques
Grossissement optique (x)
Zoom numérique continu (x)
Zoom numérique (x)
Ouverture relative (D/f)
Distance minimum de mise au point (m)
Diamètre pupille de sortie (mm)
Angle du champ de vision (horizontal), degrés
Angle du champ de vision, mètres à 100 m
Distance de mise au point de l'oculaire (dioptries)
Distance d'observation maximale (m)*
Affichage
Type
Résolution (pixels)
Spécifications opérationnelles
Tension d'alimentation extérieure
Type de batterie
Capacité
Tension de sortie nominale
Alimentation extérieure
La durée de charge de la batterie en heures (à 22°C)
Code IP (IEC60529) degré de protection
Compatibilité Stream Vision
Plage de températures d'utilisation
Dimensions (mm)
Poids sans batteries (kg)
Enregistreur vidéo
Résolution vidéo/photo (pixels)
Format vidé/photo
Capacité de mémoire incorporée
Voie Wi-Fi
Fréquence
Standard
Distance de réception en ligne de visée directe (m)
77421
XМ30
Non refroidi
320x240
50
12
4
4-16
2/4
1.2
3/3.28
3.5/0.12
7.3
12.8
±5
1300/1420
AMOLED
1024x768
3 – 4.3V
Bloc batterie Li-Ion АPS3
3200 mAh
DC 3.7V
5V (USB)
4
IpХ7
Oui
-25°С ... +40°С
143x41x69
0.25
1024х768
.mp4/.jpg
16 GB
2.4 Ghz
802.11 b/g/n
15
77422
XМ38
Non refroidi
320x240
50
12
5.5
5.5-22
2/4
1.2
3/3.28
3.5/0.12
5.8
10.1
±5
1700/1860
AMOLED
1024x768
3 – 4.3V
Bloc batterie Li-Ion АPS3
3200 mAh
DC 3.7V
5V (USB)
4
IpХ7
Oui
-25°С ... +40°С
149x49x70
0.27
1024х768
.mp4/.jpg
16 GB
2.4 Ghz
802.11 b/g/n
15
* pour un animal, comme un chevreuil
Des améliorations peuvent être apportées à la conception et au logiciel de ce produit pour améliorer ses
fonctionnalités pour l'utilisateur.
Une version mise à jour du mode d'emploi peut être obtenue sur le site web www.pulsar-vision.com
џ Caisse
џ Câble USB
џ Batterie rechargeable APS3
џ Dragonne
џ Manuel d'utilisation
џ APS chargeur de batterie avec alimentation secteur
џ Imageur thermique AXION
џ Chiffon pour nettoyer l'optique
џ Carte de garantie
DESCRIPTION
џ Intégration avec les appareils iOS et Android
џ Interface utilisateur conviviale
џ Large gamme de températures de fonctionnement (-25 °С – +40°С)
џ Logiciel évolutif
џ Enregistrement vidéo/audio
џ Léger et compact
џ Conception fonctionnelle et ergonomique
џ Taille de pixel du microbolomètre de 12 microns
џ Trois modes de calibration (manuel, semi-automatique et automatique)
џ Ecran AMOLED haute résolution
џ Trois modes d'observation (forêt, ville et identification)
џ Fonction correction des pixels
џ Parfaitement étanche à l'eau (indice de protection IPX7)
џ Enregistreur vidéo incorporé
џ Option de chargement USB
џ YouTube Diffusion en direct et enregistrement direct sur Internet via un smartphone et l'application Stream
Vision.
џ Télémètre stadiamétrique
Bloc batterie
џ Fonction extinction de l'écran
џ Observation dans huit modes de couleur
џ Bloc batterie Li-ion APS3 à remplacement rapide
џ Détection à grande distance
џ Wi-Fi Smartphone télécommande et surveillance
џ Grossissement important
1. CARACTERISTIQUES PARTICULIERES
FRANÇAIS
9

8. Connecteur MicroUSB
Appareil allumé/enregistrement vidéo
Témoin LED affichant l'état actuel de l'appareil :
Témoin LED Mode opératoire
1. Bague de réglage de dioptre d'oculaire
5. Bouton allumage/étalonnage
2. Bouton flèche vers le bas/enregistrement
3. Bouton Menu
4. Bouton flèche vers le haut/zoom
6. Bague de mise au point de l'objectif
7. Couvercle de lentille
9. Bouton de déverrouillage de batterie
L'appareil est allumé.
Appareil allumé/charge batterie <10%
Appareil allumé/enregistrement vidéo/charge batterie <10%
UTILISATION DE LA BATTERIE RECHARGEABLE
џ Insérez la batterie rechargeable (10) fournie avec votre
appareil, ou achetée séparément, le long du rail de
guidage dans l'emplacement du chargeur APS (11) (voir Fig.
3).
џ Raccordez la fiche microUSB sur le câble USB (15) au
connecteur microUSB sur le chargeur (16). Branchez
l'appareil dans une prise électrique 100–240V (17).
Note: Le PB8I* Power Bank peut servir ce chargeur.
Les imageurs thermiques AXION sont livrés avec un bloc
batterie ion-lithium APS3 rechargeable permettant
d'utiliser l'imageur thermique pendant 4 heures. La
batterie doit être chargée avant la première utilisation.
Option 1 (Fig.2.) :
Recharge de la batterie
џ Connectez un câble USB (15) au connecteur microUSB (8)
sur l'appareil.
џ Installez la batterie (10) dans son logement sur le boîtier
de l'instrument (14) en alignant les icônes pour former un
"point" sur l'appareil et la batterie. (voir Fig. 4).
џ Connectez l'autre extrémité du câble USB (15) au
chargeur par alimentation secteur (16) ou à une prise
femelle USB connectée à une autre source d'alimentation
avec une tension nominale de sortie de 5V ou moins.
џ Connectez le chargeur secteur (16) à l'alimentation
électrique du secteur.
Option 2 (Fig.3.) :
џ Le point A sur la batterie et le point B sur le chargeur
doivent être alignés.
џ Deux batteries peuvent être chargées simultanément –
un second emplacement est prévu pour cela.
џ Raccordez la seconde fiche mâle du câble microUSB à la
prise femelle (12) du chargeur secteur (11).
џ Le témoin LED (13) s'allumera.
COMPOSANTS ET COMMANDES
FONCTIONNEMENT
DES BOUTONS
10

État de charge de la batterie (voir tableau).
Témoin LED* État de charge de la batterie
Charge de la batterie de 0 à 10%; Chargeur non raccordé à l'alimentation secteur.
Charge de la batterie de 0 à 10%; Chargeur raccordé à l'alimentation secteur.
Batterie défectueuse. La batterie ne doit pas être utilisée.
Charge de la batterie entre 10% et 20%
џ Après un stockage de longue durée, la batterie doit être partiellement chargée – elle ne doit pas être chargée
au maximum ou complètement déchargée.
џ Ne laissez pas une batterie sans surveillance pendant sa charge.
џ Rangez les batteries hors de portée des enfants.
џ Ne chargez pas la batterie immédiatement après l'avoir transférée d'une atmosphère froide à une atmosphère
chaude. Attendez 30-40 minutes pour que la batterie se réchauffe.
џ Ne laissez pas un chargeur avec une batterie connectée à l'alimentation secteur pendant plus de 24 heures
après une recharge complète.
Batterie complètement chargée. Peut être débranchée du chargeur.
Installation
џ Pour recharger, utilisez toujours le
chargeur fourni avec votre appareil opti-
que. L'utilisation d'un chargeur différent
peut causer des dommages irréparables à la batterie ou au chargeur et peut provoquer l'inflammation de la
batterie.
џ La batterie doit être chargée à une température comprise entre 0°C et +45°C, sinon sa durée de vie sera
considérablement réduite.
* Le témoin LED affiche le niveau actuel de charge de la batterie pendant 30 secondes lorsque le chargeur APS
n'est pas branché. Lorsque l'alimentation est connectée, l'écran affiche l'état actuel de la batterie en
permanence, de plus les témoins LED clignotent pour indiquer que la batterie est en cours de charge.
џ N'utilisez pas le chargeur s'il a été modifié ou endommagé.
џ Ne pas démonter ni déformer la batterie.
Charge de la batterie entre 20% et 60%
џ La connexion d'appareils tiers avec une consommation électrique supérieure à celle autorisée n'est pas
recommandée.
џ La batterie est équipée d'un système de protection contre les courts-circuits. Cependant, il faut éviter les
situations pouvant provoquer un court-circuit.
џ Ne soumettez pas la batterie à des chocs ou à des chutes.
џ N'exposez pas la batterie à des températures élevées ou à une flamme nue.
џ N'utilisez pas la batterie à des températures supérieures à celles indiquées dans le tableau – ceci pourrait
diminuer la durée de vie de la batterie.
џ Insérez la batterie (10) dans l'emplace-
ment attribué sur le boîtier de l'appareil
(14) (voir Fig. 4), en alignant les images sur
l'instrument et la batterie.
џ Lorsque la batterie est utilisée à une température en dessous de zéro, sa capacité diminuera. Ceci est normal et
n'indique pas un défaut.
џ La batterie ne doit pas être utilisée en immersion dans l'eau.
Mesures de sécurité
Charge de la batterie entre 60% et 95%
џ Lorsqu'elle est bien installée, la batterie
se verrouille dans l'emplacement à l'aide
d'un clip spécial.
џ Pour retirer la batterie, appuyez sur le
bouton de déverrouillage de la batterie (9).
ALIMENTATION EXTÉRIEURE
џ Raccordez l'alimentation externe au port USB (8) de l'appareil (Fig. 1).
џ Une icône de batterie apparaîtra sur l'écran en indiquant sa charge en pourcentage.
џ L'appareil basculera sur l'alimentation externe pendant la recharge progressive de la batterie APS3.
L'alimentation doit provenir d'une source externe, comme un chargeur 5V.
џ Si l'appareil fonctionne sur une alimentation externe et si la batterie APS3 n'est pas connectée, une icône est
affichée .
џ Lorsque l'alimentation externe est déconnectée, l'appareil passe sur l'alimentation interne sans s'éteindre.
FONCTIONNEMENT
ATTENTION ! L'objectif de l'appareil ne doit pas être dirigé sur une source d'énergie intense, telle que des
appareils émettant un rayon laser et telle que le soleil. Ceci peut endommager les composants électroniques
dans l'appareil. Les dommages causés par le non-respect des directives d'utilisation ne sont pas couverts par la
garantie.
Allumage de l'appareil et réglage de l'image
џ Allumez l'appareil en appuyant sur le bouton ON (5).
џ Le réglage de la luminosité et du contraste sur l'écran, ainsi que le réglage du zoom numérique continu sont
décrits dans la section FONCTIONS DU MENU D'ACCES RAPIDE.
џ Éteignez l'appareil après utilisation en appuyant longuement sur le bouton ON (5).
џ Pour mettre au point sur l'objet observé, faites tourner la bague de mise au point (6).
џ Retirez le couvercle de lentille (7). Fixez le couvercle sur la sangle à l'aide de l'aimant intégré dans le couvercle.
џ Réglez la résolution des icônes sur l'écran en faisant tourner la bague de réglage dioptrique sur l'oculaire (1). A
l'avenir, il ne sera pas nécessaire de faire tourner la bague de réglage dioptrique de l'oculaire, quelles que soient
la distance et les autres conditions.
CALIBRATION DU CAPTEUR
La calibration permet d'égaliser la température de fond du microbolomètre et de supprimer les défauts dans
l'image (tels que les lignes verticales, les images fantômes, etc.).
Il y a trois modes de calibration : manuel (M), semi-automatique (SA) et automatique (A).
Sélectionnez le mode requis dans la section CALIBRATION du menu .
џ Mode M (manuel). Fixez le couvercle de lentille et appuyez brièvement sur le bouton ON (5). À la fin de la
calibration, enlevez le couvercle de l'objectif.
џ Mode SA (semi-automatique). La calibration est activée en appuyant rapidement sur le bouton ON (5). Il n'est
pas nécessaire de fixer le couvercle de l'objectif (le capteur est fermé par un obturateur interne).
џ Mode A (automatique). L'appareil est calibré de manière autonome, selon l'algorithme logiciel. Il n'est pas
nécessaire de fixer le couvercle de l'objectif (le capteur est fermé par un obturateur interne). Dans ce mode,
l'appareil peut être calibré par l'utilisateur à l'aide du bouton ON (5) (en mode semi-automatique).
ZOOM NUMÉRIQUE DISCRET
La fonctionnalité de l'appareil permet d'augmenter rapidement son grossissement de base (voir le tableau des
propriétés techniques dans la ligne Zoom numérique) par un facteur de 2 ou 4. Réglez le zoom numérique en
appuyant sur le bouton flèche vers le bas (2).
FONCTIONS DU MENU D'ACCES RAPIDE
Luminosité – en appuyant sur les boutons flèche vers le haut (4) et flèche vers le bas (2) et en modifiant la
luminosité de l'écran entre 00 et 20.
Les paramètres de base (réglage de la luminosité et du contraste, utilisation du zoom numérique continu et
télémètre stadiamétrique) sont modifiés via le menu Quick Access (accès rapide).
џ Lancez le menu en appuyant rapidement sur le bouton Мenu (3).
џ Un appui court sur le bouton Menu (3) permet de basculer entre les fonctions.
11

Onglet 1 Onglet 2
Vue générale du menu :
Menu General SettingMenu Mode
PIP
Off
Hot White
Automatic
10
Mode
calibration
Semi-automatique. L'utilisateur définit les exigences de calibration de façon indépendante
(en fonction de l'image observée).
џ Un appui court sur le bouton Menu (3) confirme la sélection.
Manuel. Calibration manuelle. Fermez le couvercle de lentille avant de commencer la
calibration.
Automatique. Les exigences de calibration en mode automatique sont déterminées par
programme, la calibration étant démarrée automatiquement.
џ Sélectionnez l'un des modes de calibration décrits ci-dessous à l'aide des boutons flèche
vers le haut (4) / flèche vers le bas (2).
Sélection du mode de calibration Il y a trois modes de calibration : manuel, semi-automatique
et automatique.
џ Appuyez et maintenez enfoncé le bouton Menu (3) pour lancer le menu.
џ Un appui court sur le bouton Menu (3) ouvre le sous-menu.
џ Sélectionnez l'option "Mode de calibration".
FONCTIONS DU MENU PRINCIPAL
џ La sortie automatique du menu se produit après 10 secondes d'inactivité.
џ Lancez le menu en appuyant rapidement sur le bouton Мenu (3).
џ Appuyez sur les boutons flèche vers le haut (4) et flèche vers le bas (2) pour parcourir les fonctions du menu.
џ La navigation dans le menu utilise le défilement. Lorsque la dernière option sur le premier onglet est atteinte,
la navigation se déplace sur la première option du second onglet.
џ Un appui court sur le bouton Menu (3) ouvre une option du menu.
џ Pour quitter le menu, appuyez et maintenez enfoncé le bouton Menu (3),
џ À la sortie du menu, l'emplacement du curseur ( ) n'est mémorisé que pendant la durée de la séance de travail
(c'est-à-dire jusqu'à ce que l'appareil soit éteint). La fois suivante, lorsque l'appareil est allumé et que l'on
accède au menu, le curseur se placera sur la première option du menu.
Contraste – en appuyant sur les boutons flèche vers le haut (4) et flèche vers le bas (2) et en changeant le
contraste de l'écran entre 00 et 20.
Pour quitter le menu, appuyez et maintenez enfoncé le bouton Menu (3), ou attendez 10 secondes pour la
sélection automatique.
Télémètre stadiamétrique – Appuyez sur les boutons flèche vers le haut (4) et flèche vers le bas (2) pour
modifier la position des repères permettant de déterminer la distance de l'objet observé (voir la Section 16 pour
plus d'informations sur le télémètre).
Zoom numérique continu – en appuyant sur les boutons flèche vers le haut (4) et flèche vers le bas (2) et en
modifiant la valeur du zoom numérique entre 1,0 et 4,0. L'incrément du zoom numérique est 0.1.
Le facteur de zoom numérique continu initial affiché est égal à x1.0 si le zoom discret est inactif, x2.0 s'il est 2x, et
x4.0 s'il est 4x.
Note. le grossissement est calculé comme le produit du grossissement de base et du rapport de zoom numérique
continu. Exemple : lorsque le grossissement de base est 3.0x et lorsque le rapport du zoom numérique continu
est x1.7, le grossissement réel est 5,1х (3,0*1,7). lorsque l'appareil est allumé la fois suivante, l'image est projetée
sur l'écran avec les réglages de luminosité et de contraste sauvegardés lors de l'extinction précédente.
Mode
Sélection du mode d'observation L'imageur thermique a trois modes de fonctionnement
automatique. Chacun de ces modes comporte une combinaison optimale de paramètres
(luminosité, contraste, intensité, etc.) pour obtenir la qualité d'image optimale dans toutes
les conditions d'observation.
Mode d'identification – Mode universel pouvant être appliqué sous diverses conditions
d'observation.
џ Un appui court sur le bouton Menu (3) ouvre le menu.
џ Appuyez et maintenez enfoncé le bouton Menu (3) pour lancer le menu.
џ Sélectionnez l'option "Mode".
џ Un appui court sur le bouton Menu (3) confirme la sélection.
Montagnes/Rochers – Mode contraste élevé C'est le mode optimal pour observer la faune
sur un fond de rochers et de sol dans une région montagneuse.
Forêt – Mode à faible contraste C'est le mode optimal pour observer la faune sur un fond de
végétation.
џ Sélectionnez l'un des réglages décrits ci-dessous à l'aide des boutons flèche vers le haut (4)
et flèche vers le bas (2).
Palettes de
couleurs
џ Un appui court sur le bouton Menu (3) confirme la sélection.
Sépia
Ultramarin
Sélection de palette de couleurs Le principal mode d'affichage pour une image observée est
le mode "Hot White" (blanc chaud). L'option du menu "Colour palettes" vous permet de
sélectionner une autre palette :
Violet
џ Appuyez et maintenez enfoncé le bouton Menu (3) pour lancer le menu.
џ Un appui court sur le bouton Menu (3) ouvre le menu.
Chaud rouge
Rouge monochrome
Arc-en-ciel
џ Sélectionnez l'option "Colour Palettes".
Blanc chaud. Une palette de noir et blanc (température froide correspondant au noir et
température chaude au blanc).
џ Sélectionnez l'une des palettes décrites ci-dessous à l'aide des boutons flèche vers le haut
(4) et flèche vers le bas (2).
Chaud noir. Une palette de noir et blanc (température froide correspondant au blanc et
température chaude au noir).
Composition et description du menu
12

Date
џ Réglez l'année, le mois et le jour souhaités à l'aide des boutons flèche vers le haut (4) /
flèche vers le bas (2). Appuyez sur le bouton Menu (3) pour parcourir les chiffres.
џ Pour sauvegarder la date choisie et pour quitter le sous-menu, appuyez et maintenez
enfoncé le bouton Menu (3).
Réglage de la date
џ Lancez le sous-menu "Date" en appuyant rapidement sur le bouton Мenu (3). La date
apparaît sous le format jj/mm/aaaa.
Heure
џ Sélectionnez le format de l'heure (sur 24 heures ou AM/PM) à l'aide des boutons flèche vers
le haut (4) / flèche vers le bas (2).
џ Appuyez sur le bouton Menu (3) pour passer au réglage de l'heure.
џ Appuyez sur le bouton Menu (3) pour passer au réglage des minutes.
џ Lancez le sous-menu "Heure" en appuyant rapidement sur le bouton Мenu (3).
џ Réglez l'heure en appuyant sur les boutons flèche vers le haut (4) / flèche vers le bas (2).
Réglage de l'heure
џ Réglez les minutes en appuyant sur les boutons flèche vers le haut (4) / flèche vers le bas (2).
џ Pour sauvegarder l'heure choisie et pour quitter le sous-menu, appuyez et maintenez
enfoncé le bouton Menu (3).
Unités
de mesure
M
Y
џ Le retour au sous-menu s'effectue automatiquement.
Sélection d'une unité de mesure
џ Lancez le sous-menu "M/Y" en appuyant rapidement sur le bouton Мenu (3).
џ Réglez l'unité de mesure (mètres ou yards) en appuyant sur les boutons flèche vers le haut
(4) / flèche vers le bas (2) ; puis appuyez sur le bouton Мenu (3) .
M
Y
Paramètres
par défaut
Rétablissement des paramètres usine
џ Lancez le sous-menu "Default Settings" (paramètres par défaut) en appuyant rapidement
sur le bouton Мenu (3).
Formatage de
la carte
mémoire
Formatage de la carte mémoire. Cette fonction permet de sauvegarder la carte de l'appareil
(carte mémoire) (tous les fichiers seront supprimés de sa mémoire).
џ Lancez le sous-menu "Memory Card Formatting" (formatage de carte mémoire) en
appuyant rapidement sur le bouton Мenu (3).
џ Sélectionnez l'option "YES" pour formater la carte mémoire ou sur "NO" pour revenir au
sous-menu à l'aide des boutons flèche vers le haut (4) / flèche vers le bas (2).
џ Confirmez votre sélection en appuyant rapidement sur le bouton Menu(3).
џ Si l'option YES a été sélectionnée, le message "Format the Memory Card?" (Formater la carte
mémoire ?) apparaîtra avec les options YES et NO. Sélectionnez YES pour formater la carte
mémoire.
џ Le message "Formatting memory card" (formatage de la carte mémoire) indique que le
formatage est en cours.
џ Le message "Formatting completed" (Formatage terminé) indique que le formatage est
terminé.
џ Si l'option NO a été sélectionnée, le formatage sera annulé et le sous-menu s'affichera à
nouveau.
Paramétrages
Wi-Fi
Cette option vous permet de configurer l'appareil pour le faire fonctionner sur un réseau
Wi-Fi.
Définition d'un
mot de passe
џ Appuyez sur le bouton Menu (3) pour lancer le sous-menu "Wi-Fi".
џ Pour sauvegarder le mot de passe et quitter le sous-menu, appuyez et maintenez enfoncé le
bouton Menu (3).
Cette fonction vous permet de définir un mot de passe pour accéder à l'appareil à partir d'un
périphérique extérieur. Ce mot de passe est utilisé au moment du raccordement d'un
périphérique extérieur (par exemple un smartphone) à l'appareil.
џ Le mot de passe par défaut (12345678) apparaîtra sur l'écran.
џ Initialisez votre mot de passe souhaité à l'aide des boutons flèche vers le haut (4) / flèche
vers le bas (2). Le bouton flèche vers le haut (4) augmente le nombre et le bouton flèche vers le
bas (2) le diminue. Appuyez sur le bouton Menu (3) pour parcourir les chiffres.
Choisir la langue
џ Lancez le sous-menu "Langue" en appuyant rapidement sur le bouton Мenu (3).
џ Sélectionnez l'une des langues d'interface disponibles (anglais, français, allemand,
espagnol ou russe) à l'aide des boutons flèche vers le haut (4) / flèche vers le bas (2).
џ Confirmez votre sélection en appuyant rapidement sur le bouton Menu(3).
џ Pour enregistrer votre choix et quitter le sous-menu, appuyez et maintenez enfoncé le
bouton Menu (3).
Mode PiP
PIP
Sélectionnez l'option "Mode PiP".
Sélection du mode Picture in Picture (image dans image)
Appuyez et maintenez enfoncé le bouton Menu (3) pour lancer le menu.
Un appui court sur le bouton Menu (3) active/désactive le mode (on/off).
PIP
Luminosité
de l'icône
џ Sélectionnez l'option "Luminosité icône".
џ Un appui court sur le bouton Menu (3) ouvre le sous-menu.
џ Appuyez et maintenez enfoncé le bouton Menu (3) pour lancer le menu.
џ Un appui court sur le bouton Menu (3) confirme la sélection.
Réglage de la luminosité de l'icône.
џ Sélectionnez la luminosité des pictogrammes à l'aide des boutons flèche vers le haut (4) /
flèche vers le bas (2).
Paramètres
généraux
Cette option du menu vous permet de programmer les paramètres suivants
Langue
PiP – éteint
Grossissement – valeur d'origine
џ Si l'option NO a été sélectionnée, le formatage sera annulé et le sous-menu s'affichera à
nouveau.
Les paramètres suivants seront rétablis sur leur valeur fixée en usine avant d'être initialisés
par l'utilisateur :
џ Si l'option YES a été sélectionnée, le message "Do you want to return to default settings?"
(voulez-vous revenir aux paramètres par défaut ?) apparaîtra avec les options YES et NO.
Sélectionnez YES pour formater la carte mémoire.
Unité de mesure – mètres
џ Sélectionnez l'option "YES" pour rétablir les paramètres usine ou sur "NO" pour les annuler
à l'aide des boutons flèche vers le haut (4) / flèche vers le bas (2).
Mode calibration – automatique
Wi-Fi – éteint (mot de passe par défaut)
Note : Lors du rétablissement des paramètres usine, les réglages de date/heure et la carte des
pixels de l'utilisateur sont sauvegardés.
џ Confirmez votre sélection en appuyant rapidement sur le bouton Menu(3).
Langue – Anglais
Mode opératoire – vidéo
Palette de couleurs – chaud blanc
Mode – forêt
13

BARRE D'ÉTAT
џ Heure actuelle
џ Mode d'observation
џ Mode calibration (en mode calibration automatique, 3 secondes avant la calibration automatique, un
temporisateur à rebours apparaîtra à la place de l'icône calibration).
џ Grossissement maximum actuel
џ Palette de couleurs (affichée uniquement lorsque la palette Hot Black ("chaud noir") est installée).
џ Connexion USB (si la lunette est connectée)
џ Connexion Wi-Fi
La barre d'état se trouve en bas de l'écran et elle affiche des informations concernant l'état opératoire de la
lunette, incluant :
FONCTION Wi-Fi
џ Allumez le module Wi-Fi par un appui long sur le bouton flèche vers le haut (4). Le fonctionnement Wi-Fi est
affiché dans la barre d'état de la manière suivante :
L'appareil est équipé d'un système de communication radio avec des périphériques extérieurs (ordinateur,
smartphone) via Wi-Fi.
Rétablissement
de la "carte de
pixels" créée
en usine
џ Niveau Guest (invité). Un utilisateur de Stream Vision peut afficher les vidéos de l'appareil
uniquement en temps réel.
џ Cette sous-fonction vous permet de configurer le niveau approprié d'accès à votre appareil,
rendu disponible sur l'application Stream Vision.
џ Niveau Owner (propriétaire). Un utilisateur de Stream Vision a un accès complet à toutes les
fonctions de l'appareil.
Définition des
niveaux d'accès
Suppression
des pixels
défectueux
џ Un marqueur apparaîtra à gauche de l'écran.
џ Utilisez les boutons flèche vers le haut (4) / flèche vers le bas (2) pour déplacer le marqueur
afin d'aligner son centre avec le pixel défectueux.
џ Lancez le sous-menu en appuyant sur le bouton Menu (3).
џ Un appui court du bouton Menu (3) commute la direction du marqueur de l'horizontale à la
verticale et vice-versa.
џ A l'aide des boutons flèche vers le haut (4) / flèche vers le bas (2), alignez le pixel défectueux
avec la croix fixe dans le cadre – le pixel doit disparaître.
џ Sélectionnez l'icône en appuyant rapidement sur le bouton Мenu (3).
џ Une loupe apparaîtra à droite de l'écran – une image agrandie avec une croix fixe – qui est
nécessaire pour faciliter une recherche des pixels défectueux et pour aligner le marqueur
avec. Il y a des flèches de direction horizontale et verticale pour déplacer le marqueur avec
les coordonnées le long des axes X et Y.
Lors de l'utilisation de l'appareil, les pixels défectueux (cassés) peuvent apparaître sur le
capteur par des points brillants ou sombres de luminosité constante qui sont visibles sur
l'image. Les imageurs thermiques AXION permettent de supprimer les pixels défectueux sur le
capteur par programme et permettent aussi d'annuler une suppression.
џ Lancez le sous-menu en appuyant sur le bouton Menu (3).
џ Sélectionnez "YES" si vous voulez rétablir la carte de pixels créée en usine et sur "NO" si
vous ne voulez pas.
џ Pour quitter la fonction "Suppression des pixels défectueux", appuyez et maintenez enfoncé
le bouton Menu (3).
џ Sélectionnez l'icône et appuyez sur le bouton Мenu (3).
Ramenez tous les pixels défectueux précédemment supprimés par l'utilisateur à leur état
d'origine :
џ Ensuite, en déplaçant le marqueur sur l'écran, vous pouvez supprimer le prochain pixel
défectueux.
џ Lorsqu'un pixel a été supprimé avec succès, le mot "OK" s'affiche brièvement sur l'écran.
Attention ! Un ou deux pixels sur l'écran de l'imageur, sous la forme de points noirs, brillants
blancs ou colorés (bleu ou rouge) peuvent apparaître. Ce ne sont pas des défauts.
џ Supprimez le pixel défectueux en appuyant rapidement sur le bouton ON On/Calibration.
џ Confirmez votre sélection en appuyant rapidement sur le bouton Menu(3).
џ Témoin d'alimentation extérieure (lorsque la lunette est alimentée par une alimentation extérieure)
џ Niveau de décharge de la batterie (lorsque la lunette est alimentée par le bloc batterie rechargeable)
Note : Lorsque la calibration est en cours, l'image sur l'écran se fige pendant la durée de la calibration
SA
11.0x 08:13PM
ENREGISTREMENT VIDEO ET PHOTOGRAPHIE D'UNE IMAGE OBSERVEE
Mode VIDEO. Enregistrement vidéo d'une image
Les imageurs thermiques AXION sont équipés d'une fonction pour faire un enregistrement vidéo et une photo
d'une image observée sur la carte mémoire incorporée. Il est recommandé de régler la date et l'heure avant
d'utiliser la fonction enregistrement vidéo et photographie (voir les options du menu correspondant).
L'enregistreur incorporé a deux modes de fonctionnement :
џ La lunette est en mode VIDEO dès qu'elle est allumée.
џ Démarrez l'enregistrement vidéo en appuyant rapidement sur le bouton flèche vers le bas/REC (2).
џ Arrêtez l'enregistrement vidéo en appuyant et en maintenant enfoncé le bouton flèche vers le bas/REC (2).
џ Une icône est affichée dans le coin supérieur gauche avec le temps d'enregistrement restant (en format
hh:mm), par exemple, 5:12.
џ Les fichiers vidéo sont stockés dans la carte mémoire incorporée une fois que l'enregistrement vidéo a été
arrêté.
Passez en mode photo en appuyant longuement sur le bouton flèche vers le bas/REC (2).
Prenez une photo en appuyant rapidement sur le bouton flèche vers le bas/REC (2). L'image est figée pendant 0,5
secondes et le fichier image est sauvegardé dans la carte mémoire incorporée.
Une icône , ">100" est affichée dans le coin supérieur gauche pour indiquer que la lunette peut prendre plus
de 100 photographies. Lorsque le nombre des photos disponibles est inférieur à 100, le nombre réel des photos
disponibles (par exemple 98) est affiché à côté de l'icône .
Attention : La durée maximum d'un fichier d'enregistrement vidéo est de sept minutes. À la fin de ce temps, la
vidéo sera enregistrée dans un nouveau fichier. Le nombre des fichiers est limité par la capacité de la mémoire
incorporée dans la lunette. Contrôlez régulièrement la quantité de mémoire libre dans la carte mémoire
incorporée, en transférant les vidéos et les photos sur d'autres médias pour libérer de l'espace sur la carte
mémoire.
џ Faites une pause de l'enregistrement vidéo et reprenez l'enregistrement en appuyant rapidement sur le
bouton flèche vers le bas/REC (2).
џ Pour basculer entre les modes Vidéo et Photo, appuyez et maintenez enfoncé le bouton flèche vers le bas/REC
(2).
Mode PHOTO. Photographie d'une image
џ Une fois que l'enregistrement vidéo a commencé, l'icône disparaîtra et une icône REC apparaîtra à sa place et
la minuterie d'enregistrement sera affichée en format MM:SS (minutes:secondes).
Notes : Vous pouvez lancer et utiliser le menu pendant l'enregistrement vidéo. Les vidéos et les photos
enregistrées sont sauvegardées sur la carte mémoire incorporée dans le format : img_xxx.jpg (pour les photos),
video_xxx.mp4 (pour les vidéos), xxx - compteur de fichier à trois chiffres (pour les photos et les vidéos). Le
compteur utilisé pour la dénomination des fichiers multimédia n'est PAS réinitialisé.
14

џ Lorsque le bouton ON (5) est maintenu enfoncé, l'écran affichera "Display off »
Lorsque cette fonction est utilisée, l'appareil passe en mode veille, ce qui permet de l'éteindre rapidement, si
nécessaire.
џ Lorsque l'appareil est allumé, appuyez et maintenez enfoncé le bouton ON (5). L'affichage disparaîtra et le
message "Display off" (affichage éteint) apparaîtra.
џ Pour allumer l'écran, appuyez rapidement sur le bouton ON (5).
Cette fonction désactive le transfert d'images sur l'écran, ce qui minimise l'intensité de son éclairage. Cela
permet d'éviter un démasquage intempestif. L'appareil continuera à fonctionner.
џ (affichage éteint) et un compte à rebours débutera. Ensuite l'appareil s'éteindra.
160m
66m
28m
FONCTION DISPLAY OFF (EXTINCTION DE L'ECRAN)
џ Deux options de connexion apparaîtront sur l'écran :
Use as power (utilisation comme alimentation)
џ L'appareil est détecté automatiquement par l'ordinateur et aucune installation de pilote n'est nécessaire.
џ Raccordez une extrémité du câble USB au connecteur microUSB (8) de l'appareil et l'autre extrémité au port sur
votre ordinateur.
џ Lorsque l'USB est débranché de l'appareil en mode alimentation, l'appareil continuera à fonctionner sur la
batterie lorsqu'elle est présente et suffisamment chargée.
џ Allumez l'appareil en appuyant sur le bouton ON (5) (l'ordinateur ne détectera pas l'appareil s'il est éteint).
џ Sélectionnez l'option de connexion à l'aide des boutons flèche vers le haut
(4) / flèche vers le bas (2).
Use as power (utilisation comme alimentation)
џ Lorsque cette option est sélectionnée, l'ordinateur est utilisé par l'appareil comme une source d'alimentation
externe. Une icône apparaîtra dans la barre d'état . L'appareil continuera à fonctionner et toutes les
fonctions sont disponibles.
џ La batterie installée dans l'appareil ne sera pas chargée.
џ Un appui court sur le bouton Menu (3) confirme la sélection.
Use as memory card (utilisation comme carte mémoire)
CONNEXION USB
Wi-Fi allumé, pas de connexion avec le périphérique
État connexion Indication de la barre d'état
Wi-Fi allumé, le périphérique est connecté
Wi-Fi déconnecté
Connexion Wi-Fi en cours
џ Après avoir entré le mot de passe sur un périphérique extérieur (pour avoir des informations plus détaillées
concernant l'initialisation des mots de passe, voir la sous-section intitulée "Configuration Wi-Fi" dans la section
"Fonctions du menu principal" des instructions), établissez une connexion ; l'icône dans la barre d'état
devient .
џ L'appareil est reconnu par un périphérique extérieur sous l'étiquette "AXION_XXXX", où XXXX sont les quatre
derniers chiffres du numéro de série.
Wi-Fi activé par l'utilisateur
TÉLÉMÈTRE STADIAMÉTRIQUE
Les imageurs thermiques sont équipés d'un télémètre stadiamétrique permettant de déterminer la distance à
un objet lorsque sa taille est connue.
џ Placez le curseur fixe inférieur sous l'objet et, à l'aide des boutons de navigation flèche vers le haut (4) / flèche
vers le bas (2), déplacez le curseur horizontal supérieur par rapport au curseur fixe horizontal inférieur afin de
placer l'objet entre les curseurs. La distance à la cible est recalculée automatiquement et simultanément avec ce
mouvement.
џ Allez à l'option correspondante sur le menu pour sélectionner une unité de mesure (mètres ou yards).
Lièvre – hauteur 0,3 m
Cerf – hauteur 1,7 m
џ La fonction du télémètre stadiamétrique est accessible en appuyant rapidement sur le bouton Menu (3) et en
sélectionnant l'icône .
џ Si la distance n'est pas déterminée dans un délai de 10 secondes, l'information disparaît de l'écran.
Il y a trois valeurs prédéterminées pour les objets :
џ Des barres s'afficheront sur l'écran pour déterminer la distance, les icônes des
trois objets et les chiffres de la distance estimée de ces trois objets.
Sanglier sauvage – hauteur 0,7 m
џ La valeur de distance est arrondie vers le haut ou vers le bas avant d'être affichée sur l'écran, elle est arrondie à
5 mètres pour les grandes distances et à 1 mètre pour les distances plus courtes.
џ Pour quitter le mode télémètre, appuyez rapidement sur le bouton Menu (3), ou attendez 10 secondes pour une
sortie automatique.
FONCTION PiP
La fonction PiP (image dans image) vous permet de visualiser une image
zoomée numérique agrandie dans une "fenêtre" séparée simultanément
avec l'image principale.
џ Appuyez et maintenez enfoncé le bouton Menu (3) pour lancer le menu
principal.
џ Sélectionnez l'option "Mode PiP".
Activation/désactivation de la fonction PiP :
џ Appuyez et maintenez enfoncé le bouton Menu (3) pour quitter le menu principal.
џ Pour modifier le rapport de zoom dans la fenêtre PiP, appuyez rapidement sur le bouton flèche vers le haut (4).
џ L'image agrandie est affichée dans une fenêtre séparée en utilisant la valeur de zoom optique maximum.
џ Un appui court sur le bouton Menu (3) active/désactive le mode (on/off).
џ L'image restante est affichée avec la valeur de zoom optique correspondant à la valeur du grossissement x1.0.
џ Lorsque la fonction PiP est activée, vous pouvez effectuer des zooms discrets et des zooms continus. Dans ce
cas, la valeur maximum de grossissement optique apparaîtra uniquement dans la fenêtre séparée.
џ Lorsque la fonction PiP est désactivée, l'image est affichée avec la valeur de zoom optique fixée pour le mode
PiP.
PIP
6.9x
3.1x
STREAM VISION (transmission en continu)
Les imageurs thermiques AXION prennent en charge la technologie Stream Vision, ce qui permet de transmettre
une image en temps réel depuis l'imageur thermique vers votre smartphone ou votre tablette via le Wi-Fi.
Des instructions détaillées sur l'utilisation de la technologie Stream Vision peuvent être trouvées dans un
manuel séparé ou sur le site webwww.pulsar-vision.com
Note : la conception de l'appareil permet de mettre à jour le logiciel. La mise à jour est possible via l'application
Stream Vision.
Scannez les codes QR pour télécharger l'application Stream Vision :
USB connection
Use as power
Use as memory card
15

En suivant le lien ci-dessous, vous pourrez trouver des réponses aux
questions les plus fréquemment posées à propos de l'imagerie thermique
https://www.pulsar-nv.com/glo/support/faq/79
Attention ! Les imageurs thermiques AXION exigent une licence lorsqu'ils sont exportés à l'extérieur
de votre pays.
Compatibilité électromagnétique.
Ce produit est conforme aux exigences de la norme européenne EN 55032: 2015, Classe A.
Attention : L'utilisation de ce produit dans une zone résidentielle peut provoquer des
interférences radio.
DÉPANNAGE
Mauvais fonctionnement
L'image est trop sombre.
Des rayures colorées
apparaissent sur l'écran
ou l'image a disparu.
Mauvaise qualité de
l'image/distances
réduites de détection.
L'imageur thermique ne
s'allume pas.
L'appareil ne fonctionne
pas à partir d'une source
d'alimentation externe.
L'image est floue, avec
des rayures verticales et
un fond inégal.
Raison possible
Batterie complètement déchargée.
Source d'alimentation externe
déchargée.
La calibration est nécessaire.
Câble USB endommagé.
Faible niveau de luminosité ou de
contraste.
L'appareil a été exposé à de
l'électricité statique pendant son
fonctionnement.
Correction
Rechargez la source d'alimentation
externe (si nécessaire).
Exécutez la calibration d'image
conformément à la Section 8
"Fonctionnement" des Instructions.
Après exposition à de l'électricité
statique, l'appareil peut redémarrer
automatiquement, ou il doit être
éteint et allumé à nouveau.
Rechargez la batterie.
Réglez la luminosité ou le contraste.
Remplacez le câble USB.
Ces problèmes peuvent survenir pendant l'observation dans des conditions
météo difficiles (neige, pluie, brouillard, etc.).
Ce tableau répertorie tous les problèmes pouvant survenir lors de l'utilisation de l'appareil. Exécutez les
vérifications et les réparations recommandées dans l'ordre indiqué sur le tableau. Si un défaut se produit qui
n'est pas indiqué dans le tableau, ou si vous ne pouvez pas réparer vous-même le défaut, l'appareil doit être
retourné pour réparation.
џ L'état de la lentille et de l'oculaire (il ne doit pas y avoir de fissures, de points graisseux, de poussières ou
d'autres dépôts).
џ L'état de la batterie rechargeable (elle doit être chargée) et des contacts électriques (il ne doit pas y avoir de
présence de sels ou d'oxydation).
џ Les commandes doivent être en bon état de fonctionnement.
Une inspection technique de l'appareil est recommandée avant chaque utilisation. Vérification :
џ L'aspect extérieur de l'appareil (il ne doit pas y avoir de fissures dans le boîtier).
ENTRETIEN
џ La maintenance doit être effectuée au moins deux fois par an et doit comprendre les mesures suivantes :
џ Essuyez les surfaces extérieures des pièces en métal et en plastique, et dépoussiérez avec un chiffon en coton ;
de la graisse au silicone peut être utilisée pour cela.
џ Nettoyez les contacts électriques de la batterie et l'emplacement de la batterie sur l'appareil à l'aide d'un
solvant organique non graisseux.
џ Vérifiez les surfaces en verre de l'oculaire et de la lentille. Si nécessaire, enlevez la poussière et le sable sur les
lentilles (en utilisant de préférence une méthode sans contact). Le nettoyage des surfaces extérieures de
l'optique doit être effectué avec des produits conçus spécialement dans ce but.
INSPECTION TECHNIQUE
Use as memory card (utilisation comme carte mémoire)
џ Lorsque cette option est sélectionnée, l'appareil sera reconnu par l'ordinateur comme une carte flash. Cette
option est conçue pour pouvoir utiliser des fichiers stockés dans la mémoire de l'appareil ; les fonctions de
l'appareil ne sont pas accessibles, et l'appareil s'éteindra automatiquement.
џ Si une vidéo était en cours d'enregistrement au moment de la connexion, l'enregistrement cessera et sera
sauvegardé.
Le mot de passe de l'appareil a été
modifié.
L'appareil se trouve dans une zone
avec un grand nombre de réseaux Wi-
Fi pouvant causer des interférences et
des parasites.
L'appareil est en dehors de la zone de
couverture Wi-Fi. Il y a des obstacles
entre l'appareil et le récepteur (par
exemple murs en béton).
Pour obtenir un fonctionnement stable
du Wi-Fi, déplacez l'appareil dans une
zone avec moins de réseaux Wi-Fi, ou
allez dans une zone n'en comportant
aucun.
Supprimez la connexion réseau et
reconnectez-vous en utilisant le mot
de passe de l'appareil.
Déplacez l'appareil pour qu'il soit dans
la ligne directe de vision du signal
Wi-Fi.
Dans des conditions de température positives, les objets observés
(environnement et arrière-plan) se réchauffent de manière différente en raison
de la conductivité thermique et de ce fait générant un contraste élevé de
température. En conséquence, la qualité de l'image produite par l'appareil sera
meilleure.
Dans des conditions à basse température, les objets observés (arrière-plan) se
refroidissent en général à peu près à la même température, et de ce fait le
contraste de température est considérablement réduit et la qualité de l'image
(détail) est plus médiocre. Ceci est normal pour un imageur thermique.
Le smartphone ou la
tablette ne peuvent pas
être connectés à
l'appareil.
Signal Wi-Fi inexistant ou
interrompu.
En cas d'utilisation par
basses températures, la
qualité de l'image de
l'environnement est
moins bonne que dans
des conditions de
température positives.
16

TECHNISCHE DATEN
Auf AXION IR-Matrix (Mikrobolometer) basierende Monokulare der Wärmebildtechnik werden durch eine Reihe
von Modellen dargestellt, die sich in der Vergrößerung und dem Durchmesser der Objektive unterscheiden.
Diese Geräte sind sowohl für den Einsatz in der Nacht als auch am Tage bei schwierigen Wetterverhältnissen
(Nebel, Smog, Regen) entwickelt, sowie in Umgebungen mit Hindernissen, welche die Erkennung eines Ziels
erschweren (Äste/Zweige, hohes Gras, dichte Sträucher, usw.). Im Gegensatz zu Nachtsichtgeräten, die auf
elektronenoptischen Wandlern basieren, benötigen Wärmebildmonokulare keine externe Lichtquelle und sind
gegen die Einwirkung von hellem Licht resistent.
AXION Monokulare können zur Nachtjagd, Beobachtung und Geländeorientierung und zur Durchführung von
Rettungsaktionen verwendet werden.
LIEFERUMFANG
Lagereinheit-Nr. (Stock Keeping Unit; SKU)
AXION-Modell
Mikrobolometer
Typ
Auflösung (Pixel)
Bildwiederholfrequenz (Hz)
Pixelgröße (Mikron)
Optische Daten
Optische Vergrößerung (x)
Stufenloses digitales Zoom (x)
Digitales Zoom (x)
Relatives Öffnungsverhältnis (D/f)
Minimaler Fokussierabstand (m)
Durchmesser Austrittspupille (mm)
Blickwinkel des Sichtfeldes (horizontal), Grad
Blickwinkel des Sichtfeldes, Meter bei 100 m
Fokussierbereich des Okulars (Dioptrien)
Maximale Beobachtungsentfernung (m) **
Display
Typ
Auflösung (Pixel)
Betriebstechnische Daten
Externe Versorgungsspannung
Akkutyp
Kapazität
Nennausgangsspannung
Externe Stromversorgung
Akkulaufzeit in Stunden * (bei 22 °C)
IP-Code (IEC60529) Schutzart
Stream Vision-Kompatibilität
Betriebstemperatur- Bereich
Abmessungen (mm)
Gewicht ohne Akku (kg)
Videorecorder
Video-/Bildauflösung (Pixel)
Video-/Fotoformat
Größe des integrierten Speichers
Wi-Fi-Kanal
Frequenz
Standard
Empfangsreichweite in direkter Sichtlinie (m)
77421
XМ30
ungekühlt
320x240
50
12
4
4-16
2/4
1.2
3
3.5
7.3
12.8
±5
1300
AMOLED
1024x768
3 – 4.3V
Li-Ion Akkupack АPS3
3200 mAh
DC 3.7V
5V (USB)
4
IpХ7
Yes
-25°С ... +40°С
143x41x69
0.25/8.82
1024х768
.mp4/.jpg
16 GB
2.4 Ghz
802.11 b/g/n
15
77422
XМ38
ungekühlt
320x240
50
12
5.5
5.5-22
2/4
1.2
3
3.5
5.8
10.1
±5
1700
AMOLED
1024x768
3 – 4.3V
Li-Ion Akkupack АPS3
3200 mAh
DC 3.7V
5V (USB)
4
IpХ7
Yes
-25°С ... +40°С
149x49x70
0.27/9.52
1024х768
.mp4/.jpg
16 GB
2.4 Ghz
802.11 b/g/n
15
**für ein Tierobjekt, wie z. B. ein Hirsch.
Es können Optimierungen am Design und an der Software dieses Produkts vorgenommen werden, um die
Benutzerfunktionen zu verbessern.
Eine aktualisierte Version des Benutzerhandbuchs finden Sie auf der Website www.pulsar-vision.com
џ USB-Kabel
џ Handschlaufe
џ Aufbewahrungstasche
џ Garantiekarte
џ Akkuladegerät APS mit Netzanschlussmöglichkeit
џ AXION Wärmebildkamera
џ Wiederaufladbarer APS3-Akku
џ Benutzerhandbuch
џ Optikreinigungstuch
BESCHREIBUNG
џ Starke Vergrößerung
џ Funktion „Display Off“ (Anzeige aus)
џ Aktualisierbare Software
џ YouTube Live-Übertragung und direkte Aufzeichnung im Internet über ein Smartphone und der App „Stream
Vision“.
џ Komfortable Benutzeroberfläche
џ Stadiametrischer Entfernungsmesser
џ Wi-Fi Fernbedienung und Überwachung mit dem Smartphone
џ Absolut Wasserdicht (Schutzklasse IPX7)
џ Funktion „Pixelkorrektur“
Video-/Audioaufzeichnung
џ Beobachtung in acht Farbmodi
џ Großer Betriebstemperaturbereich (–25 °C bis +40 °C)
џ Drei Kalibrierungsmodi (manuell, halbautomatisch und automatisch)
џ Integrierter Videorecorder
џ APS3 Li-Ion Schnellwechsel-Akkupack
џ USB-Ladeoption
џ Hohe Erkennungsreichweite
џ Drei Beobachtungsmodi (Wald, Stadt und Identifizierung)
џ Integration in iOS- und Android-Geräte
Akkupack
џ Funktionales und ergonomisches Design
џ AMOLED-Display mit hoher Auflösung
џ Mikrobolometer-Pixelgröße von 12 Mikron
џ Leicht und kompakt
UNTERSCHEIDENDE MERKMALE
DEUTSCH
17

џ Die LED-Anzeige (13) leuchtet auf.
Hinweis: Die PB8I Power Bank kann als Ladegerät
verwendet werden.
џ Schieben Sie den mit dem Gerät gelieferten
oder separat erworbenen wiederaufladbaren
Akku (10) entlang der Führungsschiene
vollständig in den APS-Ladeschacht (11) (siehe
Abb. 3).
џ Verbinden Sie den zweiten Stecker des
microUSB-Kabels mit der Buchse (12) des
Netzladeadapters (11).
AXION Wärmebildkameras werden mit einem
wiederaufladbaren APS3 Lithium-Ionen-
Akkupack geliefert, mit dem die Wärmebild-
kamera bis zu 4 Stunden verwendet werden kann.
Der Akku sollte vor dem ersten Gebrauch
aufgeladen werden.
џ Setzen Sie den Akku (10) in seinen Schacht im
Gerätegehäuse (14) ein, indem Sie die Symbole so
ausrichten, dass sie auf dem Gerät und dem Akku
einen „Punkt“ bilden. (siehe Abb. 4).
Option 2 (Abb. 3):
џ Punkt A auf dem Akku und Punkt B auf dem
Ladegerät müssen zueinander ausgerichtet sein.
џ Verbinden Sie den microUSB-Stecker des USB-
Kabels (15) mit dem microUSB-Anschluss des
Netzsteckers (16). Stecken Sie das Gerät in eine
Steckdose mit 100 – 240 V (17).
Aufladen des Akkus
Option 1 (Abb. 2):
џ Stecken Sie den Netzladeadapter (16) in die
Netzsteckdose.
џ Schließen Sie an dem microUSB-Anschluss (8)
des Geräts ein USB-Kabel (15) an.
џ Verbinden Sie das andere Ende des USB-Kabels
(15) mit dem Netzladeadapter (16) oder mit einer
USB-Buchse, die an eine andere Stromquelle mit
einer Ausgangsspannung von 5V oder weniger
angeschlossen ist.
џ Es können zwei Akkus gleichzeitig geladen
werden – hierzu ist ein zweiter Schacht
vorgesehen.
1. Okular-Dioptrieneinstellring
2. Taste „Down/Rec“
Gerät eingeschaltet / Video wird aufgezeichnet / Akkustand < 10 %
4. Taste „Up/Zoom“
5. Taste „On/Calibration ON“
LED-Anzeige, die den aktuellen Zustand des Geräts anzeigt:
3. Taste „Menu“
LED-Anzeige Betriebsmodus
6. Fokussierring
Gerät ist eingeschaltet
8. microUSB-Anschluss
Gerät eingeschaltet / Video wird aufgezeichnet
Gerät eingeschaltet / Akkustand < 10 %
9. Taste „Akkuentriegelung“
7. Objektivkappe
KOMPONENTEN UND BEDIENELEMENTE
BEDIENUNG DER TASTEN
VERWENDEN DES WIEDERAUFLADBAREN AKKUS
18
La pagina si sta caricando...
La pagina si sta caricando...
La pagina si sta caricando...
La pagina si sta caricando...
La pagina si sta caricando...
La pagina si sta caricando...
La pagina si sta caricando...
La pagina si sta caricando...
La pagina si sta caricando...
La pagina si sta caricando...
La pagina si sta caricando...
La pagina si sta caricando...
La pagina si sta caricando...
La pagina si sta caricando...
La pagina si sta caricando...
La pagina si sta caricando...
La pagina si sta caricando...
La pagina si sta caricando...
La pagina si sta caricando...
La pagina si sta caricando...
La pagina si sta caricando...
La pagina si sta caricando...
La pagina si sta caricando...
La pagina si sta caricando...
La pagina si sta caricando...
La pagina si sta caricando...
La pagina si sta caricando...
La pagina si sta caricando...
La pagina si sta caricando...
La pagina si sta caricando...
La pagina si sta caricando...
-
 1
1
-
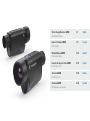 2
2
-
 3
3
-
 4
4
-
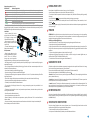 5
5
-
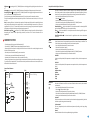 6
6
-
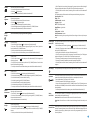 7
7
-
 8
8
-
 9
9
-
 10
10
-
 11
11
-
 12
12
-
 13
13
-
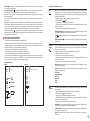 14
14
-
 15
15
-
 16
16
-
 17
17
-
 18
18
-
 19
19
-
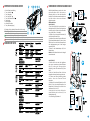 20
20
-
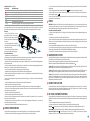 21
21
-
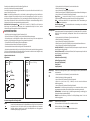 22
22
-
 23
23
-
 24
24
-
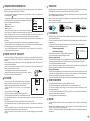 25
25
-
 26
26
-
 27
27
-
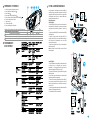 28
28
-
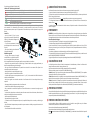 29
29
-
 30
30
-
 31
31
-
 32
32
-
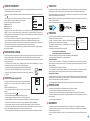 33
33
-
 34
34
-
 35
35
-
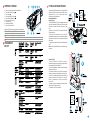 36
36
-
 37
37
-
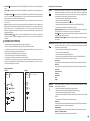 38
38
-
 39
39
-
 40
40
-
 41
41
-
 42
42
-
 43
43
-
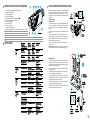 44
44
-
 45
45
-
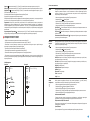 46
46
-
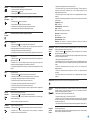 47
47
-
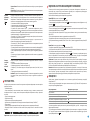 48
48
-
 49
49
-
 50
50
-
 51
51


Pulsar AXION X?30 Operating Instructions Manual
- Tipo
- Operating Instructions Manual
- Questo manuale è adatto anche per
in altre lingue
- English: Pulsar AXION X?30
- français: Pulsar AXION X?30
- español: Pulsar AXION X?30
- Deutsch: Pulsar AXION X?30
- русский: Pulsar AXION X?30
Documenti correlati
-
Pulsar Axion XM30S Manuale del proprietario
-
Pulsar Axion Key Operating Instructions Manual
-
-
Pulsar Axion XQ Manuale del proprietario
-
-
-
-
-
-