MyBinding GBC MP2500ix Modular Punch Manuale utente
- Categoria
- Macchine per rilegare
- Tipo
- Manuale utente
La pagina si sta caricando...
La pagina si sta caricando...

2
I D
Ihre eigene Sicherheit und die anderer
Personen liegt GBC sehr am Herzen.
Deshalb finden Sie in dieser
Bedienungsanleitung und auf der Maschine
selbst wichtige Sicherheitshinweise und -
informationen. Diese sind unbedingt zu
lesen und zu verstehen, bevor Sie die
Maschine in Betrieb nehmen.
Jeder Sicherheitshinweis in der
vorliegenden Bedienungsanleitung ist
durch dieses Sicherheitswarnsymbol
gekennzeichnet. Dieses Symbol weist auf
eine potentielle Gefahr für Ihre Gesundheit
und die anderer Personen hin sowie auf
eventuellen Produkt- bzw. Sachschaden.
Auf dem
MP2500iX finden Sie das
folgende Schild:
Dieser Sicherheitshinweis warnt Sie davor,
daß Sie schwere bzw. tödliche Verletzungen
erleiden könnten, wenn Sie das Produkt
öffnen und sich der gefährlichen
elektrischen Spannung aussetzen.
NIEMALS das Maschinengehäuse
abnehmen. Für Wartungsarbeiten IMMER
den qualifizierten GBC-Kundendienst zu
Hilfe rufen.
Auf diesem Produkt finden Sie Symbole
mit folgenden Bedeutungen:
Lochen
Papierschnitzelfach leer
Kein Locherblock vorhanden
SAFETY MESSAGES AVVERTENZE PER LA SICUREZZA SICHERHEITSHINWEISE
The safety of you and others is very
important to GBC. Important safety
messages and information are contained
within this manual as well as on the
machine itself. Please be certain to
carefully read and understand all of these
before operating the machine.
The safety alert symbol precedes
each safety message in this
Operating Instructions manual. This
symbol indicates a potential personal
safety hazard that could hurt you or others
as well as cause product or property
damage.
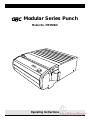
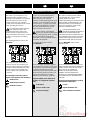
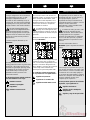
The following pictorial is found on the
MP2500iX :
This safety message means that you
could be seriously hurt or killed if you
open the product and expose yourself to
hazardous voltage. NEVER remove the
machine’s outer cover. ALWAYS refer
service requirements to qualified GBC
Personnel.
The following ISO and IEC symbols
appear on this product, their meaning is:
Means Punch
Means Empty Chip Tray
Means Die Set Out
Per GBC la sicurezza dell’operatore e
quella altrui sono molto importanti. In
questo manuale sono contenute
avvertenze e informazioni importanti per la
sicurezza, che sono riportate anche sulla
macchina stessa. Si prega di assicurarsi
di avere letto attentamente e compreso
bene tutte queste indicazioni prima di
mettere in funzione la macchina.
Questo simbolo di avvertimento
precede, nel manuale di istruzioni per
l’uso, tutti i messaggi di sicurezza. Il simbolo
indica un potenziale rischio di lesione
all’operatore o a terzi e possibilità di danni
al prodotto o alla proprietà.
La seguente illustrazione si trova
sulla
MP2500iX :
Questo messaggio di sicurezza significa
che l’operatore può riportare lesioni gravi o
mortali qualora la macchina venga aperta
e si abbia un’esposizione a tensioni
elettriche pericolose. NON smontare MAI il
coperchio esterno della macchina. Per le
esigenze di manutenzione, rivolgersi
SEMPRE al personale GBC qualificato.
I seguenti simboli sono utilizzati sul
prodotto con il significato riportato
a lato:
Perforatrice
Vassoio residui carta
Fuoriuscita stampo
La pagina si sta caricando...

4
I D
IMPORTANT SAFEGUARDS PRECAUZIONI IMPORTANTI WICHTIGE SICHERHEITSHINWEISE
• Use the MP2500iX only for its intended
purpose of punching paper and covers
according to the indicated specifications.
• Before operating the machine, make
certain that the
MP2500iX is placed on
a secure, stable work area. This will help
prevent the machine falling and possibly
causing personal injury and damage.
• Retain this Operating Instructions
manual for later use.
CAUTION: IN CASE OF
EMERGENCY, USE THE POWER
CORD AS A MAIN DISCONNECT
DEVICE!
• The MP2500iX must be connected to a
supply voltage corresponding to the
electrical rating in the machine operating
instructions (also listed on the serial
number label).
• The socket-outlet shall be located near
the equipment and shall be easily
accessible.
• The grounding plug is a safety feature
and will only fit into the proper grounding-
type power outlet. If you are unable to
insert the plug into an outlet, contact a
qualified electrician to have a suitable
outlet installed. Do not alter the plug on
the end of the cordset (if provided) of the
MP2500iX . It was provided for your
safety.
• Unplug the
MP2500iX before moving
the machine or whenever the machine is
not in use for an extended period of
time.
• Do not operate the
MP2500iX if the
machine has a damaged power supply
cord or plug. Do not operate the machine
after any malfunction, if liquid has been
spilled into the machine, or if the machine
has been damaged in any way.
• Do not overload electrical outlets beyond
their capacity. To do so can result in fire
or electrical shock.
• Usare la
MP2500iX solo per lo scopo
previsto, ovvero la rilegatura di
perforuzione e copertine secondo i dati
tecnici indicati.
• Prima di mettere in funzione la macchina,
accertare che sia sistemata in una
posizione di lavoro sicura e stabile. In
questo modo si eviterà che la macchina
possa cadere provocando lesioni alle
persone e danni a proprietà.
• Conservare queste istruzioni per l’uso
per poterle consultare in futuro.
ATTENZIONE: IN CASO DI
EMERGENZA, USARE IL CAVO
DI ALIMENTAZIONE COME
DISPOSITIVO PRINCIPALE PER
LO SCOLLEGAMENTO
DALLA RETE!
• La MP2500iX deve essere collegata ad
una presa di corrente di alimentazione il
cui voltaggio corrisponda a quanto
indicato nelle istruzioni per l’impiego della
macchina (l’indicazione è anche riportata
sulla targhetta con il numero di serie
della macchina).
• La presa di corrente deve essere situata
nei pressi della macchina e deve essere
facilmente accessibile.
• La spina con presa di terra è un’esigenza
di sicurezza e deve essere collegata ad
una presa di corrente adeguata. Se non
si riesce ad inserire la spina nella presa,
consultare un elettricista qualificato per
l’installazione di una presa di corrente
adatta. Non modificare la spina che si
trova all’estremità del cavo di
alimentazione della
MP2500iX (qualora
il cavo sia stato fornito insieme alla
macchina). La spina è stata fornita per
esigenze di sicurezza.
• Scollegare la
MP2500iX per spostarla o
quando non la si usi per un lungo
periodo di tempo.
• Non impiegare la
MP2500iX con un
cavo di alimentazione o una spina
danneggiati. Non adoperare la macchina
dopo un qualsiasi problema di
funzionamento, o nel caso in cui sia stato
versato del liquido all’interno della
macchina stessa, o in cui la macchina sia
stata comunque danneggiata in qualche
modo.
• Non sovraccaricare le prese di corrente
oltre alla loro capacità: ciò potrebbe
provocare incendi o scosse elettriche.
• Benutzen Sie den
MP2500iX nur für
seinen vorgesehenen Zweck, d.h. zum
lochen von Papier und Deckblättern
gemäß den angegebenen
Spezifikationen.
• Stellen Sie den
MP2500iX von
Inbetriebnahme auf eine sichere und
stabile Arbeitsfläche, um zu verhindern,
daß er hinunterfällt und Personen- bzw.
Sachschaden verursacht.
• Bewahren Sie diese Bedienungsanleitung
für den späteren Gebrauch auf.
VORSICHT: IM NOTFALL DAS
NETZKABEL VON DER
STROMVERSORGUNG
ABTRENNEN!
• Der Anschluß des MP2500iX darf nur an
eine Netzspannung erfolgen, die mit dem
Gerät laut Bedienungsanleitung (siehe
auch Angaben auf Typenschild)
übereinstimmt.
• Die Steckdose sollte sich - gut zugänglich
- in der Nähe des Geräts befinden.
• Der Erdungsstecker dient zur Sicherheit
und paßt nur in ordnungsgemäß geerdete
Netzsteckdosen. Wenn der Stecker nicht
in die Steckdose paßt, lassen Sie sich
von Ihrem Elektriker eine passende
Steckdose installieren. Nehmen Sie keine
Änderungen am Netzstecker (falls
mitgeliefert) des
MP2500iX vor, denn er
dient zu Ihrer Sicherheit.
• Stecken Sie den
MP2500iX aus, wenn
Sie den Standort der Maschine verändern
oder wenn die Maschine längere Zeit
nicht in Gebrauch ist.
• Den
MP2500iX nicht in Betrieb nehmen,
wenn das Netzkabel oder der Netzstecker
beschädigt ist, wenn das Gerät nicht
ordnungsgemäß funktioniert, wenn
Flüssigkeit in die Maschine gelangt ist,
oder nachdem die Maschine auf
irgendeine Weise beschädigt worden ist.
• Elektrische Anschlüsse nicht über
Kapazität belasten, da dies zu Bränden
oder elektrischen Schlägen führen kann.
La pagina si sta caricando...

6
I D
• Do not attempt to service your
MP2500iX yourself. Contact an
authorized GBC service representative
for any required repairs or major
maintenance for your
MP2500iX .
• There are NO user-serviceable parts
inside the machine. To avoid potential
personal injury and/or property or
machine damage,
DO NOT REMOVE
THE MACHINE’S COVER
.
• Non tentare di eseguire personalmente la
manutenzione della
MP2500iX .
Consultare un rappresentante autorizzato
del servizio GBC per tutte le riparazioni
necessarie o per i principali problemi di
manutenzione della
MP2500iX .
• All’interno della macchina, NON ci sono
parti la cui manutenzione possa essere
eseguita dall’utente. Per evitare potenziali
lesioni alle persone o danni a proprietà,
NON SMONTARE IL
COPERCHIO DELLA MACCHINA
.
• Bitte sehen Sie davon ab, Service und
Reparaturen an Ihrem
MP2500iX selbst
durchzuführen. Rufen Sie im Bedarfsfall
einen Fachmann des GBC-
Kundendienstes an, um Reparaturen
oder größere Wartungsarbeiten an Ihrem
MP2500iX vorzunehmen.
• Diese Maschine enthält KEINE vom
Endverbraucher zu wartenden Teile.
Vermeiden Sie potentielle
Verletzungsgefahr und/oder Sachschaden,
UND NEHMEN SIE NIEMALS DAS
MASCHINENGEHÄUSE AB
.
SERVICE MANUTENZIONE SERVICE
• You may clean the exterior of the
MP2500iX using a soft, damp cloth. Do
not use detergents or solvents as
damage to the machine may occur.
• Si può pulire la superficie esterna della
macchina passandovi un panno soffice
inumidito. Non usare detersivi o solventi
che potrebbero danneggiare la
macchina.
• Reinigen Sie das Äußere des
MP2500iX ,
indem Sie es mit einem weichen,
feuchten Tuch abwischen. Verwenden Sie
jedoch keine Wasch- bzw. Lösungsmittel,
da dadurch Schaden an der Maschine
entstehen könnte.
CLEANING PULIZIA REINIGUNG
La pagina si sta caricando...

8
I D
(THE FOLLOWING NOTE APPLIES ONLY
TO THE UNITS RATED 230V 50/60HZ.)
CAUTION: WHEN CHOOSING A
DETACHABLE LINE CORD FOR
USE WITH YOUR MP2500iX,
ALWAYS OBSERVE THE
FOLLOWING PRECAUTIONS:
The cordset consist of three parts; the
attachment plug, cordage and appliance
inlet. Each of these components must
have European regulatory approvals
for safety.
The following minimum electrical ratings
for the specific cordset are published for
safety purposes.
DO NOT USE
CORDSETS THAT DO NOT MEET THE
FOLLOWING MINIMUM ELECTRICAL
REQUIREMENTS.
PLUG:
3 ampere, 250 volts, 50/60 Hz,
Class 1, 3 conductor, European safety
approved.
CORDAGE: Type H03VV-F3G0.75,
Harmonized ( < HAR> ). The “< >”
symbols indicate cordage approved to
appropriate European standard (NOTE:
“HAR” may be substituted by the approval
mark of the European safety agency
which approved the cordage. An example
would be “< VDE >”.)
APPLIANCE CONNECTOR: 3 ampere,
250 volts, 50/60 Hz, European safety
approved, Type IEC 320. The cordset
shall not exceed 3 meters in length. A
cordset with component electrical ratings
greater than the minimum specified
electrical ratings may be substituted.
(LE NOTE CHE SEGUONO
PERTENGONO SOLO ALLE MACCHINE
ALIMENTATE A 230 V 50/60 HZ.)
ATTENZIONE: NELLA SCELTA
DI UN CAVO DI ALIMENTAZIONE
STACCABILE PER L’IMPIEGO
CON LA MP2500IX, OSSERVARE
SEMPRE LE PRECAUZIONI CHE
SEGUONO
Il cavo di alimentazione è costituito da tre
parti: la spina, il cavo stesso e la presa di
rete. Ognuno di questi componenti deve
essere approvato secondo le norme
europee per la sicurezza.
Le indicazioni seguenti sulla potenza
elettrica minima per il cavo in questione
sono riportate per esigenze di sicurezza.
NON USARE CAVI DI ALIMENTAZIONE
CHE NON CORRISPONDANO ALLE
ESIGENZE MINIME DI POTENZA CHE
SEGUONO.
SPINA:
3 ampere, 250 volt, 50/60 Hz,
conduttore della Classe 1,3, conforme alle
norme di sicurezza europee.
CAVO: Tipo HO3VV-F3G0.75, armonizzato
( < HAR > ). I simboli “< >” indicano un
cavo approvato secondo la norma europea
appropriata. (NOTA: “HAR” può essere
sostituito dal marchio di accettazione
dell’ente europeo per la sicurezza che ha
approvato il cavo stesso. Un esempio
potrebbe essere “< VDE >”.)
PRESA: 3 Ampere, 250 Volt, 50/60 Hz,
approvazione secondo le norme di
sicurezza europee, Tipo IEC 320. La
lunghezza del cavo non deve superare i 3
metri. Possono essere impiegati, in
sostituzione, cavi previsti per potenze
elettriche superiori.
(DIE FOLGENDEN HINWEISE GELTEN
NUR FÜR DIE GERÄTE MIT 230 V
UND 50/60 HZ.)
ACHTUNG: WENN SIE FÜR IHREN
MP2500IX EIN ABNEHMBARES
NETZKABEL VERWENDEN
WOLLEN, ACHTEN SIE STETS
AUF DIE FOLGENDEN
MERKMALE:
Das Kabel besteht aus drei Teilen: dem
Netzstecker, der Kabelschnur und dem
Gerätestecker. Jede dieser Komponenten
muß von den entsprechenden
europäischen Sicherheitsbehörden
zugelassen sein. Die folgenden
elektrischen Mindestwerte für die jeweiligen
Kabel werden aus Sicherheitsgründen an
dieser Stelle angeführt.
VERWENDEN SIE
KEINE KABEL, DIE NICHT DEN
NACHSTEHENDEN ELEKTRISCHEN
MINDESTANFORDERUNGEN
ENTSPRECHEN.
STECKER:
3 Amp, 250 Volt, 50/60 Hz,
Leiter der Klasse 1.3, entspricht
europäischen Sicherheitsvorschriften.
KABELSCHNUR: Typ HO3VV-F3G0.75,
Harmonisch ( < HAR> ). Die Zeichen “< >”
weisen auf eine Zulassung des Kabels
gemäß der entsprechenden europäischen
Norm hin. (HINWEIS: “HAR” kann durch
das Zulassungszeichen der europäischen
Sicherheitsbehörde, die die Kabelschnur
genehmigt, ersetzt sein. Ein Beispiel dafür
wäre “< VDE >”.)
GERÄTESTECKER: 3 Ampere, 250 Volt,
50/60 Hz, zugelassen durch europäische
Sicherheitsbehörden, Typ IEC 320. Die
Gesamtlänge des Kabels sollte 3 Meter
nicht überschreiten. Die einzelnen
Kabelkomponenten dürfen höhere
elektrische Werte als die angegebenen
Mindestwerte besitzen.
MAIN CORDSET SELECTION SCELTA DEL CAVO DI ALIMENTAZIONE STROMKABELWAHL
La pagina si sta caricando...

10
I D
(LE NOTE CHE SEGUONO
PERTENGONO SOLO ALLE MACCHINE
ALIMENTATE A 115 V 60 HZ.)
Questa macchina è stata collaudata ed è
stata trovata in osservanza delle norme
previste per un dispositivo digitale di
Classe A secondo quanto previsto dalla
parte 15 delle norme FCC. Questi limiti
sono concepiti per garantire una
protezione ragionevole contro interferenza
dannosa quando la macchina è utilizzata
in un ambiente commerciale. Questa
macchina genera, utilizza e può irradiare
energia in radio frequenza e, qualora non
venga installata secondo le indicazioni
delle istruzioni per l’uso, può essere causa
di interferenze dannose con le
comunicazioni radio. L’impiego di questa
attrezzatura in una zona residenziale
potrebbe provocare interferenze nocive: in
tal caso l’utente dovrà provvedere, a
proprie spese, ad eliminare le suddette
interferenze.
ATTENZIONE: CAMBIAMENTI O
MODIFICHE NON AUTORIZZATI
ESPRESSAMENTE DALLA
GENERAL BINDING
CORPORATION POSSONO
ANNULLARE L’AUTORIZZAZIONE
ALL’IMPIEGO DI QUESTA
MACCHINA.
Questo apparato digitale di Classe A
soddisfa tutti i requisiti delle norme
canadesi per quanto concerne le
attrezzature che generano interferenze.
(DIE FOLGENDEN HINWEISE GELTEN
NUR FÜR DIE GERÄTE MIT 115 V
UND 60 HZ.)
Dieses Gerät wurde getestet und entspricht
gemäß Teil 15 der FCC-Regeln den
Grenzen für ein Digitalgerät der Klasse A.
Diese Grenzen sollen angemessenen
Schutz gegen Störstrahlungen bei Betrieb
von Geräten in kommerziellen
Umgebungen bieten. Dieses Gerät erzeugt,
verbraucht und gibt Radiofrequenzenergie
ab, und wenn es nicht gemäß den
Anweisungen der Bedienungsanleitung
installiert wird, kann es zu Funkstörungen
kommen. Der Betrieb eines solchen Geräts
in einem Wohngebiet wird wahrscheinlich
Störstrahlungen verursachen, in welchem
Fall der Benutzer diese Störungen auf
seine eigenen Kosten beheben muß.
ACHTUNG: VERÄNDERUNGEN,
DIE NICHT AUSDRÜCKLICH VON
DER GENERAL BINDING
CORPORATION GENEHMIGT
WERDEN, KÖNNTEN IHRE
BEFUGNIS ZUM BETRIEB DIESES
GERÄTS NICHTIG MACHEN.
Dieses Digitalgerät der Klasse A entspricht
allen Anforderungen der kanadischen
Bestimmungen für Störstrahlungen
verursachende Geräte.
FCC NOTE FCC NOTA FCC HINWEIS
(THE FOLLOWING NOTE APPLIES ONLY
TO THE UNITS RATED 115V 60HZ.)
This equipment has been tested and found
to comply with the limits for a Class A
digital device, pursuant to Part 15 of the
FCC Rules. These limits are designed to
provide reasonable protection against
harmful interference when the equipment
is operated in a commercial environment.
This equipment generates, uses, and can
radiate radio frequency energy and, if not
installed and used in accordance with the
Operator Manual, may cause harmful
interference to radio communications.
Operation of this equipment in a residential
area is likely to cause harmful interference
in which case the user will be required to
correct the interference at his/her own
expense.
CAUTION: CHANGES OR
MODIFICATIONS NOT
EXPRESSLY APPROVED BY
GENERAL BINDING
CORPORATION COULD VOID
YOUR AUTHORITY TO OPERATE
THE EQUIPMENT.
This Class A digital apparatus meets all
requirements of the Canadian
Interference-Causing Equipment
Regulations.
La pagina si sta caricando...

12
I D
By purchasing the MP2500iX , you have
invested in a highly capable punching
machine that will give you years of reliable
service. To help protect this investment be
certain to take advantage of the GBC
Equipment Maintenance Agreement
(EMA). The EMA provides your
MP2500iX
with proper ongoing maintenance and
care, helping to ensure the years of quality
performance and long life built into the
machine. Without an EMA, a charge for
time and labor would result from every
normal maintenance or repair service call.
An EMA for your
MP2500iX eliminates
this possibility by providing you with a low,
fixed annual cost for protecting your
valuable machine investment. For full
details about purchasing an EMA, contact
your local GBC Branch Office or contact:
General Binding Corporation
500 Bond Street
Lincolnshire, IL 60069
Or Call: 1-800-790-7787
Con l’acquisto della
MP2500iX , si è fatto
un investimento su di una perforazione di
elevate caratteristiche che garantirà anni
di servizio affidabile. Per contribuire alla
protezione dell’investimento, assicurarsi di
usufruire dei vantaggi offerti dal contratto
di manutenzione della GBC (Equipment
Maintenance Agreement - EMA). Il
contratto garantisce alla
MP2500iX la
manutenzione continua e la cura
necessaria, contribuendo ad assicurare
anni di prestazioni qualitativamente
elevate e la lunga durata di servizio per la
quale la macchina è stata costruita. Senza
un contratto EMA, verranno addebitate le
ore di lavoro e la manodopera derivanti da
ogni richiesta di intervento di normale
manutenzione o riparazione. Un contratto
EMA per la
MP2500iX elimina questo
rischio con una bassa spesa annuale fissa
per proteggere questo investimento di
valore. Per avere tutti i dettagli sulla
stipulazione di un contratto EMA,
consultare il proprio ufficio GBC locale,
oppure consultare la:
General Binding Corporation
500 Bond Street
Lincolnshire, IL 60069
Oppure chiamare
il numero: 1-800-790-7787
Mit dem Kauf eines
MP2500iX haben Sie
in eine hochleistungsfähige
lochermaschine investiert, die Ihnen
jahrelang zuverlässige Dienste leisten wird.
Um diese Investition zu schützen, sollten
Sie einen Gerätewartungsvertrag
(Equipment Maintenance Agreement, EMA)
mit GBC abschließen. Durch diesen
Wartungsvertrag erhalten Sie fortlaufende
Wartung und Pflege, damit Ihr
MP2500iX
die Leistungsqualität und Lebensdauer
erbringen kann, für die diese Maschine
konzipiert wurde. Ohne diesen Vertrag wird
Ihnen bei jedem Wartungs- oder
Reparaturauftrag Zeit und Arbeit in
Rechnung gestellt werden. Ein
Wartungsvertrag für Ihren
MP2500iX
schützt Sie vor derartigen Kosten, indem
Sie für den Schutz Ihrer wertvollen
Investition einen niedrigen, fixen
Jahressatz zahlen. Nähere Einzelheiten
über den Wartungsvertrag erhalten Sie von
Ihrer örtlichen GBC-Zweigniederlassung
oder direkt von:
General Binding Corporation
500 Bond Street
Lincolnshire, IL 60069
Tel. gebührenfrei (nur in den USA):
1-800-790-7787
EQUIPMENT MAINTENANCE AGREEMENT
CONTRATTO PER LA MANUTENZIONE
DELL’APPARECCHIO
GERÄTEWARTUNGSVERTRAG
La pagina si sta caricando...

14
I D
Thank you for purchasing the MP2500iX.
It is a versatile production system that will
enable you to punch documents for a
variety of binding styles with a simple die
set change. It has also been designed for
easy operation.
The
MP2500iX offers an all-metal
construction to provide a longer life and
greater durability. Though ruggedly built,
the
MP2500iX is compact and light
enough to be used on any table or desk.
As part of the GBC Modular product line, a
modular binder can stack easily on top of
the
MP2500iX. Or, the binder can be
separated for greater productivity.
The
MP2500iX is an innovative solution for
punching paper and offers the following
design features:
• Quick-change die sets that are self-
latching without tools or levers.
• All
MP2500iX die sets include a Pin
Label providing sheet capacity, and pull
pin information for punching standard
size documents.
• Exclusive Auto-Reverse Jam Stopper
electronics, preventing downtime due to
paper jams.
• A vertical Open-Throat punching design
allows for easy alignment of various
sheet sizes in the punching throat,
utilizing gravity and minimizing punching
skew.
• An easily adjustable edge guide allows for
alignment of paper or oversized covers.
• Convenient LED’s indicate:
• That POWER is on.
• When a DIE SET is not in.
• When the chip tray needs to be emptied.
To prevent chip tray overfill, the LED
flashes to warn you the tray is nearly full
(after approximately 250 cycles), then after
another several cycles, the POWER LED
will go off and the EMPTY CHIP TRAY
LED will shine steady and the machine is
disabled until the chip tray is emptied.
• Choose between a palm switch or a hands
free foot pedal to activate punching.
These instructions have been prepared to
acquaint you with the
MP2500iX punch
and its operation. Please read them
carefully. Keep these operating instructions
Vi ringraziamo per aver acquistato la
perforatrice
MP2500iX, un sistema di
produzione versatile e di facile utilizzo che
consentirà la perforazione di documenti
per vari tipi di legatura semplicemente
sostituendo lo stampo.
MP2500iX presenta una costruzione
interamente metallica per offrire le
massime prestazioni quanto a rendimento
e durevolezza. Nonostante la struttura
grossolana,
MP2500iX è sufficientemente
leggera e compatta per poter essere
utilizzata su qualsiasi tavolo o banco.
Come prodotto della linea modulare GBC,
è possibile sistemare una legatrice
modulare GBC sopra
MP2500iX per
massimizzare lo spazio utile. Per
massimizzare la produttività, mantenere le
macchine separate.
MP2500iX è una soluzione innovativa per
la perforazione della carta e offre le
seguenti caratteristiche:
• Stampi ad attacco rapido autobloccanti
senza attrezzi o leve.
• Tutti gli stampi
MP2500iX riportano
un’etichetta perni con le informazioni
relative al numero di fogli e al numero di
perni estratti per la perforazione di
documenti di dimensioni standard.
• Sistema esclusivo di inversione
automatica per evitare tempi passivi
dovuti a inceppamenti della carta.
• Una progettazione verticale, con un
supporto per la perforazione aperto che
consente di allineare rapidamente fogli
di varie dimensioni, eliminando la
possibilità di una foratura inclinata.
• Una guida regolabile dei bordi facilita
inoltre l’allineamento di fogli o copertine
grandi.
• LED per indicare:
• ALIMENTAZIONE inserita.
• STAMPO non presente.
• Scarico vassoio residui carta. Per
evitare l’eccessivo riempimento del
vassoio residui carta, il LED lampeggia
per avvisare quando il vassoio è
prossimo al limite della capacità (dopo
circa 250 cicli), quindi dopo diversi cicli
il LED POWER si disinserisce e il LED
EMPTY CHIP TRAY (svuotare il
vassoio residui carta) si illumina a luce
fissa e la macchina viene disabilitata
Vielen Dank für den Kauf des Geräts vom
Typ
MP2500iX. Sie haben damit ein
vielseitiges Produktionssystem erworben.
Sie können mit diesem Gerät Dokumente
für eine Vielzahl von Bindungsarten
lochen, da der Locherblock sehr einfach
gewechselt werden kann. Das System ist
darüber hinaus einfach zu bedienen.
Das
MP2500iX ist vollständig aus Metall
gefertigt und bietet so eine lange
Lebensdauer in Kombination mit hoher
Zuverlässigkeit. Trotz der robusten
Konstruktion ist das
MP2500iX kompakt
und leicht, so dass es auf jedem Tisch
oder Schreibtisch passt. Da es in die
modulare Produktpalette von GBC
integriert ist, kann problemlos ein
modulares Bindegerät auf das
MP2500iX
gesetzt werden. Das Bindegerät kann
jedoch auch separat eingesetzt werden,
um eine höhere Produktivität zu erzielen.
Das Gerät vom Typ
MP2500iX ist eine
innovative Lösung zum Lochen von
Papier. Es bietet folgende Funktionen:
• Der Locherblock kann schnell
gewechselt werden, da keine
Werkzeuge benötigt werden und dieser
selbst einrastet.
• Alle Locherblöcke für den
MP2500iX
sind mit einem Aufkleber versehen, auf
dem die Blattkapazität und
Informationen zu Locherstiften für das
Lochen von Dokumenten in
Standardformaten angegeben sind.
• Das Gerät verfügt über einen exklusiven,
elektronisch gesteuerten Staustopper
mit Auto-Umkehrfunktion, der von
Papierstaus verursachte Ausfallzeiten
verhindert.
• Das vertikale Locherdesign der
Halteplatte ermöglicht das einfache
Ausrichten verschiedener Papiergrößen
auf der Halteplatte durch Ausnutzung
der Schwerkraft, wodurch schiefe
Lochungen auf ein Minimum reduziert
werden.
• Die einfach einstellbare Kantenführung
erleichtert das Ausrichten von Papier
oder übergroßen Deckblättern.
•Über benutzerfreundliche LED-Anzeigen
werden folgende Zustände des Geräts
angezeigt:
• Das Gerät ist eingeschaltet.
• Es ist kein Locherblock eingelegt.
INTRODUCTION INTRODUZIONE EINFÜHRUNG
La pagina si sta caricando...

16
I D
finché non si provvede a svuotare il
vassoio.
• Per azionare la perforazione scegliere
tra interruttore a mano o a pedale per
mantenere le mani libere.
Le istruzioni riportate descrivono la
perforatrice
MP2500iX e il relativo
funzionamento. Si prega di leggerle
attentamente e conservarle per
consultazioni future.
• Das Papierschnitzelfach muss geleert
werden. Um eine Überfüllung des
Papierschnitzelfachs zu verhindern,
blinkt die LED-Anzeige und macht Sie
darauf aufmerksam, dass das Fach
fast voll ist (nach ca. 250 Zyklen).
Nach einigen weiteren Zyklen erlischt
die LED-Anzeige, die angibt, dass das
Gerät eingeschaltet ist. Die LED-
Anzeige für das Leeren des
Papierschnitzelfachs leuchtet dann
andauernd auf, und das Gerät ist so
lange deaktiviert, bis das
Papierschnitzelfach geleert wurde.
• Sie können das Lochen entweder mit
einem Hand- oder Fußschalter
aktivieren.
Die folgenden Anweisungen sollen Sie mit
dem
MP2500iX und seiner Bedienung
vertraut machen. Bitte lesen Sie diese
sorgfältig durch. Heben Sie die
Anweisungen auf, damit Sie später darin
nachschlagen können.
INTRODUCTION INTRODUZIONE EINFÜHRUNG
La pagina si sta caricando...

18
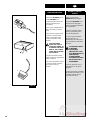
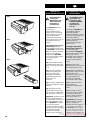
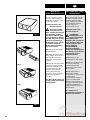
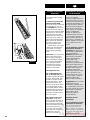
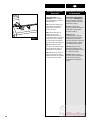
Unpack the MP2500iX punch.
Set the
MP2500iX on a
convenient work surface and
remove packaging used
for shipping.
Place on any suitable table or
desk convenient to a power
outlet.
Firmly push the square end of
the power cord (A) into the
power cord receptacle (B)
located on the back of the
machine.
CAUTION: MAKE
SURE THIS STEP IS
COMPLETE PRIOR TO
PLUGGING THE MALE
END OF THE POWER
CORD INTO A POWER
RECEPTACLE.
Plug the pronged end of the
power cord into an appropriate
power receptacle.
Press the foot pedal hose end
(C) into the round connector
(D) on the back of the
machine.
UNPACKING AND SETUP
I
Togliere la perforatrice
MP2500iX dall’imballaggio.
Posizionare
MP2500iX su un
piano di lavoro adeguato e
togliere le protezioni utilizzate
per la spedizione.
Collocare su tavolo o banco
idoneo in prossimità di una
presa di alimentazione.
Inserire a fondo l’estremità
quadrata del cavo di
alimentazione (A) nella presa
(B) posizionata sul retro della
macchina.
ATTENZIONE: PRIMA
DI INSERIRE
L’ESTREMITÀ
MASCHIO DEL CAVO
DI ALIMENTAZIONE IN
UNA PRESA DI
ALIMENTAZIONE
ACCERTARSI DI AVER
EFFETTUATO TALE
OPERAZIONE.
Inserire la spina del cavo di
alimentazione in una presa
adeguata.
Inserire a pressione l’estremità
del flessibile del pedale (C) nel
connettore rotondo (D) sul
retro della macchina.
DISIMBALLO E MESSA
A PUNTO
A
C
Figure 1a
La pagina si sta caricando...
La pagina si sta caricando...
La pagina si sta caricando...
La pagina si sta caricando...

23
I
PERFORAZIONE
Stile di legatura
Stile di legatura
Stile di
legatura
Legatura in plastica (PB)
Color Coil in plastica (C4)
Spirale doppia (W3)
Spirale doppia (W3)
Spirale doppia (W2)
Spirale doppia (W2)
VeloBind (VB)
SureBind (SB)
Legatura a 3, 5 o 7 fori,
formato 11"
Legatura a 2 o 4 fori,
formato A4
Legatura a 2 fori,
formato 11"
Cerlox (Pettine in plastica)
4:1 GBC (4 fori per pollice, 0,2475"
distanza centro foro)
3:1 (3 fori quadrati per pollice)
3:1 (3 fori rotondi per pollice)
2:1 (2 fori quadrati per pollice)
2:1 (2 fori rotondi per pollice)
1 foro per pollice
Circa 1 foro per pollice
3 fori sul bordo legato del documento,
carta formato 11"
4 fori sul bordo legato del documento,
carta formato A4
2 due fori sul bordo legato del documento,
carta formato 8 1/2", blocchetti per studi
medici o legali
PB 19/21
4:1 GBC
3:1
3:1
2:1
2:1
VB
SB
2-4/3-5-7
2-4/3-5-7
2-4/3-5-7
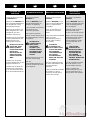
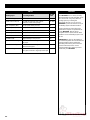
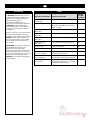
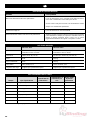
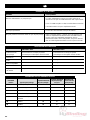
TABELLA 1
MP2500iX utilizza una varietà di stampi
facilmente intercambiabili che consentono
di effettuare diversi stili di legatura
documenti. Selezionando lo stampo
adeguato è possibile utilizzare
MP2500iX
per la perforazione di documenti negli stili
riportati in Tabella 1.
Per ciascuno degli stili di perforazione
sopra elencati occorre uno stampo a
parte, con la sola eccezione della serie 2-
4/3-5-7 che effettua stili di legatura a fogli
sciolti con un unico stampo.
IMPORTANTE: Un’etichetta
sull’impugnatura di ciascuno stampo
intercambiabile riporta il tipo di
perforazione. Durante la lettura delle
Istruzioni per l’uso, prestare attenzione
alle istruzioni speciali relative allo stampo
montato sulla perforatrice
MP2500iX in
dotazione.
La pagina si sta caricando...
La pagina si sta caricando...
La pagina si sta caricando...
La pagina si sta caricando...

28
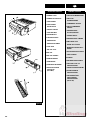
CAUTION: Before
changing the
MP2500iX die sets,
make certain that
the machine is
turned OFF (O).
Your MP2500iX offers the
convenience of
interchangeable die sets,
allowing you to economically
punch documents for a wide
variety of binding styles.
Changing the machines die
sets is both quick and easy, as
the following instructions
illustrate.
Removing Die Sets from the
Machine (Figure 2)
: The
interchangeable die set slot of
the
MP2500iX is located on the
right front side of the machine.
If a die set “M” is already
installed in your
MP2500iX,
you can easily remove the die
set by following these
instructions:
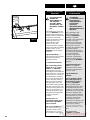
Step 1: Insert fingers into the
Die Set Handle located on the
right side of the die set (Figure
1b, N).
Step 2: Securely grasp the
handle and tug firmly (see
Figure 2). This firm tug
disengages the Automatic
Latching Mechanism, and
allows the die set
to slide out.
Step 3: Continue pulling on the
handle until the Die Set is fully
removed.
Step 4: Properly store the
removed Die Set (keep away
from dust, dirt, accidental falls
from the edge of counters etc.).
Helpful Hint: The GBC Die Set
Storage Cabinet #7703207 is
an excellent way to store all of
your interchangeable die sets
for the
MP2500iX (see Figure
3). This special product
securely holds three die sets,
protecting them from dirt, dust,
and accidental damage.
Several Die Set Storage
Cabinets can be stacked on
CHANGING THE
INTERCHANGEABLE DIE SETS
I
ATTENZIONE: Prima
di procedere alla
sostituzione degli
stampi di MP2500iX,
accertarsi che
la macchina sia
OFF (O).
La perforatrice MP2500iX con
la possibilità di utilizzare
stampi intercambiabili
consente di perforare, in modo
economico, documenti per una
vasta gamma di stili di
legatura. Come illustrato dalle
seguenti istruzioni, la
sostituzione degli stampi è
rapida e facile:
Smontaggio degli stampi
dalla macchina: (Figura 2)
La sede degli stampi
intercambiabili di
MP2500iX è
situata sul lato anteriore destro
della macchina. Per lo
smontaggio di uno stampo “M”
già montato sulla macchina,
procedere come indicato di
seguito:
Fase 1: Inserire le dita
nell’impugnatura sul lato destro
dello stampo (Figura 1b, N).
Fase 2: Afferrare saldamente
l’impugnatura e tirare con forza
(vedere Figura 2) per
disimpegnare il meccanismo di
bloccaggio automatico e
consentire lo scorrimento
verso l’esterno dello stampo.
Fase 3: Continuare a tirare
l’impugnatura fino
all’estrazione completa dello
stampo.
Fase 4: Collocare in luogo
adeguato lo stampo smontato
(tenere lontano da polvere,
sporcizia, cadute accidentali
dal bordo dei ripiani ecc.).
Suggerimento: Il contenitore
GBC per stampi N. 7703207
costituisce un sistema
eccellente per lo stoccaggio di
tutti gli stampi intercambiabili
per
MP2500iX (vedere Figura
3). Questo prodotto speciale è
in grado di contenere in modo
sicuro tre stampi proteggendoli
SOSTITUZIONE DEGLI STAMPI
INTERCAMBIABILI
Figure 2
Step 1
Step 2
Step 3
La pagina si sta caricando...

30
top of one another. Contact
your sales representative for
information on obtaining a Die
Set Storage Cabinet.
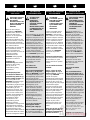
Installing Die Sets In the
Machine (Figure 4):
CAUTION: Possible
Pinch Point Hazard.
When installing Die Sets into
your MP2500iX, ALWAYS
keep fingers and body parts
out of the machine’s Die Set
Slot AND away from all areas
of the Die Set EXCEPT for
the Finger Groove in the Die
Set’s Handle. Failure to
observe these precautions
may result in injury.
Step 1
: Insert fingers into the
Die Set’s Handle.
Step 2:With the die set label
facing upward, match the left
end of the Die Set into the
shaped Die Set Slot of the
machine.
Step 3: Push it into place. With
the Die Set properly seated,
the DIE SET LED will turn off
and the POWER LED will
illuminate. The Automatic
Latching Mechanism will
engage and securely hold the
die set during punching
operations.
Note that if the Die Set is not
properly seated, the machine
will not operate.
CHANGING THE
INTERCHANGEABLE DIE SETS
I
dalla sporcizia, dalla polvere e
dai danni accidentali. Questi
contenitori possono inoltre
essere sistemati uno sull’altro.
Per informazioni relative al
prodotto rivolgersi al
rappresentante di zona.
Montaggio stampi sulla
macchina (Figura 4):
ATTENZIONE:
Probabile pericolo di
lesioni. Al montaggio
su MP2500iX, tenere
SEMPRE le dita e le parti del
corpo all’esterno della sede
E lontano dall’area dello
stampo. Utilizzare
ESCLUSIVAMENTE
l’apposita scanalatura
predisposta sull’impugnatura
dello stampo. L’inosservanza
di tali precauzioni può
comportare lesioni.
Fase 1:
Inserire le dita
nell’impugnatura dello stampo.
Fase 2: Con l’etichetta rivolta
verso l’alto, posizionare
l’estremità sinistra dello
stampo nella relativa sede
della macchina.
Fase 3: Spingere fino a
posizionare lo stampo
correttamente. In questo modo,
il LED DIE SET
(posizionamento stampo) si
spegne e il LED POWER
s'illumina. Il meccanismo di
bloccaggio automatico innesta
e trattiene saldamente lo
stampo durante le operazioni
di perforazione.
Se lo stampo non è
correttamente posizionato, la
macchina non funziona.
SOSTITUZIONE DEGLI STAMPI
INTERCAMBIABILI
Figure 3
Figure 4
Step 1
Step 2
Step 3
La pagina si sta caricando...

32
CAUTION: BEFORE
MAKING ANY
ADJUSTMENTS TO
THE VARIABLE
SETTINGS, MAKE
CERTAIN THAT THE
MACHINE IS TURNED
OFF.
After installing the correct die
set in your
MP2500iX, you are
ready to begin punching. The
following sections indicate how
to set up and activate the
machine. Read these sections
completely and become
familiar with the various
machine and Die Set
components before changing
settings. Note that the following
variable controls on your
MP2500iX must be properly
positioned.
Edge Guide Setting: For
correct punching of documents,
the Edge Guide must be
properly positioned.
For Standard Sheet Sizes:
Step 1: Move Edge Guide
(Figure 1b, I-J) to Correct
Position
: The MP2500iX
Punching Table has Edge
Guide Alignment markings that
correspond to the correct Edge
Guide position for a variety of
punching patterns and paper
sizes. Loosen the Edge Guide
Knob on the Edge Guide by
turning it counter-clockwise.
Slide the Edge Guide to the
correct Edge Guide Alignment
Mark that corresponds to your
selected punching pattern and
paper size (See Figure 5). To
lock the Edge Guide in place
firmly tighten the Edge Guide
Knob by turning knob
clockwise.
Note that this is an
approximate starting point.
Some further adjustment
may be required.
Step 2: Turn On Machine
:
Turn on the machine by
moving the ON/OFF (I/O)
Switch (Figure 1a, E) to the
ON “I” position. Verify that the
SEQUENCE OF PUNCHING
OPERATIONS
I
ATTENZIONE:
ACCERTARSI CHE LA
MACCHINA SIA
SPENTA PRIMA DI
EFFETTUARE
QUALSIASI
VARIAZIONE DELLE
IMPOSTAZIONI DELLE
VARIABILI.
Dopo il montaggio dello
stampo adeguato sulla
perforatrice
MP2500iX in
dotazione, è possibile
procedere con la perforazione.
Le sezioni successive
descrivono la procedura di
messa a punto e attivazione
della macchina. Prima di
procedere alla variazione delle
impostazioni leggere
attentamente tali sezioni per
una conoscenza adeguata dei
vari componenti della
macchina e degli stampi.
Posizionare correttamente i
comandi di seguito descritti
sulla perforatrice
MP2500iX in
dotazione.
Impostazione guida per i
bordi:
Per un’adeguata
perforazione dei documenti,
posizionare correttamente la
guida per i bordi.
Fogli di dimensioni
standard:
Fase 1: Spostare la guida
per i bordi (Figura 1b, I-J)
alla posizione corretta:
La
perforatrice
MP2500iX è
dotata di contrassegni di
allineamento guida per i bordi
corrispondenti alla posizione
corretta per una serie di tipi di
perforazione e di formati carta.
Allentare la manopola della
guida per i bordi ruotandola in
senso antiorario. Far scorrere
la guida sul contrassegno
corrispondente al tipo di
perforazione e al formato carta
selezionato (Vedere Figura 5).
Per bloccare la guida in
posizione serrare a fondo la
manopola ruotandola in senso
orario.
Tale impostazione
costituisce un punto di
SEQUENZA DELLE OPERAZIONI
DI PERFORAZIONE
Figure 5
La pagina si sta caricando...

34
green “POWER” light is on.
Hold the test sheets in place,
next to the edge guide, and
activate the punch cycle by
either depressing the Foot
Pedal (Figure 1a, C) or the
Palm Switch (Figure 1b, G).
Step 3: Insert Paper Into
Machine
: Insert a small stack
of paper (use the same size as
the document to be punched)
completely into the Punching
Throat (Figure 1b, O). For this
check, four to five pieces of
paper are easiest to handle.
Slide the paper to the left until
it touches the Edge Guide (see
Figure 6).
Step 4: Punch the Paper:
With the paper stack even
against the Edge Guide, press
the Palm Switch or the Foot
Switch to activate the punch.
Step 5: Check Edge Guide
Alignment
: For All Punching
Patterns
Except SureBind.
Remove the punched sheets
from the Punch Throat. Take
one punched sheet, fold it
lengthwise, and determine if
the space to the side of the
first hole is equal to the space
above the last hole. If the
spaces are not equal, slightly
adjust the Edge Guide, punch
another small stack of paper,
and re-check the spacings.
Repeat the process as needed
until the spacings are equal.
For SureBind: Remove the
punched sheets from the
Punch Throat. Take one
punched sheet and arrange
the sheet such that the
punched holes lie along the
edge of the paper furthest from
you. With a ruler, measure the
distance from the left edge of
the paper to the center of the
punched hole closest to the
edge of the paper. If the Edge
Guide is properly aligned, this
distance will be exactly 0.531"
(13.5 mm). If this is not correct,
slightly adjust the Edge Guide,
punch another two to three test
sheets, and re-check the
spacings. Repeat this process
SEQUENCE OF PUNCHING
OPERATIONS
I
partenza approssimativo
pertanto sarà necessario
effettuare ulteriori
regolazioni.
Fase 2: Attivare la macchina:
Attivare la macchina portando
l’interruttore ON/OFF (I/O)
(Figura 1a, E) su ON,
posizione “I”. Controllare che
la spia verde “POWER” sia
illuminata. Tenere in posizione
i fogli di prova, in prossimità
della guida dei bordi, e avviare
il ciclo di perforazione
premendo il comando a
pedale (Figura 1a, C) oppure
l’interruttore da tavolo
(Figura 1b, G).
Fase 3: Inserire la carta nella
macchina:
Inserire una piccola
quantità di carta (utilizzare
carta delle stesse dimensioni
di quella del documento da
perforare) a fondo nel supporto
per la perforazione (Figura 1b,
O). Per questa prova, si
consiglia di utilizzare quattro o
cinque fogli. Far scorrere la
carta verso sinistra finché non
giunge a contatto con la guida
dei bordi (vedere Figura 6).
Fase 4: Perforare la carta:
Con la carta posizionata contro
la guida dei bordi, premere
l’interruttore a mano oppure
l’interruttore a pedale per
azionare la perforatrice.
Fase 5: Controllare
l’allineamento della guida
per i bordi:
Per tutti i tipi di
perforazione
eccetto
SureBind. Togliere i fogli
perforati dal supporto.
Prendere un foglio perforato e
ripiegarlo nel senso della
lunghezza al fine di verificare
se la distanza al di sopra del
primo foro è uguale alla
distanza al di sopra dell’ultimo
foro. Qualora la distanza
risultasse diversa, regolare la
guida dei bordi, perforare altri
fogli e ricontrollare le distanze.
Ripetere questa procedura
come opportuno fino ad
ottenere distanze uguali.
Per SureBind: Togliere i fogli
SEQUENZA DELLE OPERAZIONI
DI PERFORAZIONE
Figure 6
Step 3
Step 4
La pagina si sta caricando...

36
as needed until the spacings
are correct.
For Sheets Larger Than the
Maximum Punch Width
:
Because of its open end Punch
Throat design, you can use
your
MP2500iX to punch non-
standard sheet sizes that are
larger than the maximum width
of paper that can be punched
in one operation. Note that
multiple steps are required to
punch these larger sheets of
paper. Some experimentation
will be required to determine
the correct position for the
Edge Guide. Follow Steps
1 – 4 listed above, “For Sheets
Smaller Than The Maximum
Punch Width,” to correctly
position and test the Edge
Guide.
Helpful Hint: You may need to
remove some of the Punch
Pins for proper punching of
some combinations of paper
sizes and punching patterns.
This is quickly and easily
accomplished. To remove
Punch Pins from Die Sets,
follow these instructions:
Removing Punch Pins:
Step 1: Determine Punch
Pins To Be Removed
: Note:
you will be punching the paper
two times, first one half, then
the other. To prepare for this
operation first place a single
sheet of paper (that is the
same size as the document to
be punched) beside the Die
Set. Carefully fold the sheet in
half. Holding the half sheet up
to the pins, determine which
pins will be required to punch
HALF of the paper.
Step 2: Remove the extra
punch pins
. Gently press
down on the top rail of the die
Set. Unlatch the hook end of
the Pin Retainer Rail (beside
the Die Set Handle) and swing
it free from the top of the
Punch Pins. Pull the Punch
Pins out that are not required.
Reattach the Punch Pin
Retainer. (See Figure 6)
SEQUENCE OF PUNCHING
OPERATIONS
I
perforati dal supporto.
Prendere un foglio perforato e
sistemarlo in modo che i fori si
trovino lungo il bordo del foglio
più distante dall’operatore. Con
una riga misurare la distanza
dal bordo sinistro del foglio al
centro del foro perforato più
vicino al bordo. Se la guida per
i bordi è correttamente
allineata, la distanza sarà
esattamente 0,531" (13,5 mm).
In caso contrario, regolare la
guida, perforare altri due o tre
fogli di prova e ricontrollare le
distanze. Ripetere la procedura
finché le distanze non sono
corrette.
Fogli di dimensioni superiori
alla larghezza massima di
perforazione:
Il supporto per
la perforazione di tipo aperto,
consente di utilizzare
MP2500iX per perforare fogli
di dimensioni non standard
maggiori della larghezza
massima della carta
perforabile in una sola
operazione. La perforazione di
questo tipo di fogli avviene in
fasi multiple. Inoltre, occorrerà
effettuare alcune prove per
determinare la posizione
corretta della guida per i bordi.
A tal fine procedere come
indicato nelle fasi da 1 a 4 di
cui sopra relative a “Fogli di
dimensioni inferiori alla
larghezza della perforatrice”.
Suggerimento: Per la corretta
perforazione di alcune
combinazioni di formati carta e
tipi di perforazione può essere
necessario togliere alcuni perni
dallo stampo. Per effettuare
questa rapida e facile
operazione, seguire le
istruzioni indicate:
Rimozione perni di
perforazione:
Fase 1: Individuare i perni di
perforazione da rimuovere:
Nota: occorrerà perforare la
carta due volte, prima una
metà poi l’altra. Per preparare
questa operazione, posizionare
un foglio di carta (delle stesse
dimensioni di quella del
SEQUENZA DELLE OPERAZIONI
DI PERFORAZIONE
Figure 7
La pagina si sta caricando...

38
Step 3: Install the Die Set:
Slide the Die Set into the
machine as described above.
Step 4: Test Punch: Test four
or five sheets of paper by
punching one half, turn the
paper around, then punch the
other half. Adjust the Edge
Guide and/or the number of
punch pins used as needed to
acquire the desired results.
SEQUENCE OF PUNCHING
OPERATIONS
I
documento da perforare)
accanto allo stampo. Piegare,
prestando particolare
attenzione, il foglio a metà.
Avvicinando la metà del foglio
ai perni, individuare quali di
questi saranno necessari per
la perforazione di METÀ foglio.
Fase 2: Togliere i perni di
perforazione in eccesso.
Premere con cautela sull’asta
superiore dello stampo.
Sbloccare l’estremità del
gancio dell’asta di fermo perni
(accanto all’impugnatura dello
stampo) e ruotare per
disimpegnare dalla parte
superiore dei perni di
perforazione. Estrarre i perni di
perforazione non necessari e
rimontare il fermo (vedere
Figura 6).
Fase 3: Montare lo stampo:
Far scorrere lo stampo nella
macchina come descritto in
precedenza.
Fase 4: Perforazione di
prova:
Effettuare una prova su
quattro o cinque fogli di carta
perforando prima una metà e
poi l’altra dopo aver girato il
foglio. Regolare la guida per i
bordi e/o il numero di perni di
perforazione utilizzati come
necessario per ottenere i
risultati desiderati.
SEQUENZA DELLE OPERAZIONI
DI PERFORAZIONE
La pagina si sta caricando...

40
Punch Activation: Your
MP2500iX can be activated
using either the Foot Pedal or
the Palm Switch.
Step 1: Turn the machine on
by pushing the ON/Off (I/O)
Switch at the back of the
machine to ON (I).
Step 2: Insert the stack of
sheets to be punched
completely into the Punch
Throat. Next, slide the stack of
sheets to the left, so that the
stack of sheets rests against
the Edge Guide (see Figure 5).
Step 3: Activate the punch
cycle of the machine by either
pressing the Palm Switch or
depressing the Foot Pedal.
Step 4: Remove the stack of
paper and proceed to punch
subsequent stacks to complete
the document to be bound.
SEQUENCE OF PUNCHING
OPERATIONS
I
Azionamento perforazione:
La perforatrice MP2500iX può
essere azionata sia tramite il
comando a pedale sia tramite
l’interruttore a mano.
Fase 1: Per azionare la
macchina, portare l’interruttore
ON/Off (I/O) sul retro della
macchina su ON (I).
Fase 2: Inserire
completamente la carta da
perforare nel supporto per la
perforazione. Far scorrere i
fogli verso sinistra in modo che
si appoggino contro la guida
per i bordi (vedere Figura 5).
Fase 3: Avviare il ciclo di
perforazione della macchina
premendo l’interruttore a mano
o il comando a pedale.
Fase 4: Togliere la carta e
procedere con la perforazione
dei blocchi successivi per
completare il documento da
rilegare.
SEQUENZA DELLE OPERAZIONI
DI PERFORAZIONE
Figure 5
La pagina si sta caricando...

42
I D
The following sections provide additional
information about punching paper and
proper operation of the machine. Please
read this information carefully before using
your
MP2500iX.
Paper: Your MP2500iX is capable of
punching any paper from onion skin bond
to cardboard stock. Because there are
wide variations in the thickness and types
of materials that can be punched, it is
difficult to define the exact maximum
number of sheets that can be punched at
one time.
For typical maximum punching capacities
for the
MP2500iX (using 20 lb. /80 gram
Bond sheets), refer to the table in the
Specifications Section of this Manual,
“Punching Capacity”.
In addition to possibly damaging the
machine, please note that punching too
many sheets per cycle may also result in
poor appearance of the punched holes
and the finished books. This degradation
of hole quality is due to the physics of
paper punching and will vary according to
both the particular paper stock being
punched and personal aesthetic standards.
Generally, reducing the number of sheets
punched per cycle will improve the quality
and appearance of the
punched holes.
Plastic Covers: You can also punch
plastic covers with your
MP2500iX. When
punching plastic covers please observe
the following guidelines to prevent damage
to the machine and die sets as well as to
produce the highest quality punched
covers:
• Punch no more than two covers per
punching cycle.
• For best results, separate each plastic
cover with a sheet of 20 lb. Bond paper
before punching.
Paper Chip Drawer: The paper chip
drawer for your
MP2500iX is located at
the front of the machine’s base. The
drawer should be periodically pulled out
and emptied. This will avoid jamming and
damage to the machine and Die Sets. The
MP2500iX incorporates microprocessor
technology to inform the operator when
the Chip Tray needs to be emptied. When
the Chip Tray is nearly full, the Chip Tray
Full LED will begin to flash on and off. You
may continue to use the
MP2500iX for a
short period longer if you wish, but after
Le seguenti sezioni forniscono ulteriori
informazioni relative alla perforazione
della carta e al corretto utilizzo della
macchina. Leggere attentamente le
informazioni riportate prima di utilizzare la
perforatrice
MP2500iX.
Carta: MP2500iX è in grado di perforare
qualsiasi tipo di carta, dalla carta
traslucida fine al cartone. I numerosi
spessori e tipi di materiali da perforare
rendono difficoltoso definire l’esatto
numero massimo di fogli da perforare in
un ciclo.
Per il numero massimo di fogli da
perforare con
MP2500iX (con fogli da 20
lb./80 grammi), fare riferimento alla tabella
nella Sezione Dati tecnici di questo
manuale, “Numero di fogli da perforare”.
La perforazione di un numero eccessivo di
fogli per ciclo, oltre a danneggiare la
macchina, può comportare uno scarso
risultato estetico dei fori perforati e dei
libri finiti. Questa minore qualità del foro è
dovuta alla fisica della perforazione della
carta variabile a seconda sia del
particolare tipo di carta sia degli standard
estetici. In generale, la riduzione del
numero di fogli per ciclo di perforazione
migliora la qualità e l’aspetto dei fori
perforati.
Copertine in plastica: Con MP2500iX è
inoltre possibile perforare copertine di
plastica. In tal caso, attenersi alle seguenti
istruzioni onde evitare danni alla
macchina e agli stampi e al contempo
produrre copertine perforate di alta
qualità:
• Non perforare oltre due copertine
per ciclo.
• Per ottenere un miglior risultato,
posizionare tra le copertine di plastica
un foglio di carta fine da 20 lb. (80
grammi) prima della perforazione
Vassoio residui carta: Il vassoio dei
residui di carta di
MP2500iX è collocato
sulla parte anteriore della base della
macchina. Estrarre e svuotare
periodicamente il vassoio, per evitare
inceppamenti e danni alla macchina e agli
stampi. La perforatrice
MP2500iX è dotata
di microprocessori che comunicano
all’operatore quando occorre svuotare il
vassoio dei residui di carta. Con il vassoio
in prossimità del limite della capacità, il
LED Chip Tray Full (vassoio residui carta
pieno) inizia a lampeggiare. Se
In den folgenden Abschnitten finden Sie
weitere Informationen über das Lochen
von Papier und den richtigen Betrieb des
Geräts. Bitte lesen Sie diese
Informationen sorgfältig, bevor Sie den
MP2500iX verwenden.
Papier: Mit dem MP2500iX kann jede
Papierart gelocht werden, vom Onion-
Skin-Papier bis hin zu Karton. Auf Grund
der großen Unterschiede in der Dicke und
Typ des Materials, das gelocht werden
kann, ist es schwierig, genau die
maximale Anzahl Blätter anzugeben, die
in einem Lochvorgang gelocht werden
können.
Angaben zur Blattkapazität des
MP2500iX
(für Papier mit 20 lb. (80 g)) finden Sie in
dieser Anleitung in der Tabelle mit den
technischen Daten unter “Maximale
Blattkapazität”.
Werden in einem Zyklus zu viele Blätter
gelocht, kann damit nicht nur das Gerät
beschädigt werden, möglicherweise haben
die Löcher und damit das Enddokument
dann auch kein optimales
Erscheinungsbild. Diese Verringerung der
Lochqualität resultiert aus der
physikalischen Beschaffenheit von Papier,
sie ist je nach Papiertyp unterschiedlich
und unterliegt den jeweils persönlichen
subjektiven Standards. In der Regel
können Qualität und Erscheinungsbild der
erzeugten Löcher durch Reduzieren der
Anzahl Blatt Papier, die in einem Zyklus
gelocht werden, verbessert werden.
Deckblätter aus Plastik: Mit dem
MP2500iX können Sie auch
Plastikdeckblätter lochen. Beachten Sie
beim Lochen von Plastikdeckblättern die
folgenden Richtlinien, um
Beschädigungen am Gerät und den
Locherblöcken zu verhindern und um
optimal gelochte Deckblätter zu erzielen:
• Lochen Sie in einem Zyklus maximal
zwei Deckblätter.
• Um optimale Ergebnisse zu erzielen,
trennen Sie vor dem Lochen die
einzelnen Plastikdeckblätter mit einem
Blatt 80 g-Papier.
Papierschnitzelfach: Das
Papierschnitzelfach des
MP2500iX
befindet sich an der Vorderseite im Sockel
des Geräts. Das Fach sollte in
regelmäßigen Abständen überprüft und
geleert werden, um Papierstaus und
Beschädigungen am Gerät und den
ADDITIONAL INFORMATION INFORMAZIONI SUPPLEMENTARI WEITERE INFORMATIONENTITLE HERE
La pagina si sta caricando...

44
I D
that time, the Chip Tray Full LED will shine
steady, the Power LED will turn off and the
machine will be disabled until the Chip
Tray is emptied. You must empty the Chip
Tray with the Power On so that the
sensors are able to identify this action.
Helpful Hint: To easily remove the Chip
Tray, PRESS DOWN and PULL OUT at
the same time.
necessario, la perforatrice
MP2500iX può
essere utilizzata per un breve periodo,
quindi il LED si illumina a luce fissa, il
LED Power si disinserisce e la macchina
viene disabilitata finché non si provvede a
svuotare il vassoio. Svuotare il vassoio
con l’alimentazione inserita in modo che i
sensori siano in grado di identificare tale
operazione.
Suggerimento: Per togliere
facilmente il vassoio residui carta,
PREMERE ed ESTRARRE
contemporaneamente.
Qualora fosse necessario riparare la
perforatrice
MP2500iX rivolgersi al centro
di assistenza GBC di zona autorizzato.
NON vi sono parti sostituibili dal cliente
all’interno della macchina. Onde evitare
potenziali lesioni personali e/o danni alla
proprietà, NON TOGLIERE IL
COPERCHIO DELLA MACCHINA.
Wenn am
MP2500iX Servicearbeiten
erforderlich werden, wenden Sie sich an
Ihren lokalen, autorisierten GBC-
Fachhändler.
Im Gerät befinden sich KEINE Teile, die
vom Benutzer gewartet werden können.
Um Verletzungen von Personen und/oder
Beschädigungen zu vermeiden,
ENTFERNEN SIE NICHT DIE
ABDECKUNGEN DES GERÄTS.
Should your
MP2500iX require service
contact your local authorized GBC service
representative.
There are NO user-serviceable parts
inside the machine. To avoid potential
personal injury and/or property damage,
DO NOT REMOVE THE MACHINE’S
COVER.
Locherblöcken zu vermeiden.
Das
MP2500iX umfasst
Mikroprozessortechnologie, über den der
Benutzer darauf aufmerksam gemacht
wird, wenn das Papierschnitzelfach
geleert werden muss. Ist das
Papierschnitzelfach fast voll, dann blinkt
die entsprechende LED-Anzeige. Sie
können dann das
MP2500iX noch einen
kurzen Zeitraum weiter verwenden,
danach leuchtet die LED-Anzeige für das
volle Papierschnitzelfach ständig auf, die
LED-Anzeige für das Einschalten des
Geräts leuchtet nicht mehr und das
Gerät wird deaktiviert, bis das
Papierschnitzelfach ausgeleert wird. Sie
müssen das Papierschnitzelfach bei
eingeschaltetem Gerät leeren, damit die
Sensoren diesen Vorgang registrieren
können. Hinweis: Sie können das
Papierschnitzelfach einfach entfernen,
indem Sie es gleichzeitig nach unten
drücken und herausziehen.
ADDITIONAL INFORMATION INFORMAZIONI SUPPLEMENTARI WEITERE INFORMATIONEN
SERVICE ASSISTENZA SERVICE
La pagina si sta caricando...
La pagina si sta caricando...
La pagina si sta caricando...

48
I
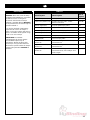
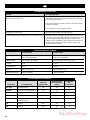
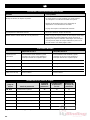
RISOLUZIONE DEI PROBLEMI MP2500iX
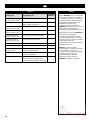
DATI TECNICI MP2500iX
Problema
Mancanza alimentazione. Nessuna perforazione
Creazione di troppi fori
Rumorosità durante l’ultima metà del ciclo di perforazione
Causa probabile
Il cavo di alimentazione non è collegato al retro della macchina o
non è stato correttamente inserito nella presa di rete
Vassoio residui carta pieno. Svuotare con l’alimentazione inserita
Stampo non correttamente posizionato
I perni di selezione non sono stati estratti
Togliere lo stampo; premere sulla barra superiore per far passare
i perni attraverso lo stampo per esporne le estremità. Tenere lo
stampo in questa posizione, pulire i perni con un panno
leggermente imbevuto di olio oppure con il pollice e l’indice.
Perforazione
Dimensioni
Peso
Peso confezionata
Dati elettrici
Larghezza max. fogli
Macchine 115 V
Azionamento tramite pedale pneumatico o
interruttore a mano su tavola
18"(W); 8 1/2" (H); 16" (D)
51 lb.
59 lb.
115 V; 60 Hz; 1,6 A
Supporto per la perforazione aperto
Macchine 230 V
Azionamento tramite pedale pneumatico o
interruttore a mano su tavola
457 mm (W); 216 mm (H); 406 mm (D)
23,3 kg
26,9 kg.
230 V; 50-60 Hz; 1,1 A
Supporto per la perforazione aperto
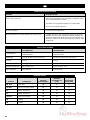
DATI DI RIFERIMENTO DELLO STAMPO
PB 19/21
4:1 GBC
3:1
2:1
2-4/3-5-7
VB
SB
Rilegatura in plastica
Color Coil 4:1 (passo .2475)
Spirale doppia 3:1
Spirale doppia 2:1
Stampo per fogli sciolti
VeloBind
SureBind
25
17
22
20
25
29
29
A4
A4
A4
A4
A4
A4
A4
21
47
34
23
11
12
10
Stampo
Tipo di perforazione
Capacità max. di
perforazione *
Lunghezza max. di
perforazione, un
ciclo
Numero totale
di perni di
perforazione
*carta fine da 20 lb./80 grammi per perforazione
La pagina si sta caricando...
La pagina si sta caricando...
La pagina si sta caricando...
La pagina si sta caricando...
La pagina si sta caricando...
La pagina si sta caricando...
La pagina si sta caricando...
La pagina si sta caricando...
La pagina si sta caricando...
La pagina si sta caricando...
-
 1
1
-
 2
2
-
 3
3
-
 4
4
-
 5
5
-
 6
6
-
 7
7
-
 8
8
-
 9
9
-
 10
10
-
 11
11
-
 12
12
-
 13
13
-
 14
14
-
 15
15
-
 16
16
-
 17
17
-
 18
18
-
 19
19
-
 20
20
-
 21
21
-
 22
22
-
 23
23
-
 24
24
-
 25
25
-
 26
26
-
 27
27
-
 28
28
-
 29
29
-
 30
30
-
 31
31
-
 32
32
-
 33
33
-
 34
34
-
 35
35
-
 36
36
-
 37
37
-
 38
38
-
 39
39
-
 40
40
-
 41
41
-
 42
42
-
 43
43
-
 44
44
-
 45
45
-
 46
46
-
 47
47
-
 48
48
-
 49
49
-
 50
50
-
 51
51
-
 52
52
-
 53
53
-
 54
54
-
 55
55
-
 56
56
-
 57
57
-
 58
58
-
 59
59


MyBinding GBC MP2500ix Modular Punch Manuale utente
- Categoria
- Macchine per rilegare
- Tipo
- Manuale utente
in altre lingue
- English: MyBinding GBC MP2500ix Modular Punch User manual
- français: MyBinding GBC MP2500ix Modular Punch Manuel utilisateur
- español: MyBinding GBC MP2500ix Modular Punch Manual de usuario
- Deutsch: MyBinding GBC MP2500ix Modular Punch Benutzerhandbuch
- Nederlands: MyBinding GBC MP2500ix Modular Punch Handleiding
Documenti correlati
-
MyBinding GBC MP2500ix / 640ID Modular Punch Manuale del proprietario
-
-
-
-
-
-
-
-
-
Altri documenti
-
Fellowes Helios 60 Manuale utente
-
-
Fellowes Helios 30 Manuale utente
-
-
GBC 9707121 Manuale utente
-
GBC SureBind 500 Manuale utente
-
GBC Ultra Ultra MP StreamPunch Manuale utente
-
-
Xerox 4112/4127 Manuale utente
-