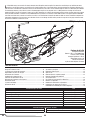
Blade Blade CX4 Manuale utente
- Categoria
- Giocattoli telecomandati
- Tipo
- Manuale utente
Questo manuale è adatto anche per

RTF
READY-TO-FLY
Instruction Manual
Bedienungsanleitung
Manuel d’utilisation
Manuale di Istruzioni

2
EN
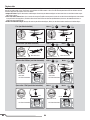
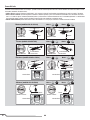
WARNING: Read the ENTIRE instruction manual to become familiar with the features of the product before operating. Failure to operate the
product correctly can result in damage to the product, personal property and cause serious injury.
This is a sophisticated hobby product. It must be operated with caution and common sense and requires some basic mechanical ability. Failure to
operate this product in a safe and responsible manner could result in injury or damage to the product or other property. This product is not intended
for use by children without direct adult supervision. Do not use with incompatible components or alter this product in any way outside of the instruc-
tions provided by Horizon Hobby, Inc. This manual contains instructions for safety, operation and maintenance. It is essential to read and follow all
the instructions and warnings in the manual, prior to assembly, setup or use, in order to operate correctly and avoid damage or serious injury.
The following terms are used throughout the product literature to indicate various levels of potential harm when operating this product:
NOTICE: Procedures, which if not properly followed, create a possibility of physical property damage AND a little or no possibility of injury.
CAUTION: Procedures, which if not properly followed, create the probability of physical property damage AND a possibility of serious injury.
WARNING: Procedures, which if not properly followed, create the probability of property damage, collateral damage, and serious injury OR create a
high probability of superfi cial injury.
• Always keep a safe distance in all directions around your model to avoid
collisions or injury. This model is controlled by a radio signal subject to
interference from many sources outside your control. Interference can
cause momentary loss of control.
• Always operate your model in open spaces away from full-size vehicles,
traffi c and people.
• Always carefully follow the directions and warnings for this and any
optional support equipment
(chargers, rechargeable battery packs, etc.).
• Always keep all chemicals, small parts and anything electrical out of the
reach of children.
• Always avoid water exposure to all equipment not specifi cally designed
and protected for this purpose. Moisture causes damage to electronics.
• Never place any portion of the model in your mouth as it could cause
serious injury or even death.
• Never operate your model with low transmitter
batteries.
• Always keep aircraft in sight and under control.
• Always move the throttle fully down at rotor strike.
• Always use fully charged batteries.
• Always keep transmitter powered on while aircraft is powered.
• Always remove batteries before disassembly
• Always keep moving parts clean.
• Always keep parts dry.
• Always let parts cool after use before touching.
• Always remove batteries after use.
• Never operate aircraft with damaged wiring.
• Never touch moving parts.
NOTICE
All instructions, warranties and other collateral documents are subject to change at the sole discretion of Horizon Hobby, Inc. For up-to-date product
literature, visit horizonhobby.com and click on the support tab for this product.
Meaning of Special Language
Safety Precautions and Warnings
Age Recommendation: Not for children under 14 years. This is not a toy.

3
EN
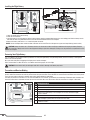
T
he Blade
®
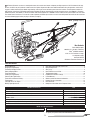
CX4 marks a new era in coaxial performance with several new features to improve your fl ight experience. You’ll fi nd that with its large
size, the CX4 is easy to fl y and well suited for novice heli pilots. Hinged and rubber over-molded main blades offer safer operation, and the land-
ing gear is rubber mounted to help absorb rough landings, reducing the chance of broken parts from minor incidents. The CX4 sports a modern full
body fuselage, including an LED spotlight and fl ashing navigation tail light for those low-light missions around the house. A 3S 800mAh Li-Po battery
provides the power, and a DSM2
®
5-channel transmitter with matching Spektrum™ AR6100e receiver enables you to fl y several CX4 helis at the same
time without fear of interference. This manual includes important information you need for successful and safe operation of the CX4, so take some time
to read the following pages before you plug in the battery and go fl y.
Box Contents
Blade CX4 Helicopter
800mAh 3S 11.1V 30C Li-Po Battery
E-fl ite
®
LP5DSM transmitter
3-Cell 11.1V Li-Po balance charger
12-volt power supply
Instruction Manual
AA Alkaline Transmitter Batteries (4)
RTF | Ready-To-Fly
Length
19.7 in (500mm)
Height
9.84 in (250mm)
Main Rotor Diameter
18.1 in (460mm)
Gross Weight
14.6 oz (414 g)
Blade CX4 Specifi cations
Blade CX4 Features RTF
Airframe – Blade
®
CX4 Included
Main Motors – 370 Brushed Installed
On-board Electronics – 3-in-1 mixer/ESCs/Gyro Installed
Receiver – AR 6100e Installed
Servos – DS75 Installed
Battery – 800mAh 3S 11.1V 30C Li-Po Included
Charger – 3-Cell 11.1V DC Li-Po Charger with alligator clip input cord Included
Transmitter – LP5DSM transmitter Included
To register your product online,visit www.bladehelis.com
Table of Contents
Charging Warnings..................................................................................4
Charging the Flight Battery .....................................................................4
The Battery Charging Process .................................................................5
Battery Charging Codes ..........................................................................5
Transmitter Controls ...............................................................................5
Installing the Flight Battery .....................................................................6
Protecting Your Flight Battery ..................................................................6
Transmitter and Receiver Binding ............................................................6
Flight Controls ........................................................................................7
Lifting Off for the First Flights ..................................................................8
Making Flight Adjustments ......................................................................8
Main Motor Proportional Mix Trimmer Pot................................................9
Gyro Gain Adjustment .............................................................................9
After Flying .............................................................................................9
How To Be A Successful Pilot ................................................................10
Troubleshooting Guide ..........................................................................10
Exploded View and Parts Listings ..........................................................11
Limited Warranty ..................................................................................12
Warranty and Service Contact Information ............................................13
Customer Service Information ...............................................................13
FCC Information ....................................................................................14
Compliance Information for the European Union ....................................14

4
EN
The charger included with your helicopter has been designed to safely
charge the included Li-Po battery.
CAUTION: All instructions and warnings must be followed exactly.
Mishandling of Li-Po batteries can result in a fi re, personal injury
and/or property damage.
• By handling, charging or using the included Li-Po battery, you assume
all risks associated with lithium batteries.
• If at any time the battery begins to balloon or swell, discontinue use
immediately. If charging or discharging, discontinue and disconnect.
Continuing to use, charge or discharge a battery that is ballooning or
swelling can result in fi re.
• Always store the battery at room temperature in a dry area for best
results.
• Always transport or temporarily store the battery in a temperature
range of 40–120º F (5–49° C). Do not store battery or model in a car
or direct sunlight. If stored in a hot car, the battery can be damaged or
even catch fi re.
• Always charge batteries away from fl ammable materials.
• Always inspect the battery before charging
• Always disconnect the battery after charging, and let the charger cool
between charges.
• Always constantly monitor the temperature of the
battery pack while charging.
• ONLY USE A CHARGER SPECIFICALLY DESIGNED TO CHARGE LI-PO BAT-
TERIES. Failure to charge the battery with a compatible charger may
cause a fi re resulting in personal injury and/or property damage.
• Never discharge Li-Po cells to below 3V under load.
• Never cover warning labels with hook and loop strips.
• Never leave charging batteries unattended.
• Never charge batteries outside recommended levels.
• Never charge damaged batteries.
• Never attempt to dismantle or alter the charger.
• Never allow children under 14 years of age to charge battery packs
• Never charge batteries in extremely hot or cold places (recommended
between 40–120° F or
5–49° C) or place in direct sunlight.
Charging Warnings
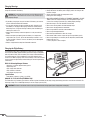
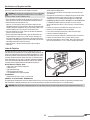
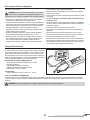
Charging the Flight Battery
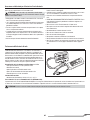
The Blade CX4 comes with a DC balancing charger and 3S Li-Po battery.
Use only Horizon Hobby approved battery packs and chargers compatible
with this product. Never leave the battery and charger unattended during
the charging process. Failure to follow the instructions properly could
result in a fi re. When charging, make sure the battery is on a heat-resistant
surface. Charge the fl ight battery before binding the aircraft or performing
control tests.
DC Li-Po Balancing Charger Features
• Charges 3-cell lithium polymer battery packs
• 0.8A charge rate
• LED charge status indicator
• LED cell balance indicator
• 12V alligator clip input cord
Specifi cations
• Input power: minimum 1.5A at 11.5–15V DC
800mAh 3S 11.1V 30C LiPo (EFLB8003SJ30)
The Blade CX4 3S Li-Po battery pack features a balancing lead that allows you to safely charge your battery pack when used with the included Li-Po
balancing charger. The included fl ight battery is safe to charge up to 3C (2.4A).
CAUTION: The balance connector must be correctly inserted into the charge port of your charger prior to charging.

5
EN
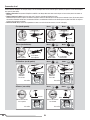
The Battery Charging Process
1. Charge only batteries that are cool to the touch and are not damaged. Inspect the battery to make sure it is not damaged e.g., swollen, bent,
broken or punctured.
2. Connect the charger to a 12V power source, noting proper polarity.
3. The RED LED fl ashes.
4. Connect the battery balance lead to the charger. The balance connector is keyed to prevent reverse polarity.
5. The GREEN and RED LEDs glow solid when the battery is charging.
6. Charging is complete when the RED LED is solid and the GREEN LED is off.
7. Always unplug the battery from the charger immediately upon completion of charging.
CAUTION: Only use a charger specifi cally designed to charge a Li-Po battery. Failure to do so could result in fi re causing injury or
property damage.
CAUTION: Do not exceed manufacturer’s recommended charge rate.
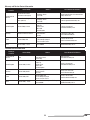
Battery Charging Codes
RED LED GREEN LED Instruction
Flashing Off
Battery charger is powered. Li-Po battery is not
connected.
Solid Solid Li-Po battery is connected and charging
Solid Off Li-Po battery is connected and charging is complete
Flashing Flashing Charge Error
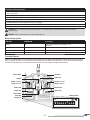
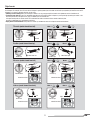
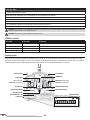
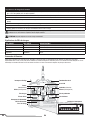
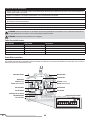
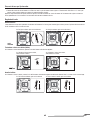
Transmitter Controls
Install the 4 included AA batteries in the transmitter. Check the power level of the batteries and operation of the transmitter by switching the power
switch on (upward). The LCD screen at the top of the transmitter will indicate the power level of the batteries. If at any time the voltage indicated on
the LCD screen falls to 4.5V or less, an alarm will sound and it will be necessary to replace the batteries with new ones.
ON
12345678910
Trainer Switch Ch 5 Knob
LCD Screen
Elevator (up/down)
Aileron (right/left)
Elevator Trim
Aileron Trim
Speaker
Throttle (up/down)
Rudder (right/left)
Throttle Trim
Rudder Trim
Power Switch
Power LED
Charge Port
Switch positions

6
EN
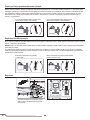
Protecting Your Flight Battery
The circuit board in the helicopter includes a protection circuit for your fl ight battery. LVC (Low Voltage Cutoff) ensures the battery is discharged to
within a safe limit for operation.
Once you realize that power is dropping off in fl ight, please land the helicopter.
LVC is activated when the Red LED on the circuit board starts fl ashing again, late in the fl ight.
CAUTION: Do not continue to fl y the helicopter while LVC is active or damage to the battery may result.
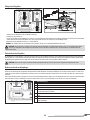
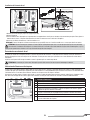
1. Lower the throttle to the lowest setting.
2. Power on the transmitter.
3. Install the battery in the helicopter by sliding it into the battery mounting supports/slots between the main landing gear. Slide the battery into the
slots with the label facing downward and the connector oriented toward the back of the helicopter.
4. Connect the battery cable to the 3-in-1 control unit power connector.
NOTICE: Set the helicopter down and do not allow it to move until the red LED on the helicopter turns green and stops blinking (remains solid.).
CAUTION: Always disconnect the Li-Po battery from the aircraft control unit when not fl ying to avoid over-discharging the battery. Batteries
discharged to a voltage lower than the lowest approved voltage may become damaged, resulting in loss of performance and potential fi re when
batteries are charged.
Installing the Flight Battery
1
2
4
3
Transmitter and Receiver Binding
The CX4 uses Spektrum 2.4 GHz DSM technology and comes from the factory with the binding procedure complete. Binding teaches the receiver the
specifi c code of the transmitter so it will only communicate with your transmitter. There should be no need to bind the transmitter and receiver prior to
use. If you ever need to re-bind the transmitter and receiver, please follow the steps below.
Each time you power the transmitter on, it will enter Bind Mode for a few seconds, as indicated by the red blinking LED located under the door on the
front of the transmitter in the bottom left hand corner of the transmitter. Once this LED becomes solid, the transmitter is no longer in bind mode.
9
Binding Procedure:
1. Disconnect the fl ight battery from the helicopter.
2. Power off the transmitter.
3. Insert the bind plug into the receiver
4. Connect the fl ight battery in the helicopter. The receiver LED fl ashes rapidly
after 5 seconds.
5. Lower the throttle stick to the lowest position, then power on the transmitter.
6. The helicopter is bound when the receiver LED turns solid.
7. Disconnect the fl ight battery, power off the transmitter, then remove the bind plug
from the receiver.

7
EN
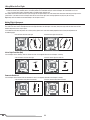
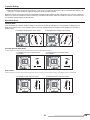
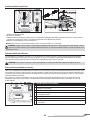
Flight Controls
For smooth control of the CX4, always make small control movements with the transmitter sticks. All directions are described as if you were sitting in
the helicopter. For example, when the nose of the helicopter is pointing toward you, left rudder control stick input (rotation) will move the nose of the
helicopter in the counter-clockwise direction, to your right.
• Climbing and descending: When your helicopter is stable in the air, gently push/pull the throttle stick up/down to make it climb/descend.
• Turning left and right: When you are comfortable controlling the fl ying height of your helicopter, try turning left/right by moving the rudder in the
direction you want the helicopter to turn (yaw). In addition, you can transition the
helicopter laterally with the aileron control. The combination of rudder control and aileron control enables the pilot
to perform coordinated turns and sideways transitions.
• Flying forward and backward: Gently move the elevator up and down to move the helicopter forward and backward.
Throttle (model viewed from left)
Descend
Throttle down
Throttle up
Mode 1
Mode 2
Ascend
Rudder (model viewed from top)
Elevator (model viewed from left)
Aileron (model viewed from back)
Mode 1
Mode 1
Mode 1
Mode 2
Mode 2
Mode 2
Rudder left
Rudder right
Nose Yaws Right
Forward
Elevator down
viewed from back
Elevator up
Aileron left
Left
Aileron right
Right
Nose Yaws Left
Backward
viewed from back
viewed from backviewed from back

8
EN
Li ing O for the First Flight:
1. Place the helicopter on the ground with the tail pointing toward you.
2. Move the throttle stick smoothly to the 1/3 throttle position. The rotor blades will spin and the helicopter will climb. Climb to 3–5 feet
(1.0–1.5 meters) high. Reduce and add throttle as needed to hover and descend.
Use smooth control stick movements when you are fl ying the helicopter. Always use small control stick movements and keep your fi ngers on the
control sticks. If you notice that the helicopter wants to turn to the left or right, some steering adjustments (trim) may be necessary.
Tip: Always move the throttle to zero immediately if the helicopter crashes.
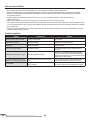
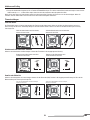
Making Flight Adjustments
Left or Right Rotation (Yaw)
The rudder trim lever makes small adjustments to the fl ight direction of the helicopter. If the nose (front) turns right, slide the trim lever until the
rotation stops and the nose stays in place.
If full rudder trim still does not prevent the heli from yawing, please refer to the main motor proportional mix trimmer pot adjustments on
the following page.
Left or Right Transition (Roll)
If the helicopter moves sideways, slide the aileron trim lever in the opposite direction the helicopter is moving.
Forward or Backward
If the helicopter moves forward, slide the elevator trim lever in the opposite direction the helicopter is moving.
If the heli turns right, then trim left.If the heli turns left, then trim right.
If the heli moves right, then trim left.
If the heli moves forward, then trim back.
If the heli moves left, then trim right.
If the heli moves back, then trim forward.

9
EN
1
2
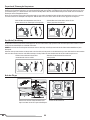
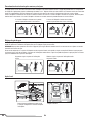
Main Motor Proportional Mix Trimmer Pot
Gyro Gain Adjustment
The Main Motor Proportional Mix Trimmer Potentiometer (trimmer pot) adjusts the mixing between the main motors, which enables you to fi ne-tune the
rudder trim. You must power down the helicopter before making adjustments to the trimmer pot. Any changes you make will not take effect until after
the 3-in-1 control unit is re-initialized. Always ensure the rudder trim lever on the transmitter is centered before making changes to the trimmer pot.
Make adjustments 1/8th of a turn at a time and test the results before making further adjustments.
Enter into a stable hover with the rudder trim centered and no rudder input. If the nose of the helicopter is trying to drift to the left, turn the trimmer pot
clockwise. If the nose of the helicopter wants to drift to the right, turn the trimmer pot counterclockwise.
The Gyro Gain adjusts the gain (response) of the gyro used to hold the tail of the helicopter straight during fl ight. You do not need to power down and
re-arm the helicopter for changes to the Gyro Gain to take effect.
NOTICE: Exercise caution while making adjustments to the Gyro Gain. When armed, the rotor will turn in response to any throttle movement.
In a stable hover, if the tail of the helicopter twitches or wags quickly from side to side, the gain is too high. Reduce the gain in small increments until
the tail is steady. If the tail of the helicopter wanders and feels loose, the gain is too low. Increase the gain in small increments until the tail is solid.
If the nose of the heli drifts to the left,
turn the trimmer clockwise
Increase the gain if the tail of the helicopter
wanders or feels loose
If the nose of the heli drifts to the right, turn
the trimmer counterclockwise
Reduce the gain if the tail of the helicopter
wags quickly back and forth
A er Flying
3
Power off the transmitter.
Remove the fl ight battery immediately after fl ight
and fully charge before storing.

10
EN
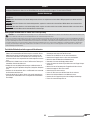
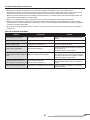
Troubleshooting Guide
Problem Possible Cause Solution
Helicopter throttle will not respond Throttle at high position
Fully lower the throttle stick
for 3 seconds
Rotor blades will not turn Low battery voltage Completely recharge fl ight battery
Motor power decreases
during flight
Receiver uses default soft Low
Voltage Cutoff (LVC)
Recharge flight battery or replace battery that is no
longer performing
Climb rate is greatly reduced Low battery voltage
Recharge fl ight battery. Replace the fl ight battery if
necessary
Helicopter vibrates or shakes in fl ight Damaged rotor blades or fl ybar
Check the main rotor blades and rotor head compo-
nents for cracks or chips. Replace all damaged parts.
Always replace rotor blades as a pair and always select
blades from the same package.
Helicopter climbouts are slow and/or
nose turns while climbing/descending
Rotor drive gears are dirty, have hair in them,
etc
Clean the rotor gearing with a dry toothbrush and re-
move any dust or hair that may have accumulated
Failure to Bind
Trying to bind while the transmitter is too close
to the helicopter
Hold the transmitter 6–10 feet
(2–3 meters) away from the helicopter while binding.
• Read the instruction manual carefully (especially the Troubleshooting section if you’re having problems).
• Small, smooth control inputs are best. Quickly moving the stick just produces instability and no real fl ight control.
• Make sure the fl ight battery is fully charged before each fl ight. It’s better to run the fl ight battery down to 50% or lower before recharging.
A good, fully charged battery should provide for approximately 8 minutes of fl ight time. If your fl ight time falls below 4 minutes, your battery
may need to be replaced.
• Keep the helicopter dry and clean. Carpet lint, pet hair, dirt, etc, can restrict the motor and controls, giving reduced power and
control response times.
• Make sure the canopy is connected to the mounting posts. A loose canopy will cause the helicopter to shake.
• The helicopter must be sitting motionless to initialize the gyro stabilization system after connecting the fl ight battery. If you are holding the helicop-
ter in your hand or moving it around, it may not initialize properly. Disconnect the fl ight battery, then reconnect the battery and place the helicopter
on the landing skids.
• Make sure that the stabilizer/fl ybar is free to teeter up and down. This is what stabilizes the top rotor system. If the stabilizer/fl ybar is restricted,
your CX4 helicopter will not fl y correctly.
How to be a Successful Pilot

11
EN
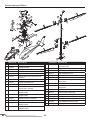
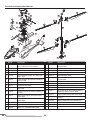
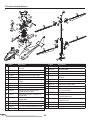
Exploded View and Parts Listing
1
2
3
15
16
4
14
9
11
12
9
5
5
7
10
7
8
17
13
6
18
18
19
20
21
21
21
22
23
25
26
27
24
22
21
19
28
Part # Description
1 BLH2158 Fuselage, Complete, Orange-to-Yellow Fade w/
Grommets and Lights, BCX4
2 BLH2154 Main Frame Set, BCX4
3 BLH2146 Swashplate Anti-Rotation Bracket w/ Screws,
BCX4
4 BLH2143 Inner-Shaft Main Gear, BCX4
5 BLH2126 Fuselage Mount Rod Set w/ Grommets, BCX4
6 BLH2123 Battery Tray w/Landing Gear Sleeves and Screws,
BCX4
7 BLH2122 Landing Gear Set, BCX4
8 BLH2118 Servo Pushrod Set, BCX4
9 BLH2115 Outer Main Shaft Bearings (Pr.), BCX4
10 BLH2144 Outer Shaft Main Gear w/ Bearing, Bearing Washer
and Screws, BCX4
11 BLH2111 Upper Main Rotor Motor w/ Pinion and Mounting
Screws, BCX4
12 BLH2110 Lower Main Rotor Motor w/ Pinion and Mounting
Screws, BCX4
13 BLH2112 Main Motor Heat Sinks, BCX4
14 EFLB8003SJ30 800mAh 3S 11.1V 30C LiPo, 18AWG JST
15 BLH2153 3-in-1 Control Unit (ESC/Mixer/Gyro), BCX4
16 SPMAR6100EB DSM2 6-CH Replacement Receiver for Blade Heli
Part # Description
17 EFLRDS75H 7.5-Gram DS75 Digital Sub-Micro Helicopter Servo
18 BLH2120 Lower Main Blades (Pr.), BCX4
19 BLH2121 Upper Main Blades (Pr.), BCX4
20 BLH2119 Stabilizer Bar Set, BCX4
21 BLH2147 Upper/Lower Main Rotor Blade Grips w/ Hardware
and Blade Bolts, BCX4
22 BLH2127 Lower Rotor Blade Linkages, BCX4
23 BLH2117 Lower Rotor Head w/ Spindle Pins and Screws,
BCX4
24 BLH2116 Swashplate Assy, BCX4
25 BLH2142 Inner Shaft, Upper Rotor Head and Spindle Pins,
BCX4
26 BLH2113 Outer Main Rotor Shaft w/ Top Bearing Holder and
Bearing, BCX4
27 BLH2114 Outer Main Shaft Collar, BCX4
28 BLH2145 Outer Main Shaft Cap w/ Inner-Shaft Bearing
EFLC3105 3S 11.1V DC LiPo Balancing Charger, 0.8Aby
E-Flite
EFLC4000 1.5-Amp Power Supply, 12V DC by E-Flite
EFLH1055 LP5DSM 5-Channel Transmitter, 2.4GHz: BCX2/3/4
EFLH1209
Toolset
t

12
EN
Limited Warranty
What this Warranty Covers
Horizon Hobby, Inc. (“Horizon”) warrants to the original purchaser that the
product purchased (the “Product”) will be free from defects in materials and
workmanship at the date of purchase.
What is Not Covered
This warranty is not transferable and does not cover (i) cosmetic damage,
(ii) damage due to acts of God, accident, misuse, abuse, negligence, com-
mercial use, or due to improper use, installation, operation or maintenance,
(iii) modification of or to any part of the Product, (iv) attempted service by
anyone other than a Horizon Hobby authorized service center, (v) Product not
purchased from an authorized Horizon dealer, or (vi) Product not compliant
with applicable technical regulations.
OTHER THAN THE EXPRESS WARRANTY ABOVE, HORIZON MAKES NO
OTHER WARRANTY OR REPRESENTATION, AND HEREBY DISCLAIMS ANY
AND ALL IMPLIED WARRANTIES, INCLUDING, WITHOUT LIMITATION, THE
IMPLIED WARRANTIES OF NON-INFRINGEMENT, MERCHANTABILITY AND
FITNESS FOR A PARTICULAR PURPOSE. THE PURCHASER ACKNOWLEDGES
THAT THEY ALONE HAVE DETERMINED THAT THE PRODUCT WILL SUITABLY
MEET THE REQUIREMENTS OF THE PURCHASER’S INTENDED USE.
Purchaser’s Remedy
Horizon’s sole obligation and purchaser’s sole and exclusive remedy shall be
that Horizon will, at its option, either (i) service, or (ii) replace, any Product
determined by Horizon to be defective. Horizon reserves the right to inspect
any and all Product(s) involved in a warranty claim. Service or replacement
decisions are at the sole discretion of Horizon. Proof of purchase is required
for all warranty claims. SERVICE OR REPLACEMENT AS PROVIDED UNDER
THIS WARRANTY IS THE PURCHASER’S SOLE AND EXCLUSIVE REMEDY.
Limitation of Liability
HORIZON SHALL NOT BE LIABLE FOR SPECIAL, INDIRECT, INCIDENTAL
OR CONSEQUENTIAL DAMAGES, LOSS OF PROFITS OR PRODUCTION
OR COMMERCIAL LOSS IN ANY WAY, REGARDLESS OF WHETHER SUCH
CLAIM IS BASED IN CONTRACT, WARRANTY, TORT, NEGLIGENCE, STRICT
LIABILITY OR ANY OTHER THEORY OF LIABILITY, EVEN IF HORIZON HAS
BEEN ADVISED OF THE POSSIBILITY OF SUCH DAMAGES. Further, in no
event shall the liability of Horizon exceed the individual price of the Product
on which liability is asserted. As Horizon has no control over use, setup, final
assembly, modification or misuse, no liability shall be assumed nor accepted
for any resulting damage or injury. By the act of use, setup or assembly,
the user accepts all resulting liability. If you as the purchaser or user are
not prepared to accept the liability associated with the use of the Product,
purchaser is advised to return the Product immediately in new and unused
condition to the place of purchase.
Law
These terms are governed by Illinois law (without regard to conflict of law
principals). This warranty gives you specific legal rights, and you may also
have other rights which vary from state to state. Horizon reserves the right
to change or modify this warranty at any time without notice.
WARRANTY SERVICES
Questions, Assistance, and Services
Your local hobby store and/or place of purchase cannot provide warranty
support or service. Once assembly, setup or use of the Product has been
started, you must contact your local distributor or Horizon directly. This will
enable Horizon to better answer your questions and service you in the event
that you may need any assistance. For questions or assistance, please visit
our website at www.horizonhobby.com, submit a Product Support Inquiry, or
call 877.504.0233 toll free to speak to a Product Support representative.
Inspection or Services
If this Product needs to be inspected or serviced and is compliant in the
country you live and use the Product in, please use the Horizon Online
Service Request submission process found on our website or call Horizon to
obtain a Return Merchandise Authorization (RMA) number. Pack the Product
securely using a shipping carton. Please note that original boxes may be
included, but are not designed to withstand the rigors of shipping without
additional protection. Ship via a carrier that provides tracking and insurance
for lost or damaged parcels, as Horizon is not responsible for merchandise
until it arrives and is accepted at our facility. An Online Service Request is
available at http://www.horizonhobby.com/content/_service-center_render-
service-center. If you do not have internet access, please contact Horizon
Product Support to obtain a RMA number along with instructions for submit-
ting your product for service. When calling Horizon, you will be asked to pro-
vide your complete name, street address, email address and phone number
where you can be reached during business hours. When sending product
into Horizon, please include your RMA number, a list of the included items,
and a brief summary of the problem. A copy of your original sales receipt
must be included for warranty consideration. Be sure your name, address,
and RMA number are clearly written on the outside of the shipping carton.
NOTICE: Do not ship LiPo batteries to Horizon. If you have any issue with a
LiPo battery, please contact the appropriate Horizon Product Support office.
Warranty Requirements
For Warranty consideration, you must include your original sales
receipt verifying the proof-of-purchase date. Provided warranty
conditions have been met, your Product will be serviced or replaced free
of charge. Service or replacement decisions are at the sole discretion of
Horizon.
Non-Warranty Service
Should your service not be covered by warranty, service will be
completed and payment will be required without notification or esti-
mate of the expense unless the expense exceeds 50% of the retail
purchase cost. By submitting the item for service you are agreeing to pay-
ment of the service without notification. Service estimates are available upon
request. You must include this request with your item submitted for service.
Non-warranty service estimates will be billed a minimum of ½ hour of labor.
In addition you will be billed for return freight. Horizon accepts money orders
and cashier’s checks, as well as Visa, MasterCard, American Express, and
Discover cards. By submitting any item to Horizon for service, you are agree-
ing to Horizon’s Terms and Conditions found on our website http://www.
horizonhobby.com/content/_service-center_render-service-center.
ATTENTION: Horizon service is limited to Product compliant in the
country of use and ownership. If received, a non-compliant Product
will not be serviced. Further, the sender will be responsible for
arranging return shipment of the un-serviced Product, through a
carrier of the sender’s choice and at the sender’s expense. Horizon
will hold non-compliant Product for a period of 60 days from notifi-
cation, after which it will be discarded.

13
EN
Country of
Purchase
Horizon Hobby Address Phone Number/Email Address
United States of
America
Horizon Service Center
(Electronics and engines)
4105 Fieldstone Rd
Champaign, Illinois
61822 USA
877-504-0233
Online Repair Request: visit www.horizon-
hobby.com/service
Horizon Product Support (All
other products)
4105 Fieldstone Rd
Champaign, Illinois
61822 USA
877-504-0233
productsupport@horizonhobby.com
United Kingdom Horizon Hobby Limited
Units 1-4 Ployters Rd
Staple Tye
Harlow, Essex
CM18 7NS
United Kingdom
+44 (0) 1279 641 097
sales@horizonhobby.co.uk
Germany Horizon Technischer Service
Christian-Junge-Straße 1
25337 Elmshorn
Germany
+49 (0) 4121 2655 100
service@horizonhobby.de
France Horizon Hobby SAS
Horizon Hobby SAS
11 Rue Georges Charpak
77127 Lieusaint, France
+33 (0) 1 60 18 34 90
infofrance@horizonhobby.com
China Horizon Hobby – China
Room 506, No. 97 Changshou Rd. Shanghai,
China 200060
+86 (021) 5180 9868
info@horizonhobby.com.cn
Warranty and Service Contact Information
Customer Service Information
Country of
Purchase
Horizon Hobby Address Phone Number/Email Address
United States of
America
Sales
4105 Fieldstone Rd
Champaign, Illinois
61822 USA
(800) 338-4639
sales@horizonhobby.com
United Kingdom Horizon Hobby Limited
Units 1-4 Ployters Rd
Staple Tye
Harlow, Essex
CM18 7NS
United Kingdom
+44 (0) 1279 641 097
sales@horizonhobby.co.uk
Germany Horizon Hobby GmbH
Christian-Junge-Straße 1
25337 Elmshorn
Germany
+49 (0) 4121 2655 100
service@horizonhobby.de
France Horizon Hobby SAS
Horizon Hobby SAS
11 Rue Georges Charpak
77127 Lieusaint, France
+33 (0) 1 60 18 34 90
infofrance@horizonhobby.com
China Horizon Hobby – China
Room 506, No. 97 Changshou Rd. Shanghai,
China 200060
+86 (021) 5180 9868
info@horizonhobby.com.cn

14
EN
Declaration of Conformity
(in accordance with ISO/IEC 17050-1)
No. HH2012112202
Product(s): BLH CX4 RTF
Item Number(s): BLH2100EU1
BLH2100EU2
BLH2100UK1
BLH2100UK2
Equipment class: 1
The object of declaration described above is in conformity with the requirements of the specifi cations listed below, following the provisions of the
European R&TTE directive 1999/5/EC, EMC Directive 2004/108/EC and LVD Directive 2006/95/EC:
EN 300-328 V1.7.1: 2006
EN 301 489-1 V1.7.1: 2006
EN 301 489-17 V1.3.2: 2008
EN60950-1:2006+A11:2009+A1:2010+A12: 2011
EN61000-3-2:2006+A1:2009+A2:2009
EN61000-3-3:2008
EN55022:2010 + AC:2011
EN55024:2010
Signed for and on behalf of:
Horizon Hobby, Inc.
Champaign, IL USA
Nov 22, 2012
Steven A. Hall
Executive VP – Chief Operating Offi cer
International Operations and Risk Management
Horizon Hobby, Inc.
Instructions for disposal of WEEE by users in the European Union
This product must not be disposed of with other waste. Instead, it is the user’s responsibility to dispose of their waste equipment by handing
it over to a designated collections point for the recycling of waste electrical and electronic equipment. The separate collection and recycling
of your waste equipment at the time of disposal will help to conserve natural resources and make sure that it is recycled in a manner that
protects human health and the environment. For more information about where you can drop off your waste equipment for recycling, please
contact your local city offi ce, your household waste disposal service or where you purchased the product.
Compliance Information for the European Union
FCC Information
This device complies with part 15 of the FCC rules. Operation is subject to the following two conditions: (1) This device may not cause harmful
interference, and (2) this device must accept any interference received, including interference that may cause undesired operation.
CAUTION: Changes or modifi cations not expressly approved by the party responsible for compliance could void the user’s authority to operate
the equipment.
This product contains a radio transmitter with wireless technology which has been tested and found to be compliant with the applicable regulations
governing a radio transmitter in the 2.400GHz to 2.4835GHz frequency range.

15
DE
WARNUNG: Lesen Sie die GESAMTE Bedienungsanleitung, um sich vor dem Betrieb mit den Produktfunktionen vertraut zu machen. Wird das Produkt nicht korrekt betrieben, kann
dies zu Schäden am Produkt oder persönlichem Eigentum führen oder schwere Verletzungen verursachen.
Dies ist ein hochentwickeltes Hobby-Produkt. Es muss mit Vorsicht und gesundem Menschenverstand betrieben werden und benötigt gewisse mechanische Grundfähigkeiten. Wird dieses
Produkt nicht auf eine sichere und verantwortungsvolle Weise betrieben, kann dies zu Verletzungen oder Schäden am Produkt oder anderen Sachwerten führen. Dieses Produkt eignet sich
nicht für die Verwendung durch Kinder ohne direkte Überwachung eines Erwachsenen. Verwenden Sie das Produkt nicht mit inkompatiblen Komponenten oder verändern / gebrauchen es
ausserhalb der Anweisungen von Horizon Hobby. Diese Bedienungsanleitung enthält Anweisungen für Sicherheit, Betrieb und Wartung. Es ist unbedingt notwendig, vor Zusammenbau,
Einrichtung oder Verwendung alle Anweisungen und Warnhinweise im Handbuch zu lesen und zu befolgen, damit es bestimmungsgemäß betrieben werden kann und Schäden oder
schwere Verletzungen vermieden werden.
Die folgenden Begriffe werden in der gesamten Produktliteratur verwendet, um auf unterschiedlich hohe Gefahrenrisiken beim Betrieb dieses Produkts
hinzuweisen:
HINWEIS: Wenn diese Verfahren nicht korrekt befolgt werden, können sich möglicherweise Sachschäden UND geringe oder keine Gefahr von Verlet-
zungen ergeben.
ACHTUNG: Wenn diese Verfahren nicht korrekt befolgt werden, ergeben sich wahrscheinlich Sachschäden UND die Gefahr von schweren Verlet-
zungen.
WARNUNG: Wenn diese Verfahren nicht korrekt befolgt werden, ergeben sich wahrscheinlich Sachschäden, Kollateralschäden und schwere Verlet-
zungen ODER mit hoher Wahrscheinlichkeit oberfl ächliche Verletzungen.
• Halten Sie stets in allen Richtungen einen Sicherheitsabstand um Ihr
Modell, um Zusammenstöße oder Verletzungen zu vermeiden. Dieses
Modell wird von einem Funksignal gesteuert, das Interferenzen von
vielen Quellen außerhalb Ihres Einfl ussbereiches unterliegt. Diese In-
terferenzen können einen augenblicklichen Steuerungsverlust verursa-
chen.
• Betreiben Sie Ihr Modell immer auf einer Freifl äche ohne Fahrzeuge in
voller Größe, Verkehr oder Menschen.
• Befolgen Sie stets sorgfältig die Anweisungen und Warnhinweise für
das Modell und jegliche optionalen Hilfsgeräte (Ladegeräte, Akkupacks
usw.).
• Bewahren Sie alle Chemikalien, Klein- und Elektroteile stets außerhalb
der Reichweite von Kindern auf.
• Setzen Sie Geräte, die für diesen Zweck nicht speziell ausgelegt und
geschützt sind, niemals Wasser aus. Feuchtigkeit kann die Elektronik
beschädigen.
• Stecken Sie keinen Teil des Modells in den Mund, da dies zu schweren
Verletzungen oder sogar zum Tod führen kann.
• Betreiben Sie Ihr Modell nie mit fast leeren Senderakkus.
• Halten Sie das Fluggerät immer in Sicht und unter Kontrolle.
• Gehen Sie sofort auf Motor Aus bei Rotorberührung.
• Verwenden Sie immer vollständig geladene Akkus.
• Lassen Sie immer den Sender eingeschaltet wenn das Fluggerät einge-
schaltet ist.
• Nehmen Sie vor der Demontage des Fluggerätes die Akkus heraus.
• Halten Sie bewegliche Teile immer sauber.
• Halten Sie die Teile immer trocken.
• Lassen Sie Teile immer erst abkühlen bevor Sie sie anfassen.
• Nehmen Sie die Akkus/Batterien nach Gebrauch heraus.
• Betreiben Sie Ihr Fluggerät niemals mit beschädigter Verkabelung.
• Fassen Sie niemals bewegte Teile an.
HINWEIS
Alle Anweisungen, Garantien und anderen zugehörigen Dokumente können im eigenen Ermessen von Horizon Hobby, Inc. jederzeit geändert werden.
Die aktuelle Produktliteratur fi nden Sie auf horizonhobby.com unter der Registerkarte „Support“ für das betreffende Produkt.
Spezielle Bedeutungen
Zusätzliche Sicherheitsvorkehrungen und Warnhinweise
Nicht geeignet für Kinder unter 14 Jahren. Dies ist kein Spielzeug.

16
DE
D
er Blade CX4 steht mit vielen neuen Features die das Fliegen noch besser und einfacher machen für eine neue Era der Koaxialhubschrauber. Mit seiner
handlichen Größe ist er einfach zu kontrollieren und perfekt für den Einstieg in das Hobby. Die gummierten Hauptrotorblätter sind in Gelenken gelagert
und minimieren mit dem Gummi gedämpften Kufengestell effektiv mögliche Beschädigungen auch bei härteren Landungen. Der Blade CX4 ist mit einem LED
Landescheinwerfer und blinkender Positionsleuchte am Heck ausgestattet, die Nachtfl üge im Garten oder Haus zum echten Erlebnis werden lassen. Der große
3S 800mAh LiPo Akku bietet ausreichend Kapazität für lange Flüge und der DSM2 5-Kanal Sender mit dem Spektrum AR6100 Empfänger lässt viele CX4 Hub-
schrauber gleichzeitig fl iegen ohne das die Gefahr von Störungen besteht. Diese Bedienungsanleitung enthält wichtige Informationen die Sie für einen sicheren
und erfolgreichen Betreib des Hubschraubers benötigen. Bitte nehmen Sie sich die Zeit diese gründlich zu lesen bevor Sie den Akku anstecken und fl iegen.
Lieferumfang
Blade CX4 Hubschrauber
800mAh 3S 11.1V 30C Li-Po Akku
E-fl ite LP5DSM Sender
3-Cell 11.1V Li-Po Balance Ladegerät
12-volt Netzteil
Bedienungsanleitung
AA Alkaline Sender Batterien (4)
RTF | Ready-To-Fly
Länge
500mm
Höhe
250mm
Hauptrotordurchmesser
460mm
Gesamtgewicht
414 g
Blade CX4 Spezifi kationen
Blade CX4 Features RTF
Rumpf – Blade CX4 Inklusive
Hauptmotoren – 370 Bürstenmotoren Inklusive
On-board-Elektronik – 3-in-1 Mischer/ESC/Gyro Inklusive
Empfänger – AR6100E Inklusive
Servos – DS75 Inklusive
Akku – 800mAh 3S 11,1Volt 30C LiPo Inklusive
Ladegerät – 3S 11,1 Volt DC LiPo Ladegerät mit Krokodilklemme Inklusive
Sender – LP5DSM Sender Inklusive
Besuchen Sie bladehelis.com und registrieren ihr Produkt online
Inhaltsverzeichnis
Warnungen zum Laden .......................................................................... 17
Laden des Flugakkus ............................................................................. 17
Der Ladevorgang ................................................................................... 18
LED Akku Ladecodes .............................................................................. 18
Senderkontrollen .................................................................................... 18
Einsetzen des Flugakkus ........................................................................ 19
Schutz des Flugakkus ............................................................................. 19
Binden von Sender und Empfänger ......................................................... 19
Flugkontrollen ........................................................................................ 20
Abheben zum Erstfl ug ............................................................................ 21
Einstellungen ......................................................................................... 21
Proportional- Trimmerpoti für Hauptrotor .................................................. 22
Einstellung Gyro Gain Verstärkung .......................................................... 22
Nach dem Fliegen .................................................................................. 22
So werden Sie ein erfolgreicher Pilot ....................................................... 23
Leitfaden zur Problemlösung ................................................................... 23
Explosionszeichnung und Teileliste .......................................................... 24
Garantie ................................................................................................ 25
Garantie und Serviceinformationen .......................................................... 26
Rechtliche Informationen für die Europäische Union ................................. 26

17
DE
Das im Lieferumfang des Hubschraubers enthaltene Ladegerät wurde für
das sichere Laden des enthaltenen LiPo Flugakkus entwickelt.
ACHTUNG: Alle Anweisungen und Warnungen müssen exakt befolgt
werden. Falscher Umgang mit LiPo Akkus kann zu Feuer, Körper-
verletzung und/oder Sachbeschädigung führen.
• Durch Handhaben, Aufl aden oder Verwenden des inbegriffenen Li-Po-
Akkus übernehmen Sie alle mit Lithiumakkus verbundenen Risiken.
• Sollte der Akku beim Laden oder im Flug
beginnen, sich auszudehnen oder anzuschwellen stoppen Sie den
Ladevorgang oder den Flug unverzüglich. Wird mit dem Aufl aden oder
Entladen eines Akkus fortgefahren, der sich auszudehnen oder anzus-
chwellen begonnen hat, kann dieses zu einem Brand führen.
• Um beste Ergebnisse zu erzielen, lagern Sie den Akku bei Raumtem-
peratur an einem trockenen Ort.
• Beim Transport oder vorübergehenden Lagern des Akkus sollte der
Temperaturbereich zwischen 5° C und 49° C liegen. Bewahren Sie
den Akku bzwdas Modell nicht im Auto oder unter direkter Sonnenein-
strahlung auf. Bei Aufbewahrung in einem heißen Auto, kann der Akku
beschädigt werden oder sogar Feuer fangen.
• Laden Sie immer Li Po Akkus weit weg entfernt von brennbaren
Materialien.
• Überprüfen Sie immer den Akku vor dem Laden und laden Sie niemals
defekte oder beschädigte Akkus.
• Trennen Sie immer den Akku nach dem Laden und lassen das Lade-
gerät abkühlen.
• Verwenden Sie ausschließlich ein Ladegerät das speziell für das Laden
von LiPo Akku geeignet ist. Das Laden mit einem nicht geeignetem
Ladegerät kann Feuer und/oder Sachbeschädigung zur Folge habe.
• VERWENDEN SIE NUR EIN SPEZIELL GEEIGNETES LI-PO LADEGERÄT UM
LI-PO AKKUS ZU LADEN. Laden Sie den Akku mit einem nicht gee-
igneten Ladegerät kann dieses zu Feuer, Personen- und Sachschäden
führen.
• Entladen Sie niemals ein LiPo Akku unter 3V pro Zelle unter Last.
• Verdecken Sie niemals Warnhinweise mit Klettband.
• Lassen Sie niemals Akkus während des Ladens unbeaufsichtigt.
• Laden Sie niemals beschädigte Akkus.
• Versuchen Sie nicht das Ladegerät zu demontieren oder zu verändern.
• Erlauben Sie niemals Kinder unter 14 Jahren Akkus zu laden.
• Laden Sie niemals Akkus an extrem kalten oder heißen Plätzen (emp-
fohlener Temperaturbereich 5 - 49° C ) oder im direkten Sonnenlicht.
Warnhinweise und Vorgaben zum Akku
Laden des Flugakkus
Der Blade CX4 wird mit einem DC-Balancer-Ladegerät und einem 3 S
LiPo-Akku geliefert. Verwenden Sie nur von Horizon Hobby zugelassene Ak-
kupacks und Ladegeräte, die mit diesem Produkt kompatibel sind. Lassen
Sie den Akku und das Ladegeräts während des Ladevorgangs nicht unbe-
aufsichtigt. Ein Missachtung der Anweisungen kann zu Feuerentwicklung
führen. Vergewissern Sie sich, dass sich der Akku während des Aufl adens
auf einer hitzebeständigen Oberfl äche befi ndet. Laden Sie den Flugakku
auf, bevor Sie das Fluggerät binden bzw. Kontrolltests durchführen.
DC-LiPo-Balancer-Ladegerät - Daten
• Lädt 3-Zellen-Lithium-Polymer-Akkupacks
• Ladestrom 0,8 A
• LED-Ladestatusanzeige
• LED-Zellenausgleichs-Anzeige
• 12-V-Krokodilklemmen-Einspeisungskabel
Spezifi kationen
• Eingangsleistung: mind. 1,5 A bei 11,5 bis 15 V DC
800mAh 3S 11.1V 30C LiPo Akku (EFLB8003SJ30)
Der Blade CX4 3S LiPo-Akkupack weist einen Ausgleichsleiter auf, der ein sicheres Laden Ihres Akkupacks mit dem im Lieferumfang enthaltenen Blade
CX4 LiPo-Balancer-Ladegerät gewährleistet. Der im Lieferumfang enthaltene Flugakku kann bedenkenlos bis zu 3 C geladen werden.
ACHTUNG: Bevor Sie mit dem Ladevorgang beginnen, muss der Balance-Stecker mit dem richtigen Anschluss Ihres Ladegeräts verbunden sein.

18
DE
Laden des Akkus
1. Laden Sie nur kühle und einwandfreie Akkus auf. Prüfen Sie den Akku, um sicherzustellen, dass er nicht beschädigt ist, z. B. ob angeschwollen,
verbogen, gebrochen oder punktiert.
2. Schließen Sie das Ladegerät an eine 12-V-Stromquelle an. Achten Sie dabei auf die Polarität.
3. Die rote LED blinkt.
4. Schließen Sie die Ausgleichsleitung des Akkus an das Ladegerät an. Der Balance-Stecker verhindert eine Polaritätsumkehr.
5. Die grüne und rote LED leuchten wenn der Akku geladen wird.
6. Der Ladevorgang ist beendet wenn die rote LED leuchtet und die grüne LED aus ist.
7. Entnehmen Sie den Akku immer sofort nach abgeschlossenem Ladevorgang aus dem Ladegerät.
ACHTUNG: Verwenden Sie nur ein Ladegerät, das speziell für das Aufl aden von LiPo-Akkus konzipiert wurde. Andernfalls könnte es zu Feuer und
infolge zu Verletzungen oder Sachschäden kommen.
ACHTUNG: Überschreiten Sie den empfohlenen Ladestrom nicht.
LED Akku Ladecodes
Rote LED Grüne LED Erklärung
Blinkt Aus Ladegerät ist eingeschaltet. LiPo Akku ist nicht angeschlossen
Leuchtet Leuchtet LiPo Akku ist angeschlossen und lädt
Leuchtet Aus LiPo Akku ist angeschlossen und Ladevorgang durchgeführt
Blinkt Blinkt Fehler
Senderkontrollen
Setzen Sie die 4 im Lieferumfang enthaltenen AA Batterien in den Sender ein. Prüfen Sie den Batteriezustand und Senderbetrieb durch Einschalten
des Senders mit dem Ein/Aus Schalter nach oben. Die LCD Anzeige auf der Oberseite des Senders zeigt den Batteriezustand an. Sollte zu irgendeinem
Zeitpunkt die Spannung unter 4,5 Volt oder darunter fallen ertönt ein Alarm und es ist notwendig die Batterien zu wechseln.
ON
12345678910
Trainerschalter Kanal 5 Knopf
LCD Monitor
Höhenruder (rauf/runter)
Querruder (rechts /links)
Höhenrudertrimmung
Querrudertrimmung
Lautsprecher
Gas (rauf/runter)
Seitenruder (rechts/links)
Gastrimmung
Seitenrudertrimmung
Ein/Aus Schalter
Einschaltkontroll- LED
Ladebuchse
Schalterpostionen

19
DE
Entladeschutz des Flugakkus
Die Hauptlatine des Hubschrauber ist mit einer Schutzschaltung für den Flugakku ausgerüstet. Diese Niederspannungsabschaltung (LVC) sorgt dafür,
dass der Akku im sicheren Rahmen entladen wird. Stellen Sie während des Fliegens fest, dass die Leistung sinkt landen Sie bitte den Hubschrauber.
Die Niederspannungsabschaltung ist aktiv wenn die rote LED auf der Platine später im Flug wieder zu blinken beginnt.
ACHTUNG: Setzen Sie den Flug mit aktivierter Niederspanungsabschaltung nicht fort da sonst der Flugakku beschädigt werden kann.
1. Senken Sie den Gasgeber auf die niedrigste Einstellung.
2. Schalten Sie den Sender ein.
3. Legen Sie den Akku in den Helikopter ein, indem Sie ihn in die Akkuhalterung (Akkufach) unterhalb des Hauptzahnrads schieben. Achten Sie dabei
darauf, dass die Beschriftung des Akkus nach unten zeigt und der Stecker zum hinteren Teil des Helikopters weist.
4. Schließen Sie das Akkukabel an das 4-in-1-Steuergerät an.
HINWEIS: Der Helikopter darf sich erst bewegen, wenn die blaue LED am 4-in-1-Steuergerät kontinuierlich leuchtet.
ACHTUNG: Trennen Sie den Li-Po-Akku stets vom ESC, wenn der Helikopter nicht fl iegt, damit der Akkunicht zu stark entladen wird. Akkus,
die unter die angegebene Mindestspannung tiefentladen werden, können beschädigt werden; Leistungseinbußen und Brandgefahr beim
Laden sind die Folge.
Einlegen des Flugakkus
1
2
4
3
Binden von Sender und Empfänger
Der Blade CX4 verwendet die Spektrum 2,4 Ghz Technologie und wird bereits an den Sender gebunden geliefert. Bei dem Bindevorgang wird vom
Sender an den Empfänger der einzigartige senderspezifi sche Code übermittelt, so dass der Empfänger nur auf diesen Sender reagiert. Es sollte nicht
notwendig sein den Sender und Empfänger vor Benutzung erneut zu binden. Sollte dieses aber mal der Fall sein folgen Sie bitte den untenstehenden
Schritten.
Immer wenn Sie den Sender einschalten ist für kurze Zeit der Bindemode aktiviert. Dieses ist an der blinkenden roten LED unter der linken blinkenden
roten LED unter der linken Frontklappe zu erkennen. Beginnt diese LED zu leuchten befi ndet sich der Sender nicht mehr in Bindemode.
9
Der Bindevorgang
1. Trennen Sie den Flugakku vom Hubschrauber.
2. Schalten Sie den Sender aus.
3. Stecken Sie den Bindestecker in den Empfänger.
4. Schließen Sie den Flugakku am Hubschrauber an. Die Empfänger LED beginnt nach
5 Sekunden schnell zu blinken.
5. Bringen Sie den Gashebel auf die niedrigste Postion und schalten dann den Sender
ein.
6. Der Hubschrauber ist gebunden wenn die LED leuchtet.
7. Trennen Sie den Flugakku, schalten den Sender aus und entfernen den Bindestecker
vom Empfänger.

20
DE
Flugkontrollen
Für eine präzise Kontrolle der Blade CX4, steuern Sie mit den Steuerknüppeln immer nur kleine Bewegungen. Die Steuerrichtungen sind so beschrieben als
wenn Sie im Hubschrauber sitzen. Zum Beispiel: zeigt die Nase des Hubschraubers zu Ihnen, lässt die Steuereingabe Seitenruder links die Nase des Hub-
schraubers gegen den Uhrzeigersinn nach rechts drehen.
•Steigen und sinken: Fliegt ihr Hubschrauber stabil bewegen Sie vorsichtig den Gassteuerknüppel nach vorne oder hinten um den Hubschrauber steigen
oder sinken zu lassen.
•Linkes oder rechtes drehen: Haben Sie sich mit der Steuerung der Flughöhe vertraut gemacht, drehen Sie mit dem Seitenruderknüppel den Hubschrauber
in die gewünschte Richtung (Gieren). Zusätzlich können Sie bei dem Drehen das Querruder (die Rollfunktion) mit steuern, das koordiniertes Drehen er-
möglich oder das seitwärst fl iegen.
•Vorwärts und Rückwärts fl iegen: Bewegen Sie vorsichtig den Höhenruderknüppel (Nicken) um den Hubschrauber vorwärts und rückwärts fl iegen.
Gas (von links betrachtet)
Sinken
Gas nach unten
Gas nach oben
Mode 1
Mode 2
Steigen
Seitenruder (von oben betrachtet)
Höhenruder/Nicken (von links betrachtet)
Querruder / Roll (von hinten betrachtet)
Mode 1
Mode 1
Mode 1
Mode 2
Mode 2
Mode 2
Seitenruder links
Seitenruder rechts
Nase dreht rechts
Vorwärts
Höhenruder
nach vorne
von hinten betrachtet
Höhenruder
nach hinten
Querruder links
links
Querruder rechts
rechts
Nase dreht links
Rückwärts
von hinten betrachtet
von hinten betrachtetvon hinten betrachtet
La pagina si sta caricando...
La pagina si sta caricando...
La pagina si sta caricando...
La pagina si sta caricando...
La pagina si sta caricando...
La pagina si sta caricando...
La pagina si sta caricando...
La pagina si sta caricando...
La pagina si sta caricando...
La pagina si sta caricando...
La pagina si sta caricando...
La pagina si sta caricando...
La pagina si sta caricando...
La pagina si sta caricando...
La pagina si sta caricando...
La pagina si sta caricando...
La pagina si sta caricando...
La pagina si sta caricando...
La pagina si sta caricando...
La pagina si sta caricando...
La pagina si sta caricando...
La pagina si sta caricando...
La pagina si sta caricando...
La pagina si sta caricando...
La pagina si sta caricando...
La pagina si sta caricando...
La pagina si sta caricando...
La pagina si sta caricando...
La pagina si sta caricando...
La pagina si sta caricando...
La pagina si sta caricando...
La pagina si sta caricando...
-
 1
1
-
 2
2
-
 3
3
-
 4
4
-
 5
5
-
 6
6
-
 7
7
-
 8
8
-
 9
9
-
 10
10
-
 11
11
-
 12
12
-
 13
13
-
 14
14
-
 15
15
-
 16
16
-
 17
17
-
 18
18
-
 19
19
-
 20
20
-
 21
21
-
 22
22
-
 23
23
-
 24
24
-
 25
25
-
 26
26
-
 27
27
-
 28
28
-
 29
29
-
 30
30
-
 31
31
-
 32
32
-
 33
33
-
 34
34
-
 35
35
-
 36
36
-
 37
37
-
 38
38
-
 39
39
-
 40
40
-
 41
41
-
 42
42
-
 43
43
-
 44
44
-
 45
45
-
 46
46
-
 47
47
-
 48
48
-
 49
49
-
 50
50
-
 51
51
-
 52
52


Blade Blade CX4 Manuale utente
- Categoria
- Giocattoli telecomandati
- Tipo
- Manuale utente
- Questo manuale è adatto anche per
in altre lingue
- English: Blade Blade CX4 User manual
- français: Blade Blade CX4 Manuel utilisateur
- Deutsch: Blade Blade CX4 Benutzerhandbuch
Documenti correlati
-
Blade BLH1301 Manuale del proprietario
-
-
Blade 360 CFX 3S Manuale utente
-
-
-
-
-
BNF mCP X BL BNF Manuale utente
-
-
Altri documenti
-
E-flite EFLC3110 Manuale utente
-
-
-
ParkZone PKZ1040 Manuale del proprietario
-
-
Carson Race Rebel Manuale del proprietario
-
BeeWi BBZ301 Guida utente
-
-
-