
FRANÇAIS ENGLISH
Instructions traduites de l’italien Instructions translated from Italian
Warnings
■ Before beginning installation, check that
the product is suitable for use, paying par-
ticular attention to the data in the “Technical
characteristics” chapter. ■ NICE declines all
liability for damage resulting from improper
use of the product and other than as spe-
cied in this manual. ■ Packaging materials
must be disposed of in compliance with local
regulations. ■ Do not place the transmit-
ter near heat sources or expose it to open
ames; this could damage the device and
cause malfunctions or other dangers. ■
The batteries, even when drained, could con-
tain poisonous substances so should not be
thrown away as general waste but disposed
of in compliance with local regulations regar-
ding batteries.
Description and intended use
These transmitters are part by Nice Home au-
tomation system and are designed to control
systems produced using products from the
same line, for residential use.
– Any use other than that specied
herein or in environmental conditions
other than those stated in this manual is
to be considered improper and is strictly
forbidden.
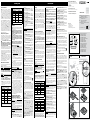
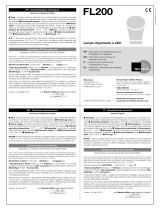
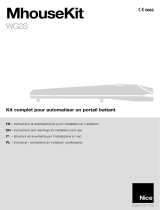
The transmitter features 5 keys that can be
used to send 5 types of command to one
single automation or to control up to 5 auto-
mations or radio receivers. The sending of the
command is conrmed when the LED lights
up (LED L1 - g. 1).
Functionality of the innovative 5th key (T5 -
g. 1) depends on the control unit or radio
receiver with which it is paired: for example,
with the FILO400C/FILO600C product this
key is used to program the “Presence” fun-
ction; see the relevant instruction manual.
Memorising the transmitter
There are two ways to memorise the new
transmitter:
• Mode 1: all transmitter keys are memorised
simultaneously, automatically paired with
the commands shown in Table 1.
A transmitter memorised in Mode 1 can
control only one automation.
• Mode 2: this procedure is used to memo-
rise one key at a time, pairing it with the
command of your choosing as cited in
Table 2.
A transmitter memorised in Mode 2 can
control several automations (for exam-
ple: automation 1 controlled by key 1; auto-
mation 2 controlled by key 2; and so on ...)
Table 1
Transmitter function in Mode 1
ECCO5... transmitter Command
Control unit Radio receiver
Key 1 Step-by-step Output 1 activation
Key 2 Partial open Output 2 activation
Key 3 Only opens Output 3 activation
Key 4 Only closes Output 4 activation
Key 5 Auxiliary
function
Not present
Note: Functionality of the 5th key (T5 - g. 1) depends on
the control unit or radio receiver with which it is paired; con-
sult the product instruction manual.
Table 2
Transmitter function in Mode 2
ECCO5... transmitter Command
Control unit Radio receiver
Command 1 Step-by-step Output 1 activation
Command 2 Partial open Output 2 activation
Command 3 Only opens Output 3 activation
Command 4 Only closes Output 4 activation
Note: the T5 key is not suitable for memorisation in Mode 2.
Transmitter memorisation process
The memorisation process depends on
the related control unit or radio receiver.
To make the processes easier to read,
the keys of the transmitters and control
Recommandations
■ Avant de commencer l’installation,
vérier si le produit est approprié pour l’u-
sage, avec une attention particulière pour
les données contenues dans le chapitre
« caractéristiques techniques ». ■ NICE
ne répond pas des dommages résultant
d’une utilisation impropre des produits,
différente de ce qui est prévu dans cette
notice. ■ Les matériaux de l’emballage doi-
vent être mis au rebut conformément aux
normes locales. ■ Ne pas conserver l’ém-
etteur à proximité de sources de chaleur
ni l’exposer à des ammes; ces actions
peuvent l’endommager et être la cause de
problèmes de fonctionnement, incendie ou
situations dangereuses. ■
Les piles,
y compris les piles usagées, pourraient
contenir des substances polluantes et ne
doivent donc pas être jetées avec les or-
dures ménagères. Il faut les éliminer selon
les méthodes prévues pour les piles par les
réglementations locales.
Description et application
Ces émetteurs font partie du système
d’automatisme de la gamme Nice Home et
sont dédiés au commande des installations
réalisées avec des produits de la même
gamme et pour usage résidentiel.
– Toute utilisation autre que celle
décrite et dans des conditions am-
biantes différentes de celles indiquées
dans cette notice doit être considérée
comme impropre et interdite.
L’émetteur dispose de 5 touches qui peu-
vent être utilisées pour envoyer 5 types de
commande à un seul automatisme ou pour
commander jusqu’à 5 automatismes ou
récepteurs audio. L’envoi de la commande
est conrmé par l’allumage de la led prés-
ente (led L1 - g. 1).
La fonction de la 5ème touche novatrice
(T5 - g. 1), dépend de la logique de
commande ou du récepteur radio auquel
il est adapté: par exemple, avec le produit
FILO400C/FILO600C cette touche sert à
programmer la fonction «Présence». Voir
la notice correspondante.
Mémorisation de l’émetteur
Deux modes sont disponibles pour mém-
oriser le nouvel émetteur:
• Mode 1: toutes les touches de l’émett-
eur sont mémorisées simultanément, en
les associant automatiquement aux com-
mandes indiquées dans le Tableau 1.
Un émetteur mémorisé en Mode 1
peut commander un seul automati-
sme.
• Mode 2: une seule touche à la fois est
mémorisée avec cette procédure, en as-
sociant au choix l’une des commandes
indiquées dans le Tableau 2.
Un émetteur mémorisé en Mode 2
peut commander plusieurs automa-
tismes (par exemple : automatisme 1
commandée par la touche 1, automa-
tisme 2 commandée par la touche 2 et
ainsi de suite...)
Tableau 1
Fonction de l’émetteur en Mode 1
Émetteur ECCO5... Commande
Logique Récepteur radio
Touche 1 Pas-à-pas Activation sortie 1
Touche 2 Ouverture
partielle
Activation sortie 2
Touche 3 Ouverture
seule
Activation sortie 3
Touche 4 Fermeture
seule
Activation sortie 4
Touche 5 Fonction
auxiliaire
Pas disponible
Remarque: Le fonctionnement de la touche 5 (T5-g.
1), dépend de la logique de commande ou du récepteur
radio auquel elle est associée. Consulter les notices des
produits.
units have been assigned initials:
- transmitter = keys T1, T2, T3, T4, T5 and
LED L1 (g.1)
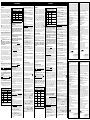
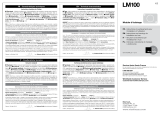
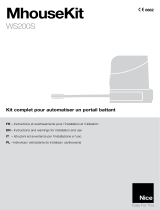
- control units = key P1 and LED L1 for
control unit CL201/2/3/4/5 (g.2) or key
P4 and LED L4 for control unit CL101
(g. 2)
Before carrying out the memorisation
procedures, we recommend you read
them and respect the indicated times.
Memorisation in Mode 1
01. On the central unit press and hold
down the P1 or P4 key (depending on
the control unit) for at least 3 seconds;
when the L1 or L4 LED (depending on
the control unit) lights up, release the key.
02. Within 10 seconds of releasing it, press
and hold down any key on the transmitter
to be memorised for at least 3 seconds.
If the memorisation process is successful,
the L1 or L4 LED (depending on the con-
trol unit) will ash 3 times.
03. To memorise other transmitters, repeat
step 02 within 10 seconds, otherwise the
memorisation phase will end automati-
cally.
Memorisation in Mode 2
• On the Control units and radio receivers
(refer to Table 2)
01. In Table 2, select the command.
02. On the control unit, press and release
key P1 or P4 (depending on the control
unit) the correct number of times for the
command selected (Table 2 - e.g. 3 times
for the “Only Opens” command); the L1
or L4 LED (depending on the control unit)
should ash quickly the same number of
times as the command selected.
03. Within 10 seconds, press and hold down
the transmitter key to be memorised for
at least 2 seconds: if the memorisation
process is successful, the L1 or L4 LED
(depending on the control unit) will ash 3
times.
04. To memorise other transmitters with the
same command type, repeat step 03 wi-
thin 10 seconds; otherwise, the memori-
sation phase will end automatically.
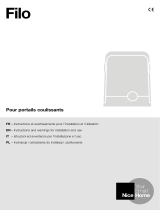
Memorisation process with two
transmitters in proximity to the
control unit
This procedure is used to memorise a NEW
transmitter using a second transmitter (OLD)
that is already memorised and operative,
without using the keys on the control unit,
but by simply positioning it in proximity to
the latter.
During the process, the NEW transmitter is
memorised just as the OLD transmitter was
memorised (Mode 1 or Mode 2).
• Procedure for OLD transmitter memorised
in Mode 1:
01. Position the two transmitters in proxi-
mity to the control unit: wait 1 second
between one step and the next.
02. On the NEW transmitter press and hold
down any key for at least 8 seconds and
then release it.
03. On the OLD transmitter press and hold
down any key to be copied for at least 2
seconds and then release it.
04. On the OLD transmitter press and hold
down any key to be copied for at least 2
seconds and then release it.
05. On the OLD transmitter press and hold
down any key to be copied for at least 2
seconds and then release it.
06. On the NEW transmitter press and hold
down any key to be memorised for at le-
ast 5 seconds and then release it.
Repeat the process for every transmitter to
be memorised.
• Procedure for OLD transmitter memorised
in Mode 2:
01. Position the two transmitters in proxi-
mity to the control unit: wait 1 second
between one step and the next.
Tableau 2
Fonction de l’émetteur en Mode 2
Émetteur ECCO5... Commande
Logique Récepteur radio
Commande 1 Pas-à-pas Activation sortie 1
Commande 2 Ouverture
partielle
Activation sortie 2
Commande 3 Ouverture
seule
Activation sortie 3
Commande 4 Fermeture
seule
Activation sortie 4
Remarqua: la touche T5 n’est pas adaptée pour la mém-
orisation en Mode 2.
Procédures de mémorisation de
l’émetteur
Les procédures de mémorisation dépend-
ent de la logique de commande ou du récept-
eur radio associé.
Pour faciliter la lecture des procédures,
des sigles ont été assignés aux touches de
l’émetteur et des logiques de commande:
- émetteur = touches T1, T2, T3, T4, T5
et led L1 (g.1)
- logiques de commande = touche P1
et led L1 pour la logique de commande
CL201/2/3/4/5 (g. 2) ou sur la touche P4
et led L4 pour la logique de commande
CL101 (g. 2)
Avant d’effectuer les procédures de
mémorisation, nous conseillons de les
lire et de respecter les délais indiqués.
Mémorisation en Mode 1
01. Sur la logique de commande, appuyer
et maintenir enfoncée la touche P1 ou P4
(cela dépend de la logique de commande)
pendant au moins 3 secondes. Quand la
led L1 ou L4 (cela dépend de la logique de
commande) s’allume, relâcher la touche.
02. Dans les 10 secondes qui suivent le
relâchement, appuyer et maintenir en-
foncée pendant au moins 3 secondes
n’importe quelle touche de l’émetteur à
mémoriser.
Si la mémorisation a été effectuée cor-
rectement, la led L1 ou L4 (cela dépend
de la logique de commande) émettra 3
clignotements.
03. Pour mémoriser d’autres émetteurs,
répéter l’étape 02 dans les 10 secondes
qui suivent, sinon la phase de mémoris-
ation se terminera automatiquement.
Mémorisation en Mode 2
• Sur les logiques de commande et récep-
teurs radio (référence au Tableau 2)
01. Dans le Tableau 2, choisir la commande.
02. Sur la logique de commande, appuyer
et maintenir enfoncée la touche P1 ou
P4 (cela dépend de la logique de com-
mande) le nombre de fois correspondant
à la commande choisie (Tableau 2 - par
exemple, 3 fois pour la commande «Ou-
verture seule»); la led L1 ou L4 (cela
dépend de la logique de commande) doit
émettre des clignotements rapides corre-
spondants à la commande choisie.
03. Dans les 10 secondes, appuyer et
maintenir enfoncée pendant au moins
2 secondes, la touche de l’émetteur à
mémoriser: si la procédure de mémoris-
ation a été effectuée avec succès, la led
L1 ou L4 (cela dépend de la logique de
commande ) émet 3 clignotements.
04. Pour mémoriser d’autres émetteurs avec
la même commande, répéter l’étape 03
dans les 10 secondes qui suivent, sinon
la phase de mémorisation se terminera
automatiquement.
Procédure de mémorisation à
proximité de la logique de com-
mande avec deux émetteurs
Avec cette procédure, un NOUVEL émetteur
est mémorisé, en utilisant un second émett-
eur (ANCIEN) déjà mémorisé et fonctionnant,
sans utiliser les touches de la logique de com-
mande mais seulement en se plaçant près de
cette dernière.
Pendant la procédure, le NOUVEL émetteur
est mémorisé comme était mémorisé l’émett-
eur ANCIEN (Mode 1 ou Mode 2).
• Procédure avec ANCIEN émetteur mémor-
isé en Mode 1:
01. Se positionner avec les deux émetteurs
à proximité de la logique de commande:
attendre 1 seconde entre un passage et
l’autre.
02. Sur le NOUVEL émetteur appuyer et
maintenir enfoncée n’importe quelle tou-
che pendant au moins 8 secondes puis
02. On the NEW transmitter press and hold
down the key to be memorised for at least
8 seconds and then release it.
03. On the OLD transmitter press and hold
down the key to be copied for at least 2
seconds and then release it.
04. On the OLD transmitter press and hold
down the key to be copied for at least 2
seconds and then release it.
05. On the OLD transmitter press and hold
down the key to be copied for at least 2
seconds and then release it.
06. On the NEW transmitter press and hold
down the key to be memorised for at least
5 seconds and then release it.
Repeat the process for every transmitter to
be memorised.
Check transmitter function
Simply press one of the keys on the transmit-
ter and check that the red LED ashes and
that the automation carries out the expected
command.
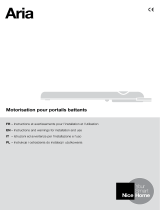
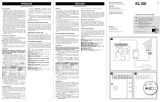
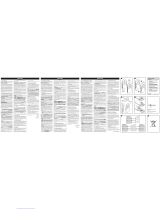
Battery replacement (g. 3)
When battery capacity drops considerably
and the LED light becomes dim, it is likely
that the battery is drained. The transmitter
contains a lithium battery, of type CR2032.
The product functions with batteries that
could contain poisonous substances and so
they should NOT be thrown away as general
waste.
The batteries should instead be dispo-
sed of according to separate waste
collection methods as envisaged by
local regulations.
Technical Characteristics
ECCO5... is manufactured by NICE S.p.A.
(TV) Italy. In order to improve its products,
NICE S.p.A. reserves the right to modify their
technical specications at any time and with-
out prior notice. In any case, the manufac-
turer guarantees their functionality and tness
for the intended purposes.
Note: all technical specications refer to a
temperature of 20°C.
■ Type: Radio transmitters for controlling au-
tomatic gate or door automatisms ■ Tech-
nology used: AM OOK codied modulation
of radio carrier ■ Frequency: 433.92 MHz (±
100 kHz) ■ Power emitted: 0 dBm (ERP) ■
Codication: Rolling code with 64 Bit code
(18 trillion combinations) ■ Keys: each key
sends a command and can be used for dif-
ferent commands on the same control unit
or to control various control units ■ Power
supply: 3V +20% -40% with a lithium bat-
tery of type CR2032 ■ Battery life: 2 years,
estimated on the basis of 10 commands/day,
each lasting 1s at 20°C (at low temperatures
the efciency of the batteries decreases) ■
Operating temperature: -20°C ... +55°C
■ Protection rating: IP40 (suitable for use
indoors or in protected environments) ■ Di-
mensions / weight: 45 x 52 h 11 mm / 20 g
la relâcher.
03. Sur l’ANCIEN émetteur appuyer et
maintenir enfoncée n’importe quelle tou-
che à copier pendant au moins 2 secon-
des puis la relâcher.
04. Sur l’ANCIEN émetteur appuyer et
maintenir enfoncée n’importe quelle tou-
che à copier pendant au moins 2 secon-
des puis la relâcher.
05. Sur l’ANCIEN émetteur appuyer et
maintenir enfoncée n’importe quelle tou-
che à copier pendant au moins 2 secon-
des puis la relâcher.
06. Sur le NOUVEL émetteur appuyer et
maintenir enfoncée n’importe quelle tou-
che à mémoriser au moins 5 secondes
puis la relâcher.
Répéter la procédure pour chaque émetteur
à mémoriser.
• Procédure avec ANCIEN émetteur mémor-
isé en Mode 2:
01. Se positionner avec les deux émetteurs
à proximité de la logique de commande:
attendre 1 seconde entre un passage et
l’autre.
02. Sur le NOUVEL émetteur appuyer et
maintenir enfoncée la touche à mémoriser
pendant au moins 8 secondes puis la
relâcher.
03. Sur l’ANCIEN émetteur appuyer et
maintenir enfoncée la touche à copier
pendant au moins 2 secondes puis la
relâcher.
04. Sur l’ANCIEN émetteur appuyer et
maintenir enfoncée la touche à copier
pendant au moins 2 secondes puis la
relâcher.
05. Sur l’ANCIEN émetteur appuyer et
maintenir enfoncée la touche à copier
pendant au moins 2 secondes puis la
relâcher.
06. Sur le NOUVEL émetteur appuyer et
maintenir enfoncée la touche à mémoriser
pendant au moins 5 secondes puis la
relâcher.
Répéter la procédure pour chaque émetteur
à mémoriser.
Vérication du fonctionnement de
l’émetteur
Il suft d’appuyer sur l’une des touches de
l’émetteur et vérier que la led rouge clignote
et que l ’automatisme effectue la commande
donnée.
Remplacement des piles (g. 3)
Lorsque la portée de l’émetteur est diminuée
de façon signicative et que la lumière émise
par la led est faible, la pile est probablement
usée. L’émetteur contient une pile au lithium
de type CR2032.
Le produit fonctionne avec des piles qui
pourraient contenir des substances polluan-
tes et qui NE doivent donc PAS être jetées
avec les ordures ménagères.
Il faut les mettre au rebut en adoptant
les méthodes de tri sélectif prévues
par les normes en vigueur dans le pays
d’utilisation.
Caractéristiques techniques
ECCO5... est produit par NICE S.p.A. (TV) Ita-
lie. Dans le but d’améliorer ses produits, NICE
S.p.A. se réserve le droit d’en modier à tout
moment et sans préavis les caractéristiques
techniques, en garantissant dans tous les cas
le bon fonctionnement et le type d’utilisation
prévus.
Note: toutes les caractéristiques techniques
se réfèrent à la température de 20 °C.
■ Typologie : Émetteurs radio pour le
contrôle des automatismes pour portails,
portes automatiques ■ Technologie adop-
tée: Modulation codiée AM OOK de portée
radio ■ Fréquence : 433.92 MHz (+/- 100
kHz) ■ Puissance rayonnée: 0 dBm (ERP)
■ Codication: Code variable (rolling code)
avec code à 64 Bits (18 milliards de milliards
de combinaisons) ■ Touches : chaque
touche envoie une commande et peut être
utilisée pour les différentes commandes de
la même logique de commande ou de lo-
giques de commande différentes ■ Alimen-
tation: 3V +20% -40% avec une pile de type
CR2032 ■ Durée des piles: 2 ans, estimée
sur une base de 10 commandes/jour d’une
durée d’1 s à 20°C (aux basses températures
l’efcacité des piles diminue) ■ Température
ambiante de fonctionnement : -20°C ...
+55°C ■ Indice de protection: IP40 (uti-
lisation à l’intérieur ou dans des milieux pro-
tégés) ■ Dimensions/ poids: 45 x 52 h 11
mm / 20 g
FR - Instructions et avertissements pour
l’installation et l’utilisation
EN - Instructions and warnings for
installation and use
IT - Istruzioni ed avvertenze per
l’installazione e l’uso
PL - Instrukcje i ostrzeżenia do instalacji
i użytkowania
Télécommande
ECCO5
www.niceforyou.com
Nice S.p.A.
Via Pezza Alta, 13
31046 Oderzo TV Italy
LED
T5
T2
T4
T3
T1
1
IS0472A00MM_29-11-2016
3
2
Fuse 1.6A T
Flash
ECSbus
Stop
Aerial
SbS
OGI
Fuse 15A
P4
L4 L3 L2
P3 P2
SbS
L1
P1
F
use 1.
6A
T
Fl
as
h
E
CS
bu
s
S
top
A
eria
l
S
bS
OGI
F
use 1
5A
P4
L
4
L
3
L2
P3
P
2
S
b
S
L
1
P1
Aerial
P4
L4 L3
P3
Aerial
P4
L4
L3
P3
P4
P4
L4
CL101 CL201/2/3/4/5
MMM M
FLAS
HECS bus STOP SbS
M M M M
F
LA
S
H
ECS
bus
S
T
OP
S
b
S
P1P2
L1
01.
03.
02.
04.
Service Après Vente France
En cas de panne, merci de contacter obligatoi-
rement notre Service Après Vente par téléphone
ou par email :
0 820 859 203
Service 0,15 €/min + prix appel
niceser[email protected]
Merci de ne pas retourner le produit en magasin
Worldwide Customer Service
customerser[email protected]
FR - Cette notice s’applique aux
émetteurs ECCO5 mod.
ECCO5BO, ECCO5WO,
ECCO5BW, ECCO5WP
EN - This manual applies to ECCO5
transmitters, models
ECCO5BO, ECCO5WO,
ECCO5BW, ECCO5WP
IT - Il presente manuale vale per
i trasmettitori ECCO5 mod.
ECCO5BO, ECCO5WO,
ECCO5BW, ECCO5WP
PL - Niniejsza instrukcja dotyczy
nadajników ECCO5 mod.
ECCO5BO, ECCO5WO,
ECCO5BW, ECCO5WP

POLSKI
Instrukcja przetłumaczona z języka włoskiego
Ostrzeżenia
■ Przed rozpoczęciem montażu należy
sprawdzić, czy produkt nadaje się do użycia,
ze szczególnym uwzględnieniem danych
zamieszczonych w rozdziale „Parametry te-
chniczne”. ■ Firma NICE nie odpowiada za
szkody wynikłe z niewłaściwego używania
urządzenia, odmiennego od przewidzianego
w niniejszej instrukcji. ■ Materiał opakowa-
niowy należy utylizować zgodnie z lokalnymi
przepisami. ■ Nie przechowywać nadajnika
w pobliżu silnych źródeł ciepła, ani nie na-
rażać go na działanie płomienia; działania
te mogą doprowadzić do uszkodzenia ur-
ządzenia, być przyczyną nieprawidłowego
działania lub spowodować zagrożenia. ■
Baterie, także rozładowane, zawierają sub-
stancje zanieczyszczające i, w związku z tym,
nie mogą być wyrzucane razem ze zwykłymi
odpadami, lecz należy je usunąć zgodnie z
lokalnie obowiązującymi przepisami.
Opis i przeznaczenie
Nadajniki są częścią systemu automatyki linii
Nice Home i są przeznaczone do sterowa-
nia instalacjami wykonanymi z użyciem pro-
duktów z tej samej linii przeznaczonych do
użytku prywatnego.
– Wszelkie inne użycie oraz wykorzy-
stywanie produktu w warunkach otoc-
zenia odmiennych, niż przedstawione w
niniejszej instrukcji, jest nieprawidłowe i
zabronione.
Nadajnik posiada 5 przycisków, które mogą
być wykorzystywane do wysyłania 5 różnych
poleceń do tej samej automatyki lub do ste-
rowania 5 różnymi automatykami lub odbior-
nikami radiowymi. Wysłanie polecenia jest
potwierdzane zapaleniem się diody (led L1
- rys. 1).
Funkcje innowacyjnego 5. przycisku (T5 -
rys. 1) zależą od centrali lub odbiornika ra-
diowego, do których jest on przypisany, na
przykład: w przypadku produktu FILO400C/
FILO600C przycisk ten służy do programowa-
nia funkcji „Obecność”; zob. odpowiednią in-
strukcję obsługi.
Wczytywanie nadajnika
Nowy nadajnik można wczytać przy użyciu
jednego z dwóch dostępnych trybów:
• Tryb 1: zapisuje się równocześnie wszy-
stkie przyciski nadajnika, przypisując je
automatycznie do poleceń podanych w
Tabeli 1.
Nadajnik wczytany w Trybie 1 może
sterować tylko jedną automatyką.
• Tryb 2: przy użyciu tej procedury zapisuje
się po jednym przycisku na raz, przypisując
je dowolnie do poleceń przedstawionych w
Tabeli 2.
Nadajnik wczytany w Trybie 2 może
sterować większą ilością instalacji
automatyki (na przykład: automatyka 1
sterowana przyciskiem 1; automatyka 2
sterowana przyciskiem 2 i tak dalej ...)
Tabela 1
Funkcja nadajników w Trybie 1
Nadajnik ECCO5... Polecenie
Centrala Odbiornik ra-
diowy
Przycisk 1 Krok po kroku Aktywacja
wyjścia 1
Przycisk 2 Otwarcie
częściowe
Aktywacja
wyjścia 2
Przycisk 3 Tylko otwiera Aktywacja
wyjścia 3
Przycisk 4 Tylko zamyka Aktywacja
wyjścia 4
Przycisk 5 Funkcja
pomocnicza
Nieobecny
Uwaga: Funkcje 5. przycisku (T5 - rys. 1) zależą od centrali
lub odbiornika radiowego, do których jest on przypisany;
zob. instrukcje obsługi poszczególnych produktów.
Tabela 2
Funkcja nadajników w Trybie 2
Nadajnik ECCO5... Polecenie
Centrala Odbiornik ra-
diowy
Polecenie 1 Krok po kroku Aktywacja wyjścia
1
Polecenie 2 Otwarcie
częściowe
Aktywacja wyjścia
2
Polecenie 3 Tylko otwiera Aktywacja wyjścia
3
Polecenie 4 Tylko zamyka Aktywacja wyjścia
4
Uwagi: przycisk T5 nie jest przeznaczony do wczytywania
w Trybie 2.
Procedury wczytywania nadajnika
Procedury wczytywania nadajnika zależą
od centrali lub odbiornika radiowego, do
których przypisano nadajnik.
Aby ułatwić odczyt procedur, przypi-
sano następujące skróty przyciskom
zarówno na nadajniku, jak i na centralach:
- nadajnik = przyciski T1, T2, T3, T4,T5 i
dioda led L1 (rys.1)
- centrale = przycisk P1 i dioda led L1 dla
centrali CL201/2/3/4/5 (rys.2) lub przycisk
P4 i dioda led L4 dla centrali CL101 (rys. 2)
Przed wykonaniem procedur
wczytywania, należy je dokładnie pr-
zeczytać i przestrzegać podanych w nich
czasów.
Wczytywanie w Trybie 1
01. Na centrali wcisnąć i przytrzymać pr-
zycisk P1 lub P4 (w zależności od cen-
trali) przez co najmniej 3 sekundy; gdy
dioda led L1 lub L4 (w zależności od
centrali) zapali się, zwolnić przycisk.
02. W ciągu 10 sekund od zwolnienia, wci-
snąć i przytrzymać wciśnięty przez co
najmniej 3 sekundy dowolny przycisk
wczytywanego nadajnika.
Jeżeli wczytywanie przebiegło pomyślnie,
dioda led L1 lub L4 (w zależności od
centrali) zamiga 3 razy.
03. Aby wczytać dalsze nadajniki, należy w
ciągu 10 sekund powtórzyć krok 02, w
przeciwnym razie wczytywanie zakończy
się automatycznie.
Wczytywanie w Trybie 2
• Centrale i odbiorniki radiowe (zob. Tabela 2)
01. W Tabeli 2 wybrać polecenie.
02. Na centrali wcisnąć i zwolnić przycisk
P1 lub P4 (w zależności od centrali) tyle
razy, ile wymaga tego wybrane polece-
nie (Tabela 2 - np. 3 razy dla polecenia
„Tylko otwiera”); dioda led L1 lub L4 (w
zależności od centrali) musi szybko za-
migać: liczba mignięć musi odpowiadać
wybranemu poleceniu.
03. W ciągu 10 sekund, wcisnąć i przytr-
zymać wciśnięty przez co najmniej 2
sekundy przycisk wczytywanego na-
dajnika: jeżeli wczytywanie przebiegło
pomyślnie, dioda led L1 lub L4 (w za-
leżności od centrali) zamiga 3 razy.
04. Aby wczytać dalsze nadajniki, z tym
samym poleceniem, należy w ciągu
10 sekund powtórzyć krok 03, w prze-
ciwnym razie wczytywanie zakończy się
automatycznie.
Procedura wczytywania w pobliżu
centrali z dwoma nadajnikami
W tej procedurze zapisuje się NOWY nadajnik
przy użyciu drugiego nadajnika (STAREGO),
już wczytanego i działającego, bez użycia pr-
zycisków centrali, a jedynie stając w jej pobliżu.
Podczas tej procedury NOWY nadajnik zo-
staje wczytany tak samo, jak został wczytany
STARY nadajnik (Tryb 1 lub Tryb 2).
• Procedura ze STARYM nadajnikiem
wczytanym w Trybie 1:
01. Ustawić się z dwoma nadajnikami w
pobliżu centrali: odczekać 1 sekundę
między kolejnymi krokami.
02. Na NOWYM nadajniku wcisnąć i przytr-
zymać dowolny przycisk przez co najm-
niej 8 sekund, a następnie go zwolnić.
03. Na STARYM nadajniku wcisnąć i przytr-
zymać dowolny przycisk do skopiowania
przez co najmniej 2 sekundy, a następnie
go zwolnić.
04. Na STARYM nadajniku wcisnąć i przytr-
zymać dowolny przycisk do skopiowania
przez co najmniej 2 sekundy, a następnie
go zwolnić.
05. Na STARYM nadajniku wcisnąć i przytr-
zymać dowolny przycisk do skopiowania
przez co najmniej 2 sekundy, a następnie
go zwolnić.
06. Na NOWYM nadajniku wcisnąć i przytr-
zymać dowolny przycisk do wczytania pr-
zez co najmniej 5 sekund, a następnie go
zwolnić.
Powtórzyć procedurę, dla każdego nadajnika,
który ma zostać wczytany.
• Procedura ze STARYM nadajnikiem
wczytanym w Trybie 2:
01. Ustawić się z dwoma nadajnikami w
pobliżu centrali: odczekać 1 sekundę
między kolejnymi krokami.
02. Na NOWYM nadajniku wcisnąć i pr-
zytrzymać przycisk do wczytania przez
co najmniej 8 sekund, a następnie go
zwolnić.
03. Na STARYM nadajniku wcisnąć i pr-
zytrzymać przycisk do skopiowania przez
co najmniej 2 sekundy, a następnie go
zwolnić.
04. Na STARYM nadajniku wcisnąć i pr-
zytrzymać przycisk do skopiowania przez
co najmniej 2 sekundy, a następnie go
zwolnić.
05. Na STARYM nadajniku wcisnąć i pr-
zytrzymać przycisk do skopiowania przez
co najmniej 2 sekundy, a następnie go
zwolnić.
06. Na NOWYM nadajniku wcisnąć i pr-
zytrzymać przycisk do wczytania przez
co najmniej 5 sekund, a następnie go
zwolnić.
Powtórzyć procedurę, dla każdego nadajnika,
który ma zostać wczytany.
Kontrola działania nadajnika
Wystarczy nacisnąć jeden z przycisków na-
dajnika i sprawdzić, czy czerwona dioda led
miga, a automatyka wykonuje przewidziane
polecenie.
Wymiana baterii (rys. 3)
Gdy zasięg działania nadajnika wyraźnie się
zmniejsza, a światło emitowane przez diodę
led słabnie, oznacza to, że najprawdopodob-
niej rozładowała się bateria. Nadajnik korzysta
z baterii litowej typu CR2032.
Produkt działa z użyciem baterii, które
mogą zawierać substancje zanieczyszc-
zające, więc NIE mogą być one usuwane z
odpadami komunalnymi.
Należy je utylizować stosując metody
„selektywnej zbiórki odpadów”, pr-
zewidziane przez przepisy obowiąz-
ujące w kraju użytkownika.
Charakterystyka techniczna
Urządzenie ECCO5... zostało wyprodu-
kowane przez rmę NICE S.p.A. (TV) Italy.
Firma NICE S.p.A. zastrzega sobie prawo do
zmiany parametrów technicznych swych pro-
duktów w dowolnej chwili i bez uprzedzenia,
gwarantując jednakże, że będą one dalej peł-
nić swe funkcje zgodnie z ich przewidzianym
zastosowaniem.
Uwaga: charakterystyka techniczna odnosi
się do temperatury 20°C.
■ Typologia: Nadajniki radiowe do stero-
wania automatyką do bram automatycznych
■ Zastosowana technologia: Kodowana
modulacja AM OOK zasięgu radiowego ■
Częstotliwość: 433.92 MHz (± 100 kHz) ■
Moc promieniowana: 0 dBm (ERP) ■ Ko-
dowanie: Kod zmienny (Rolling code) 64 Bit
(18 trylionów kombinacji) ■ Przyciski: każdy
przycisk może być używany do różnych po-
leceń tej samej centrali lub do sterowania
różnymi centralami ■ Zasilanie: 3V +20%
-40% baterią litową typu CR2032 ■ Czas
pracy baterii: 2 lata, szacowany przy 10
poleceniach/dzień o długości 1s przy 20°C
(w niskich temperaturach wydajność baterii
jest mniejsza) ■ Temperatura otoczenia
pracy: -20°C ... +55°C ■ Stopień ochrony:
IP40 (stosowanie w domu lub w chronionym
otoczeniu) ■ Wymiary/waga: 45 x 52 h 11
mm / 20 g
FR - Déclaration de conformité
Déclaration conforme à la Directive 1999/5/CE
Remarque – Le contenu de cette déclaration
correspond en tous points au document of-
ciel déposé au siège de la société Nice S.p.a.
et, plus particulièrement, à sa dernière révision
disponible avant l’impression de ce manuel. Le
présent texte a été réadapté pour des raisons
d’édition. Une copie de la déclaration originale
peut être demandée à Nice S.p.a. (TV) Italy.
Numéro : 572/ECCO5 Version : 0
Le soussigné Roberto Griffa, déclare que le
produit :
Nom du producteur : NICE S.p.A.
Adresse : Via Pezza Alta n°13, 31046 Rusti-
gnè di Oderzo (TV) Italy
Type de produit: Émetteur à 5 canaux
avec code variable
Modèle : ECCO5BO, ECCO5WO,
ECCO5BW, ECCO5WP
Accessoires :
S’avère conforme aux conditions essen-
tielles requises par l’article 3 de la Directive
communautaire ci-après, pour l’usage au-
quel les produits sont destinés:
• Directive 1999/5/CE DU PARLEMENT EU-
ROPÉEN ET DU CONSEIL du 9 mars 1999
concernant les équipements hertziens et les
équipements terminaux de télécommunica-
tions et la reconnaissance mutuelle de leur
conformité, selon les normes harmonisées
suivantes:
- Protection de la santé (art. 3(1)(a)) :
EN 62479:2010
- Sécurité électrique (art. 3(1)(a)) :
EN 60950-1:2006+ A11:2009+A12:2011+A
1:2010+A2:2013
- Compatibilité électromagnétique (art. 3(1)
(b)) : EN 301 489-1 V1.9.2:2011,
EN 301 489-3 V1.6.1:2013
- Spectre radio (art. 3(2)) :
EN 300 220-2 V2.4.1:2012
Conformément à la Directive 1999/5/CE (An-
nexe V), le produit appartient à la classe 1 et
marqué:
Oderzo, 28 Juillet 2016
Ing. Roberto Griffa
(Chief Executive Ofcer)
EN - Declaration of conformity
Declaration pursuant to Directive 1999/5/EC
Note – The content of this declaration corres-
ponds to that specied in the ofcial document
deposited at the Nice S.p.a. headquarters and,
in particular, to the latest revised edition available
prior to the publishing of this manual. The text
herein has been re-edited for editorial purpo-
ses. A copy of the original declaration can be
requested from Nice S.p.a. (TV) Italy.
Number: 572/ECCO5 Revision: 0
The undersigned Roberto Griffa, hereby
declares that the product:
Manufacturer’s name: NICE S.p.A.
Address: Via Pezza Alta n°13, 31046 Rusti-
gnè di Oderzo (TV) Italy
Product type: 5-channel variable code
transmitter
Model: ECCO5BO, ECCO5WO,
ECCO5BW, ECCO5WP
Accessories:
Meets the essential requirements of article 3
of the following EU Directive, as regards its
use and intended purpose:
• Directive 1999/5/EC OF THE EUROPEAN
PARLIAMENT AND COUNCIL of March 9th
1999 concerning radio and telecommuni-
cations terminal equipment and the mutual
acknowledgement of compliance, in ac-
cordance with the following harmonized
standards:
- Health protection (art. 3(1)(a)):
EN 62479:2010
- Electrical safety (art. 3(1)(a)):
EN 60950-1:2006+ A11:2009+A12:2011+A
1:2010+A2:2013
- Electromagnetic compatibility (art. 3(1)(b)):
EN 301 489-1 V1.9.2:2011,
EN 301 489-3 V1.6.1:2013
- Radio spectrum (art. 3(2)):
EN 300 220-2 V2.4.1:2012
In accordance with Directive 1999/5/
EC (Annex V), the product is class 1 and
marked:
Oderzo, 28 July 2016
Ing. Roberto Griffa
(Chief Executive Ofcer)
PL - Deklaracja zgodności
Deklaracja zgodności według dyrektywy
1999/5/WE
Uwaga - Zawartość niniejszej deklaracji zgod-
ności odpowiada oświadczeniom znajdującym
się w ocjalnym dokumencie złożonym w siedzi-
bie rmy Nice S.p.a., w szczególności ostatnim
zmianom dostępnym przed wydrukowaniem
niniejszej instrukcji. Niniejszy tekst został dos-
tosowany w celach wydawniczych. Kopię ory-
ginalnej deklaracji można uzyskać w siedzibie
spółki Nice S.p.a. (TV) Italy.
Numer: 572/ECCO5 Werykacja: 0
Niżej podpisany Roberto Griffa deklaruje, że
produkt:
Nazwa producenta: NICE S.p.A.
Adres: Via Pezza Alta n°13, 31046 Rustignè
di Oderzo (TV) Italy
Typ produktu: Nadajnik 5-kanałowy z ko-
dem zmiennym
Model: ECCO5BO, ECCO5WO,
ECCO5BW, ECCO5WP
Osprzęt:
W odniesieniu do przeznaczenia użytkowego
produktu, jest on zgodny z wymogami za-
sadniczymi, określonymi w artykule 3 nastę-
pującej dyrektywy wspólnotowej:
• Dyrektywa PARLAMENTU EUROPEJ-
SKIEGO I RADY NR 1999/5/WE z dnia 9
marca 1999 r. w sprawie urządzeń radio-
wych i końcowych urządzeń telekomunika-
cyjnych oraz wzajemnego uznawania ich
zgodności, zgodnie z następującymi nor-
mami zharmonizowanymi:
- Ochrona zdrowia (art. 3(1)(a)):
EN 62479:2010
- Bezpieczeństwo elektryczne (art. 3(1)(a)):
EN 60950-1:2006+ A11:2009+A12:2011+A
1:2010+A2:2013
- Kompatybilność elektromagnetyczna (art.
3(1)(b)): EN 301 489-1 V1.9.2:2011,
EN 301 489-3 V1.6.1:2013
- Spektrum radiowe (art. 3(2)):
EN 300 220-2 V2.4.1:2012
Zgodnie z dyrektywą 1999/5/WE (Załącz-
nik V) jest to produkt klasy 1 i oznaczony:
Oderzo, 28 Lipiec 2016
Inż. Roberto Griffa
(Chief Executive Ofcer)
IT - Dichiarazione di conformità
Dichiarazione in accordo alla Direttiva
1999/5/CE
Nota – Il contenuto di questa dichiarazione cor-
risponde a quanto dichiarato nel documento
ufciale depositato presso la sede di Nice S.p.a.
e, in particolare, alla sua ultima revisione dispo-
nibile prima della stampa di questo manuale. Il
testo qui presente è stato riadattato per motivi
editoriali. Copia della dichiarazione originale può
essere richiesta a Nice S.p.a. (TV) Italy.
Numero: 572/ECCO5 Revisione: 0
Il sottoscritto Roberto Griffa, dichiara che il
prodotto:
Nome produttore: NICE S.p.A.
Indirizzo: Via Pezza Alta n°13, 31046 Rusti-
gnè di Oderzo (TV) Italy
Tipo di prodotto: Trasmettitore a 5 canali a
codice variabile
Modello: ECCO5BO, ECCO5WO,
ECCO5BW, ECCO5WP
Accessori:
Risulta conforme ai requisiti essenziali richie-
sti dall’articolo 3 della seguente direttiva co-
munitaria, per l’uso al quale i prodotti sono
destinati:
• Direttiva 1999/5/CE DEL PARLAMENTO
EUROPEO E DEL CONSIGLIO del 9 marzo
1999 riguardante le apparecchiature radio
e le apparecchiature terminali di comuni-
cazione e il reciproco riconoscimento della
loro conformità, secondo le seguenti norme
armonizzate:
- Protezione della salute (art. 3(1)(a)):
EN 62479:2010
- Sicurezza elettrica (art. 3(1)(a)):
EN 60950-1:2006+ A11:2009+A12:2011+A
1:2010+A2:2013
- Compatibilità elettromagnetica (art. 3(1)(b)):
EN 301 489-1 V1.9.2:2011, EN 301 489-3
V1.6.1:2013
- Spettro radio (art. 3(2)):
EN 300 220-2 V2.4.1:2012
In accordo alla direttiva 1999/5/CE (Allegato
V), il prodotto risulta di classe 1 e marcato:
Oderzo, 28 Luglio 2016
Ing. Roberto Griffa
(Chief Executive Ofcer)
ITALIANO
Istruzioni originali
Avvertenze
■ Prima di iniziare l’installazione vericate
se il prodotto è adatto all’uso, con partico-
lare attenzione ai dati riportati nel capitolo
“Caratteristiche tecniche”. ■ NICE non
risponde di danni risultanti da un uso im-
proprio del prodotto; diverso da quanto
previsto nel presente manuale. ■ Il mate-
riale dell’imballaggio deve essere smaltito
nel pieno rispetto della normativa locale. ■
Non tenere il trasmettitore vicino a forti fonti
di calore né esporlo a amme; tali azioni
possono danneggiarlo ed es sere causa di
malfunzionamenti o situazioni di pericolo. ■
Le pile, anche se esaurite, po trebbero
con tenere sostanze inquinanti e quindi non
devono essere buttate nei riuti comuni ma
occorre smaltirle secondo i metodi previsti,
per le batterie, dai regolamenti locali.
Descrizione e destinazione d’uso
Questi trasmettitori fanno parte del sistema
di automazione della linea Nice Home e
sono destinati al comando di impianti rea-
lizzati con prodotti della stessa linea e per
uso residenziale.
– Qualsiasi altro uso diverso da
quello descritto e in condizioni am-
bientali diverse da quelle riportate in
questo manuale è da considerarsi im-
proprio e vietato.
Il trasmettitore presenta 5 tasti che pos-
sono essere usati per inviare 5 tipi di co-
mando ad una stessa automazione o per
comandare no a 5 automazioni o ricevitori
radio. L’invio del comando è confermato
dall’accensione del led presente.
La funzionalità dell’innovativo 5° tasto (T5
- g. 1), dipende dalla centrale o ricevitore
radio a cui è abbinato: per esempio, con
il prodotto FILO400C/FILO600C questo
tasto serve per programmare la funzione
“Presenza”; vedere il rispettivo manuale
d’istruzione.
Memorizzazione del trasmettitore
Per memorizzare il nuovo trasmettitore
sono disponibili due modalità:
• Modo 1: si memorizzano contempora-
neamente tutti i tasti del trasmettitore,
abbinandoli automaticamente ai comandi
riportati nella Tabella 1.
Un trasmettitore memorizzato in
Modo 1 può comandare una sola au-
tomazione.
• Modo 2: con questa procedura si me-
morizza un singolo tasto alla volta, ab-
binandolo a scelta a uno dei comandi
riportati nella Tabella 2.
Un trasmettitore memorizzato in
Modo 2 può comandare più auto-
mazioni (per esempio: automazione 1
comandata dal tasto 1; automazione 2
comandata dal tasto 2; e cosi via ...)
Tabella 1
Funzione dei trasmettitori in Modo 1
Trasmettitore ECCO5... Comando
Centrale Ricevitore radio
Tasto 1 Passo Passo Attivazione uscita 1
Tasto 2 Apertura
parziale
Attivazione uscita 2
Tasto 3 Solo apre Attivazione uscita 3
Tasto 4 Solo chiude Attivazione uscita 4
Tasto 5 Funzione
ausiliaria
Non presente
Nota: La funzionalità del 5° tasto (T5 - g. 1), dipende
dalla centrale o ricevitore radio a cui è abbinato; consul-
tare i manuali istruzioni dei prodotti.
Tabella 2
Funzione dei trasmettitori in Modo 2
Trasmettitore ECCO5... Comando
Centrale Ricevitore radio
Comando 1 Passo Passo Attivazione uscita 1
Comando 2 Apertura
parziale
Attivazione uscita 2
Comando 3 Solo apre Attivazione uscita 3
Comando 4 Solo chiude Attivazione uscita 4
Nota: il tasto T5 non è predisposto per la memorizzazione
in Modo 2.
Procedure di memorizzazione del
trasmettitore
Le procedure di memorizzazione dipen-
dono dalla centrale o ricevitore radio abbinato.
Per facilitare la lettura delle procedure
sono state assegnate delle sigle ai tasti
sia del trasmettitore sia delle centrali:
- trasmettitore = tasti T1, T2, T3, T4,T5
(g.1)
- centrali = tasto P1 e led L1 per centrale
CL201/2/3/4/5 (g.2) o tasto P4 e led L4
per centrale CL101 (g.2)
Prima di eseguire le procedure di me-
morizzazione, si consiglia di leggerle e di
rispettare i tempi indicati.
Memorizzazione in Modo 1
01. Sulla centrale premere e mantenere
premuto il tasto P1 o P4 (dipende dalla
centrale) per almeno 3 secondi; quando
il led L1 o L4 (dipende dalla centrale) si
accende, rilasciare il tasto.
02. Entro 10 secondi dal rilascio, premere
e mantenere premuto per almeno 3 se-
condi un tasto qualsiasi del trasmettitore
da memorizzare.
Se la memorizzazione è andata a buon
ne il led L1 o L4 (dipende dalla centrale)
emette 3 lampeggi.
03.Per memorizzare altri trasmettitori, ripetere
il passo 02 entro 10 secondi, altrimenti la
fase di memorizzazione termina automa-
ticamente.
Memorizzazione in Modo 2
• Su Centrali e ricevitori radio (riferimento alla
Tabella 2)
01. Nella Tabella 2, scegliere il comando.
02. Sulla centrale premere e rilasciare il
tasto P1 o P4 (dipende dalla centrale) il
numero di volte pari al comando scelto
(Tabella 2 - es. 3 volte per il comando
“Solo Apre”); il led L1 o L4 (dipende dalla
centrale) deve emettere dei lampeggi ve-
loci pari al comando scelto.
03. Entro 10 secondi, premere e mantenere
premuto per almeno 2 secondi il tasto del
trasmettitore da memorizzare: se la me-
morizzazione è andata a buon ne il led
L1 o L4 (dipende dalla centrale) emette 3
lampeggi.
04. Per memorizzare altri trasmettitori, con
lo stesso comando, ripetere il passo 03
entro 10 secondi, altrimenti la fase di me-
morizzazione termina automaticamente.
Procedura di memorizzazione in
prossimità della centrale con due
trasmettitori
Con questa procedura si memorizza un
NUOVO trasmettitore usando un secondo
trasmettitore (VECCHIO) già memorizzato
e funzionante senza usare i tasti della cen-
trale, ma solo posizionandosi in prossimità
di quest’ultima.
Durante la procedura il trasmettitore NUOVO
viene memorizzato come era stato memorizzato
il trasmettitore VECCHIO (Modo 1 o Modo 2).
• Procedura con trasmettitore VECCHIO me-
morizzato in Modo 1:
01. Posizionarsi con i due trasmettitori in
prossimità della centrale: attendere 1
secondo tra un passaggio e l’altro.
02. Sul NUOVO trasmettitore premere e
mantenere premuto un tasto qualsiasi per
almeno 8 secondi e poi rilasciarlo.
03. Sul VECCHIO trasmettitore premere
e mantenere premuto un tasto qualsiasi
da copiare per almeno 2 secondi e poi
rilasciarlo.
04. Sul VECCHIO trasmettitore premere
e mantenere premuto un tasto qualsiasi
da copiare per almeno 2 secondi e poi
rilasciarlo.
05. Sul VECCHIO trasmettitore premere
e mantenere premuto un tasto qualsiasi
da copiare per almeno 2 secondi e poi
rilasciarlo.
06. Sul NUOVO trasmettitore premere e
mantenere premuto un tasto qualsiasi da
memorizzare per almeno 5 secondi e poi
rilasciarlo.
Ripetere la procedura per ogni trasmettitore
da memorizzare.
• Procedura con trasmettitore VECCHIO me-
morizzato in Modo 2:
01. Posizionarsi con i due trasmettitori in
prossimità della centrale: attendere 1
secondo tra un passaggio e l’altro.
02. Sul NUOVO trasmettitore premere e
mantenere premuto il tasto da memo-
rizzare per almeno 8 secondi e poi rila-
sciarlo.
03. Sul VECCHIO trasmettitore premere e
mantenere premuto il tasto da copiare per
almeno 2 secondi e poi rilasciarlo.
04. Sul VECCHIO trasmettitore premere e
mantenere premuto il tasto da copiare per
almeno 2 secondi e poi rilasciarlo.
05. Sul VECCHIO trasmettitore premere e
mantenere premuto il tasto da copiare per
almeno 2 secondi e poi rilasciarlo.
06. Sul NUOVO trasmettitore premere e
mantenere premuto il tasto da memo-
rizzare per almeno 5 secondi e poi rila-
sciarlo.
Ripetere la procedura per ogni trasmettitore
da memorizzare.
Verica funzionamento del trasmet-
titore
È sufciente premere uno dei tasti del tra-
smettitore e vericare che lampeggi il led
rosso e che l’automazione esegua il co-
mando previsto.
Sostituzione pile (g. 3)
Quando la portata del trasmettitore si riduce
sensibilmente e la luce emessa dal led è afe-
volita, è probabile che la pila sia scarica. Il tra-
smettitore contiene una pila al litio tipo CR2032.
Il prodotto funziona con batterie che po-
trebbero contenere sostanze inquinanti e
quindi NON de vono essere gettate nei riuti
comuni.
Occorre smaltirle utilizzando i metodi
di raccolta differenziata, previste dalle
normative vigenti nel territorio.
Caratteristiche tecniche
ECCO5... è prodotto da NICE S.p.A. (TV)
Italy. Allo scopo di migliorare i prodotti, NICE
S.p.A. si riserva il diritto di modicare le ca-
ratteristiche tecniche in qualsiasi momento e
senza preavviso, garantendo comunque fun-
zionalità e destinazione d’uso previste.
Nota: tutte le caratteristiche tecniche sono
riferite alla temperatura di 20°C.
■ Tipologia: Trasmettitori radio per il con-
trollo di au tomatismi per cancelli, portoni
automatici ■ Tecnologia adottata: Modula-
zione codicata AM OOK di portante radio ■
Frequenza: 433.92 MHz (± 100 kHz) ■ Po-
tenza irradiata: 0 dBm (ERP) ■ Co dica:
Rolling code con codice a 64 Bit (18 miliardi
di miliardi di combinazioni) ■ Tasti: ogni tasto
invia un comando e può essere utilizzato per i
diversi comandi della stessa centrale oppure
per comandare diverse centrali ■ Alimenta-
zione: 3V +20% -40% con una pila al litio tipo
CR2032 ■ Durata delle batterie: 2 anni, sti-
mata su una ba se di 10 co mandi/giorno della
durata di 1s a 20°C (alle basse temperature
l’efcienza delle batterie diminuisce) ■ Tem-
peratura ambientale di funzionamento:
-20°C ... +55°C ■ Grado di protezione:
IP40 (utilizzo in casa o am bienti protetti) ■
Dimensioni / peso: 45 x 52 h 11 mm / 20 g
-
 1
1
-
 2
2


in altre lingue
- English: NiceHome ECCO5 Owner's manual
- français: NiceHome ECCO5 Le manuel du propriétaire
- polski: NiceHome ECCO5 Instrukcja obsługi
Documenti correlati
-
 NiceHome FILO 400 / 600 Manuale del proprietario
-
 NiceHome ARIA Manuale del proprietario
-
Nice RC200 Guida d'installazione
-
 NiceHome ALTO100 / ALTO101START Manuale del proprietario
-
 NiceHome FL200 Manuale del proprietario
-
 NiceHome LM100 Manuale del proprietario
-
-
 NiceHome EL100 Manuale del proprietario


Altri documenti
-
Nice Automation One (OXI and OX2 series) Manuale del proprietario
-
-
 Mhouse MhouseKit WG2S Instructions For Installation And Use Manual
-
 Mhouse WS200S Manuale del proprietario
-
-
-
-
-
 Mhouse STX1 Installation And Use Instructions And Warnings
-
HySecurity EDSWG Keypad Guida di riferimento


