
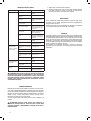
DATI TECNICI
1. Tipo motore
2. Potenza motore
3. Cilindrata
4. Capacità serbatoio carburante
5. Quantità olio motore
6. Diametro di taglio
7. Tipo candela accensione
8. Velocità motore a vuoto
9. Capacità cesto raccoglierba
10. Regolazione altezza taglio
11. Vibrazioni a livello dell’impugnatura
12.
Procedura di valutazione della conformità seguita per 2005/88/CE, allegato:
13. Ente notificato preposto
14. Livello di potenza sonoro misurato LwA
15. Livello di potenza sonoro garantito LwA
16.
Livello di pressione acustica misurato LpA
17. Peso macchina
18. Codice lama
TECHNICAL DATA
1. Motor type
2. Motor power
3. Motor size
4. Fuel tank capacity
5. Quantity of engine oil
6. Cutting diameter
7. Spark plug type
8. Motor speed when empty
9. Grass collection box capacity
10. Cutting height regulation
11. Grip vibrations
12. Procedure for evaluating conformity enclosed (for 2005/88/CE)
13. Notified body
14. Measured noise level LwA
15. Guaranteed noise level LwA
16. Measured acoustic pressure level LpA
17. Machine weight
18. Blade code
1 4T OHV
2 1,8 kW - 2,4 Hp
3 98 cm
3
4 1,3 l
5 0,6 l
6 400 mm
7 TORCH F7RTC - CHAMPION N8YC -
NGK BPR7ES
8 2850 min
-1
9 45 l
10 25-65 mm
11 7,00 m/s
2
K=1,5
12 VI
13
Intertek Testing Services
Shanghai Ltd.
14 93,41 dB(A) K=0,82
15 96 dB(A)
16 85 dB(A)
17 20,8 kg
18 DAYEE DY0903-2
DICHIARAZIONE DI CONFORMITA’
La ditta indicata in etichetta dichiara sotto
la propria responsabilità che il prodotto ivi
citato è conforme ai requisiti essenziali di
sicurezza e salute contenuti nelle seguenti
direttive europee:
2006/42/CE, 2014/30/CE, 2005/88/CE
DECLARATION OF CONFORMITY
The firm indicated on the label declares, under
its own responsibility, that the product cited
there complies with the essential health and
safety requirements contained in the following
European directives:
2006/42/EC, 2014/30/EC, 2005/88/EC
Persona autorizzata a costituire il fascicolo
tecnico presso:
The person authorized to compile the tech-
nical file is in:
Valex SpA
Via Lago Maggiore 24
36015 Schio (VI) - Italy -
Schio 01.2016
Un procuratore - Attorney
ARRIGO ZANELLA
S497513
12.01.2016
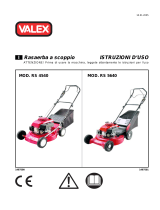
Rasaerba a scoppio
ISTRUZIONI PER L’USO
Istruzioni originali
Petrol lawn mower
INSTRUCTION MANUAL
Translation from the original instructions
ATTENZIONE! Prima di usare la macchina, leggete
attentamente le istruzioni per l’uso
CAUTION! Before starting the machine, read the operating
instructions carefully
TS4024

- 2 -

- 3 -

- 4 -

- 5 -

- 6 -
i
Vi ringraziamo per averci preferito nella scelta di questa macchina,
di seguito chiamata “rasaerba a scoppio”.
ATTENZIONE! Il rasaerba a scoppio è idoneo a tagliare l’erba su su-
perfici aperte e piane come quella di un giardino. Ogni altro uso è vietato.
Questo istruzioni riportano le informazioni e quanto ritenuto neces-
sario per il buon uso, la conoscenza e la normale manutenzione della
macchina. Esse non riportano le informazioni sulle tecniche di giar-
dinaggio; l’utilizzatore troverà maggiori notizie su libri e pubblicazioni
specifiche o partecipando a corsi di specializzazione.
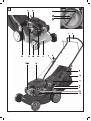
COMPONENTI
Fare riferimento alla fig. A e seguenti:
1. Manico superiore
2. Leva di avvio/spegnimento motore
3. Manico inferiore
4. Piastra di fissaggio
5. Volantino di fissaggio
6. Fascetta blocca cavo
7. Supporto per maniglia
8. Maniglia per avviamento a strappo
9. Scocca
10. Ruota
11. Sportello posteriore
12. Cesto di raccolta
13. Motore a scoppio
14. Tappo per livello e rabbocco lubrificante
15. Candela
16. Cappuccio candela
17. Serbatoio carburante
18. Tappo carburante
19. Filtro aria
20. Marmitta
21. Leva per regolazione altezza di taglio
22. Lama
23. Vite
24. Rondella
25. Tappo scarico olio
26. Leva di comando
INSTALLAZIONE
ATTENZIONE! La Ditta costruttrice declina ogni responsabilità per gli
eventuali danni diretti e/o indiretti causati da una errata installazione.
TRASPORTO
Per trasportare la macchina utilizzate sempre il suo imballo; questo la
preserverà da urti, polvere e umidità che ne possono compromettere
il regolare funzionamento.
Durante il trasporto sganciate il cesto, staccate il cappuccio della
candela, piegate sopra il motore la parte superiore del manico (al-
lentare prima i volantini di fissaggio) e scaricate completamente il
serbatoio del carburante.
Effettuate il sollevamento della macchina in due persone e mai da soli,
mantenendola orizzontale. Se trasportata su un veicolo assicurate
bene la macchina con cinghie tenditrici, in modo da evitare sposta-
menti improvvisi dovuti a frenate, curve, dossi ecc.
MOVIMENTAZIONE
La movimentazione su una superficie non erbosa deve avvenire
sempre a motore spento e a spinta dell’utilizzatore. Su un tappeto
erboso già tagliato è possibile mantenere il motore acceso e sfruttare
la trazione (se presente), anche se è possibile che il passaggio “segni”
l’erba con un risultato antiestetico.
MESSA IN SERVIZIO
Nel luogo che utilizzerete la macchina è opportuno considerare:
• che agenti atmosferici avversi come pioggia o temporale non
siano presenti.
• che attorno sia prevista un’ampia zona operativa libera da
impedimenti.
• che vi sia una buona illuminazione naturale o artificiale.
• che il tappeto erboso sia idoneo e l’erba non sia eccessivamente
alta, non sia bagnato e sia privo di sassi, radici sporgenti, rami,
tubi, cavi elettrici, oggetti ecc. che danneggerebbero la macchina
e metterebbero in pericolo l’utilizzatore.
• che estranei, bambini ed animali non siano presenti.
ASSEMBLAGGIO
ATTENZIONE! Prima di effettuare le seguenti operazioni assi-
curatevi che il cappuccio candela sia scollegato.
Estraete la macchina ed i componenti e verificate visivamente la loro
perfetta integrità.
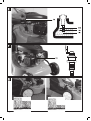
MONTAGGIO DEI MANICI (fig.C)
1. Fig.C1: prelevate il manico inferiore (pos.3) e fissatelo con la viteria
(pos.5) alle due piastre (pos.4) della macchina, a destra e a sinistra
dello sportello posteriore (pos.11). Per alcuni modelli esiste più
di una posizione di fissaggio dei manici inferiori per permettere la
regolazione dell’altezza finale del manico superiore. Le guaine e i
cavi di comando devono essere posizionati sopra il manico. Nota:
il manico inferiore può essere composto da due pezzi, anziché uno.
2. Fig.C2: prelevate il manico superiore (pos.1) e posizionatelo all’e-
stremità del manico inferiore facendo combaciare i fori di fissaggio.
3. Fig.C3: avvitate i volantini (pos.5) mantenendo le guaine dei cavi
sopra al manico. Se la viteria è del tipo a sgancio rapido (volantino
più leva), allora avvitate il volantino senza serrare e poi inclinate di
90° la leva. Inserite le fascette (pos.8) sopra i manici in modo da
fermare le guaine e i cavi di comando.
4. Fig.C4: infilate la parte filettata del supporto ad anello (pos.7)
per maniglia di avviamento (pos.8) sul foro nel manico superiore
lato destro ed avvitate poco il dado. Ora impugnate la maniglia di
avviamento posizionata sopra il motore, tiratela lentamente fino al
supporto e infilate la corda dentro l’anello; a questo punto serrate
a fondo il dado e rilasciate la maniglia che si arresterà sul supporto
appena installato.
MONTAGGIO CESTO DI RACCOLTA (fig.D)
ATTENZIONE! L’operazione di aggancio e sgancio del cesto
durante l’uso del rasaerba deve avvenire solo a motore spento,
con lama completamente ferma e cappuccio candela staccato.
1. Fig.D: sollevate lo sportello posteriore (pos.11) e mantenetelo aperto.
Noterete che nel cesto (pos.12) sono presenti delle estremità spor-
genti che andranno ad agganciarsi nell’asse (pos.4) dello sportello.
2. Accompagnate lo sportello posteriore con la mano fino ad adagiarsi
sul cesto in modo da chiudere ogni apertura. Verificate che il cesto
sia stabile e non possa sganciarsi.
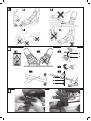
VERIFICA DEL FISSAGGIO LAMA (fig.M)
ATTENZIONE! Ogni operazione indicata di seguito deve essere
effettuata con il motore spento, la lama ferma, il cappuccio candela
staccato. Indossate guanti di protezione.
Questa verifica deve essere eseguita al primo utilizzo del rasaerba.
Evitate di ruotare a mano la lama in quanto è collegata direttamente con il
pistone e può mettere in compressione la camera di scoppio del motore.
1. Fig.M1: staccare il cappuccio candela (pos.16) dalla candela
(pos.15) in modo da evitare un avvio improvviso.
2. Fig.M2: inclinate il rasaerba come indicato in figura per accedere
sotto la macchina. Assicurate la posizione con cinghie per evitare
che la macchina vi cada addosso.
3. Fig.M3: con una mano trattenete la lama (pos.22) fuori dalla zona
tagliente e con una chiave esagonale a tubo verificare il serraggio
della vite (pos.23).

- 7 -
ATTENZIONE! Procedete ora con la messa in servizio del motore
leggendo ed applicando le istruzioni del capitolo seguente.
MOTORE A SCOPPIO CICLO 4 TEMPI (4T)
ATTENZIONE! Ogni operazione indicata di seguito deve essere
effettuata con il motore spento.
ATTENZIONE! Indossate guanti ed occhiali di protezione.
Il motore viene fornito senza olio di lubrificazione e senza carburante.
Far funzionare il motore senza olio o con un livello insufficiente lo
danneggia irrimediabilmente ed annulla la garanzia.
OLIO MOTORE
ATTENZIONE! Il motore è fornito senza olio di lubrificazione: non far
funzionare la macchina! È necessario prima effettuare il riempimento.
Utilizzare un olio per motore 4T di qualità e altamente detergente,
classificato API categorie SG e SF. Un olio SAE 15W-40 è indicato
per tutte le temperature di utilizzo, ma è sempre bene scegliere il tipo
di olio in base alle temperature medie della zona.
Temperatura ambiente di impiego Grado di viscosità dell’olio
da 0°C a 25°C SAE 20W, 10W-30, 15W-40
da 25°C a 35°C SAE 30W, 10W-30, 15W-40
sopra ai 35°C e fino ai 45°C SAE 40W
PRIMO UTILIZZO E RABBOCCO OLIO MOTORE (fig.E)
1. Posizionate stabilmente la macchina su una superficie orizzontale.
2. Svitare il tappo di rabbocco olio (pos.14) in senso antiorario e
pulire l’estremità.
3. Immettere la quantità necessaria di olio (vedi dati tecnici).
4. Infilare nuovamente il tappo, attendere qualche secondo e con-
trollare il livello dell’olio come indicato in figura, eventualmente
rabboccare. Il livello dell’olio motore deve essere compreso nel
campo indicato sull’asta del tappo; una quantità inferiore o maggiore
di quella prescritta danneggia il motore.
5. Riavvitare il tappo ruotandolo in senso orario.
6. Pulire con uno straccio eventuali gocce di olio sulla macchina.
UTILIZZI SUCCESSIVI, CONTROLLO LIVELLO E RABBOCCO OLIO MOTORE
ATTENZIONE! Il controllo deve essere effettuato a motore freddo
prima di ogni utilizzo.
1. Posizionate stabilmente la macchina su una superficie orizzontale.
2. Svitare il tappo di rabbocco olio (pos.14) in senso antiorario e
pulire l’estremità.
3. Infilare nuovamente il tappo, attendere qualche secondo e con-
trollare il livello dell’olio come indicato in figura, eventualmente
rabboccare. Il livello dell’olio motore deve essere compreso nel
campo indicato sull’asta del tappo; una quantità inferiore o maggiore
di quella prescritta danneggia il motore.
4. Riavvitare il tappo ruotandolo in senso orario.
5. Pulire con uno straccio eventuali gocce di olio sulla macchina.
RIFORNIMENTO CARBURANTE
ATTENZIONE! Pericolo di incendio ed esplosione. Effettuare il
rifornimento di carburante a motore spento, in un luogo all’aperto
e ventilato. Se versato sulla macchina o sul pavimento, asciugare
bene prima di avviare la macchina.
ATTENZIONE! Pericolo di incendio ed esplosione. Non versare
il carburante sulle superfici calde del motore.
Utilizzare solo benzina senza piombo per veicoli (benzina verde o
Eurosuper) con numero di ottano 95. Non utilizzare mai miscele olio-
benzina, carburante sporco o vecchio oppure benzina contenente alcool.
Fate attenzione a non lasciare penetrare nel serbatoio acqua o sporco.
1. Posizionate stabilmente la macchina su una superficie orizzontale.
2. Svitare il tappo serbatoio (pos.18) ruotando in senso antiorario.
3. Riempire il serbatoio (pos.17) senza farlo tracimare utilizzando un
imbuto largo (non incluso). Osservare eventuali indicazioni poste
sul serbatoio; se non sono presenti, mantenere il livello massimo
5cm sotto il bordo.
4. Avvitare bene il tappo ruotando in senso orario.
AVVIAMENTO ED ARRESTO
ATTENZIONE! Prima di avviare la macchina è obbligatorio
indossare tutti i dispositivi di protezione individuale (non inclusi),
citati nelle Avvertenze di sicurezza.
ATTENZIONE! Non appena il motore si metterà in moto la lama
comincerà a girare.
Prima di procedere nell’avviamento del motore verificare di aver
effettuato le operazioni richieste dai capitoli precedenti per la messa
in servizio della macchina e del motore.
AVVIAMENTO A MOTORE FREDDO
1. Verificare il livello dell’olio motore e riempire di carburante il
serbatoio.
2. Azionare la leva comando aria (pos.26) in posizione di AVVIO
(aria chiusa).
3. Con la mano sinistra tirare e trattenere contro il manico la leva di
avvio (pos.2)
4. Con la mano destra afferrare la maniglia di avviamento (pos.8),
tirare lentamente fino a trovare resistenza e poi tirare energicamente
con un colpo deciso; ad avviamento avvenuto, accompagnare la
maniglia in sede senza rilasciarla di scatto. Se il motore non si
avvia, ripetere questa operazione alcune volte; se l’avvio non va a
buon fine, consultare il capitolo ‘PROBLEMI, CAUSE E RIMEDI’.
5. Attendere qualche secondo che il motore prenda velocità e poi
posizionare la leva comando aria (pos.26) in posizione di MARCIA
(aria aperta) senza mai rilasciare la leva di avvio (pos.2).
Nota: non lasciare troppo tempo la leva comando aria nella posi-
zione di avvio altrimenti il motore tenderà a ingolfarsi.
AVVIAMENTO A MOTORE CALDO
6. Effettuare le medesime operazioni indicate sopra con la sola diffe-
renza di posizione subito la leva comando aria (pos.26) in posizione
di MARCIA (aria aperta).
SPEGNIMENTO DEL MOTORE ED ARRESTO DELLA LAMA
ATTENZIONE! Il motore e la lama girano ancora per alcuni
secondi dopo aver spento la macchina.
1. Per spegnere il motore rilasciare la leva di avvio (pos.2) mantenendo
le mani appoggiate al manico superiore.
RODAGGIO MOTORE
Nelle prime 10 ore di funzionamento il motore non deve essere
sollecitato eccessivamente; perciò all’interno di questo periodo non
far funzionare a vuoto al massimo numero di giri e durante l’uso non
forzare la macchina tagliando erba alta; una sollecitazione eccessiva
può essere avvertita sentendo il regime di rotazione del motore che
da costante diventa più basso con un rumore più cupo.
Vi consigliamo di ripetere queste operazioni alcune volte prima di ini-
ziare il lavoro in modo da familiarizzare il più possibile con i comandi.
Se osservate delle anomalie di funzionamento spegnete la macchina
e consultate il capitolo “Problemi, cause e rimedi”.
Quando non lavorate spegnete la macchina.

- 8 -
ISTRUZIONI D’USO
Dopo aver letto attentamente i capitoli precedenti, seguite scrupolosa-
mente queste istruzioni che vi permetteranno di ottenere il massimo
delle prestazioni.
Procedete con calma in modo da prendere familiarità con tutti i
comandi; solo dopo aver acquisito una buona esperienza riuscirete
a sfruttarne a fondo tutte le potenzialità.
LAMA
Il tipo, le dimensioni e l’efficienza della lama (pos.22) sono fonda-
mentali per la buona riuscita del lavoro che vi state apprestando ad
eseguire, mantenetela sempre affilata e in perfette condizioni.
Vista da sotto (posizione di montaggio) deve ruotare in senso an-
tiorario. Ogni estremità è composta da un lato tagliente (nel senso
di rotazione) e da un lato piegato verso l’interno della scocca del
rasaerba. Quando il lato corto è stato consumato per metà a seguito
delle affilature, allora è necessario sostituirla.
La dimensione caratteristica della lama è la misura in diagonale del
lato lungo (diametro di taglio): osservate quanto indicato nei dati
tecnici allegati per individuare la dimensione di taglio e poter installare
il ricambio corretto.
TAGLIO DEL PRATO ERBOSO
Procedete con calma e seguite attentamente le indicazioni di seguito
riportante:
• Osservate le figure L ed agite di conseguenza.
• Eliminate dal prato erboso gli oggetti estranei come sassi, fili,
tubazioni, rami e oggetti ecc. Fate attenzione ai pozzetti e ai punti
sporgenti di innaffiatura.
• Evitate di calpestare l’erba per non schiacciarla.
• Indossate i dispositivi di protezione individuale elencati nel cap.
Avvertenze.
• Affilate la lama.
• Controllate il livello dell’olio motore.
• Procuratevi il carburante necessario, un imbuto e uno straccio
e fate rifornimento nel serbatoio. Non effettuare il rifornimento
sul tappeto erboso perché il carburante è velenoso per l’erba.
• Regolate l’altezza di taglio variando la distanza tra lama e ter-
reno (fig.G). Afferrate la leva di regolazione (pos.21) e, come
indicato in figura, inseritela in una delle asole poste sulla scocca.
Si consiglia di non tagliare più di 1/3 dell’altezza del filamento
erboso, per non danneggiare le piante e impedirne la successiva
crescita. Se il manto erboso è alto e/o particolarmente folto sarà
necessario effettuare due o più passate, regolando l’altezza di
taglio in modo graduale.
• Montare il cesto di raccolta (pos.12) e verificare che gli sportelli
siano chiusi.
Operatore:
Mantenete la posizione d’uso illustrata nelle figure L, cioè con rasaerba
posto davanti a voi; il manico superiore vi manterrà a distanza di sicurez-
za dalla zona di taglio. Non mettetevi mai di fianco o davanti al rasaerba.
Se utilizzate il rasaerba senza cesto di raccolta fate attenzione al
movimento dei vostri piedi che devono sempre rimanere a distanza di
sicurezza; in particolare prestare la massima attenzione nei movimenti
per far arretrare il rasaerba, nell’inversione di marcia e nel taglio su
un terreno in pendio.
Per evitare problemi muscolari derivanti da una postura scorretta,
cercate per quanto possibile di mantenere diritta la schiena ed evi-
tate di piegarvi in avanti, distendete in avanti le braccia e mantenete
l’equilibrio senza appoggiarvi sopra il manico.
Avanzamento:
Afferrare con entrambe le mani il manico superiore e camminando
lentamente spingete in avanti il rasaerba.
Taglio:
L’uso delle cuffie antirumore riduce anche eventuali avvertimenti
sonori per richiamare la vostra attenzione (esempio il clacson di un
veicolo), evitate quindi di stazionare in luoghi di transito e osservate
sempre con attenzione l’area in cui operate.
Avviate il rasaerba su una superficie pulita non erbosa e procedete
subito al taglio dell’erba. Si consiglia di avanzare nel lato lungo del
prato, per fasce parallele, in modo da ridurre al minimo i cambi di
direzione ed ottenere un buon effetto visivo dell’erba tagliata.
Evitate di passare sopra gli accumuli di erba tagliata precedentemente per
non intasare lo scarico e per non sovraccaricare il funzionamento del motore.
Quando il cesto sarà pieno, spegnete il motore, attendete l’arresto lama e
scollegate il cappuccio candela prima di sganciare il cesto per svuotarlo.
La rotazione della lama, oltre a tagliare l’erba, produce un vortice
d’aria che aspira l’erba tagliata e qualsiasi altra cosa sotto la scocca
e nelle sue immediate vicinanze; prestate attenzione quando passate
nei bordi del prato per non aspirare ghiaia, lapillo, corteccia ecc. che
danneggiano la macchina e vengono eiettati attorno con pericolo di
colpire persone o cose.
Prestate attenzione agli ostacoli (radici sporgenti, pozzetti, marciapie-
di, punti di illuminazione ecc.), aggirateli a distanza e successivamente
con una forbice o un tagliabordi completate il taglio.
Non fate urtare la macchina contro ostacoli fissi come un muro, una
recinzione, un tronco d’albero ecc. perché potrebbe danneggiarsi.
In caso necessità e di pericolo rilasciate la leva (pos.2) che spegnerà il motore.
MANUTENZIONE
ATTENZIONE! Ogni operazione indicata di seguito deve essere
effettuata con il motore spento, la lama ferma, il cappuccio candela
staccato e il motore raffreddato a temperatura ambiente.
ATTENZIONE! Non manomettete o tentate di riparare la macchina.
ATTENZIONE! In caso di dubbi su come procedere consultate
un centro assistenza autorizzato.
Pulite regolarmente ed abbiate cura della vostra macchina, vi garan-
tirete una perfetta efficienza ed una lunga durata della stessa.

- 9 -
MANUTENZIONE ORDINARIA E PERIODICA
Componenete Quando Cosa fare
Rasaerba e lama Dopo di ogni uti-
lizzo
•Rimuovete l’erba e la terra utilizzando
uno bastoncino di legno e una spazzo-
la in materiale plastico.
•Verificate l’assenza di rotture, deforma-
zioni, cricche, piegamenti, schiaccia-
menti, usura, corrosione.
•Verificate lo stato di usura della lama,
l’affilatura e il bilanciamento. Affilare o
sostituire secondo necessità.
Cesto di raccolta Dopo di ogni uti-
lizzo
Rimuovete l’erba e la terra, non utilizzare
oggetti appuntiti. Se necessario lavare
con acqua ed asciugare bene.
Manico e leve di
comando
Dopo di ogni uti-
lizzo
Pulire le impugnature dallo sporco ed
asciugarle bene da tracce di olio, carbu-
rante o umidità.
Motore Dopo di ogni uti-
lizzo
•Con un pennello mantenere pulite le
alette di raffreddamento.
•Mantenere libere e pulite tutte le feritoie
di ventilazione presenti nel motore.
Tubazioni del car-
burante
Dopo di ogni uti-
lizzo
•Verificare l’assenza di tagli o screpolature.
•Verificare che non ci siano perdite di
carburante. Se necessario far sosti-
tuire le tubazioni a cura di un centro
assistenza autorizzato.
•Il filtro carburante, se presente, è colloca-
to lungo la tubazione del carburante, tra
serbatoio e carburatore. Verificare e pulire
almeno ogni 3 pieni del serbatoio o nel
caso di malfunzionamento del motore.
Filtro dell’aria Pulire ogni 50 ore
di funzionamento.
Sostituire ogni 100
ore di funziona-
mento.
Nel caso di utilizzo
in ambienti pol-
verosi ridurre gli
intervalli di pulizia
e sostituzione.
1.Aprire il coperchio della cassetta del
filtro (fig.N2 pos.19).
2.Togliere l’elemento filtrante.
3.Batterlo delicatamente contro un
superficie in modo che le impurità si
stacchino.
4.Rimontare il filtro e il suo coperchio.
Candela Pulire ogni 25 ore
di funzionamento.
Sostituire ogni 100
ore di funziona-
mento.
Per il tipo di cande-
la vedere i dati tec-
nici delle istruzioni.
1.Staccare il cappuccio candela e svi-
tare la candela con l’apposita chiave
(fig.F pos.15-16).
2.Esaminare la candela e nel caso
fossero presenti residui carboniosi
eliminarli con una spazzola metallica
(non inclusa). Se l’elettrodo fosse
eccessivamente usurato o l’isolante
danneggiato, sostituire la candela.
3.Misurare la distanza tra gli elettrodi
con uno spessimetro (non incluso)
osservando il valore indicato in fig.F,
eventualmente regolare.
4.Avvitare la candela a mano.
5.Serrare la candela tramite l’apposita chia-
ve per circa ¼ di giro con candela usata,
di circa ½ giro con candela nuova.
Verifica del livello
dell'olio motore
Prima di ogni uti-
lizzo
Effettuate il controllo e rabbocco secon-
do quando indicato nel capitolo “Motore
a scoppio”.
Sostituzione olio
motore
Dopo il primo
mese o le prime
20 ore di funzio-
namento, Succes-
sivamente ogni 12
mesi o 80 ore di
funzionamento.
•La sostituzione dell’olio motore deve
essere eseguita da un centro assisten-
za autorizzato.
•L’olio esausto va smaltito negli appositi
centri di raccolta e smaltimento.
Controllo gene-
rale
Ogni 12 mesi o ogni
80 ore di funziona-
mento in corrispon-
denza del cambio
olio motore.
Consegnate la macchina ad un centro
assistenza autorizzato per una controllo
generale.
AFFILATURA E SOSTITUZIONE DELLA LAMA
ATTENZIONE! Ogni operazione indicata di seguito deve essere effet-
tuata con il motore spento, la lama ferma, il cappuccio candela staccato
e il serbatoio del carburante vuoto. Indossate guanti di protezione.
ATTENZIONE! Il montaggio della lama deve essere eseguito a
perfetta regola d’arte. Un montaggio errato genera pericoli.
Se si deve sostituire la lama per il suo cattivo stato utilizzate esclu-
sivamente parti di ricambio originali di uguali dimensioni e forma.
Prima di procedere osservate attentamente i componenti e la fig.M.
Se non avete dimestichezza con la manipolazione e l’assemblaggio
di componenti meccanici, vi consigliamo di rivolgervi ad un centro
assistenza autorizzato.
Evitate di ruotare a mano la lama in quanto è collegata direttamente
con il pistone e può mettere in compressione la camera di scoppio
del motore.
1. Indossate i guanti a protezione delle mani.
2. Fig.M1: staccare il cappuccio candela (pos.16) dalla candela
(pos.15) in modo da evitare un avvio improvviso e svuotare il ser-
batoio.
4. Fig.M2: inclinate il rasaerba come indicato in figura per accedere
sotto la macchina (tappo serbatoio e carburatore si troveranno nella
parte alta). Assicurate la posizione con cinghie per evitare che la
macchina vi cada addosso.
5. Fig.M3: con una mano trattenete la lama (pos.22) fuori dalla zona
tagliente e con una chiave esagonale a tubo svitate la vite (pos.23).
Togliete la rondella (pos.24) e smontate la lama.
6. Fig.M4: affilate le due parti taglienti della lama mantenendo l’angolo
di taglio.
7. Fig.M5: verificare la bilanciatura della lama, eventualmente affilare
ancora uno dei taglienti per controbilanciare.
8. Fig.M6: rimontare la lama sull’estremità dell’albero motore (fare
attenzione ai perni di posizionamento e ai rispettivi fori sulla lama); la
parte tagliente della lama deve essere rivolta verso il terreno. Infilate
la rondella ed avvitate la vite con una coppia di serraggio di 30Nm.
9. Verificate visivamente il corretto assemblaggio della lama.
10. Rimettete il rasaerba in orizzontale ed avviate il motore per effet-
tuare una prova di funzionamento a vuoto per 30 secondi.

- 10 -
PROBLEMI, CAUSE E RIMEDI
PROBLEMA CAUSE RIMEDI
Il motore non si avvia Leva di avvio non premuta Premere a fondo la leva
di avvio
Mancanza di carburante nel
serbatoio
Rifornire con carburante
Carburante vecchio, sporco o
con acqua
Svuotare il serbatoio e
riempire con carburante
nuovo
Rubinetto del carburante chiu-
so (se presente)
Aprire il rubinetto
Le tubazioni del carburante
sono ostruite o piegate
Pulire le tubazioni carbu-
rante e verificare che non
ci siano piegamenti lungo
il percorso
Serbatoio sporco o con acqua
al suo interno
Svuotare completamente il
serbatoio ed effettuare un
nuovo rifornimento
Candela sporca, usurata o
guasta
Pulire la candela e
controllare la distanza tra
gli elettrodi, eventualmente
sostituirla.
Cappuccio candela staccato Infilare il cappuccio sulla
candela
Guasto meccanico o elettrico Rivolgersi ad un centro di
assistenza autorizzato
Il motore si avvia ma
si spegne subito.
Il motore si spegne
durante il taglio.
Il tappo del serbatoio del
carburante ha il foro di sfiato
otturato
Pulire il tappo del serbato-
io del carburante
Carburante esaurito Rifornire
Candela difettosa Sostituire la candela
L'erba impedisce alla lama
di ruotare (possibile a cesto
pieno).
Svuotare il cesto e pulire
l'interno scocca.
Altezza di taglio eccessiva. Diminuire l'altezza di
taglio.
Il cesto non si riempe
e l'erba tagliata rima-
ne nel prato.
Erba bagnata Effettuare il taglio con erba
asciutta
Feritoie di ventilazione del
cesto ostruite
Pulire il cesto di raccolta
La macchina fa fatica
a tagliare
Lama senza tagliente Affilare i due taglienti
Lama montata al contrario Smontare la lama e rimon-
tarla nel verso corretto
ATTENZIONE! Se dopo aver eseguito gli interventi sopra descritti
la macchina non funziona correttamente o in caso di anomalie
diverse da quelle indicate, portatela presso un centro di assistenza
autorizzato esibendo la prova di acquisto e richiedendo ricambi
originali. Fate sempre riferimento alle informazioni riportate
sull’etichetta dati tecnici.
IMMAGAZZINAMENTO
Effettuate una accurata pulizia di tutta la macchina e sue parti acces-
sorie (vedi paragrafo Manutenzione). Proteggete le parti non verniciate
con un olio protettivo ed utilizzate l’imballo originale per proteggerla.
Riponete la macchina lontano dalla portata dei bambini, in posizione
stabile e sicura. Il luogo dovrà essere asciutto, privo da polveri,
temperato e protetto dai raggi solari diretti.
Al locale di rimessaggio non devono avere accesso i bambini e gli
estranei.
ATTENZIONE! Superfici calde. Alcune parti rimangono a
temperature elevate anche per alcune ore dopo l’arresto della
macchina; attendete il raffreddamento completo prima dell’im-
magazzinamento.
1. Togliere tutto il carburante dal serbatoio.
2. Versare qualche goccia di olio nel foro della candela, rimettere
la candela e mettere il motore in posizione di compressione
(azionare piano la leva di avviamento a strappo).
SMALTIMENTO
Per la salvaguardia ambientale procedete secondo le leggi vigenti
del Paese in cui vi trovate. Rivolgetevi alle autorità competenti per
maggiori notizie in merito.
Quando la macchina non è più utilizzabile né riparabile, consegnatela
con l’imballo ad un punto di raccolta per il riciclaggio.
GARANZIA
Il prodotto è tutelato a norma di legge contro non conformità rispetto
alle caratteristiche dichiarate purché sia stato utilizzato esclusivamente
nel modo descritto dalle istruzioni, non sia stato manomesso in alcun
modo, sia stato conservato correttamente, sia stato riparato da tecnici
autorizzati e, ove previsto, siano stati utilizzati solo ricambi originali.
In caso di utilizzo industriale o professionale oppure in caso di impiego
simile la garanzia ha validità di 12 mesi.
Per emettere una richiesta di intervento in garanzia è necessario
presentare la prova di acquisto al rivenditore o ad centro assistenza
autorizzato.

- 11 -

- 12 -
g
Thank you for choosing our machine. Hereinafter it will be referred
to as “petrol lawnmower”.
WARNING! The petrol lawnmower is ideal for mowing grass on
open and flat surfaces, such as a garden. Any other use is prohibited.
This manual contains information deemed necessary for proper use,
knowledge and standard machine maintenance. They do not include
information on gardening techniques; the user can find additional
information in specific books or publications or by attending specia-
lised training courses.
COMPONENTS
Refer to fig. A and following;
1. Upper handle
2. Engine on/off lever
3. Lower handle
4. Fixing plate
5. Fastening handwheel
6. Cable locking clamp
7. Handle support
8. Recoil starter handle
9. Casing
10. Wheel
11. Rear door
12. Grass collection box
13. Internal combustion engine
14. Lubricant level and topping up cap
15. Spark plug
16. Spark plug cap
17. Fuel tank
18. Fuel cap
19. Air filter
20. Exhaust
21. Cutting height adjustment lever
22. Blade
23. Screw
24. Washer
25. Oil drain plug
26. Air lever
INSTALLATION
WARNING! The manufacturer is not liable for any direct and/
or indirect damage caused by incorrect installation.
TRANSPORT
Always use the packaging when transporting the machine; this will
protect it from impact, dust and humidity which can compromise
normal operation.
During transportation, unhook the box, disconnect the spark plug cap,
fold the upper part of the handle over the engine (after loosening the
fastening handwheels) and completely empty the fuel tank.
Lift the machine with a second person to help you, never by yourself,
keeping it horizontal. If transporting on a vehicle, secure the machine
using tensioning straps in order to prevent sudden movements due to
braking, driving around corners, driving over bumps, etc.
HANDLING
Carrying the machine over a non-grassy area must always be done
with the engine off, pushed by the user. It is possible to keep the
engine on over already cut grass, and take advantage of the drive
(where fitted), though it is possible that passage of the lawnmower
may “mark” the grass with an unattractive result.
SWITCHING ON
When choosing where to use the machine, the following should be
considered:
• that there is no bad weather, such as rain or storms.
• that there should be a large operational area free from obstacles.
• that the area is well lit with natural or artificial light.
• That the turf is suitable for mowing and the grass is not excessively
tall, that it is not wet, and that it is free of rocks, protruding tree roots,
branches, pipes, electric cables, objects, etc. that would damage
the machine and endanger the user.
• that unauthorised personnel, children and pets are not present.
ASSEMBLY
WARNING! Before carrying out the following operations, ensure
that the spark plug cap is disconnected.
Take the machine and its components out and visually ensure that
they are in perfect condition.
HANDLE ASSEMBLY (fig. C)
1. Fig. C1: Remove the lower handle (pos.3) and fasten it with screws
(pos.5) to the two plates (pos.4) of the machine, to the right and
left of the rear door (pos.11). In some models, there is more than
one position for fastening the lower handles, for adjusting the final
height of the upper handle. The shields and control cables must be
positioned above the handle. Note: the lower handle may consist
of two parts, rather than just one.
2. Fig. C2: Take the upper handle (pos.1) and position it at the end
of the lower handle, aligning the fixture holes.
3. Fig. C3: Screw the handwheels (pos.5) keeping the cable sheaths
above the handle. If the hardware is quick release (handwheel and
lever), then screw the handwheel without tightening and then tilt the
lever by 90°. Insert the clamps (pos.8) above the handles in order
to secure the sheaths and control cables.
4. Fig. C4: Insert the threaded part of the ring support (pos.7) for
the starter handle (pos.8) on the hole on the right side of the upper
handle and slightly tighten the nut. Now, grip the starter handle
located above the engine, slowly pull it up to the support and insert
the cord inside the ring. At this point, tighten the nut all the way and
release the handle, which will stay on the freshly installed support.
ASSEMBLY OF THE GRASS COLLECTION BOX (Fig. D)
WARNING! Hooking and unhooking the grass collection box
while using the lawnmower must only take place while the engine
is switched off, with the blade completely still and the spark plug
cap off.
1. Fig. D: Lift the rear door (pos.11) and keep it open. Note that in
the grass collection box (pos.12) there are protruding ends that will
hook onto the door’s axis (pos.4).
2. Guide the rear door with your hand until it rests onto the box in
order to close every opening. Check that the grass collection box
is stable and cannot be unhooked.
CHECK BLADE FASTENING (fig. M)
WARNING! All operations indicated below must be carried out
with the engine switched off, the blade still, and the spark plug cap
disconnected. Always wear protective gloves.
This check must be carried out upon first using the lawnmower.
Avoid turning the blade by hand as it is directly connected to the piston
and may compress the engine combustion chamber.
1. Fig. M1: Disconnect the spark plug cap (pos.16) from the spark
plug (pos.15) to prevent suddenly starting the engine.
2. Fig. M2: Tilt the lawnmower as shown in the figure to gain access
under the machine. Secure the position with straps to prevent the
machine from falling on you.
3. Fig. M3: Use one hand to hold the blade (pos.22) away from the
cutting area, and using a socket hex key, check that the screw is
tightened (pos.23).
WARNING! Take the following steps for the initial start-up of
the engine. Read and follow the instructions in the next chapter.
4-STROKE INTERNAL COMBUSTION ENGINE (4T)
WARNING! All the operations described below must be carried
out with the engine switched off.
WARNING! Always wear safety gloves and safety goggles.
The engine is supplied without lubricating oil and without fuel. Starting
the engine without oil or with an insufficient amount of oil will irre-
parably damage it and cause the warranty to become null and void.

- 13 -
ENGINE OIL
WARNING! The engine is supplied without lubricating oil: do
not operate the machine! You must first add oil to the machine.
Use a quality, highly detergent oil for 4T engines, classified under API
categories SG or SF. An SAE 15W-40 oil is suitable for all working
temperatures, but it is always best to choose the oil type based on
the average temperatures of the area.
Ambient temperature of use Degree of oil viscosity
from 0°C to 25°C SAE 20W, 10W-30, 15W-40
from 25°C to 35°C SAE 30W, 10W-30, 15W-40
Above 35° and up to 45° C SAE 40W
FIRST USE AND TOPPING UP THE ENGINE OIL (fig.E)
1. Position the machine on a stable, level surface.
2. Unscrew the oil cap (pos.14) in an anti-clockwise direction and
wipe the end.
3. Fill with the required quantity of oil (see the technical specifications).
4. Screw the cap back on, wait a few seconds, check the oil level as
shown in the figure, and top up if necessary. The engine oil level must
be within the range indicated on the rod attached to the cap; a greater
or lesser quantity than the one prescribed will damage the engine.
5. Re-tighten the cap by turning it clockwise.
6. Wipe with a cloth any drops of oil spilled on the machine.
SUBSEQUENT USE, LEVEL CHECK AND TOPPING UP THE ENGINE OIL
WARNING! You must check the oil level when the engine is
cold before each use.
1. Position the machine on a stable, level surface.
2. Unscrew the oil cap (pos.14) in an anti-clockwise direction and
wipe the end.
3. Screw the cap back on, wait a few seconds, check the oil level as
shown in the figure, and top up if necessary. The engine oil level must
be within the range indicated on the rod attached to the cap; a greater
or lesser quantity than the one prescribed will damage the engine.
4. Re-tighten the cap by turning it clockwise.
5. Wipe with a cloth any drops of oil spilled on the machine.
FILLING UP WITH FUEL
WARNING! Risk of fire and explosion. Refill with fuel with
the engine off, in a well ventilated outdoor area. If the fuel has
splashed onto the machine or pavement, wipe it thoroughly before
starting the machine.
WARNING! Risk of fire and explosion. Do not pour fuel onto hot
engine surfaces.
Only unleaded car petrol should be used (or EuroSuper) with a mini-
mum 95 octane. Never use a petrol-oil mixture, dirty or old fuel, or
petrol blended with alcohol.
Do not allow water or dirt to enter the tank.
1. Position the machine on a stable, level surface.
2. Unscrew the tank cap (pos.18), turning it anti-clockwise.
3. Fill the tank (pos. 17) without letting it overflow, using a large funnel
(not included). Follow any instructions placed on the tank; if there
are none, keep the maximum level 5cm below the rim.
4. Tighten the cap by turning it clockwise.
SWITCHING ON AND OFF
WARNING! Before starting the machine, it is compulsory to
wear all personal protective equipment (not included), mentioned
under the chapter “Safety Warnings”.
WARNING! As soon as the engine starts, the blade will start
turning.
Before starting the engine, ensure that you have completed the
operations requested in the previous chapters for initial start-up of
the machine and engine.
COLD ENGINE START-UP
1. Check the engine oil level and fill the fuel tank.
2. Turn the air control lever (pos.26) in position START (air off).
3. With your left hand pull and hold against the handle the on/off
lever(pos.2)
4. With the right hand grasp the starter handle (pos.8), pull slowly
until resistance and then pull hard with a decisive blow; after start,
accompany the handle when not release the shutter. If the engine
does not start, repeat this process a few times; If the startup is
successful, see ‘PROBLEMS, CAUSES AND SOLUTIONS’.
5. Wait a few seconds for the engine speed takes place and then the
air control lever (pos.26) in position RUN
(air open) and never
release the on/off lever(pos.2).
Note: Do not leave it too long the air control lever to the start position
or the engine will tend to become engulfed.
HOT ENGINE START-UP
6. Carry out the same operations described above with the only
difference of position once the lever control air (pos.26) in position
RUN (open air).
TURNING OFF THE ENGINE AND STOPPING THE BLADE
WARNING! The engine and the blade continue to turn for a
few seconds after the machine is switched off.
1. To turn the engine off, release the start-up lever (pos. 2) keeping
your hands on the upper handle.
BREAKING-IN THE ENGINE
During the first 10 hours of operation, do not strain the engine too
much; for this reason, do not operate the machine at the maximum
RPM when idle and during use do not force the machine by cutting
tall grass; excessive strain can be noticed as the engine rotation
speed changes from constant and becomes a lower, deeper noise.
We recommend repeating these operations several times before
starting work, in order to familiarise yourself with the controls as
much as possible.
If you notice any malfunctions, stop the machine and consult the
chapter “Problems, causes and solutions”.
Turn the machine off when not in use.
USER INSTRUCTIONS
After reading the previous chapters carefully, apply these instructions
scrupulously to obtain maximum performance.
Proceed calmly so as to become familiar with all the controls; after
having gained sufficient experience, you will be able to make full use
of its capacities.
BLADE
The type, size and efficiency of the blade (pos.22) are essential for a
successful outcome of the work you are about to do; keep it always
sharpened and in perfect condition.
Viewed from below (assembly position), it should rotate in an anti-
clockwise direction. Each end consists of a cutting edge (on the
direction of rotation), and a side bent towards the inside of lawnmower
casing. When the short side is half consumed due to sharpening,
then it is time to replace it.
The characteristic size of the blade is the diagonal measurement of
the long side (cutting diameter): follow the technical specifications
attached to find the cutting size and install the correct replacement.
MOWING THE LAWN
Proceed calmly and carefully follow the instructions below:
• Study figure L and act accordingly.
• Eliminate from the lawn any foreign objects, such as rocks, wires,
pipes, branches and objects, etc. Pay attention to sumps and
protruding sprinklers.
• Avoid trampling on grass and crushing it.
• Wear the personal protective equipment listed in the “Warnings”
chapter.
• Sharpen the blade.
• Check engine oil level.
• Get the necessary fuel, a funnel and a rag, and refill the tank. Do
not refill the tank on the lawn as the fuel is poisonous to grass.
• Adjust the cutting height by changing the distance between the blade
and the soil (fig. G). Grab the adjustment lever (pos. 21) and, as

- 14 -
shown in the figure, insert it in one of the slots on the casing. We
recommend cutting no more than 1/3 of the grass strand, in order
to avoid damaging the plants and preventing future growth. If the
grass is tall and/or particularly thick, you will have to go over it two
or more times, gradually adjusting the cutting height.
Install the grass collection box (pos.12) and check that the doors
are closed.
Operator:
Hold the position of use shown in figure L, with the lawnmower in front
of you; the upper handle will keep you at a distance from the cutting
area. Never be on the side or in front of the lawnmower.
If using the lawnmower without grass collection box, pay attention
to the movement of your feet, which must always remain at a safe
distance; in particular, pay close attention when moving the lawnmo-
wer backwards, when reversing, and when mowing along a slope.
To prevent muscular problems due to poor posture, try to keep
your back straight as much as possible and avoid leaning forward,
stretch your arms forward and keep your balance without leaning
on the handle.
Moving forward:
Grip the upper handle with both hands, walk slowly and push the
lawnmower forward.
Mowing:
Using the safety earmuffs also attenuates any warning sounds used
to draw your attention (such as the horn of a vehicle): therefore, do
not station yourself in transit areas and always closely observe the
area in which you operate.
Start the lawnmower on a clean, non-grassy area, and begin mowing
the lawn straight away. We recommend going along the long side of
the lawn, in parallel lines, to reduce the number of direction changes
to a minimum and achieve a good visual effect of mown grass.
Avoid going over piles of previously mown grass so as to avoid
clogging the discharge and overloading the engine.
When the grass collection box is full, switch off the engine, wait for
the blade to come to a stop and disconnect the spark plug cap, before
unhooking the box to empty it.
The rotation of the blade, in addition to mowing grass, creates an
air vortex that suctions the cut grass and any other object under the
casing and its immediate vicinity; pay attention when going along
the edges of the lawn not to suction pebbles, lapilli, bark, etc. that
could damage the machine and get thrown around with the danger
of hitting persons or property.
Pay attention to obstacles (protruding roots, sumps, pavement, spot-
lights, etc.), keep a distance as you go around them, and afterwards
trim around them with a pair of scissors or an edger.
Do not bump the machine against fixed obstacles such as walls,
fences, tree trunks, etc. because the machine could be damaged.
If necessary and in case of danger, release the lever (pos. 2) to turn
off the engine.
MAINTENANCE
WARNING! Each operation indicated below must be carried
out while the engine is off, the blade stopped, the spark plug cap
disconnected and the engine cooled to ambient temperature.
WARNING! Do not tamper with or attempt to repair this machine.
WARNING! If in doubt, contact an authorised service centre.
Clean and maintain your machine regularly, to ensure that it remains
perfectly efficient and has a long working life.
ROUTINE AND PERIODIC MAINTENANCE
Component When What to do
Lawnmower
and blade
After each use •Remove earth and grass using a small
wooden stick and a plastic brush.
•Check that there are no breaks, deforma-
tions, cracks, bending, crushing, wear or rust.
•Check the state of wear of the blade, its
sharpness and its balance. Sharpen or
replace if necessary.
Grass col-
lection box
After each use Remove earth and grass, do not use sharp
objects. If necessary, wash with water and
dry thoroughly.
Control levers
and handle
After each use Clean the dirt off the handles, and thorou-
ghly wipe traces of oil, petrol or dampness.
Engine After each use •Using a brush, clean the cooling fins.
•Keep all air vents in the engine clean and
unobstructed.
Fuel pipes After each use •Check that there are no cuts or cracks.
•Check that there are no fuel leaks. If
necessary, have the pipes replaced by an
authorised service centre.
•The fuel filter, where fitted, is located along
the fuel line, between the tank and carbu-
rettor. Check and clean at least every three
tank fills, or in case the engine malfunctions.
Air filter Clean every 50
hours of use.
Replace every
100 hours of use.
In case of use
in dusty are-
as, clean and
replace parts
more often.
1. Open the filter box cover (fig.N2 pos.19).
2. Remove the filter element.
3. Gently knock it against a surface so the
dirt comes off.
4. Reassemble the filter and its cover.
Spark plug Clean every 25
hours of use .
Replace every
100 hours of
use. For the
spark plug
type, check
the technical
specifications
in the manual.
1. Disconnect the spark plug cap and
unscrew the spark plug with the correct
spanner (fig.F pos.15-16).
2. Check the spark plug and in case of
carbon residue remove with a metal brush
(not included). Replace the spark plug if
the electrode is excessively worn or the
insulation is damaged.
3. Measure the distance between the
electrodes using a thickness gauge (not
included) cross-checking with the value
indicated in fig. F; adjust if necessary.
4. Screw the spark plug by hand.
5. Secure a used spark plug with around
¼ turn of the spanner, and a new one with
around ½ turn of the spanner.
Engine oil
level check
Before each
use
Do a level check and top up as indicated in
the chapter “Internal combustion engine”.
Replacing
the engine
oil
Change the oil
after the first
month or after
the first 20 hours
of use. Then
change it every
12 months or
every 80 hours
of operation.
•The engine oil change must be done by
an authorised service centre.
•The used oil should be disposed of at
collection and disposal centres.
General
check-up
Every 12
months or eve-
ry 80 hours of
use at the same
time as the en-
gine oil change.
Take the machine to an authorised service
centre for a general check-up.
SHARPENING AND REPLACING THE BLADE
WARNING! Each operation indicated below must be carried out
while the engine is off, the blade stopped, the spark plug cap di-
sconnected and the fuel tank empty. Always wear protective gloves.
WARNING! The assembly of the blade must be carried out with
absolute precision. Incorrect assembly causes danger.

- 15 -
If you have to replace the blade because of its poor condition, only
use original spare parts of equal size and shape.
Before you start, carefully study the components and figure M. If you
are not familiar with handling and assembling mechanical compo-
nents, we recommend that you contact an authorised service centre.
Avoid turning the blade by hand as it is directly connected to the piston
and may compress the engine combustion chamber.
1. Wear protective gloves.
2. Fig. M1: Disconnect the spark plug cap (pos.16) from the spark plug
(pos.15) to prevent suddenly starting the machine, and empty the tank.
4. Fig. M2: Tilt the lawnmower as shown in the figure to gain access under
the machine (tank cap and carburettor will be in the upper part). Secure
the position with straps to prevent the machine from falling on you.
5. Fig. M3: Use one hand to hold the blade (pos.22) away from
the cutting area, and using a socket hex key, unscrew the screw
(pos.23). Remove the washer (pos.24) and remove the blade.
6. Fig. M4: Sharpen the two cutting edges of the blade, while retaining
the cutting angle.
7. Fig. M5: Check the balancing of the blade; if necessary, sharpen
one of the cutting edges more in order to counterbalance.
8. Fig. M6: Reinstall the blade on the end of the engine shaft (pay
attention to the positioning pins and the respective holes on the
blade); the cutting edge must face the soil. Insert the washer and
tighten the screw with a tightening torque of 30 Nm.
9. Visually check that the blade is correctly assembled.
10. Return the lawnmower to a horizontal position and start the engine
to carry out a dry test run for 30 seconds.
PROBLEMS, CAUSES AND SOLUTIONS
PROBLEM CAUSES SOLUTIONS
The engine
does not start
Start-up lever not
pressed
Fully press down the start-up lever
No fuel in the tank Refill with fuel
Old, dirty fuel or
fuel contains water
Empty the tank and refill with new
fuel
The fuel lines are
clogged or bent
Clean the fuel lines and check that
they are not bent
Tank is dirty or con-
tains water
Completely empty the tank and refill
with new fuel
Dirty, worn or bro-
ken spark plug
Clean the spark plug and check the
distance between the electrodes,
replace if necessary.
Spark plug cap di-
sconnected
Put the spark plug cap back on
Mechanical or elec-
trical failure
Contact an authorised service centre
The engine
starts but
stops imme-
diately. The
engine stops
during trim-
ming
The fuel tank cap has
a clogged bleed hole
Clean the fuel tank cap
No fuel Refuel
Defective spark plug Replace spark plug
The grass prevents
the blade from rota-
ting (possible when
the box is full).
Empty the grass collection box and
clean the casing interior.
Excessive cutting
height.
Lower the cutting height.
The grass
collection box
is not filling
up and the
grass stays
in the lawn.
The grass is wet Mow on dry grass
The grass collec-
tion box ventilation
slots are clogged
Clean the collection box
The machine
has trouble
trimming
Blade has no cut-
ting edge
Sharpen the two cutting edges
Blade installed
backwards
Remove the blade and reinstall it in
the correct sense
WARNING! If the machine still fails to operate correctly after
you have carried out the above operations, or in the event of ano-
malies other than those described above, take it to an authorised
service centre showing proof of purchase, and ask for original
spare parts. Always provide the information shown on the tech-
nical data label.
STORAGE
Clean the machine and all its accessories thoroughly (see Mainte-
nance section). Protect unpainted parts with protective oil and use
original packaging to protect the machine.
Store the machine in a stable and safe position out of children’s reach.
The place must be dry, free from dust, temperate and protected from
direct sunlight.
Keep children and unauthorised personnel out of the storage room.
WARNING! Hot surfaces. Some parts of the machine may stay
hot for several hours after it has been switched off. Wait for it to
cool down completely before storing it.
1. Remove all the fuel from the tank.
2. Pour a few drops of engine oil into the spark plug hole, put back
the spark plug and put the engine in the compression stroke
(slowly operate the recoil starter lever).
DISPOSAL
In order to protect the environment, proceed according to the local
laws in force. Contact the relevant authorities for more information.
When the machine is no longer usable or repairable, take the machine
and its packaging to a recycling centre.
WARRANTY
The product is protected by law against non-compliance with the de-
clared characteristics provided it is used only in the manner described
in the instructions, it has not been tampered with in any way, it has
been stored properly, has been repaired by authorized and, where
applicable, have been used only original spare parts.
In the case of industrial or professional use or when using such a
guarantee is valid for 12 months.
To issue a claim under warranty you must present proof of purchase
to your dealer or authorized service center.

-
 1
1
-
 2
2
-
 3
3
-
 4
4
-
 5
5
-
 6
6
-
 7
7
-
 8
8
-
 9
9
-
 10
10
-
 11
11
-
 12
12
-
 13
13
-
 14
14
-
 15
15
-
 16
16


in altre lingue
- English: Valex TS4024 User manual
Documenti correlati
-
 Valex 1497516 Manuale del proprietario
-
 Valex 1497511 Manuale del proprietario
-
 Valex 1497513 Manuale del proprietario
-
 Valex 1491971 Manuale del proprietario
-
 Valex 1491905 Manuale del proprietario
-
 Valex 1497500 Manuale del proprietario
-
 Valex 1496218 Manuale del proprietario
-
 Valex 1494802 Manuale del proprietario
-
 Valex 1497656 Manuale del proprietario
-
 Valex 1498461 Manuale del proprietario


Altri documenti
-
Atco Liner 19SV Istruzioni per l'uso
-
-
Toro 12-32 Rear Engine Rider Manuale utente
-
Toro 13-32H Rear-Engine Riding Mower Manuale utente
-
Toro H132 Rear-Engine Riding Mower Manuale utente
-
-
Mountfield HP454 Istruzioni per l'uso
-
-
-