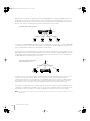
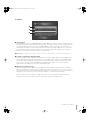
Yamaha MCX-2000 Manuale del proprietario
- Categoria
- Lettore CD
- Tipo
- Manuale del proprietario

YAMAHA ELECTRONICS CORPORATION, USA 6660 ORANGETHORPE AVE., BUENA PARK, CALIF. 90620, U.S.A.
YAMAHA CANADA MUSIC LTD. 135 MILNER AVE., SCARBOROUGH, ONTARIO M1S 3R1, CANADA
YAMAHA ELECTRONIK EUROPA G.m.b.H. SIEMENSSTR. 22-34, 25462 RELLINGEN BEI HAMBURG, GERMANY
YAMAHA ELECTRONIQUE FRANCE S.A. RUE AMBROISE CROIZAT BP70 CROISSY-BEAUBOURG 77312 MARNE-LA-VALLEE CEDEX02, FRANCE
YAMAHA ELECTRONICS (UK) LTD. YAMAHA HOUSE, 200 RICKMANSWORTH ROAD WATFORD, HERTS WD18 7GQ, ENGLAND
YAMAHA SCANDINAVIA A.B. J A WETTERGRENS GATA 1, BOX 30053, 400 43 VASTRA FRÖLUNDA, SWEDEN
YAMAHA MUSIC AUSTRALIA PTY, LTD. 17-33 MARKET ST., SOUTH MELBOURNE, 3205 VIC., AUSTRALIA
WF 37460
Printed in Malaysia
UCABG
© 2005 All rights reserved.
Digital Audio Server
OWNER’S MANUAL
MCX-2000

MCX-2000 Owner’s Manual
2
Table of Contents.................................................2
Preface ..................................................................3
What’s Included...................................................................................... 4
Feature Overview ................................................................................... 4
Audio Playback Functions........................................................................ 4
Audio Recording Functions...................................................................... 5
Music Archiving Functions ....................................................................... 5
CD Recording Functions.......................................................................... 5
Music Streaming Functions...................................................................... 6
Timer Function.......................................................................................... 6
Preparations and Setup.......................................7
Panel Descriptions: MCX-2000.............................................................. 7
Front Panel ............................................................................................... 7
Back Panel ............................................................................................... 9
Panel Descriptions: Remote Control.................................................. 11
Connecting External Devices.............................................................. 13
Connecting to the AC Power............................................................... 13
Remote Control Features and Operations ......................................... 16
Setting Batteries ..................................................................................... 16
Operating on the Remote Control .......................................................... 16
Using as a Universal Remote Control .................................................... 17
Menu Operation Basics ....................................................................... 19
MCX-2000 Menu Tree ........................................................................... 22
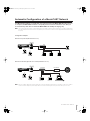
Configuring Your MusicCAST Network ....................23
Network Basics ...................................................................................... 23
Configuring a MusicCAST-only Network ........................................... 25
Configuring a MusicCAST Network for PC Network and
Internet Access..................................................................................... 26
Using Easy Setup .......................................................27
Easy Setup Overview ........................................................................... 28
Date and Time........................................................................................ 28
MusicCAST System Configuration ......................................................... 28
Network Connection (stand-alone, without clients)................................ 28
Network Connection (with clients).......................................................... 29
Network Configuration............................................................................ 29
For the MCX-2000 to access the Internet via
an existing PC network........................................................................... 30
For automatic configuration of a MusicCAST network ........................... 30
Automatic Configuration of a
MusicCAST Network...................................................31
Preparation on the MCX-2000................................................................ 32
Preparation on Each Client .................................................................... 33
Automatic Registration of Clients ........................................................... 34
Manual Configuration of a MusicCAST Network ..... 35
Checking Out Parameter Values............................................................ 35
Settings on the MCX-2000 ..................................................................... 36
IP Address.............................................................................................. 37
Wireless LAN.......................................................................................... 37
Settings on Each Client .......................................................................... 39
Mode ...................................................................................................... 40
Server ID ................................................................................................ 40
DHCP ..................................................................................................... 41
IP Address.............................................................................................. 41
Subnet Mask .......................................................................................... 41
ESS ID .................................................................................................... 42
WEP Key................................................................................................. 42
Manual Registration of Clients ............................................................... 43
Confirming Network Status ................................................................. 44
Updating Client Firmware.................................................................... 45
Applications....................................................... 46
Playing Audio Sources ........................................................................ 46
Playing Archived Music....................................................................... 46
Adding a Bookmark to a Song............................................................... 50
Play Information and Controls................................................................ 50
Playing a CD ......................................................................................... 51
Notes on Playing an MP3 CD................................................................. 52
Listening to a Radio Broadcast .......................................................... 54
Listening to FM Radio ............................................................................ 54
Listening to XM Radio (US model only) ................................................. 55
Listening to Internet Radio ..................................................................... 59
Using the Presets List ............................................................................ 59
Playing External Audio Signals .............................................................. 63
Playing Audio Content on the Computer ............................................... 64
Recording Audio Sources ................................................................... 66
Recording Songs from a Music CD ....................................................... 66
Recording from FM Radio or External Audio Signals ............................ 69
Duplicating a Music CD ......................................................................... 71
Recording Archived Songs to a CD....................................................... 73
Editing the Library ............................................................................... 75
Typing Text Characters.......................................................................... 75
Editing Song Data .................................................................................. 77
Using a Playlist....................................................................................... 82
Registering an Internet Radio Station .................................................... 84
Renaming Items from the Radio Presets List......................................... 85
Operating a Client Remotely ............................................................... 87
Selecting the Client Audio Source ......................................................... 88
Setting the Timer Playback .................................................................... 89
Other Features...................................................................................... 91
Setting Date and Time ........................................................................... 91
Using the Online CDDB Database......................................................... 93
Defining User Interface .......................................................................... 93
Selecting Playback Options................................................................... 95
Selecting Recording Options................................................................. 96
Using the Timer Playback ................................................................... 97
Using a Yamaha AV Receiver ............................................................. 98
Managing an Existing MusicCAST Network .................................... 100
Checking the Network Status............................................................... 100
Initializing Network Settings ................................................................. 100
Managing the MCX-2000 System ...................................................... 101
Viewing System Information................................................................. 102
Resetting the MCX-2000 for Factory Settings...................................... 103
Updating the MCX-2000 Firmware ...................................................... 103
Limiting Local Operations on the MCX-2000 ....................................... 104
Compatible Media (CD/CD-R/CD-RW)............ 105
About Digital Recording with MusicCAST.... 107
Troubleshooting.............................................. 108
Glossary........................................................... 111
Specifications.................................................. 113
The illustrations and operation screens as shown in this owner’s manual
are for instructional purpose only, and may appear somewhat different
from those on your products.
Table of Contents
MCX2000.book Page 2 Monday, September 12, 2005 11:09 AM

MCX-2000 Owner’s Manual
3
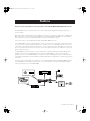
Thank you and congratulations on your purchase of the Yamaha MCX-2000 Digital Audio Server!
The MCX-2000 is a music server that enhances the concept of MusicCAST, a digital music delivery method over a
personal network.
MusicCAST delivers a new listening style for the digital era. It allows you to record various audio sources, including music
CDs, onto the music server, and enjoy streamed playback on a client device (MCX-A10 or MCX-C15, sold separately)
placed anywhere in your home, using wired and wireless computer networking technologies.
There are many ways to use the MusicCAST network and the MCX-2000 music server.
Use the MCX-2000 to collect and centralize all music sources in your home. Then, simply place a client device in every
room of your house—instead of buying a separate stereo or audio set for each of your family members. This setup lets
each member of the family enjoy their own favorite music—in any room at the same time. Naturally, the music server can
also be set to stream the same music to each client, so that you can walk around your house and have the same music
play no matter where you go.
The MCX-2000 has other great features. It can also stream music or audio programs from the built-in FM radio tuner
anywhere in your home via the MusicCAST network. Locally on the MCX-2000, you can also enjoy Internet radio
programs. You can also use the MCX-2000 to record audio content from old analog tapes. Once recorded, they can be
streamed via the MusicCAST network and burned onto CD-R/RW media for storage purposes, together with songs from
music CDs.
The above are just a few examples to show how you can use the MusicCAST network and the MCX-2000 music server.
You’ll find additional ones throughout this manual, too—so, keep the manual in a safe place and read it thoroughly in
order to get the most out of your new MCX-2000.
Preface
Casette deck
Casette tapes
A
MCX-2000
MCX-A10
with optional speakers
Audio CD
Original CD
Tuner
Audio sysytem
Song 01
Song 02
Song 24
MCX-C15
MCX2000.book Page 3 Monday, September 12, 2005 11:09 AM

MCX-2000 Owner’s Manual
4
What’s Included
The MCX-2000 product package contains the following items. When you open the box, first check they have all been
included. If something is missing, please contact the dealer from whom you purchased the product.
Feature Overview
Designed to be a comprehensive, ultimate audio center for your home, the MCX-2000 incorporates a wide variety of
features and functions. Here, we’ll take a look at some of ways you can use these features.
Audio Playback Functions
The MCX-2000 lets you play a wide variety of audio sources, including commercial music CDs, your own original MP3
CDs (CD-ROM), external audio signals, and radio programs from the built-in FM tuner. You can also listen to audio content
stored on your Windows computer if you connect the MCX-2000 to your computer network (LAN). Since the MCX-2000
can access the Internet through your computer network, you can even enjoy music from your favorite Internet radio
stations. When you play these audio sources on the main MCX-2000 itself, connect a speaker system (power amplifier
and speakers, or powered speakers) to the unit.
• Playing Archived Music (page 46)
• Playing a CD (page 51)
• Listening to FM Radio (page 54)
• Listening to Internet Radio (page 59)
• Playing External Audio Signals (page 63)
• Playing Audio Content on the Computer (page 64)
123
456
7
123
89
0
2 3 4
1
Indoor FM antenna (1)
Setup Guide (1)
Audio pin cable (1) Video pin cable (1)
Owner’s Manual (1)
Installation Guide for “DiXiM Media Server” Software (1)
Power cable (1)
MCX-2000 unit (1) Remote control (1) Optical cable (1)
Network cable (1)
AA batteries (2)
(For US and Canada)
(For Europe, UK and Australia)
CD-ROM (1)
• DiXiM™ Media Server software
• MCX-A10/C15 client manuals (electronic documents; see these updated manuals
when operating each client together with the MCX-2000).
• GNU GPL/LGPL software license agreement (electronic documents)
• MCX-2000 program source code (based on GNU GPL/LGPL)
MCX-2000
Router
Audio CD
MP3 CD
FM Radio
Internet
Radio
MD Player
PC
WAN
LAN
AUX in
MCX2000.book Page 4 Monday, September 12, 2005 11:09 AM

MCX-2000 Owner’s Manual
5
Audio Recording Functions
The MCX-2000 incorporates a large-capacity 160GB hard disk drive, allowing up to 200 hours of digital recording in linear
PCM format (16-bit/44.1kHz) or up to 2,000 hours in MP3 format (160kbps bit rate). Recordable audio sources include
commercial music CDs, external audio signals, and radio programs from the built-in FM tuner.
• Recording Songs from a Music CD (page 66)
• Recording from FM Radio (page 69)
• Recording External Audio Signals (page 69)
Music Archiving Functions
When recording audio sources, you can add information to each song—such as the song title, artist name, album name
and genre—then store it to the music archive in the MCX-2000 hard drive. This information can then be used to find
specific songs you want to play. Because the MCX-2000 incorporates a special song database system (based on
Gracenote CDDB
®
), this information will be set automatically if your songs are from popular music CDs. Other useful
functions include Playlist and Bookmark, letting you create custom song lists appropriate to specific occasions (such as
parties, morning ‘wake-up’ music, etc.) and allowing you to mark your favorite tunes for quick access.
• Adding a Bookmark to a Song (page 50)
•Typing Text Characters (page 75)
• Editing Titles (page 77)
• Changing Song Attributes (page 77)
• Using a Playlist (page 82)
• Registering an Internet Radio Station (page 84)
CD Recording Functions
This function lets you create a music mix CD of your own selections by arranging archived songs in your favorite order.
You can also use this function to duplicate existing music CDs, allowing you to copy your personal mixes to CD and give
it to your friends.
• Recording Archived Songs to a CD (page 73)
• Duplicating a Music CD (page 71)
MCX-2000
160GB HDD
MD Recorder
AUX in
Music CD
MCX-2000
Internet (CDDB)
HDD
(Internal CDDB)
MCX-2000 Original CD
MCX2000.book Page 5 Monday, September 12, 2005 11:09 AM

MCX-2000 Owner’s Manual
6
Music Streaming Functions
Once songs are archived (recorded) on the MCX-2000 hard drive, you can stream them to up to 15 clients via the
MusicCAST network. The MCX-2000 can deliver the same music to each client simultaneously (broadcast). It can also
deliver different songs to different clients at the same time, at the request of each client. In addition, the MCX-2000
supports remote control of clients via the MusicCAST network, allowing you to operate them without having to go to each
unit individually.
• MusicCAST as an Integrated Music Delivery System (page 89)
• Operating a Client Remotely (page 87)
Timer Function
The MCX-2000 and clients incorporate a timer that enables song playback at a specified time. You can program up to ten
playback timer instances for each MusicCAST device.
• Setting the Timer Playback (page 89)
• Using the Timer Playback (page 97)
Wireless
LAN
MCX-A10
MCX-A10
MCX-2000
LAN
MCX-C15
wireless
LAN
Wireless
LAN
MCX-2000
MCX2000.book Page 6 Monday, September 12, 2005 11:09 AM

MCX-2000 Owner’s Manual
7
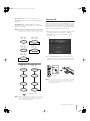
This section explains how to connect peripheral devices to your MCX-2000 and set it up as a
music server, and how to create a MusicCAST network in conjunction with clients (MCX-A10 or
MCX-C15, sold separately).
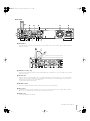
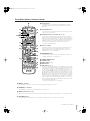
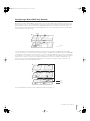
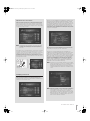
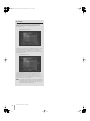
Panel Descriptions: MCX-2000
Front Panel
1
STANDBY/ON button
Use this button when switching among the MCX-2000 operating modes. The button indicator light changes color, showing the
unit’s current operating mode (green: active mode, amber: sleep mode, red: standby mode).
•
Connecting to the AC Power (page 13)
2
Disc tray
3
Open/Close button ( )
Use these when setting a CD in the MCX-2000. Press this button to open the tray, set a CD with its label side facing up, and
press the button again to close the tray.
4
Stop button (
ss
ss
)
5
Play button (
pp
pp
)
Press the Play button to start playback of the current song from the beginning. Press the Stop button to stop playback of the
current song that’s being played. These buttons similarly works with all other audio sources available on the MCX-2000 (CD,
archived songs, radios, external inputs).
6
CD AUTO STORE button
Use this button when recording (storing) all songs from a music CD at a time. Since importing an entire CD is possible with a
single click of the button, you can quickly store a number of songs from a pile of music CDs into the MCX-2000 music archive.
•
Importing a Music CD Automatically (page 68)
7
Display
Shows the current MCX-2000 status or menu screen.
8
CLIENT STATUS indicators (1~10)
Each indicator is associated with a client registered to the MCX-2000. A client whose indicator lights up in green is properly
connected, and can receive audio streams from the MCX-2000. The 10th indicator (10...) shows the operating status for the
10th and following clients all together. You can view detailed information of each client’s status in the Client Control screen.
Preparations and Setup
STANDBY/ON
DIGITAL AUDIO SERVER MCX-2000
BROADCAST
TIMER
RECORDING
ENCODING
MENU/
PLAY INFO.
PUSH
SELECT
RADIO
CLIENT STATUS
23451
789
10
6
CD AUTO STORE
PS/2 KEYBOARD PHONES LEVEL
MIN MAX
LEVEL
1 2
3 4 5 6
* & ^
7
@#$%
!
) 9
8
MCX2000.book Page 7 Monday, September 12, 2005 11:09 AM

MCX-2000 Owner’s Manual
8
9
RADIO button
Press this button to fast access the last selected radio station. Every time you press this button, the radio type cycles through
FM, XM, Internet Radio and Presets (XM is for US model only).
)
Cursor controller
Delivers the same functions with the center controller on the remote control. You can move the highlight (selection) onto a target
item by pushing the center stick upward, downward, leftward or rightward. When you press this stick vertically, it determines to
select the current item (PUSH SELECT).
!
MENU/PLAY INFO. button
Press this button to toggle between the last selected menu screen and the Play Information screen for the current song.
Continue pressing this button for the Top Menu screen.
@
BROADCAST indicator
Lights up in blue while the MCX-2000 is broadcasting to clients.
#
TIMER indicator
Lights up in amber while the MCX-2000 is waiting or operating in timer playback mode.
$
RECORDING indicator
Lights up in red while the MCX-2000 is recording (storing) an audio source or writing onto a CD-R/RW disc.
%
ENCODING indicator
Lights up in green while the MCX-2000 is encoding recorded audio into MP3 format.
^
LEVEL knob
&
PHONES jack
Connect a pair of headphones here to listen to sounds being played on the MCX-2000. You can adjust the playback volume
using the LEVEL knob.
*
PS/2 KEYBOARD port
Connect a generic PS/2 keyboard designed for PC here. A connected PS/2 keyboard lets you control the MCX-2000 in the
same way as the supplied remote control. It also lets you type words (such as song titles) quickly when editing song information.
In addition, the MCX-2000 doesn’t support a PS/2 mouse. So, don’t connect a PS/2 mouse to this port.
•
Typing Text Characters (page 75)
MCX2000.book Page 8 Monday, September 12, 2005 11:09 AM

MCX-2000 Owner’s Manual
9
Back Panel
1
W_LAN ANT
A movable antenna for the wireless network. When you stream audio to clients over the wireless network, adjust the antenna
angle for best results.
2
XM jack (US model only)
If you live in the United States and want to listen to XM Satellite Radio on the MCX-2000, connect your XM Connect-and-Play
antenna here (page 55).
3
RS-232C port
Use this port when connecting the MCX-2000 to a compatible Yamaha AV receiver using an RS-232C cross cable. With this
setup, you can synchronize both units’ power on/off timing or automatically select a surround program on the AV receiver to
match the genre of a song you select on the MCX-2000.
•
Using a Yamaha AV Receiver (page 98)
4
FM ANT terminal
Connect the supplied indoor FM antenna here when using the MCX-2000 built-in FM tuner.
5
Fan opening
To effectively cool down the inside of the MCX-2000, be sure not to shut off the airflow from this opening. When placing the
MCX-2000 near a wall, make sure there is enough room behind the back panel.
6
AC IN socket
Connect the supplied power cable here.
THIS DEVICE COMPLIES WITH PART 15 OF THE FCC RULES.
OPERATION IS SUBJECT TO THE FOLLOW ING TWO CONDITIONS:
(1) T HIS DEVICE MAY NOT CAUSE HARMFUL INTERFERENCE, AND
(2) THIS DEVICE MUST ACCE PT ANY INTERFERENCE RECEIVED,
INCLUDING INTERFERENCE THAT MAY CAUSE UNDESIRED OPERATION
®
T
FCC ID: A6RMCX2000A
THE XM NAME AND RELATED LOGOS
ARE REGISTERED TRADEMARKSOF
XM SATELLITE RADIO INC.
WE87930-U-1
FM ANT
US
T
T
VIDEO
VIDEO
LAN
REMOTE
W
_
LAN ANT
S
VIDEO
LINK/DATA 10/100
IN
IN
XM
IN
OUT
OUT
RS–
232C
75Ω UNBAL.
OPTICAL
AUDIO
ANALOG
T
T
AC IN
L
R
CAUTION
RISK OF ELECTRIC SHOCK
DO NOT OPEN
THIS PRODUCT COMPLIES WITH DHHS RULES 21 CFR
SUBCHAPTER J APPLICABLE AT DATE OF MANUFACTURE
YAMAHA CORPORATION 10-1 NAKAZAWA-CHO,
HAMAMATSU-SHI, SHIZUOKA-KEN, JAPAN
MANUFACTURED BY
YEM (M)
MANUFACTURED:
MADE IN MALAYSIA
MODEL NO. MCX–2000
YAMAHA
MCX–2000
9
1
^
%
32
5
4
6
$ # @ !
)
8 7
FM ANT
T
T
VIDEO
W
_
LAN ANT
S
VIDEO
XM
IN
OU
T
RS–232C
75Ω UNBAL.
L
CAUTION
RISK OF ELECTRIC SHOCK
DO NOT OPEN
Avoid using excessive force when moving the antenna.
MCX2000.book Page 9 Monday, September 12, 2005 11:09 AM

MCX-2000 Owner’s Manual
10
7 ANALOG OUT jacks (stereo)
9 OPTICAL OUT jack (stereo)
Audio playback signals on the MCX-2000 are output from these jacks. Use the supplied optical digital cable (or one purchased
separately) to connect the OPTICAL OUT jack to a digital audio input on an external device. Use the supplied stereo pin cable
(or one purchased separately) to connect the ANALOG OUT jacks to analog audio input jacks on an external device.
8 ANALOG IN jacks (stereo)
) OPTICAL IN jack (stereo)
Audio sources called ‘external input’ in this manual are incoming audio signals via these jacks. Use the supplied optical digital
cable (or the one purchased separately) to connect the OPTICAL IN jack to a digital audio output on an external device. Use the
supplied stereo pin cable (or one purchased separately) to connect the ANALOG IN jacks to analog audio output jacks on an
external device.
! REMOTE terminal
This terminal is designed for professional expansion purposes, not for consumer use of the MCX-2000.
@ 10/100 indicator
# LINK/DATA indicator
$ LAN (Ethernet) port
Connect a network cable (CAT-5 straight cable) to the Ethernet port when creating a wired network with clients or connecting
the MCX-2000 to your home network. The LINK/DATA indicator lights up when the wired connection is properly working, and
flashes when data traffic over the network is being done. The Ethernet port is automatically configured to match the speed of a
connected network (10 or 100 Mbps); the 10/100 indicator lights up when the Ethernet port is configured for 100 Mbps, and is
unlit for 10 Mbps.
% S-VIDEO port
^ VIDEO port
These ports output the MCX-2000 operating screen displays (OSD) to an external TV monitor. Connect either port to your TV
monitor’s video input (yellow-coded composite port for VIDEO, or 4-pin S port for S-VIDEO). The VIDEO and S-VIDEO ports
output the same displays.
MCX2000.book Page 10 Monday, September 12, 2005 11:09 AM

MCX-2000 Owner’s Manual
11
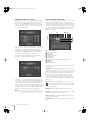
Panel Descriptions: Remote Control
1 IR transmitter
Infrared (IR) remote control signals are transmitted from here. When
operating the remote control, point this part at the IR receiver on the
target unit.
4 PLAY INFO. button
Press this button to show the Play Information (song data) screen for the
current song on the TV monitor.
5 Alphabetical index search buttons (
uu
uu
/
dd
dd
)
You can find a recorded (archived) song from one of groups (artists,
albums, genres or all songs). Whichever group you select, its contents
(artist names, album titles, genres or song titles) are listed in alphabetical
order. You can then press either button to jump to the first item in each
alphabetical index. Use the down arrow button to jump in an A-to-Z
direction, or the up arrow button to jump in a Z-to-A direction.
•
Selecting a List Item (page 48)
6 Cursor controller
Provides the same functions as the controller on the MCX-2000 front
panel. Use the up, down, left and right arrow buttons to move the
highlight (selection) onto a target item, and then press the center
SELECT button to select or determine it.
7 BOOKMARK button
Press this button to add or remove the bookmark to the current song.
•
Adding a Bookmark to a Song (page 50)
2 POWER AMP/TV button
3 TV/AMP switch
8 INPUT buttons ( +/– )
9 MUTE button
@ VOL. buttons ( +/– )
In addition to operating the MCX-2000, the supplied remote control also
lets you operate compatible Yamaha AV receivers and TV monitors from
other manufacturers (page 17). Slide the TV/AMP switch to TV to control
the TV monitor, or to AMP to control a Yamaha AV receiver. You can
then use the POWER AMP/TV button to turn the target device on or off,
the VOL. buttons to adjust the volume level of the target device, and the
MUTE button to temporarily turn off the target device volume. Press the
MUTE button again to cancel muting. The INPUT buttons let you switch
the input source on the target device. So, you can even route a different
audio source from the Yamaha AV receiver to the MCX-2000 external
input. In addition, directional switching with the INPUT +/– buttons only
works with Yamaha AV receivers. TV input will be switched in the same
direction with either INPUT button.
•
Using as a Universal Remote Control (page 17)
) MENU 1~3 buttons
Use the MENU 1~3 buttons to fast access the Library, Artists and Playlists menu screens.
! FAVORITES 1~4 buttons
The FAVORITES 1~4 buttons are reserved for future use (no functions).
# PAGE scroll buttons ( uu
uu
/ dd
dd
)
When a list of items (such as songs from a CD) cannot be displayed at a time, press either button for a scrolled view of the list.
$ TOP MENU button
Press this button to immediately access the Top Menu screen whatever screen is shown on the TV monitor.
STAMDBY/ON
POWER
AMP/TV
TV AMP
TIMER
TOP
MENU
PLAY
INFO.
PAGE
A
PAGE
Z
VOL.
BOOKMARK
AMP/TV
MUTE
LIBRARY ARTISTS
FAVORITES
PLAYLISTS
INPUT
SELECT
OPEN/CLOSE
123
MENU MENU MENU
123
456
789
0
2 3 4
1
RANDOM REPEAT BROADCAST RADIO
1
£
&*(º
^
%
™
$
4
# 5
6
@ 8
2
9
)
!
3
¡
7
MCX2000.book Page 11 Monday, September 12, 2005 11:09 AM

MCX-2000 Owner’s Manual
12
% Playback control buttons
You can control playback on the MCX-2000 using:
•
Pause button ( e ) to pause or resume playback of the current song
•
Skip backward button ( b ) to go to the beginning of the previous song (or the current song during playback)
•
Skip forward button ( a ) to go to the beginning of the next song
•
Stop button ( s ) to stop playback of the current song and rewind to its beginning
•
Backward button ( w ) to scrub playback toward the beginning of the current song
•
Forward button ( f) to scrub playback toward the end of the current song
•
Play button ( p) to start playback from the beginning of the current song
^ Group selection buttons (–/+)
Press this button to select the previous (–) or next (+) group within the currently selected group (album, artist, genre or the like).
& RANDOM button
Every time you press this button, you can change the playback order of songs from the current group (album, artist, genre or all
songs) as listed, or at random.
•
Play Information and Controls (page 50)
* REPEAT button
Every time you press this button, you can change how to repeat playback of the current song(s).
•
Play Information and Controls (page 50)
( BROADCAST button
Press this button to start or stop broadcasting to selected clients.
•
MusicCAST as an Integrated Music Delivery System (page 89)
º RADIO button
Press this button to fast access the last selected radio station. Every time you press this button, the radio type cycles through
FM, XM, Internet Radio and Presets (XM is for US model only).
¡ OPEN/CLOSE button
Like the Open/Close button on the MCX-2000 front panel, use this button when setting a CD in the MCX-2000. Press this
button to open the tray, set a CD with its label side facing up, and press the button again to close the tray.
™ TIMER button
Press this button to enable or disable the MCX-2000 Timer function.
•
Using the Timer Playback (page 97)
£ STANDBY/ON button
Use this button when switching the MCX-2000 operating modes.
•
Operation Modes on the MCX-2000 (page 14)
MCX2000.book Page 12 Monday, September 12, 2005 11:09 AM

MCX-2000 Owner’s Manual
13
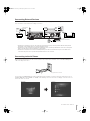
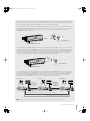
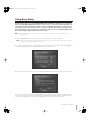
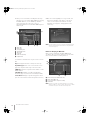
Connecting External Devices
Connect all relevant devices referring to the section “Panel Descriptions” (page 7) and the setup illustration below. Make
sure each device is turned off before making connections.
• The MCX-2000 is designed to connect to a TV monitor for easy operation. Though you can still operate the unit while viewing its front
panel display, a large TV display offers more operation information at a time.
• The MCX-2000 accepts a generic PS/2 keyboard. This enables faster, more convenient operation than the remote control or front-panel
buttons, especially when you edit song information or other text data.
• The MCX-2000 is designed to become active immediately after the power cable is connected to the AC power source. Make sure to
connect to the AC power source only in the last step after all other devices are connected.
Connecting to the AC Power
When relevant external devices are all connected, turn on these devices first, and then connect the MCX-2000 power
cable to the AC power source.
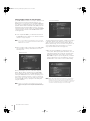
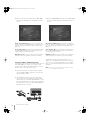
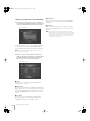
The front panel STANDBY/ON button indicator will light up in green. On the TV monitor, switch the video input source to
the MCX-2000 video output (VIDEO or S-VIDEO). If the following screen is shown on the TV display, connection to the TV
monitor has been successful.
THIS DEVICE COMPLIES WITH PART 15 OF THE FCC RULES.
OPERATION IS SUBJECT TO THE FOLLOWING TW O CONDITIONS:
(1 ) THIS DEVICE MAY NOT CAUSE HARMFUL INTERFERENCE, AND
(2 ) THIS DEVICE MUST AC CEPT ANY INTERFERENCE RECEIVED,
IN CLUDING INTERFERENCE THAT MAY CAUSE UNDE SIRED OPERATION
®
T
FCC ID: A6RMCX2000A
THE XM NAME AND RELATED LOGOS
ARE REGISTERED TRADEMARKSOF
XM SATELLITE RADIO INC.
WE87930-U-1
FM ANT
US
T
T
VIDEO
VIDEO
LAN
REMOTE
W
_
LAN ANT
S
VIDEO
LINK/DATA 10/100
IN
IN
XM
IN
OUT
OUT
RS–
232C
75ΩUNBAL.
OPTICAL
AUDIO
ANALOG
T
T
AC IN
L
R
CAUTION
RISK OF ELECTRIC SHOCK
DO NOT OPEN
THIS PRODUCT COMPLIES WITH DHHS RULES 21 CFR
SUBCHAPTER J APPLICABLE AT DATE OF MANUFACTURE
YAMAHA CORPORATION 10-1 NAKAZAWA-CHO,
HAMAMATSU-SHI, SHIZUOKA-KEN, JAPAN
MANUFACTURED BY
YEM (M)
MANUFACTURED:
MADE IN MALAYSIA
MODEL NO. MCX–2000
YAMAHA
MCX–2000
Audio pin cable (supplied)
Video pin cable
(supplied)
VIDEO
IN
IN
L
R
Power cable
(should be connected last)
AC plug and outlet for US model
AC plug and outlet for US model
Initial display Top menu
MCX2000.book Page 13 Monday, September 12, 2005 11:09 AM

MCX-2000 Owner’s Manual
14
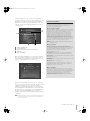
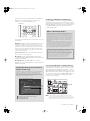
You can call up any necessary operation by selecting a menu item from the Top Menu. In addition, when you turn on the
MCX-2000 for the first time after purchase, or after the system reset operation (page 103), the Easy Setup screen
(page 27) will appear instead of the Top Menu screen.
n If the indicator light of the STANDBY/ON button turns amber or red, press the button to continue working on the MCX-2000. The unit is designed
to automatically go into an energy saving mode if no operations have been performed for a while. Read the following column for more information.
Operation Modes on the MCX-2000
The MCX-2000 has no switch to completely turn the unit off. When you connect the MCX-2000 to the AC power source,
the front panel STANDBY/ON button indicator lights up in green and the MCX-2000 enters active mode. In this mode, you
can record or play an audio source while viewing the built-in display or the TV monitor.
When you press the STANDBY/ON button on the remote control or the unit’s front panel, the front panel STANDBY/ON
button indicator light turns amber, and then the MCX-2000 enters sleep mode. In this mode, the MCX-2000 stops
showing a screen on the TV monitor and built-in display, waiting for a client request or your remote control operation.
MCX-2000
STANDBY/ON button: green
MCX-A10/MCX-C15
MCX-2000
STANDBY/ON button: amber
MCX2000.book Page 14 Monday, September 12, 2005 11:09 AM

MCX-2000 Owner’s Manual
15
When you press the power switch on a client, it immediately establishes a network connection with the MCX-2000 and
enters active mode. (The corresponding CLIENT STATUS indicator lights up on the MCX-2000.) The client shows Top
Menu in the backlit display, and gets ready to play a streamed song from the MCX-2000.
As mentioned above, even in sleep mode, the MCX-2000 can still respond to a request from any registered client. This is
because the MCX-2000 maintains network connections with clients. As long as network connections are maintained, the
MCX-2000 can continue streaming music to clients. In fact, clients can continue playing a streamed song if the
MCX-2000 later enters sleep mode.
If you hold down the STANDBY/ON button for more than 3 seconds when the MCX-2000 is in active or sleep mode, the
indicator light turns red and the MCX-2000 enters standby mode, where the unit consumes less power. In standby mode,
network activities between the MCX-2000 and clients stop. (All CLIENT STATUS indicators go off on the MCX-2000.) In
this process, all active clients also enter sleep mode (Remote Sleep). They stop playing a streamed song (because of no
network connection with the MCX-2000), and show the current time in the display without backlight. In sleep mode,
clients wait for your operation and can awake the MCX-2000 to resume music streaming.
Let’s say, standby mode is deep sleep. When a client sends a request, the MCX-2000 in standby mode notices it and
enters ‘lighter’ sleep mode. (The STANDBY/ON indicator light turns amber.) Otherwise, you can press the STANDBY/ON
button to completely awake the MCX-2000 and make it enter active mode. (The STANDBY/ON indicator light turns
green.) But, when the MCX-2000 directly enters active mode from standby mode, it first must re-establish network
connections with clients, taking more time to resume network activities or music streaming.
n The MCX-2000 enters standby mode if it’s been idle (with no operation on the unit or no network activities) for one hour.
MCX-2000
STANDBY/ON button: amber
MCX-A10/MCX-C15
MCX-2000
STANDBY/ON button: red
MCX-A10/MCX-C15
MCX-A10
or
MCX-C15
MCX-A10
or
MCX-C15
MCX-A10
or
MCX-C15
TV
MCX-2000
TV
MCX-2000
TV
MCX-2000
ON OFF
OFF OFF
OFF
Active mode Sleep mode Standby mode
Hold the STANDBY/ON button for more than 3 seconds to put the MCX-2000 in standby mode.
Press the STANDBY/ON button to put the MCX-2000 in active mode.
Automatically
enters sleep mode
in 30 minutes if not
operated at all.
Automatically
enters standby
mode in 5 minutes
if the MCX-2000
and clients are not
operated at all.
Press the
STANDBY/ON button.
When a client enters
active mode
MCX2000.book Page 15 Monday, September 12, 2005 11:09 AM

MCX-2000 Owner’s Manual
16
Remote Control Features and Operations
You can use the supplied remote control to do most of the MCX-2000 operations (such as selecting a menu item or
determining a setting value). Prepare the remote control before operations.
Setting Batteries
Set batteries inside the remote control as shown below.
1 Remove the bottom cover of the remote control.
2 Set two AA batteries (supplied) in appropriate directions, according to the illustration in the compartment.
3 Slide the cover until it snaps into place.
n If the remote control doesn’t work well, the batteries may be weak. Replace them with generic two AA batteries. Always handle batteries
appropriately, according to the safety precautions at the beginning of this manual.
Operating on the Remote Control
When operating on the remote control, direct the IR transmitter to the IR receiver on the MCX-2000 front panel.
1
2
3
IR receiver
1
2
3
4
5
6
7
1
2
3
8
9
0
2
3
4
1
Remote control
MCX-2000
6 meters
(approx.)
30˚30˚
MCX2000.book Page 16 Monday, September 12, 2005 11:09 AM

MCX-2000 Owner’s Manual
17
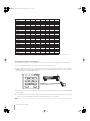
Using as a Universal Remote Control
The supplied remote control can be used as a universal (multi-platform) remote control, letting you operate TV monitors
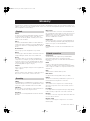
from other manufacturers. The remote control supports TV monitors from manufacturers (brands) in the following list.
So, if your TV monitor is applicable, select and register the corresponding preset setting to enable the universal control feature.
n The supplied remote control also supports a compatible Yamaha AV receiver that’s connected to the MCX-2000 using an RS-232C cross cable
(page 98). You can use the remote control for power on/off, volume adjustment (including mute) and input selection on the connected AV receiver.
ID
Yamaha 42 87 92 53
Admiral 16 92 93
Aiwa 76 83 94
Akai 95 96
Alba 96
AOC 97
Bell&Howell 92
Bestar 98
Blaupunkt 22 29
Blue sky 98
Brandt 23
Brocsonic 97
Bush 96
Clatronic 98
Craig 24
Croslex 25
Curtis Mathis 26 97
Daewoo 24 27 28 97 98
Daytron 39
Dual 98
Dwin 81 93
Emerson 24 32 39 97
Ferguson 23 65 66
First line 98
Fisher 33 95
Fraba 98
Fujitsu 89
Funai 77 78
GE 34 35 36 93 97
Goodmans 23 96 98
Grundig 29 49
Hitachi 39 42 43 97
ICE 96
Irradio 96
Itt/Nokia 44
JC Penny 34 37 93 97
JVC 46 47 96
Kendo 98
KTV 39 97
LG/Goldstar 37 39 97 98
Loewe 48 98
LXI 25 26 33 93 97
Magnavox 25 39 97
Marantz 10 98
Matsui 95
Memorex 16 97
Mitsubishi 59 87 97
Nad 26 55
NEC 52 82 97
Nokia 44
Nokia Oceanic 44
Nordmende 65 66
Onwa 96
Panasonic 34 35 36 53
Philco 25 39 97
MCX2000.book Page 17 Monday, September 12, 2005 11:09 AM

MCX-2000 Owner’s Manual
18
n Your TV monitor may not be fully controllable even when it’s from a manufacturer (brand) in the above list, depending on the model type or
production year. If this is the case, use the remote control for your TV monitor.
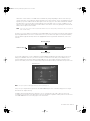
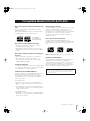
Registering Your TV Monitor to the MCX-2000
To enable universal operations from the supplied remote control, select the preset setting for your TV monitor brand.
1 Press the TOP MENU button on the remote control to show the Top Menu screen.
2 Input a 2-digit brand code for your TV monitor from the above list, using group selection, playback control and TOP
MENU buttons (these buttons work as numeric keys; see the corresponding number printed on the left of each button)
while holding down the POWER AMP/TV button.
3 If the brand code is successfully registered, a message will be shown telling it on the TV monitor and the MCX-2000
built-in display.
4 Set the AMP/TV switch to TV, and try operating your TV monitor. If the universal feature is fully working, you can remote
control of power on/off, switching of video inputs, volume and muting on your TV monitor.
n
If there are two or more brand codes available for TV monitor, register one at a time in the above steps. Use the one that best works for your TV monitor.
Philips 25
Pioneer 26 35 54 55 68
Portland 56 97
Proscan 21 31 41 51 93
Proton 50 60 70 97
Quasar 34 35
Radio Shack 87 93 97
RCA 21 34 56 57 58 93 97
Runco 20 30 71
SABA 23 65 66 69
Sampo 80 81 97
Samsung 39 48 62 75 97
Sanyo 33 73 79 95
Schneider 96
Scott 97
Sharp 32 39 92
Siemens 29
Signature 16 92
Sony 63
Sylvania 25 97
Symphonic 17 18 19
Telefunken 64 65 66 69
Thomson 23 66
Toshiba 26 67 92
Videch 42 97
Wards 16 32 39 97
Zenith 16 61 71
1
2
3
4
5
6
7
1
2
3
8
9
0
2
3
4
1
Remote control
MCX-2000
MCX2000.book Page 18 Monday, September 12, 2005 11:09 AM

MCX-2000 Owner’s Manual
19
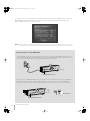
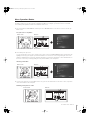
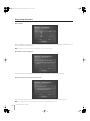
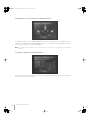
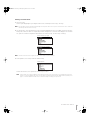
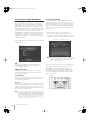
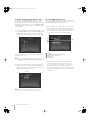
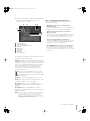
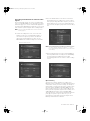
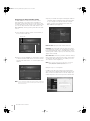
Menu Operation Basics
The MCX-2000 has a menu tree that categorizes all commands, functions and settings relevantly. You can access them
by simply selecting a necessary menu item starting with Top Menu. For example, if you want to listen to a music CD,
select Library from Top Menu, and then select CD in the next screen.
1 Set a music CD in the MCX-2000 first, and then press the TOP MENU button on the remote control to view the Top
Menu screen.
For quick access to Top Menu
2 Select Library from Top menu.
To select a menu item, use the cursor controller on the remote control or the MCX-2000 front panel. Vertically move the
highlight (selection) by pressing the up or down arrow buttons on the remote control, or by pushing the center stick
upward or downward on the front panel, and then determine your selection by pressing the center SELECT button on
the remote control or by ‘vertically’ pushing the stick (PUSH SELECT) on the front panel.
Selecting a menu item
3 To return to the previous screen (Top Menu in this case), press the left arrow button on the remote control, or push the
center stick leftward on the front panel.
Returning to the previous screen
Remote control MCX-2000
Press and hold on
Remote control
MCX-2000
Remote Control
MCX-2000
MCX2000.book Page 19 Monday, September 12, 2005 11:09 AM

MCX-2000 Owner’s Manual
20
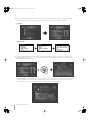
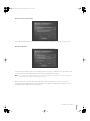
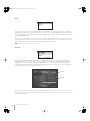
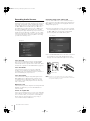
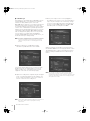
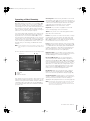
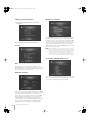
4 Now you learned how to go back and forth between screens. Re-select Library from Top Menu, and then select CD as
target audio source. Your TV monitor and the built-in display will show a list of songs from the music CD.
TV monitor:
Built-in display:
5 You can start playing the CD, from the first song in the list, by pressing the Play button on the remote control or on the
MCX-2000 front panel. Otherwise, you can first select your favorite song from the list using the cursor controller, and
then start playback from that song.
The MCX-2000 also offers Submenu. When the current screen shows “Submenu” in the lower right corner, try pressing
the right arrow button on the remote control, or try pushing the center stick rightward on the front panel cursor control-
ler. For example, you can see the following Submenu commands from the CD song list screen.
MCX2000.book Page 20 Monday, September 12, 2005 11:09 AM
La pagina si sta caricando...
La pagina si sta caricando...
La pagina si sta caricando...
La pagina si sta caricando...
La pagina si sta caricando...
La pagina si sta caricando...
La pagina si sta caricando...
La pagina si sta caricando...
La pagina si sta caricando...
La pagina si sta caricando...
La pagina si sta caricando...
La pagina si sta caricando...
La pagina si sta caricando...
La pagina si sta caricando...
La pagina si sta caricando...
La pagina si sta caricando...
La pagina si sta caricando...
La pagina si sta caricando...
La pagina si sta caricando...
La pagina si sta caricando...
La pagina si sta caricando...
La pagina si sta caricando...
La pagina si sta caricando...
La pagina si sta caricando...
La pagina si sta caricando...
La pagina si sta caricando...
La pagina si sta caricando...
La pagina si sta caricando...
La pagina si sta caricando...
La pagina si sta caricando...
La pagina si sta caricando...
La pagina si sta caricando...
La pagina si sta caricando...
La pagina si sta caricando...
La pagina si sta caricando...
La pagina si sta caricando...
La pagina si sta caricando...
La pagina si sta caricando...
La pagina si sta caricando...
La pagina si sta caricando...
La pagina si sta caricando...
La pagina si sta caricando...
La pagina si sta caricando...
La pagina si sta caricando...
La pagina si sta caricando...
La pagina si sta caricando...
La pagina si sta caricando...
La pagina si sta caricando...
La pagina si sta caricando...
La pagina si sta caricando...
La pagina si sta caricando...
La pagina si sta caricando...
La pagina si sta caricando...
La pagina si sta caricando...
La pagina si sta caricando...
La pagina si sta caricando...
La pagina si sta caricando...
La pagina si sta caricando...
La pagina si sta caricando...
La pagina si sta caricando...
La pagina si sta caricando...
La pagina si sta caricando...
La pagina si sta caricando...
La pagina si sta caricando...
La pagina si sta caricando...
La pagina si sta caricando...
La pagina si sta caricando...
La pagina si sta caricando...
La pagina si sta caricando...
La pagina si sta caricando...
La pagina si sta caricando...
La pagina si sta caricando...
La pagina si sta caricando...
La pagina si sta caricando...
La pagina si sta caricando...
La pagina si sta caricando...
La pagina si sta caricando...
La pagina si sta caricando...
La pagina si sta caricando...
La pagina si sta caricando...
La pagina si sta caricando...
La pagina si sta caricando...
La pagina si sta caricando...
La pagina si sta caricando...
La pagina si sta caricando...
La pagina si sta caricando...
La pagina si sta caricando...
La pagina si sta caricando...
La pagina si sta caricando...
La pagina si sta caricando...
La pagina si sta caricando...
La pagina si sta caricando...
La pagina si sta caricando...
La pagina si sta caricando...
La pagina si sta caricando...
-
 1
1
-
 2
2
-
 3
3
-
 4
4
-
 5
5
-
 6
6
-
 7
7
-
 8
8
-
 9
9
-
 10
10
-
 11
11
-
 12
12
-
 13
13
-
 14
14
-
 15
15
-
 16
16
-
 17
17
-
 18
18
-
 19
19
-
 20
20
-
 21
21
-
 22
22
-
 23
23
-
 24
24
-
 25
25
-
 26
26
-
 27
27
-
 28
28
-
 29
29
-
 30
30
-
 31
31
-
 32
32
-
 33
33
-
 34
34
-
 35
35
-
 36
36
-
 37
37
-
 38
38
-
 39
39
-
 40
40
-
 41
41
-
 42
42
-
 43
43
-
 44
44
-
 45
45
-
 46
46
-
 47
47
-
 48
48
-
 49
49
-
 50
50
-
 51
51
-
 52
52
-
 53
53
-
 54
54
-
 55
55
-
 56
56
-
 57
57
-
 58
58
-
 59
59
-
 60
60
-
 61
61
-
 62
62
-
 63
63
-
 64
64
-
 65
65
-
 66
66
-
 67
67
-
 68
68
-
 69
69
-
 70
70
-
 71
71
-
 72
72
-
 73
73
-
 74
74
-
 75
75
-
 76
76
-
 77
77
-
 78
78
-
 79
79
-
 80
80
-
 81
81
-
 82
82
-
 83
83
-
 84
84
-
 85
85
-
 86
86
-
 87
87
-
 88
88
-
 89
89
-
 90
90
-
 91
91
-
 92
92
-
 93
93
-
 94
94
-
 95
95
-
 96
96
-
 97
97
-
 98
98
-
 99
99
-
 100
100
-
 101
101
-
 102
102
-
 103
103
-
 104
104
-
 105
105
-
 106
106
-
 107
107
-
 108
108
-
 109
109
-
 110
110
-
 111
111
-
 112
112
-
 113
113
-
 114
114
-
 115
115


Yamaha MCX-2000 Manuale del proprietario
- Categoria
- Lettore CD
- Tipo
- Manuale del proprietario
in altre lingue
- English: Yamaha MCX-2000 Owner's manual
- français: Yamaha MCX-2000 Le manuel du propriétaire
- Deutsch: Yamaha MCX-2000 Bedienungsanleitung
- Nederlands: Yamaha MCX-2000 de handleiding
- dansk: Yamaha MCX-2000 Brugervejledning
- svenska: Yamaha MCX-2000 Bruksanvisning
- Türkçe: Yamaha MCX-2000 El kitabı
- suomi: Yamaha MCX-2000 Omistajan opas
- română: Yamaha MCX-2000 Manualul proprietarului
Documenti correlati
-
Yamaha MCX-A10 Manuale del proprietario
-
-
-
Yamaha DSP-Z7 Manuale del proprietario
-
Yamaha MCX-1000 Manuale del proprietario
-
Yamaha RX V3900 - AV Network Receiver Manuale utente
-
Yamaha CDR-HD1500 Manuale del proprietario
-
Yamaha RX-V3800 Manuale del proprietario
-
Yamaha DSP-Z11 Manuale utente
-
Altri documenti
-
X-Micro XMP3E-20F Manuale utente
-
AudioSonic TXCD-1530 Manuale del proprietario
-
Philips WAS6050/05 Manuale utente
-
MPMan TK1 Guida utente
-
-
TechniSat HD-Vision DVB-S Manuale utente
-
Ingo PMP 4.3” Manuale del proprietario
-
Numark Industries HDCD1 Manuale utente
-
Sony NAS-CZ1 Manuale del proprietario
-
SMC Networks Stereo Receiver SMCWMR-AG Manuale utente