
Adventurer
TM
Balances
Instruction Manual


ADVENTURER BALANCES EN-1
TABLE OF CONTENTS
1. INTRODUCTION ....................................................................................................................3
1.1 Description ................................................................................................................................................... 3
1.2 Features ....................................................................................................................................................... 3
1.3 Definition of Signal Warnings and Symbols ................................................................................................. 3
1.4 Safety Precautions ....................................................................................................................................... 3
2. INSTALLATION .....................................................................................................................4
2.1 Unpacking .................................................................................................................................................... 4
2.2 Selecting the Location .................................................................................................................................. 4
2.3 Leveling the Equipment ................................................................................................................................ 4
2.4 Connecting Power ........................................................................................................................................ 5
2.5 Connecting the Interface .............................................................................................................................. 5
2.6 Initial Calibration ........................................................................................................................................... 5
3. OPERATION ..........................................................................................................................6
3.1 Overview of Display, Home Screen ............................................................................................................. 6
3.2 Principal Functions and Main Menu ............................................................................................................ 7
3.3 Overview of Parts and Features – Draft Shield Models ............................................................................... 8
3.4 Overview of Parts and Features – Non Draft Shield Models ....................................................................... 8
4. APPLICATIONS .....................................................................................................................9
4.1 Weighing ...................................................................................................................................................... 9
4.1.1 Item Settings .......................................................................................................................................... 10
4.1.2 Sample Name ......................................................................................................................................... 11
4.1.3 Save to USB ........................................................................................................................................... 11
4.2 Parts Counting............................................................................................................................................ 11
4.2.1 Item Settings .......................................................................................................................................... 12
4.3 Percent Weighing ....................................................................................................................................... 14
4.3.1 Item Settings .......................................................................................................................................... 14
4.4 Dynamic Weighing ..................................................................................................................................... 15
4.4.1 Item Settings .......................................................................................................................................... 15
4.5 Density Determination ................................................................................................................................ 16
4.5.1 Measuring the Density of a Solid Using Water (default) ........................................................................ 16
4.5.2 Measuring the Density of a Buoyant Material Using Water ................................................................... 17
4.5.3 Measuring the Density of a Solid Using an Auxiliary Liquid ................................................................... 17
4.5.4 Measuring the Density of a liquid using a Calibrated Sinker (not supplied) ........................................... 18
4.5.5 Measuring the Density of Porous Material Using Oil ............................................................................. 19
4.6 Check Weighing ......................................................................................................................................... 22
4.6.1 Item Settings .......................................................................................................................................... 22
4.7 Display Hold ............................................................................................................................................... 23
4.7.1 Display Hold ........................................................................................................................................... 23
4.7.2 Peak Hold ............................................................................................................................................... 23
4.7.3 Item Settings .......................................................................................................................................... 24
4.8 Totalization ................................................................................................................................................. 24
4.9 Formulation ................................................................................................................................................ 25
4.9.1 Item Settings .......................................................................................................................................... 25
4.10 Additional Features .................................................................................................................................... 26
4.10.1 Weigh Below .......................................................................................................................................... 26
5. MENU SETTINGS ................................................................................................................ 27
5.1 Menu Navigation ........................................................................................................................................ 27
5.1.1 Changing Settings .................................................................................................................................. 28
5.2 Calibration .................................................................................................................................................. 29
5.2.1 Calibration sub-menu (InCal models) ..................................................................................................... 29
5.2.2 Internal Calibration ................................................................................................................................. 29
5.2.3 Automatic Calibration ............................................................................................................................. 29
5.2.4 AutoCal™ Adjustment ............................................................................................................................ 30
5.2.5 Span Calibration ..................................................................................................................................... 30
5.2.6 Linearity Calibration................................................................................................................................ 31
5.2.7 Calibration Test ...................................................................................................................................... 31
5.3 Balance Setup ............................................................................................................................................ 31
5.3.1 Balance Set-up sub-menu ...................................................................................................................... 31
5.3.2 Language ............................................................................................................................................... 31
5.3.3 User Setting ............................................................................................................................................ 32

EN-2 ADVENTURER BALANCES
5.3.4 Filter Level .............................................................................................................................................. 32
5.3.5 Auto Zero Tracking ................................................................................................................................. 32
5.3.6 Auto Tare ................................................................................................................................................ 32
5.3.7 Graduations ............................................................................................................................................ 32
5.3.8 Date & Time ........................................................................................................................................... 33
5.3.9 Approved Mode ...................................................................................................................................... 33
5.4 Weighing Units ........................................................................................................................................... 34
5.4.1 Units Sub-menu ...................................................................................................................................... 34
5.5 Data Maintenance ...................................................................................................................................... 34
5.5.1 Data Maintenance sub-menu ..................................................................................................................... 34
5.6 Communication .......................................................................................................................................... 35
5.6.1 Communication Sub-menu ..................................................................................................................... 35
5.6.2 Baud Rate .............................................................................................................................................. 35
5.6.3 Transmission .......................................................................................................................................... 36
5.6.4 Handshake ............................................................................................................................................. 36
5.6.5 Print Output ............................................................................................................................................ 36
5.6.6 Auto Print ................................................................................................................................................ 36
5.6.7 Print Content .......................................................................................................................................... 36
5.6.8 Feed.. ..................................................................................................................................................... 36
5.6.9 Format.. .................................................................................................................................................. 36
5.6.10 Print Calibration Data.. ........................................................................................................................... 36
5.7 GLP and GMP Data ................................................................................................................................... 38
5.7.1 GLP Data Sub-menu .............................................................................................................................. 38
5.7.2 Header .................................................................................................................................................... 38
5.7.3 Balance Name ........................................................................................................................................ 38
5.7.4 User Name ............................................................................................................................................. 38
5.7.5 Project Name .......................................................................................................................................... 38
5.8 Factory Reset ............................................................................................................................................. 38
5.9 Lockout ....................................................................................................................................................... 38
6. LEGAL FOR TRADE (LFT) .................................................................................................. 39
6.1 Settings ...................................................................................................................................................... 39
6.2 Verification .................................................................................................................................................. 39
6.3 Sealing ....................................................................................................................................................... 39
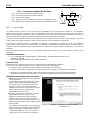
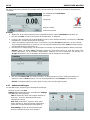
7. PRINTING ............................................................................................................................ 40
7.1 Connecting, Configuring and Testing the Printer/Computer Interface ....................................................... 40
7.2 Output Format ............................................................................................................................................ 40
7.3 Printout Examples ...................................................................................................................................... 41
8. MAINTENANCE ................................................................................................................... 44
8.1 Calibration .................................................................................................................................................. 44
8.2 Cleaning ..................................................................................................................................................... 44
8.3 Troubleshooting ......................................................................................................................................... 44
8.4 Service Information .................................................................................................................................... 44
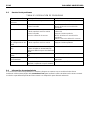
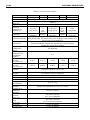
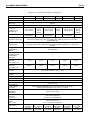
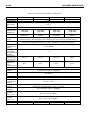
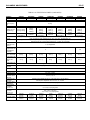
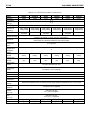
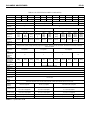
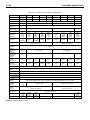
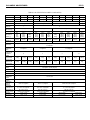
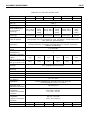
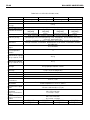
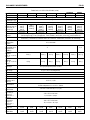
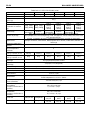
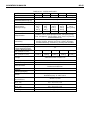
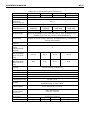
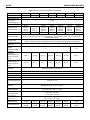
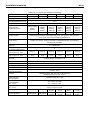
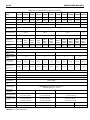
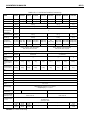
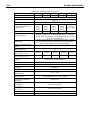
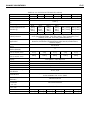
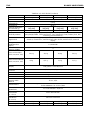
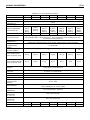
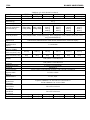
9. TECHNICAL DATA .............................................................................................................. 45
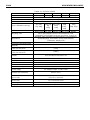
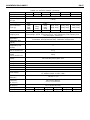
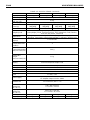
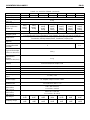
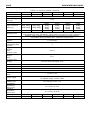
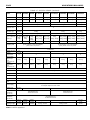
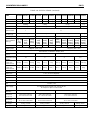
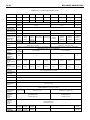
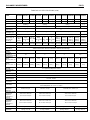
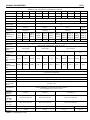
9.1 Specifications ............................................................................................................................................. 45
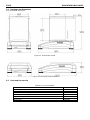
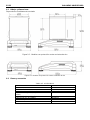
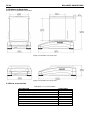
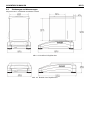
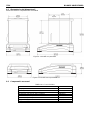
9.2 Drawings and Dimensions ......................................................................................................................... 54
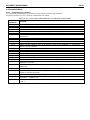
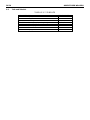
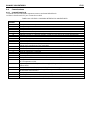
9.3 Parts and Accessories ............................................................................................................................... 54
9.4 Communication .......................................................................................................................................... 55
9.4.1 Interface Commands .............................................................................................................................. 55
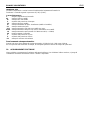
9.4.2 RS232 (DB9) Pin Connections ............................................................................................................... 56
9.5 The USB Interface ...................................................................................................................................... 56
10. SOFTWARE UPDATES ....................................................................................................... 57
11. COMPLIANCE...................................................................................................................... 58

ADVENTURER BALANCES EN-3
1. INTRODUCTION
1.1 Description
The Adventurer balance is a precision weighing instrument that will provide you with years of service if properly
cared for. The Ohaus Adventurer balances are available in capacities from 120 grams to 8,200 grams.
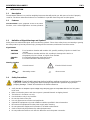
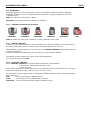
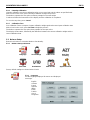
1.2 Features
Touch Controls: Quick, graphical access to all control
functions, over a dozen applications and many features.
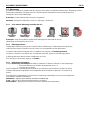
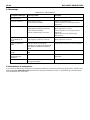
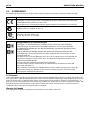
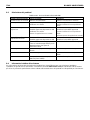
1.3 Definition of Signal Warnings and Symbols
Safety notes are marked with signal words and warning symbols. These show safety issues and warnings. Ignoring
the safety notes may lead to personal injury, damage to the instrument, malfunctions and false results.
Signal Words
WARNING For a hazardous situation with medium risk, possibly resulting in injuries or death if not
avoided.
CAUTION For a hazardous situation with low risk, resulting in damage to the device or
the property or in loss of data, or injuries if not avoided.
Attention For important information about the product
Note For useful information about the product
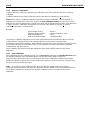
Warning Symbols
General Hazard Electrical Shock Hazard
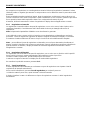
1.4 Safety Precautions
CAUTION: Read all safety warnings before installing, making connections, or servicing this
equipment. Failure to comply with these warnings could result in personal injury and/or
property damage. Retain all instructions for future reference.
Verify that the AC adapter’s input voltage range and plug type are compatible with the local AC power
to be used.
Make sure that the power cord does not pose a potential obstacle or tripping hazard.
The balance is for indoor use only.
Use the balance only in dry locations.
Do not drop loads on the pan.
Use only approved accessories and peripherals.
Operate the equipment only under ambient conditions specified in these instructions.
Disconnect the equipment from the power supply when cleaning.
Do not operate the equipment in hazardous or unstable environments.
Service should only be performed by authorized personnel.
Do not position the balance such that it is difficult to reach the power connection.
Direct current
Alternating current

EN-4 ADVENTURER BALANCES
2. INSTALLATION
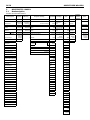
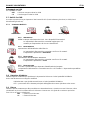
2.1 Unpacking
Carefully remove your Adventurer balance and each of its components from the package. The included
components vary depending on the balance model (see table below). Save the packaging to ensure safe storage
and transport. Please read the manual completely before installing and using the Adventurer balance to avoid
incorrect operation.
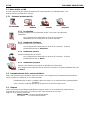
Included Components
Balance
Power Adapter
Wind Ring (only for 0.1 mg and 1 mg models)
Warranty Card
Software Compact Disk
2.2 Selecting the Location
Avoid excessive vibrations, heat sources, air current, or rapid temperature changes. Allow sufficient space.
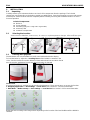
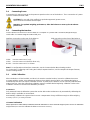
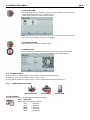
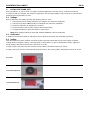
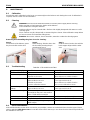
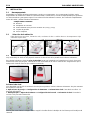
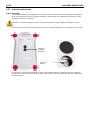
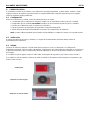
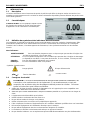
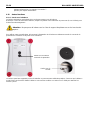
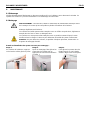
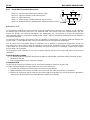
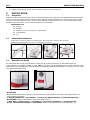
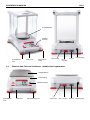
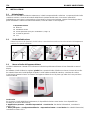
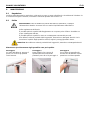
2.3 Leveling the Equipment
The Adventurer has a level bubble in a small round window beside the display.
To level the balance, adjust the 4 Leveling Feet until the bubble is centered in the
circle. See the Level Assist section below on information about how and which feet to
turn. Be sure the equipment is level each time its location is changed.
Level Assist
A level assist function is available to help leveling the Adventurer. There are two ways to access the function:
1. Weighing Application -> Item Settings -> Level Assist. See section 4.1.1 for more information.
2. Main Menu -> Balance Setup -> User Settings -> Level Assist. See section 5.3.3 for more information.
Rotate the feet according to the image above depending on the location of the level bubble until the bubble is
centered.

ADVENTURER BALANCES EN-5
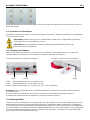
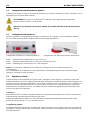
2.4 Connecting Power
Connect the DC output connector to the power receptacle on the rear of the balance. Then connect the AC power
cord to a suitable electrical outlet.
CAUTION: For use with CSA certified (or equivalent approved) power source,
which must have a limited current output.
Attention: For optimal weighing performance, allow the balance to warm up for 60 minutes
prior to use.
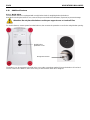
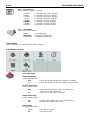
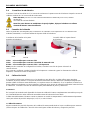
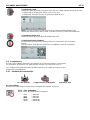
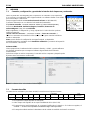
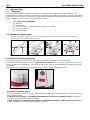
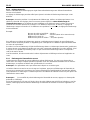
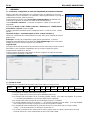
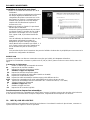
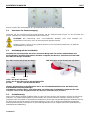
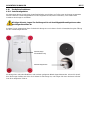
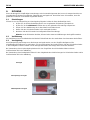
2.5 Connecting the Interface
Use the built-in RS-232 Port to connect either to a computer or a printer with a standard (straight-through)
serial cable. Or connect using the scale’s USB port.
Interface connections on the rear of the balance: USB connection on the front of the balance:
.
USB1: Used to connect to PC only
USB2: Used to connect a USB flash driver only
RS232: Used to connect to PC or Printer
Note: For configuration and interface commands, see the Communication Menu Settings section.
For Connecting, Configuring and Testing the Printer/Computer Interface, and for sample Print Output Formats,
see the Printing section.
2.6 Initial Calibration
When the Balance is first installed, and when it is moved to another location, it must be calibrated to ensure
accurate weighing results. Most Adventurer Balances have built in AutoCal which can calibrate the balance
automatically and does not require calibration masses. If preferred, the balance can be manually calibrated with
external masses. Have the appropriate calibration masses available before beginning calibration. Refer to the
Calibration Section for masses and calibration procedure.
¤ AutoCal™
Fully automatic internal calibration system that assists with routine maintenance by automatically calibrating the
balance daily is available on most models.
Automatically calibrates the system when it senses a temperature change sufficient enough to affect weighing
accuracy (>1.5°C), or every 11 hours.
¤ External Calibration
Select precision models feature traditional external calibration in which external weights (user’s choice of calibration
weight values) are used to calibrate the balance to ensure accuracy.
USB1
RS232
USB2

EN-6 ADVENTURER BALANCES
3. OPERATION
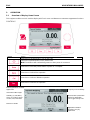
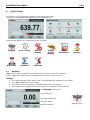
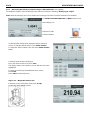
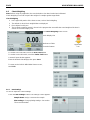
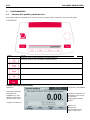
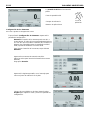
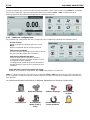
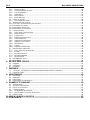
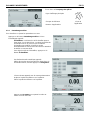
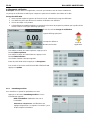
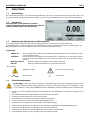
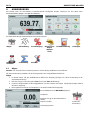
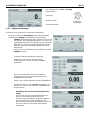
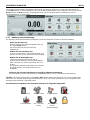
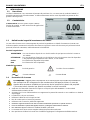
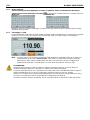
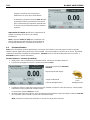
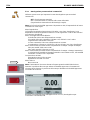
3.1 Overview of Display, Home Screen
This equipment utilizes a touch-sensitive display with Touch areas and Buttons to control the equipment’s functions.
CONTROLS
Button
Action
Short Press (if powered Off): Turns on the scale
Long Press (if powered On): Turns off the scale
Note:
The balance will automatically power on when power is connected.
Short Press: Prints the present data to a printer or a computer.
Short Press: Perform Zero operation
Short Press: Perform Calibration operation
Short Press: Perform Tare operation
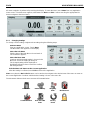
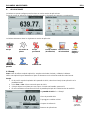
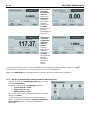
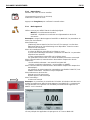
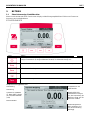
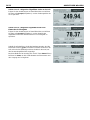
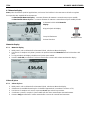
Main Application Screen
Application
Instructional Messages
Stability (*), Net (NET),
Gross (G) and/or center
of zero (>0<) indicators
Reference Fields
Application Buttons:
Functions vary by
application
Result Field: Information
varies by application
Touch g to change unit
Capacity and readability

ADVENTURER BALANCES EN-7
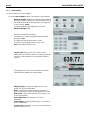
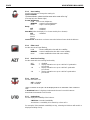
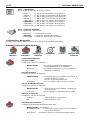
3.2 Principal Functions and Main Menu
Weighing: Press Zero to set the display to zero. Place an item on the pan. Display indicates gross weight.
Taring: With no load on the pan, press Zero to set the display to zero. Place an empty container on the pan
and press Tare. Add material to the container and its net weight is displayed. Remove container and
container’s weight appears as a negative number. Press Tare to clear.
Zero: Press Zero to zero the balance
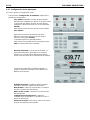
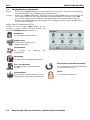
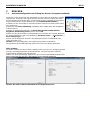
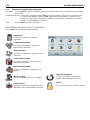
MENU & SCREEN NAVIGATION
Touch Menu to open the menu list.
Calibration:
Touch to view calibration options.
Balance Setup:
Touch to view and change balance settings.
Weighing Units:
Touch to view and change weighing units.
Data Maintenance:
Touch to view data maintenance settings.
GLP and GMP Data:
Insert user data for traceability.
Factory Reset:
Touch to do a Factory reset of menu
settings.
Communication:
Touch to view COM Device Settings and
Print Settings.
Lockout:
Touch to view lockout options.

EN-8 ADVENTURER BALANCES
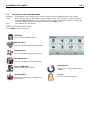
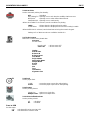
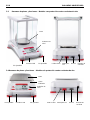
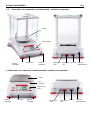
3.3 Overview of Parts and Features – Draft Shield Models
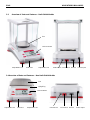
3.4 Overview of Parts and Features – Non Draft Shield Models
USB Host
USB Device
Power Input
RS232
LFT Switch
Adjustable Foot
Level Indicator
Level Indicator
USB Host
Adjustable Foot
USB Device
LFT Switch
RS232
Power Input
Pan
Adjustable Foot
Pan
Wing Ring
Adjustable Foot

ADVENTURER BALANCES EN-9
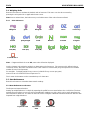
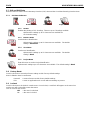
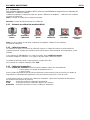
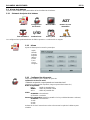
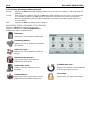
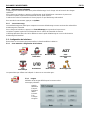
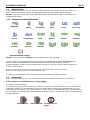
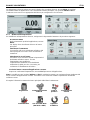
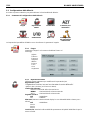
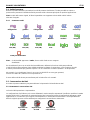
4. APPLICATIONS
The balance can be configured to operate in various Application modes.
Touch the top left Application field (weighing in the example below):
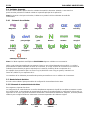
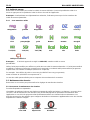
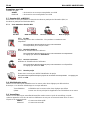
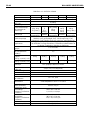
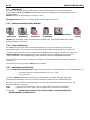
The Adventurer Balance has 9 application modes, as follows:
Weighing
Parts Counting
Percent
Weighing
Dynamic
(Animal)
Weighing
Density
Determination
Check
Weighing
Display Hold
Totalization
Formulation
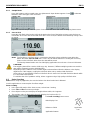
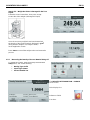
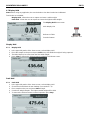
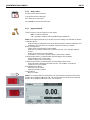
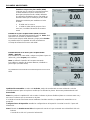
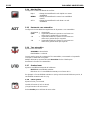
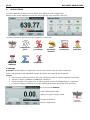
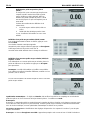
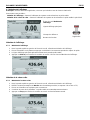
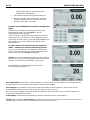
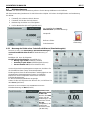
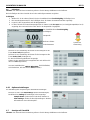
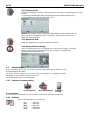
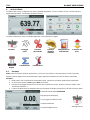
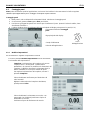
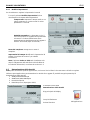
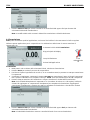
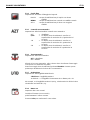
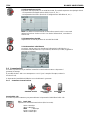
4.1 Weighing
Note: Before using any application, be sure the balance has been leveled and calibrated.
Use this application to determine the weight of items in the selected unit of measure.
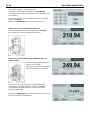
Weighing
1. In the upper left portion of the home screen, select Weighing (this application is the default).
2. Press Tare or Zero if necessary to begin.
3. Place objects on the pan to display the weight. When stable, the * appears.
4. The resulting value is displayed in the main Display Line in the active unit of measure.
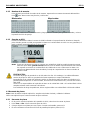
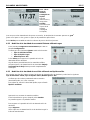
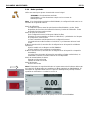
The WEIGHING Home screen
Main Display Line
Reference Fields
Application Buttons
Application Icon
Touch g to change unit

EN-10 ADVENTURER BALANCES
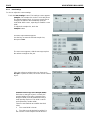
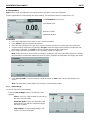
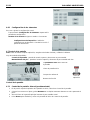
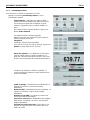
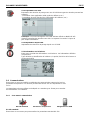
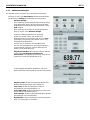
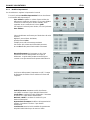
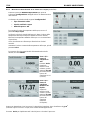
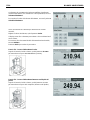
4.1.1 Item Settings
To view or adjust the current settings
Touch the
Item Settings
button. The Settings screen appears.
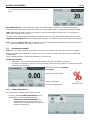
Minimum Weight: establish a minimum weight value to
be used to verify a reading. If an actual weight is below
the established Minimum Weight value, it is flagged by
a color change: yellow.
To adjust the Minimum Weight value, touch the
Minimum Weight
button.
A numeric input window appears.
Use the keys to enter the desired Minimum Weight,
then press Save.
The display reverts to the previous screen.
To return to the Weighing home screen, touch
Exit at the bottom of that screen.
Capacity Bar: When set to ON, a capacity bar is
displayed in the reference field. The capacity guide will
show the current weight as a percentage of balance
capacity.
If Capacity Bar is set to OFF, the reference field will
show Minimum Weight and Sample Name.
Weighing Units: Change the displayed unit. See
section 5.4 for more information
Note: Touching the weighing unit from application
home screen will also open the Weighing Units screen.
Filter Level: Change Filtering level. See section 5.3.4
for more information
GLP & GMP Data: See section 5.7 for more
information
Print settings: Change printing settings. See section 7
for more information.
Level Assist: Instructions on how to move the balance
feet to level the balance.

ADVENTURER BALANCES EN-11
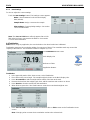
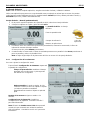
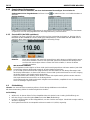
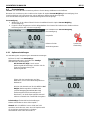
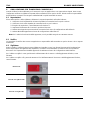
4.1.2 Sample Name
Press this button to add a sample name. An alphanumeric input window appears. Press to alternate
between Lower and Upper case characters.
Lower Case: Upper Case:
Key in the desired sample name and press Save to save the name and return to weighing home screen.
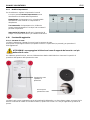
4.1.3 Save to USB
Insert the USB flash drive into the USB slot located on the front of the balance. Next, press the Save to
USB button to save the data to the USB flash drive. Once saved, the button will momentarily change color
to orange.
Notes: The first time a USB flash drive is connected to the balance there might be some delay time
before the button Save to USB works. This is due to that the balance is creating the necessary
folders on the USB flash drive where the data will be stored.
The Density Determination and Check Weighing applications do not have a Save to USB button.
CAUTION:
The weighing data will be saved to USB every day. However, if different weighing modes are used the
data will be separately saved to individual files.
Depending on the USB drive used, all data might not be transferred from the balance or the display
might freeze. If this happens, unplug the USB flash drive and try another USB flash drive.
Ohaus takes no responsibility if data on USB flash drive is erased or if the USB flash drive breaks while
it is connected to the balance.
To minimize the risk of problems arising, Ohaus suggests using a high quality USB flash drive.
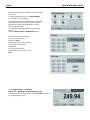
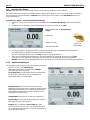
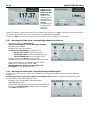
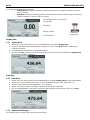
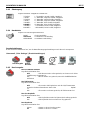
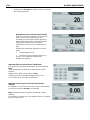
4.2 Parts Counting
Note: Before using any application, be sure the balance has been leveled and calibrated.
Use this application to count samples of uniform weight.
Parts Counting
1. In the upper left portion of the home screen, select Parts Counting
2. Press Tare or Zero if necessary to begin.
3. Place objects on the pan to display the weight. When stable, the * appears.
4. The resulting value is displayed in the main Display Line in pieces (PCS).
The Parts Counting Home screen
Main Display Line
Reference Fields
Application Buttons
Application
Icon

EN-12 ADVENTURER BALANCES
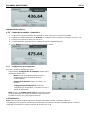
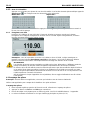
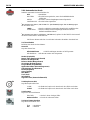
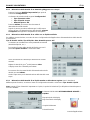
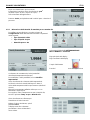
4.2.1 Item Settings
To view or adjust the current settings
Touch the
Item Settings
button. The Settings screen appears.
Samples: The sample size can be 1 to 10 000 pieces.
The default sample size is 10. Once a sample size is
changed, the balance will immediately open the
recalculate APW screen, expecting to establish a new
APW.
To adjust the sample size, touch the
Samples
button.
A numeric input window appears.
Use the keys to enter the desired sample size,
then press Save.
The next screen appears, with the message to place
the reference weight on the pan.
Place the reference weight on the pan, then touch
Accept to capture the value, the screen shows number
of pcs.
Establish an Average Piece Weight (APW):
Each time a new type of part is counted, the
nominal weight of one piece (Average Piece
Weight or APW) must be established using a
small quantity of pieces. This APW is stored
until replaced by another APW.
There are two methods to establish the APW
value:
1. The actual APW is known
2. The APW must be derived by weight. For
this case the current sample size will be used

ADVENTURER BALANCES EN-13
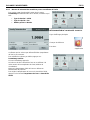
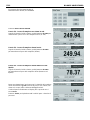
Set a known Average Piece Weight (APW)
To adjust the APW value directly, touch the
APW
button.
A numeric input window appears.
Key in the desired APW Weight, then press Save.
The display returns to the application home screen with the
new APW value in the reference field.
Set a new Average Piece Weight (APW) – Derived
To establish a new APW, place the reference weight on the pan
and press Accept to continue.
Note: The sample size that is displayed will be used.
To use a different sample size, change that first. (See above.)
The home screen shows the number of pieces at the new APW
Auto Optimization: When set to On, improves counting accuracy by re-calculating the piece weight
automatically as parts are added. Default is Off.
Notes:
APW Optimization occurs only when the number of pieces added to the pan is between one and three times the
number already on the pan.
If the APW is entered manually by the numeric keypad, APW auto optimization will not occur.
Print settings: Change printing settings. See section 7 for more information.
Note: The Save to USB button will only appear after a USB flash drive has been connected to the balance.
See section 4.1.3 for more information.

EN-14 ADVENTURER BALANCES
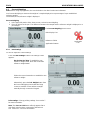
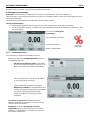
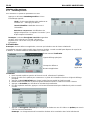
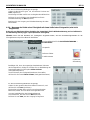
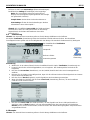
4.3 Percent Weighing
Note: Before using any application, be sure the balance has been leveled and calibrated.
Use Percent Weighing to measure the weight of a sample displayed as a percentage of a pre-established
reference weight.
The default (or last) reference weight is displayed.
Percent Weighing
1. In the upper left portion of the home screen, select Percent Weighing.
2. Place an object on the pan. The difference between the sample and the reference weight is displayed as a
percentage.
The Percent Weighing Home screen
Main Display Line
Reference Fields
Application Buttons
Application
Icon
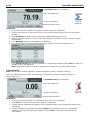
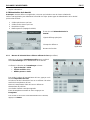
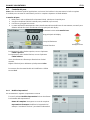
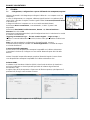
4.3.1 Item Settings
To view or adjust the current settings
Touch the
Item Settings
button. The Settings screen
appears.
Recalculate Ref. Wgt: To establish a new
reference weight value, touch the recalculate
reference weight button.
Follow the screen instructions to establish a new
reference weight.
Alternatively, press the
Ref. Weight
button from
the Percent Weighing Recalculate Ref. Wgt
screen to establish a new reference weight
manually through a numerical keypad.
Print settings: Change printing settings. See section 7
for more information.
Note: The Save to USB button will only appear after a
USB flash drive has been connected to the balance.
See section 4.1.3 for more information.

ADVENTURER BALANCES EN-15
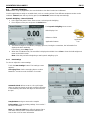
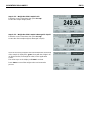
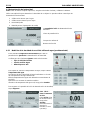
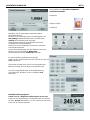
4.4 Dynamic Weighing
Note: Before using any application, be sure the balance has been leveled and calibrated.
Use this application to weigh an unstable load, such as a moving animal. Two different start/reset modes can be
selected: Manual (start and stop via key press) and Automatic (start and stop automatically).
Dynamic Weighing – Manual (default)
1. In the upper left portion of the home screen, select Dynamic Weighing
2. Place objects on the pan and press the Start button.
The Dynamic Weighing Home screen
Main Display Line
Reference Fields
Application Buttons
Application
Icon
3. The balance begins a countdown (averaging process). During the countdown, the information line
displays the time remaining.
If necessary, press Stop to quit.
4. When the countdown ends, the result line is displayed and held. Press Clear to clear the held weight and
return to the initial screen.
Note: Clear the pan before beginning a new Dynamic weighing cycle.
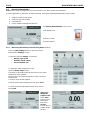
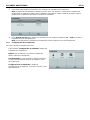
4.4.1 Item Settings
To view or adjust the current settings
Touch the
Item Settings
button. The Settings screen
appears.
Averaging Time: Set the averaging time to a value
between 1 and 99 seconds. Default is 5 seconds.
Automatic Mode: When set to On, the cycle begins
when an object is placed on the pan, and the held value
is automatically reset when the object is removed from
the pan.
Sample Name: Assign a name to the sample.
Print settings: Change printing settings. See section 7
for more information.
Note: The Save to USB button will only appear after a
USB flash drive has been connected to the balance.
See section 4.1.3 for more information.

EN-16 ADVENTURER BALANCES
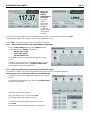
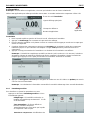
4.5 Density Determination
Note: Before using any application, be sure the balance has been leveled and calibrated.
Use this application to determine an object’s density. Four types of density determination can be made:
1. Solids more dense than water
2. Solid less dense than water
3. Liquid density
4. Porous material (impregnated with oil)
The Density Determination Home screen
Main Display Line
Reference Fields
Function Buttons
Application
Icon
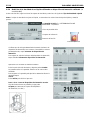
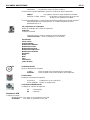
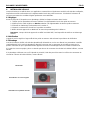
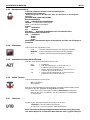
4.5.1 Measuring the Density of a Solid Using Water (default)
Press the Item Settings button to open the Density
Determination Settings screen.
Confirm the following Setups are selected:
Density Type: Solid
Auxiliary Liquid: Water
Porous Material: Off
To adjust the water temperature value,
touch the Water Temp. button.
The balance calculates water density based on the water
temperature value entered.
Measure the actual water temperature using a precision
thermometer.
A numeric input window appears.
Enter the actual water temperature, then press Save.
To return to the Density Determination home screen,
touch Back.
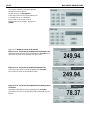
Step 1 of 2 –
Weigh the
Sample in Air.
Press
Start
.
Follow screen
instructions,
then press
Accept
to store the dry
sample weight
(“in air”).

ADVENTURER BALANCES EN-17
Step 2 of 2 –
Weigh the
Sample
Submerged in
the Liquid.
Follow the
screen
instructions,
then press
Accept
to store the
sample weight
(submerged
in liquid).
Once the necessary weights have been determined, the density of the sample is displayed in g/cm
3
(along with the weight in air, weight in water) on the Application screen.
Press
Start
to reset all the weight values and restart the process.
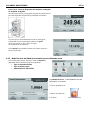
4.5.2 Measuring the Density of a Buoyant Material Using Water
Press the Item Settings button to open Settings screen.
Confirm the following Setups are selected:
Density Type: Solid
Liquid Type: Water
Porous Material: Off
Press
Back
to return to the Density Determination home
screen.
Follow the same procedure as Solid Material above, except
in Density Determination step 2, push the sample down
into the liquid until it is fully submerged.
4.5.3 Measuring the Density of a Solid Using an Auxiliary Liquid
To enable this feature, enter the Density Determination Setup menu and select the following:
Density Type: Solid; Liquid Type: Other; Porous Material: Off.
Confirm the default values displayed (Liquid Density, etc) are
correct.
To adjust the Liquid Density value, touch the Auxiliary liquid
button and select Other.
A numeric input window appears.
Key in the density in g/cm
3
, then press Save.
The display returns to the previous screen.
To return to the Density Determination home screen,
touch Back.
Begin the Density determination process as per above.

EN-18 ADVENTURER BALANCES
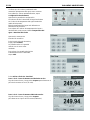
4.5.4 Measuring the Density of a liquid using a Calibrated Sinker (not supplied)
To enable this feature, enter the Density Setup menu and select the following; Density Type: Liquid.
Note: when the Density Type is set to Liquid, the Liquid type and Porous material selections are disabled.
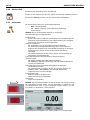
The DENSITY DETERMINATION – LIQUID Home screen
Main Display Line
Reference Fields
Function Buttons
Application Icon
Confirm that the default value displayed (sinker volume) is
correct. To edit the default values, touch
Sinker Volume
.
To adjust the Sinker volume value, touch the
Sinker Volume
button.
A numeric input window is displayed.
Key in the desired value, then press Save.
The display returns to the previous screen with the new value
highlighted.
To return to the Density Determination home screen,
touch Back.
Press
Start
to start the process.
Step 1 of 2 – Weigh the Sinker in Air.
Follow the screen instructions, then press
Accept
to store the sinker weight (“in air”).
La pagina si sta caricando...
La pagina si sta caricando...
La pagina si sta caricando...
La pagina si sta caricando...
La pagina si sta caricando...
La pagina si sta caricando...
La pagina si sta caricando...
La pagina si sta caricando...
La pagina si sta caricando...
La pagina si sta caricando...
La pagina si sta caricando...
La pagina si sta caricando...
La pagina si sta caricando...
La pagina si sta caricando...
La pagina si sta caricando...
La pagina si sta caricando...
La pagina si sta caricando...
La pagina si sta caricando...
La pagina si sta caricando...
La pagina si sta caricando...
La pagina si sta caricando...
La pagina si sta caricando...
La pagina si sta caricando...
La pagina si sta caricando...
La pagina si sta caricando...
La pagina si sta caricando...
La pagina si sta caricando...
La pagina si sta caricando...
La pagina si sta caricando...
La pagina si sta caricando...
La pagina si sta caricando...
La pagina si sta caricando...
La pagina si sta caricando...
La pagina si sta caricando...
La pagina si sta caricando...
La pagina si sta caricando...
La pagina si sta caricando...
La pagina si sta caricando...
La pagina si sta caricando...
La pagina si sta caricando...
La pagina si sta caricando...
La pagina si sta caricando...
La pagina si sta caricando...
La pagina si sta caricando...
La pagina si sta caricando...
La pagina si sta caricando...
La pagina si sta caricando...
La pagina si sta caricando...
La pagina si sta caricando...
La pagina si sta caricando...
La pagina si sta caricando...
La pagina si sta caricando...
La pagina si sta caricando...
La pagina si sta caricando...
La pagina si sta caricando...
La pagina si sta caricando...
La pagina si sta caricando...
La pagina si sta caricando...
La pagina si sta caricando...
La pagina si sta caricando...
La pagina si sta caricando...
La pagina si sta caricando...
La pagina si sta caricando...
La pagina si sta caricando...
La pagina si sta caricando...
La pagina si sta caricando...
La pagina si sta caricando...
La pagina si sta caricando...
La pagina si sta caricando...
La pagina si sta caricando...
La pagina si sta caricando...
La pagina si sta caricando...
La pagina si sta caricando...
La pagina si sta caricando...
La pagina si sta caricando...
La pagina si sta caricando...
La pagina si sta caricando...
La pagina si sta caricando...
La pagina si sta caricando...
La pagina si sta caricando...
La pagina si sta caricando...
La pagina si sta caricando...
La pagina si sta caricando...
La pagina si sta caricando...
La pagina si sta caricando...
La pagina si sta caricando...
La pagina si sta caricando...
La pagina si sta caricando...
La pagina si sta caricando...
La pagina si sta caricando...
La pagina si sta caricando...
La pagina si sta caricando...
La pagina si sta caricando...
La pagina si sta caricando...
La pagina si sta caricando...
La pagina si sta caricando...
La pagina si sta caricando...
La pagina si sta caricando...
La pagina si sta caricando...
La pagina si sta caricando...
La pagina si sta caricando...
La pagina si sta caricando...
La pagina si sta caricando...
La pagina si sta caricando...
La pagina si sta caricando...
La pagina si sta caricando...
La pagina si sta caricando...
La pagina si sta caricando...
La pagina si sta caricando...
La pagina si sta caricando...
La pagina si sta caricando...
La pagina si sta caricando...
La pagina si sta caricando...
La pagina si sta caricando...
La pagina si sta caricando...
La pagina si sta caricando...
La pagina si sta caricando...
La pagina si sta caricando...
La pagina si sta caricando...
La pagina si sta caricando...
La pagina si sta caricando...
La pagina si sta caricando...
La pagina si sta caricando...
La pagina si sta caricando...
La pagina si sta caricando...
La pagina si sta caricando...
La pagina si sta caricando...
La pagina si sta caricando...
La pagina si sta caricando...
La pagina si sta caricando...
La pagina si sta caricando...
La pagina si sta caricando...
La pagina si sta caricando...
La pagina si sta caricando...
La pagina si sta caricando...
La pagina si sta caricando...
La pagina si sta caricando...
La pagina si sta caricando...
La pagina si sta caricando...
La pagina si sta caricando...
La pagina si sta caricando...
La pagina si sta caricando...
La pagina si sta caricando...
La pagina si sta caricando...
La pagina si sta caricando...
La pagina si sta caricando...
La pagina si sta caricando...
La pagina si sta caricando...
La pagina si sta caricando...
La pagina si sta caricando...
La pagina si sta caricando...
La pagina si sta caricando...
La pagina si sta caricando...
La pagina si sta caricando...
La pagina si sta caricando...
La pagina si sta caricando...
La pagina si sta caricando...
La pagina si sta caricando...
La pagina si sta caricando...
La pagina si sta caricando...
La pagina si sta caricando...
La pagina si sta caricando...
La pagina si sta caricando...
La pagina si sta caricando...
La pagina si sta caricando...
La pagina si sta caricando...
La pagina si sta caricando...
La pagina si sta caricando...
La pagina si sta caricando...
La pagina si sta caricando...
La pagina si sta caricando...
La pagina si sta caricando...
La pagina si sta caricando...
La pagina si sta caricando...
La pagina si sta caricando...
La pagina si sta caricando...
La pagina si sta caricando...
La pagina si sta caricando...
La pagina si sta caricando...
La pagina si sta caricando...
La pagina si sta caricando...
La pagina si sta caricando...
La pagina si sta caricando...
La pagina si sta caricando...
La pagina si sta caricando...
La pagina si sta caricando...
La pagina si sta caricando...
La pagina si sta caricando...
La pagina si sta caricando...
La pagina si sta caricando...
La pagina si sta caricando...
La pagina si sta caricando...
La pagina si sta caricando...
La pagina si sta caricando...
La pagina si sta caricando...
La pagina si sta caricando...
La pagina si sta caricando...
La pagina si sta caricando...
La pagina si sta caricando...
La pagina si sta caricando...
La pagina si sta caricando...
La pagina si sta caricando...
La pagina si sta caricando...
La pagina si sta caricando...
La pagina si sta caricando...
La pagina si sta caricando...
La pagina si sta caricando...
La pagina si sta caricando...
La pagina si sta caricando...
La pagina si sta caricando...
La pagina si sta caricando...
La pagina si sta caricando...
La pagina si sta caricando...
La pagina si sta caricando...
La pagina si sta caricando...
La pagina si sta caricando...
La pagina si sta caricando...
La pagina si sta caricando...
La pagina si sta caricando...
La pagina si sta caricando...
La pagina si sta caricando...
La pagina si sta caricando...
La pagina si sta caricando...
La pagina si sta caricando...
La pagina si sta caricando...
La pagina si sta caricando...
La pagina si sta caricando...
La pagina si sta caricando...
La pagina si sta caricando...
La pagina si sta caricando...
La pagina si sta caricando...
La pagina si sta caricando...
La pagina si sta caricando...
La pagina si sta caricando...
La pagina si sta caricando...
La pagina si sta caricando...
La pagina si sta caricando...
La pagina si sta caricando...
La pagina si sta caricando...
La pagina si sta caricando...
La pagina si sta caricando...
La pagina si sta caricando...
La pagina si sta caricando...
La pagina si sta caricando...
La pagina si sta caricando...
La pagina si sta caricando...
La pagina si sta caricando...
La pagina si sta caricando...
La pagina si sta caricando...
La pagina si sta caricando...
La pagina si sta caricando...
La pagina si sta caricando...
La pagina si sta caricando...
La pagina si sta caricando...
La pagina si sta caricando...
La pagina si sta caricando...
La pagina si sta caricando...
La pagina si sta caricando...
La pagina si sta caricando...
La pagina si sta caricando...
La pagina si sta caricando...
La pagina si sta caricando...
La pagina si sta caricando...
La pagina si sta caricando...
La pagina si sta caricando...
La pagina si sta caricando...
La pagina si sta caricando...
La pagina si sta caricando...
La pagina si sta caricando...
La pagina si sta caricando...
La pagina si sta caricando...
La pagina si sta caricando...
La pagina si sta caricando...
La pagina si sta caricando...
La pagina si sta caricando...
La pagina si sta caricando...
La pagina si sta caricando...
La pagina si sta caricando...
La pagina si sta caricando...
La pagina si sta caricando...
La pagina si sta caricando...
La pagina si sta caricando...
La pagina si sta caricando...
La pagina si sta caricando...
-
 1
1
-
 2
2
-
 3
3
-
 4
4
-
 5
5
-
 6
6
-
 7
7
-
 8
8
-
 9
9
-
 10
10
-
 11
11
-
 12
12
-
 13
13
-
 14
14
-
 15
15
-
 16
16
-
 17
17
-
 18
18
-
 19
19
-
 20
20
-
 21
21
-
 22
22
-
 23
23
-
 24
24
-
 25
25
-
 26
26
-
 27
27
-
 28
28
-
 29
29
-
 30
30
-
 31
31
-
 32
32
-
 33
33
-
 34
34
-
 35
35
-
 36
36
-
 37
37
-
 38
38
-
 39
39
-
 40
40
-
 41
41
-
 42
42
-
 43
43
-
 44
44
-
 45
45
-
 46
46
-
 47
47
-
 48
48
-
 49
49
-
 50
50
-
 51
51
-
 52
52
-
 53
53
-
 54
54
-
 55
55
-
 56
56
-
 57
57
-
 58
58
-
 59
59
-
 60
60
-
 61
61
-
 62
62
-
 63
63
-
 64
64
-
 65
65
-
 66
66
-
 67
67
-
 68
68
-
 69
69
-
 70
70
-
 71
71
-
 72
72
-
 73
73
-
 74
74
-
 75
75
-
 76
76
-
 77
77
-
 78
78
-
 79
79
-
 80
80
-
 81
81
-
 82
82
-
 83
83
-
 84
84
-
 85
85
-
 86
86
-
 87
87
-
 88
88
-
 89
89
-
 90
90
-
 91
91
-
 92
92
-
 93
93
-
 94
94
-
 95
95
-
 96
96
-
 97
97
-
 98
98
-
 99
99
-
 100
100
-
 101
101
-
 102
102
-
 103
103
-
 104
104
-
 105
105
-
 106
106
-
 107
107
-
 108
108
-
 109
109
-
 110
110
-
 111
111
-
 112
112
-
 113
113
-
 114
114
-
 115
115
-
 116
116
-
 117
117
-
 118
118
-
 119
119
-
 120
120
-
 121
121
-
 122
122
-
 123
123
-
 124
124
-
 125
125
-
 126
126
-
 127
127
-
 128
128
-
 129
129
-
 130
130
-
 131
131
-
 132
132
-
 133
133
-
 134
134
-
 135
135
-
 136
136
-
 137
137
-
 138
138
-
 139
139
-
 140
140
-
 141
141
-
 142
142
-
 143
143
-
 144
144
-
 145
145
-
 146
146
-
 147
147
-
 148
148
-
 149
149
-
 150
150
-
 151
151
-
 152
152
-
 153
153
-
 154
154
-
 155
155
-
 156
156
-
 157
157
-
 158
158
-
 159
159
-
 160
160
-
 161
161
-
 162
162
-
 163
163
-
 164
164
-
 165
165
-
 166
166
-
 167
167
-
 168
168
-
 169
169
-
 170
170
-
 171
171
-
 172
172
-
 173
173
-
 174
174
-
 175
175
-
 176
176
-
 177
177
-
 178
178
-
 179
179
-
 180
180
-
 181
181
-
 182
182
-
 183
183
-
 184
184
-
 185
185
-
 186
186
-
 187
187
-
 188
188
-
 189
189
-
 190
190
-
 191
191
-
 192
192
-
 193
193
-
 194
194
-
 195
195
-
 196
196
-
 197
197
-
 198
198
-
 199
199
-
 200
200
-
 201
201
-
 202
202
-
 203
203
-
 204
204
-
 205
205
-
 206
206
-
 207
207
-
 208
208
-
 209
209
-
 210
210
-
 211
211
-
 212
212
-
 213
213
-
 214
214
-
 215
215
-
 216
216
-
 217
217
-
 218
218
-
 219
219
-
 220
220
-
 221
221
-
 222
222
-
 223
223
-
 224
224
-
 225
225
-
 226
226
-
 227
227
-
 228
228
-
 229
229
-
 230
230
-
 231
231
-
 232
232
-
 233
233
-
 234
234
-
 235
235
-
 236
236
-
 237
237
-
 238
238
-
 239
239
-
 240
240
-
 241
241
-
 242
242
-
 243
243
-
 244
244
-
 245
245
-
 246
246
-
 247
247
-
 248
248
-
 249
249
-
 250
250
-
 251
251
-
 252
252
-
 253
253
-
 254
254
-
 255
255
-
 256
256
-
 257
257
-
 258
258
-
 259
259
-
 260
260
-
 261
261
-
 262
262
-
 263
263
-
 264
264
-
 265
265
-
 266
266
-
 267
267
-
 268
268
-
 269
269
-
 270
270
-
 271
271
-
 272
272
-
 273
273
-
 274
274
-
 275
275
-
 276
276
-
 277
277
-
 278
278
-
 279
279
-
 280
280
-
 281
281
-
 282
282
-
 283
283
-
 284
284
-
 285
285
-
 286
286
-
 287
287
-
 288
288
-
 289
289
-
 290
290
-
 291
291
-
 292
292
-
 293
293
-
 294
294
-
 295
295
-
 296
296
-
 297
297
-
 298
298
-
 299
299
-
 300
300
-
 301
301
-
 302
302
-
 303
303
-
 304
304


in altre lingue
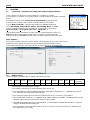
- English: Ohaus AX4202N/E User manual
- français: Ohaus AX4202N/E Manuel utilisateur
- español: Ohaus AX4202N/E Manual de usuario
- Deutsch: Ohaus AX4202N/E Benutzerhandbuch
Documenti correlati
-
Ohaus PX5202E Manuale utente
-
Ohaus AR2140-2EO Manuale utente
-
Ohaus STX2201 Manuale utente
-
Ohaus Defender T24PE Manuale utente
-
 Recoton/Advent EC Series Manuale utente
-
-
Chemglass CG-9504-01 Manuale del proprietario
-
Ohaus SKX1202 Manuale utente
-
Ohaus AD7-MD Manuale utente
-
Ohaus MB25 Manuale utente

Altri documenti
-
A D HR-250AZ Guida utente
-
 Giropes Baxtran BAR Manuale utente
-
Nice Automation Ten Manuale del proprietario
-
Baxtran ABS Manuale utente
-
 Erard LUX UP 1050L Black Manuale del proprietario
-
 AND FX-iWP Series Manuale utente
-
-
 AND GX/GF-K Series Manuale utente
-
-
 Smart Weigh top2kg Manuale utente


