Kenwood KAX950ME Manuale del proprietario
- Categoria
- Tritacarne
- Tipo
- Manuale del proprietario
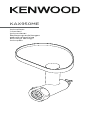
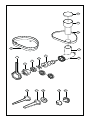
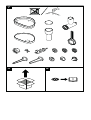
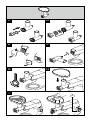
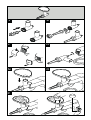
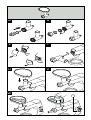
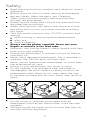
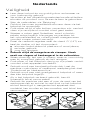
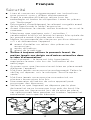
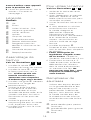
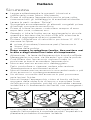
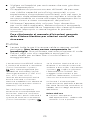
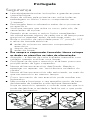
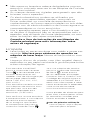
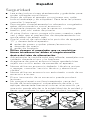
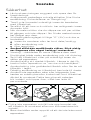
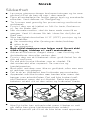
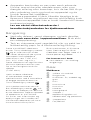
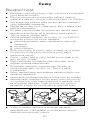
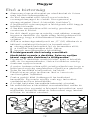
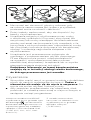
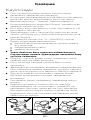
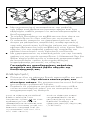
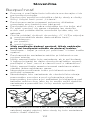
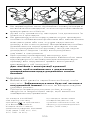
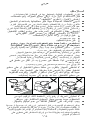
Di seguito troverai una breve descrizione per Tritacarne KAX950ME. Questo accessorio per robot da cucina è progettato per tritare carne, pollame e pesce. Può anche essere utilizzato per preparare salsicce e kebbe con gli accessori inclusi. L'accessorio utilizza il sistema di connessione Twist ed è compatibile con i robot da cucina Kenwood Chef di ultima generazione e con i modelli Kmix dotati di uscita a bassa velocità. Prima dell'uso, assicurarsi di scongelare completamente gli alimenti surgelati e rimuovere ossa e pelle prima di tritare. Lame affilate, maneggiare con cura. Non utilizzare accessori danneggiati o non autorizzati.
Di seguito troverai una breve descrizione per Tritacarne KAX950ME. Questo accessorio per robot da cucina è progettato per tritare carne, pollame e pesce. Può anche essere utilizzato per preparare salsicce e kebbe con gli accessori inclusi. L'accessorio utilizza il sistema di connessione Twist ed è compatibile con i robot da cucina Kenwood Chef di ultima generazione e con i modelli Kmix dotati di uscita a bassa velocità. Prima dell'uso, assicurarsi di scongelare completamente gli alimenti surgelati e rimuovere ossa e pelle prima di tritare. Lame affilate, maneggiare con cura. Non utilizzare accessori danneggiati o non autorizzati.


-
 1
1
-
 2
2
-
 3
3
-
 4
4
-
 5
5
-
 6
6
-
 7
7
-
 8
8
-
 9
9
-
 10
10
-
 11
11
-
 12
12
-
 13
13
-
 14
14
-
 15
15
-
 16
16
-
 17
17
-
 18
18
-
 19
19
-
 20
20
-
 21
21
-
 22
22
-
 23
23
-
 24
24
-
 25
25
-
 26
26
-
 27
27
-
 28
28
-
 29
29
-
 30
30
-
 31
31
-
 32
32
-
 33
33
-
 34
34
-
 35
35
-
 36
36
-
 37
37
-
 38
38
-
 39
39
-
 40
40
-
 41
41
-
 42
42
-
 43
43
-
 44
44
-
 45
45
-
 46
46
-
 47
47
-
 48
48
-
 49
49
-
 50
50
-
 51
51
-
 52
52
-
 53
53
-
 54
54
-
 55
55
-
 56
56
-
 57
57
-
 58
58
-
 59
59
-
 60
60
-
 61
61
-
 62
62
-
 63
63
-
 64
64
-
 65
65
-
 66
66
-
 67
67
-
 68
68
-
 69
69
-
 70
70
-
 71
71
-
 72
72
-
 73
73
-
 74
74
-
 75
75
-
 76
76
-
 77
77
-
 78
78
-
 79
79
-
 80
80
-
 81
81
-
 82
82
-
 83
83
-
 84
84
-
 85
85
-
 86
86
-
 87
87
-
 88
88
-
 89
89
-
 90
90
-
 91
91
-
 92
92
-
 93
93
-
 94
94
-
 95
95
-
 96
96
-
 97
97
-
 98
98
-
 99
99
-
 100
100
-
 101
101
-
 102
102
-
 103
103
-
 104
104
-
 105
105
-
 106
106
-
 107
107
-
 108
108
-
 109
109
-
 110
110
-
 111
111
-
 112
112
-
 113
113
-
 114
114
-
 115
115
-
 116
116
-
 117
117
-
 118
118
-
 119
119
-
 120
120
-
 121
121
-
 122
122
-
 123
123
-
 124
124
-
 125
125
-
 126
126
-
 127
127


Kenwood KAX950ME Manuale del proprietario
- Categoria
- Tritacarne
- Tipo
- Manuale del proprietario
Di seguito troverai una breve descrizione per Tritacarne KAX950ME. Questo accessorio per robot da cucina è progettato per tritare carne, pollame e pesce. Può anche essere utilizzato per preparare salsicce e kebbe con gli accessori inclusi. L'accessorio utilizza il sistema di connessione Twist ed è compatibile con i robot da cucina Kenwood Chef di ultima generazione e con i modelli Kmix dotati di uscita a bassa velocità. Prima dell'uso, assicurarsi di scongelare completamente gli alimenti surgelati e rimuovere ossa e pelle prima di tritare. Lame affilate, maneggiare con cura. Non utilizzare accessori danneggiati o non autorizzati.
in altre lingue
- slovenčina: Kenwood KAX950ME Návod na obsluhu
- dansk: Kenwood KAX950ME Brugervejledning
Documenti correlati
-
Kenwood KAX950ME Hachoir de Boucher Manuale utente
-
-
Kenwood AX950 Manuale utente
-
Kenwood MG474 Manuale del proprietario
-
Kenwood MG516 Manuale del proprietario
-
-
Kenwood MG700 series Manuale utente
-
Kenwood MG510 Manuale del proprietario
-
-