ProLights Full colour and pixel controlled table centre Manuale utente
- Categoria
- Stroboscopi
- Tipo
- Manuale utente

USER MANUAL
MANUALE UTENT
EN - IT
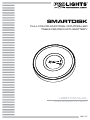
FULL COLOR AND PIXEL CONTROLLED
TABLE CENTER WITH BATTERY
SMARTDISK

All rights reserved by Music & Lights S.r.l. No part of this instruction manual may be
reproduced in any form or by any means for any commercial use.
In order to improve the quality of products, Music&Lights S.r.l. reserves the right to modify the
characteristics stated in this instruction manual at any time and without prior notice.
All revisions and updates are available in the ‘manuals’ section on site www.musiclights.it
REV.003-08/17

1
SMARTDISK
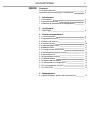
TABLE OF CONTENTS
Safety
General instructions
Warnings and installation precautions
1 Introduction
1. 1 Description
1. 2 Technical specifications
1. 3 Operating elements and connections
2 Installation
2. 1 Mounting
3 Functions and settings
3. 1 Operation
3. 2 Basic setup
3. 3 Recharge
3. 4 Menu structure
3. 5 DMX addressing
3. 6 DMX mode
3. 7 DMX configuration
3. 8 Wireless setting
3. 9 IR setup
3. 10 Display setting
3. 11 Reload default
3. 12 White balance
3. 13 Fixture information
3. 14 Wireless operation
3. 15 DMX channels
4 Maintenance
4. 1 Maintenance and cleaning the unit
2
2
3
3
5
6
7
7
7
8
9
9
9
10
10
11
11
11
11
12
13
16

SMARTDISK
2
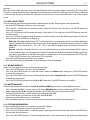
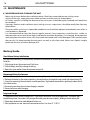
WARNING! Before carrying out any operations with the unit, carefully read this instruction
manual and keep it with cure for future reference. It contains important information about
the installation, usage and maintenance of the unit.
SAFETY
General instruction
• The products referred to in this manual conform to the European Community Directives and are there-
fore marked with .
• Supply voltage of this product is DC15V; never connect directly to AC100-240V. Leave servicing to
skilled personnel only. Never make any modifications on the unit not described in this instruction man-
ual, otherwise you will risk an electric shock.
• Connection of the power adapter must be made to a power supply system fitted with efficient earth-
ing (Class I appliance according to standard EN 60598-1). It is, moreover, recommended to protect the
supply lines of the units from indirect contact and/or shorting to earth by using appropriately sized
residual current devices.
• The connection to the main network of electric distribution must be carried out by a qualified electri-
cal installer. Check that the voltage correspond to those for which the unit is designed as given on the
electrical data label.
• This unit is not for home use, only professional applications.
• Never use the fixture under the following conditions:
- in places subject to vibrations or bumps;
- in places subject to excessive humidity.
• Make certain that no inflammable liquids, water or metal objects enter the fixture.
• Do not dismantle or modify the fixture.
• All work must always be carried out by qualified technical personnel. Contact the nearest sales point for
an inspection or contact the manufacturer directly.
• If the unit is to be put out of operation definitively, take it to a local recycling
plant for a disposal which is not harmful to the environment.
Warnings and installation precautions
• If this device will be operated in any way different to the one described in this manual, it may suffer
damage and the guarantee becomes void. Furthermore, any other operation may lead to dangers like
short circuit, burns, electric shock, etc.
• Before starting any maintenance work or cleaning the projector, cut off power from the main supply.
• Always additionally secure the projector with the safety rope. When carrying out any work, always com-
ply scrupulously with all the regulations (particularly regarding safety) currently in force in the country
in which the fixture’s being used.
• Install the fixture in a well ventilated place.
• Keep any inflammable material at a safe distance from the fixture.
• Shields, lenses or ultraviolet screens shall be changed if they have become damaged to such an extent
that their effectiveness is impaired.
• The lamp (LED) shall be changed if it has become damaged or thermally deformed.
• Never look directly at the light beam. Please note that fast changes in lighting, e. g. flashing light, may
trigger epileptic seizures in photosensitive persons or persons with epilepsy.
• Do not touch the product’s housing when operating because it may be very hot.
• This product was designed and built strictly for the use indicated in this documentation. Any other use,
not expressly indicated here, could compromise the good condition/operation of the product and/or
be a source of danger.
• We decline any liability deriving from improper use of the product

3
SMARTDISK
- 1 - INTRODUCTION
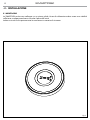
1.1 DESCRIPTION
SMARTDISK is an IP rated, wireless battery powered RGBW LED table centre. Designed for both branding
events and adding a controllable element to a table - it adds an extra dimension to any event design.
1.2 TECHNICAL SPECIFICATIONS
LIGHT SOURCE
• Source: 39x0.25W RGB + warm white
• CT: 2800~6000K
• Source life expectancy: >30.000 h
OPTICS
• Beam angle: 360° to light up tables and 25° to light up objects on top
COLOUR SYSTEM
• Colour mixing: RGBW/FC
• Macros: several pre-build pixel macros with adjustable speed
DYNAMIC EFFECTS
• FX generator: adjustable foreground/background colour, index, speed, direction
• Static colour mode: selection of static colour
• Manual colour mode: manual adjustment of colour
BODY
• Body: sturdy policarbonate body
• Body colour: white
CONTROL
• Protocols: W-DMX
• DMX channels: 4 / 8 / 17 / 165channel
• Pixel control: pixel2pixel control
• W-DMX: included, wireless solution receiver
• Display: LCD display
• Firmware upgrade: yes, via USB-DMX interface (UPBOX1) not included
• IR: infrared sensor controlled by remote
ELECTRONICS
• Dimmer: linear 0~100% electronic dimmer
• Dimmer curves: different dimming curves available
• Strobe / shutter: 1 - 30 Hz, electronic
• Operating temperature: -10° ~ +45°
ELECTRICAL
• Power consumption (at 230V): 19.9W
BATTERY
• Battery: 4.4 Ah - 11.1V lithium

SMARTDISK
4
• Estimated battery life in colour change mode up to: 15h
• Estimated battery life in single colour mode up to: 24h
• Estimated battery life in full-mode up to: 8h
• Re-charge connection: power cable
• Re-charge time: 5h/max
• Battery status: shown on display
PHYSICAL
• Data connection: W-DMX receiver
• IP rating: 54
• Dimensions (WxHxD): 300x40x300mm
• Weight: 1.62kg
Technical drawing
Fig.1
SMARTDISKPACK Technical drawing
40
Ø300
527
426
271

5
SMARTDISK
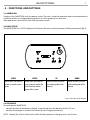
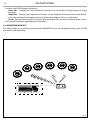
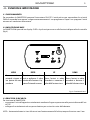
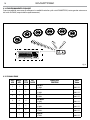
1.3 OPERATING ELEMENTS AND CONNECTIONS
Fig.2
1
3
2
1. Display OLED with display and 4 button used to access the control panel functions and manage them.
2. Side LED
3. Top LED

SMARTDISK
6
- 2 - INSTALLATION
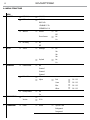
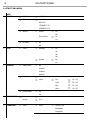
2.1 MOUNTING
SMARTDISK may be set up on a solid and even surface. The mounting place must be of sufficient stability
and be able to support a weight of 10 times of the unit’s weight.
When carrying out any installation, always comply scrupulously with all the regulations (particularly re-
garding safety) currently in force in the country in which the fixture’s being used.
Fig.3

7
SMARTDISK
- 3 - FUNCTIONS AND SETTINGS
3.1 OPERATION
Switch on the SMARTDISK with the power switch. The unit is ready for operation and can be operated via
a DMX controller or it independently performs its show program in succession.
After operation, switch off the unit with the power switch.
3.2 BASIC SETUP
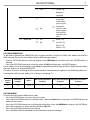
The SMARTDISK has a OLED display and 4 buttons for access to the functions of the control panel (fig. 5).
MENU ENTER UP DOWN
Used to access the menu or
to return a previous menu
option
Used to select and store the
current menu or confirm the
current function value or
option within a menu
Button to select the values
in ascending order of the
function
Button to select the values
in descending order of the
function
Fig.4 - Functions of the buttons
3.3 RECHARGE
To recharge the SMARTDISK:
• connect the unit to the battery charger using the input on the bottom of the TOP unit
• connect the charger to an electrical socket to start charging the battery
NOTE - Battery life: 8 hours 30 minutes with full white operation, charging time: max 5 hours.

SMARTDISK
8
3.4 MENU STRUCTURE
MENU
1 CONNECT
ð
DMX Address
ð
001 - 503
ð
DMX mode
ð
EASY 4 Ch
BASIC 8 Ch
STANDARD 17 Ch
EXTENDED 165 Ch
ð
Wireless
ð
Receive
ð
On
Off
Reset Connect
ð
No
Yes
ð
IR Setting
ð
On
Off
2 SETUP
ð
Screen
ð
Backlight
ð
On
10s
20s
30s
ð
Key lock
ð
No
Yes
3 ADVANCED
ð
Dimmer mode
ð
Off
Dimmer 1
Dimmer 2
Dimmer 3
ð
White Balance
ð
Off
ð
Adjust
ð
Red
ð
125 - 255
Green
ð
125 - 255
Blue
ð
125 - 255
White
ð
125 - 255
ð
Factory Reload
ð
No
Yes
4 INFORMATIOJN
ð
Fixture time
ð
9999 H
Version
ð
V 1.0
5 STAND ALONE
ð
Effects
ð
Effect1
ð
Speed 0~100
Background
Foreground

9
SMARTDISK
3.5 DMX ADDRESSING
To be able to operate the SMARTDISK with a light controller, set the unit DMX start address for the first
DMX channel. To set the start address refer to following procedure:
• Use the UP/DOWN button until the display reads [DMX Address] and then press the ENTER button to
confirm
• Press the UP/DOWN button to select the value [d 1-509] and then press the ENTER button .
If e. g. address 33 on the controller is provided for controlling the function of the first DMX channel, adjust
the start address 33 on the SMARTDISK.
The other functions of the light effect panel are then automatically assigned to the following addresses.
An example with the start address 33 is shown in the page 13.
DMX
Channels
number
Start address
(example)
Busy DMX
address
Next possible start address
for unit n°1
Next possible start address
for unit n°2
Next possible start address
for unit n°3
4 33 33-36 37 41 45
3.6 DMX MODE
To enter the DMX mode, follow these steps:
• Press the ENTER button to access the main menu.
• Press the UP/DOWN button to scroll the menu, select the Connect icon, then press the ENTER button to
enter the next menu.
• Press the UP/DOWN button to scroll through the menu, select the DMX Address and press the ENTER key.
• Press the arrow keys to select the desired value (001-512).
• Press the ENTER key to confirm the setting.
• Press the MENU button repeatedly to exit the menu and save changes.
4 channels DMX configuration example
ð
Effect .......
ð
Speed 0~100
Background
Foreground
ð
Static Preset
ð
Side
ð
black,red,deep
orange, light
orange, yellow,
green, sea green,
acquamarine,
cyan, blue, violet,
purple, magenta,
white, white all,
warm white, cold
white
ð
Top
ð
Manual Color
ð
Side
ð
Red (0 - 255)
ð
Top Green (0 - 255)
Blue (0 - 255)
White (0 - 255)

SMARTDISK
10
3.7 DMX CONFIGURATION
The SMARTDISK has 5 DMX channel configurations which can be accessed from the control panel.
• Press the ENTER button to access the main menu.
• Press the UP/DOWN button to scroll the menu, select the Set icon, then press the ENTER button to enter
the next menu.
• Press the UP/DOWN button to scroll through the menu, select Users and press the ENTER button to
enter the next menu.
• Press the UP/DOWN button to scroll through the menu, select User Mode and press ENTER to confirm
your choice.
• Use the UP/DOWN button to select the desired DMX channel configuration (Basic, Standard, Extended),
then press the ENTER button to confirm your choice.
• Press the MENU button repeatedly to exit the menu and save changes.
The tables on page 18 show the mode of operation and their values DMX.
The unit is equipped with 3/5-pole XLR connections.
3.8 WIRELESS CONTROL SETTINGS
To enable wireless control mode, proceed as follows:
• Press the ENTER button to access the main menu.
• Press the UP/DOWN button to scroll the menu, select the Connect icon, then press the ENTER button to
enter the next menu.
• Press the UP/DOWN button to scroll through the menu, select Wireless and press ENTER.
• Press the UP/DOWN and LEFT/RIGHT buttons to select the desired value (001-512).
• Press the ENTER key to confirm the setting.
To change the settings of wireless control, proceed as follows:
• Press the ENTER button to access the main menu.
• Press the UP/DOWN button to scroll the menu, select the Set icon, then press the ENTER button to enter
the next menu.
• Press the UP/DOWN button to scroll through the menu, select Wireless Set, and press the ENTER button
to enter the next menu.
• Press the UP/DOWN button to select the option proposed and press the ENTER button to confirm your
choice.
- Receive - Disable/enable the DMX signal cable. Select OFF to deactivate or ON to activate the func-
tion.
- Reset Connect - Reset the wireless connection of the unit. Select OFF to deactivate or ON to activate
the function.
• Press the ENTER button to confirm your choice.
• Press the MENU button repeatedly to exit the menu and save changes.
3.9 IR SETUP
To start up the IR recevitor refer to the following steps:
• Press the MENU button so many times until the display shows [IR Setup].
• Press the ENTER button to confirm.
• Press the UP/DOWN button, select one of the programs [ON] or [OFF].
• Press the ENTER button for save the setting.
• Press the MENU button so many times until the display shows [Stand
Alone].
• Press the ENTER button to confirm.
• Press the UP/DOWN button, select one of the programs [Static Present].
• Press the ENTER button for save the setting.
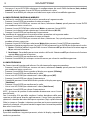
NOTE - Make sure to point the controller directly at the receiver on the
Fig.5
FADE
SOUND
SENSIT.
AUTO
MACRO
POWER
STROBESPEEDDIMMERMANUAL
AMBER
UV
RED
YELLOW
CYAN
MAGENTA
STATIC
DEEP
ORANGE
LIGHT
ORANGE
SEA
GREEN
AQUA
MARINE
WARM
WHITE
COLD
WHITE
GREEN
BLUE VIOLET PURPLE
WHITE

11
SMARTDISK
product.
With the IR controller you can choose the desired color of the top and side part separately. The Static but-
ton allows you to move the color selection from the top to the side, the other way around. When selecting
a color for the top part, to move the selection to the side you must necessarily press the Static button
twice.
3.10 DISPLAY SETTINGS
You can change the following parameters related to the display, following the same procedure:
• Press the ENTER button to access the main menu.
• Press the UP / DOWN keys to scroll the menu, select the Setup icon, then press the ENTER button to
enter the next menu.
• Press UP / DOWN to scroll through the menu, then select UI Set, and press the ENTER button to enter
the next menu.
• Press UP / DOWN to scroll through the menu, and then select one of the following settings for the dis-
play and press the ENTER key to display it.
- Back Light - Backlight display Auto Off. This feature allows you to automatically turn off the backlight
after a specified time that you can set using the arrow buttons. To have the display always on select
Always On or set a value of On - 10s - 20s - 30s to turn off the display after the amount of time you
choose.
- Key Lock - Lock keys. With this function, you can lock the buttons on the control panel. If this function
is activated, the keys are automatically locked. To disable or temporarily disable the key lock func-
tion, press the buttons in the following order to regain access to menu commands: UP, DOWN, UP,
DOWN, ENTER. Select ON to activate or OFF to disable.
• Press the ENTER button to confirm your choice.
• Press the MENU button repeatedly to exit the menu and save changes.
3.11 RELOAD DEFAULT
Select this function to reset the unit to factory settings:
• Press the ENTER button to access the main menu.
• Press the UP/DOWN button to scroll the menu, select the Advanced icon, then press the ENTER button
to enter the next menu.
• Press the UP/DOWN button to scroll through the menu, select Factory Reload and press the ENTER button
to enter the next menu.
• Press the UP/DOWN button to select ON or OFF, then press the ENTER button to confirm.
3.12 WHITE BALANCE
Enter the White balance to adjust the Red, Green, Blue and White parameter to make different whites.
• Press the button MENU so many times until shows White Balance, and press the button ENTER to confirm.
• Select the color R, G, B, W through the buttons UP/DOWN, then press the button ENTER.
• Using UP/DOWN button, select the desired color value 125 - 255.
• Press ENTER button to continue to the next color R, G, B, W.
• Continue until the desired mix is obtained.
• Press the MENU button to go back or to meet the waiting time to exit the setup menu.
3.13 FIXTURE INFORMATION
To view all the information on the device, proceed as follows:
• Press the ENTER button to access the main menu.
• Press the UP/DOWN button to scroll the menu, select the icon Information, then press the ENTER but-
ton to enter the next menu.
• Press the UP/DOWN button to scroll through the menu, then select one of the following information

SMARTDISK
12
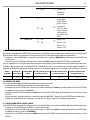
Fig.6
DMX512 Controller
wireless
solution
and press the ENTER button to display it.
- Fixture Time - Through the Time Information function you can display the operating time of the
projector.
- Temperature - Through the Temperature function can be displayed the temperature inside the fix-
ture, near the lamp. The temperature can be displayed in degrees Celsius or Fahrenheit.
- Version - Through Software Version function you can display the currently installed software version.
• Press the MENU button repeatedly to exit the menu.
3.14 OPERATION WITH WIFI
This mode allows you to wirelessly connect more SMARTDISK units, all managed through a unit W-DMX
transmitter (sold separately).

13
SMARTDISK
3.15 DMX CHANNELS
EASY
4CH
BASIC
8CH
STD
17CH
EXT
165CH
SMARTDISK
FUNCTION
DMX
Value
1 1 1
Side Red
0~100% 000 - 255
2 2 2
Side Green
0~100% 000 - 255
3 3 3
SideBlue
0~100% 000 - 255
4 4 4
Side White
0~100% 000 - 255
5 5
Top Red
0~100% 000 - 255
6 6
Top Green
0~100% 000 - 255
7 7
Top Blue
0~100% 000 - 255
8 8
Top White
0~100% 000 - 255
9 1 Dimmer
000 - 250
10 2
Strobe
Open
Strobe slow to fast
Open
Random slow to fast
Open
000 - 015
016 - 115
116 - 135
136 - 235
236 - 255
11 3
Effects
NO function
Effect 1
Effect 2
Effect 3
Effect 4
Effect 5
Effect 6
Effect 7
Random pixels
000 - 010
011 - 040
041 - 070
071 - 100
101 - 130
131 - 160
161 - 190
191 - 220
221 - 255
12 4
Effects speed
Static indexing
Forward Slow to fastest
Stop
Reverse Slow to fastest
000 - 050
051 - 150
151 - 155
156 - 255
13 5
Foreground Dimmer
0~100% 000 - 255

SMARTDISK
14
EASY
4CH
BASIC
8CH
STD
17CH
EXT
165CH
SMARTDISK
FUNCTION
DMX
Value
14 6
Foreground color
Black
Red
Green
Blue
White
Pastel red
Pastel green
Pastel blue
Cyan
Magenta
Yellow
Light Yellow
Light Blue
Light Magenta
Full white
000 - 000
001 - 018
019 - 036
037 - 054
055 - 072
073 - 090
091 -108
109 - 126
127 - 144
145 - 162
163 - 180
181 - 198
199 - 216
217 - 234
235 -255
15 7
Background Dimmer
0~100% 000 - 255
16 8
Background color
Black
Red
Green
Blue
White
Pastel red
Pastel green
Pastel blue
Cyan
Magenta
Yellow
Light Yellow
Light Blue
Light Magenta
Full white
000 - 000
001 - 018
019 - 036
037 - 054
055 - 072
073 - 090
091 -108
109 - 126
127 - 144
145 - 162
163 - 180
181 - 198
199 - 216
217 - 234
235 -255
17 9
Dimmer fade
Dimmer snap to fade
000 - 000
001 - 255
10
11
12
13
Pixel 1
Red 0~100%
Green 0~100%
Blue 0~100%
White 0~100%
000 - 255
000 - 255
000 - 255
000 - 255
....
.......
Red 0~100%
Green 0~100%
Blue 0~100%
White 0~100%
000 - 255
000 - 255
000 - 255
000 - 255

15
SMARTDISK
EASY
4CH
BASIC
8CH
STD
17CH
EXT
165CH
SMARTDISK
FUNCTION
DMX
Value
162
163
164
165
Pixel 39
Red 0~100%
Green 0~100%
Blue 0~100%
White 0~100%
000 - 255
000 - 255
000 - 255
000 - 255

SMARTDISK
16
- 4 - MAINTENANCE
4.1 MAINTENANCE AND CLEANING THE UNIT
• Make sure the area below the installation place is free from unwanted persons during setup.
• Switch off the unit, unplug the main cable and wait until the unit has cooled down.
• All screws used for installing the device and any of its parts should be tightly fastened and should not
be corroded.
• Housings, fixations and installation spots (ceiling, trusses, suspensions) should be totally free from any
deformation.
• The main cables must be in impeccable condition and should be replaced immediately even when a
small problem is detected.
• It is recommended to clean the front at regular intervals, from impurities caused by dust, smoke, or
other particles to ensure that the light is radiated at maximum brightness. For cleaning, disconnect the
main plug from the socket. Use a soft, clean cloth moistened with a mild detergent. Then carefully wipe
the part dry. For cleaning other housing parts use only a soft, clean cloth. Never use a liquid, it might
penetrate the unit and cause damage to it.
Battery Guide
New Lithium Battery Initialisation
Any new fixture containing a Lithium battery should be initialised when first purchased to maximise its battery life.
To do this:
1. Fully charge the unit for a minimum of 5 to 6 hours.
2. Fully discharge, then fully recharge the battery.
3. Repeat this cycle another 2 times for optimum battery life.
Maximizing Battery Performance
1. Lithium batteries perform best when in regular use. Long idle periods will reduce the battery life.
2. Recharge the battery at the earliest opportunity, leaving batteries discharged for long periods will reduce battery life.
3. Store units containing Lithium batteries at cool temperatures. High ambient temperatures significantly reduce the life
of a Lithium battery.
4. Disconnect power from the unit when charging is complete.
5. Do not use fixtures whilst charging.
Long term storage
1. Charge your fixture’s battery to around 50%. If you store a fixture with a fully discharged battery, it could fall into a
deep discharge state. If you store it fully charged, the battery may lose some capacity, leading to shorter battery life.
2. Power down the device to avoid additional battery use.
3. Place your device in a cool, moisture-free environment that’s less than 32° C (90° F).


REV.003-08/17
Music & Lights S.r.l. si riserva ogni diritto di elaborazione in qualsiasi forma delle presenti istruzioni per l’uso.
La riproduzione - anche parziale - per propri scopi commerciali è vietata.
Al fine di migliorare la qualità dei prodotti, la Music&Lights S.r.l. si riserva la facoltà di modificare, in
qualunque momento e senza preavviso, le specifiche menzionate nel presente manuale di istruzioni.
Tutte le revisioni e gli aggiornamenti sono disponibili nella sezione 'Manuali' sul sito www.musiclights.it
La pagina si sta caricando...
La pagina si sta caricando...
La pagina si sta caricando...
La pagina si sta caricando...
La pagina si sta caricando...
La pagina si sta caricando...
La pagina si sta caricando...
La pagina si sta caricando...
La pagina si sta caricando...
La pagina si sta caricando...
La pagina si sta caricando...
La pagina si sta caricando...
La pagina si sta caricando...
La pagina si sta caricando...
La pagina si sta caricando...
La pagina si sta caricando...
-
 1
1
-
 2
2
-
 3
3
-
 4
4
-
 5
5
-
 6
6
-
 7
7
-
 8
8
-
 9
9
-
 10
10
-
 11
11
-
 12
12
-
 13
13
-
 14
14
-
 15
15
-
 16
16
-
 17
17
-
 18
18
-
 19
19
-
 20
20
-
 21
21
-
 22
22
-
 23
23
-
 24
24
-
 25
25
-
 26
26
-
 27
27
-
 28
28
-
 29
29
-
 30
30
-
 31
31
-
 32
32
-
 33
33
-
 34
34
-
 35
35
-
 36
36


ProLights Full colour and pixel controlled table centre Manuale utente
- Categoria
- Stroboscopi
- Tipo
- Manuale utente
in altre lingue
Documenti correlati
-
ProLights Revolutionary full colour event battery table lamp Manuale utente
-
-
-
-
-
-
-
-
-
Altri documenti
-
 Smartdisk FireFly Computer Hard Drive Manuale utente
-
 Smartdisk FireLite FireWire 800 Manuale utente
-
 Smartdisk FireLite FireWire 800 Manuale utente
-
 Smartdisk Portable Hard Drive Manuale utente
-
 Smartdisk ROVER Manuale utente
-
 Smartdisk PU-W224 Manuale utente
-
 Smartdisk PowerPlay Manuale utente
-
Griven Moon Marine RGBW Manuale del proprietario


