
Deskmaster
User Guide V2.0
HL_DM5201_GB.qxd 16-04-2003 13:24 Page 1

2
Deskmaster
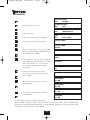
1 FUNCTION KEYS 6
2 DISPLAY 7
3 GENERAL REMARKS 7
3.1 CONNECTION 7
3.2 PLACE 8
3.3 SECURITY NOTES 8
3.4 CLEANING 8
3.5 DISCONNECTING THE LINE CORD(S) FROM THE PHONE 8
4 USER INTERFACE CONCEPT 9
4.1 Language Setting 9
4.2 Operation 9
5 ESTABLISHING A PHONE CALL 10
5.1 OUTGOING CALLS 10
5.2 INCOMING CALL 11
5.3 CALL LOG 11
5.4 GROUP LISTENING 11
5.5 HANDS FREE SPEAKING 11
5.6 PREPARATORY DIALLING 12
5.7 SELECTION OF OUTGOING MSN NUMBER BEFORE DIALLING 12
5.8 SPECIAL DIALLING PROCEDURE 13
5.9 DTMF DIALLING 13
5.10 D CHANNEL SIGNALLING 13
6 DIALLING WITH COMFORT 14
6.1 LAST NUMBER REDIAL 14
6.2 EXTENDED LAST NUMBER REDIAL 14
6.3 DIALLING FROM THE PHONE BOOK 14
6.4 DIALLING FROM THE NOTEBOOK 15
7 DURING A PHONE CALL 16
7.1 HOLD THE LINE (BROKER, CONFERENCE) 16
7.1.1 Establishing a second call 16
7.1.2 Broker 17
7.1.3 Party Conference 17
7.2 PARKING A CONNECTION 18
7.2.1 Parking a call 18
7.2.2 Unplugging the phone 18
7.2.3 Reconnect (resume) a parked call 18
8 INCOMING CALL DURING A CONNECTION 19
8.1 A 2ND INCOMING CALL (CALL WAITING) 19
9 PERSONAL CONFIGURATIONS 19
9.1 CALL DIVERSION (CALL FORWARDING) 19
HL_DM5201_GB.qxd 16-04-2003 13:24 Page 2

3
Deskmaster
9.1.1 Call fowarding enabled/disabled 20
9.1.2 Enter/Change Call Fowarding destination 20
9.2 PHONE BARRING 20
9.3 HOTLINE CALLS 21
9.4 CALL LOG 22
9.5 DISPLAYING THE SELECTED FEATURES 22
9.6 DIRECT FEATURE ACCESS 23
9.6.1 Disable function Code Display 23
10 RINGER CONFIGURATIONS 24
10.1 QUIET FUNCTION (DO-NOT-DISTURB) 24
10.1.1 Function ON 24
10.1.2 Function OFF 24
10.2 CALL FILTER 24
10.3 SETTING RINGING TONE AND VOLUME 25
10.3.1 Access to ringing tone programming 26
10.3.2 Special ringing tone 26
11 APPOINTMENT FUNCTION 27
11.1 DISPLAYING APPOINTMENTS 27
11.2 SCHEDULING A NEW APPOINTMENT 28
11.3 CHANGING OR DELETING AN APPOINTMENT 28
11.4 EXPIRY OF AN APPOINTMENT 28
12 DISPLAYING CALL CHARGES 29
12.1 REVIEW THE STORED CHARGE INFORMATION 29
12.2 CALL CHARGE DISPLAY DURING A CONNECTION 29
12.3 CALL CHARGE DISPLAY AT THE END OF A CONNECTION 29
13 PROGRAMMING AND CONFIGURATIONS 30
13.1 ALPHANUMERIC CHARACTERS 30
13.2 PROGRAMMING THE PHONE BOOK 30
13.2.1 New phonebook entry 30
13.2.2 Modifying a phonebook entry 31
13.2.3 Deleting a phonebook entry 32
13.3 PROGRAMMING THE NOTEBOOK RECORD(S) DURING A CALL 32
13.3.1 Storing a new note 32
13.3.2 Modifying and deleting notes 32
13.4 PROGRAMMING PASSWORD PROTECTION 33
13.4.1 Programme Protection ON/OFF 33
13.4.2 Modifying Passwoord 33
13.5 PROGRAMMING MULTIPLE SUBSCRIBER NUMBERS (MSN) 34
13.5.1 MSN for Voice Calls 34
13.5.2 MSN for Data Calls 34
HL_DM5201_GB.qxd 16-04-2003 13:24 Page 3

4
Deskmaster
13.6 PROGRAMMING THE PREFIX 35
13.7 TELEPHONE RESET 36
13.8 CALLER ID DISPLAY CONFIGURATION (NUMBER, NAME, OFF) 36
13.9 USER TO USER SIGNALLING (UUS) 37
13.9.1 Programming UUS Messages 37
13.10 LEAST COST ROUTING (LCR FUNCTION) 37
14 DATA INTERFACE 39
14.1 CONFIGURATION OVERVIEW 39
14.2 ESTABLISHING INTERNET CONNECTION (WIN95
®
; WIN98
®
)39
14.2.1 Installing Modem driver into Windows 39
14.2.2 Setting Dial-Up Network 39
14.2.3 Setting Internet Protocol 40
14.2.4 Establishing Connenction witn Internet provider via Dial-Up Network 40
14.3 CTI SOFTWARE INSTALLATION 41
14.4 PC TELEPHONY WITH THE DESKMASTER PC SOFTWARE 41
14.4.1 Functions of the Deskmaster PC Application 41
14.5 DATA ACCESS WITH MODEM COMMANDS 42
15 DESKMASTER 520I ANALOG INTERFACE 42
15.1 CONFIGURATION OVERVIEW 43
15.2 TRANSFER CALL FROM ISDN PHONE TO ANALOGUE PHONE 43
15.3 KEYPAD COMMANDS ON ANALOGUE PORT 43
15.4 FLASH COMMANDS ON ANALOGUE PORT 44
15.5 MSN FOR THE ANALOG PORT 44
15.6 SELECTING THE ISDN CALL TYPE ON THE ANALOG EXTENSION 44
16 TROUBLESHOOTER 45
17 APPENDIX 46
17.1 MODEM COMMANDS (AT COMMANDS) 46
17.1.1 Basic Commands 46
17.1.2 '&' Commands 46
17.1.3 '*' Commands (Special Deskmaster Control Commands) 47
17.2 RESULT CODES 47
17.2.1 Data Codes 47
17.2.2 Voice Codes 48
17.2.3 Register 48
17.2.4 External Interfaces (Microsoft TAPI, CAPI, DDE and ODBC) 49
18 ERROR MESSAGES/CAUSES 49
19 QUICK OPERATION GUIDE 51
HL_DM5201_GB.qxd 16-04-2003 13:24 Page 4

Deskmaster
HL_DM5201_GB.qxd 16-04-2003 13:24 Page 5

1
2
3
4
5
6
7
8
9
*
0
1
+
-
R
ES
C
OK
6
Deskmaster
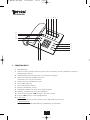
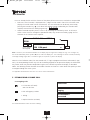
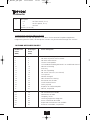
1 FUNCTION KEYS
1 Phonebook key
2 To quit an active function and return to the menu level above, to end a procedure started or a
programming sequence.
3 Selection/confirmation of the menu item offered in the display.
4 To go to the previous available menu item.
Correction of an entry (last character).
5 To go to the next available menu item.
6 Last number redial key.
7 Increase loudspeaker volume.
8 Decrease loudspeaker volume.
9 Loudspeaker ON/OFF for Hands Free, Group Listening.
10 Hold Key: To hold call or to answer second call
11 List of unanswered calls. LED flashing = new call(s) stored.
12 Info key. LED flashing = feature programmed.
13 In idle state :
Function key. Direct function selection with 3 digit code of menu items.
In connected state :
Mute key. Will enable and disable the microphone(s) of the phone.
12
6
7
8
9
10 13
11
12
11
2
1345
HL_DM5201_GB.qxd 16-04-2003 13:24 Page 6

V 24
ISDN
7
Deskmaster
Fr. 03 Jan 99 00:39
ISDN
1 234
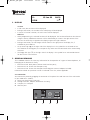
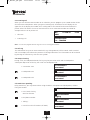
2DISPLAY
1st Line
• In idle state, date and time will be displayed.
• During a connection, the number of the called party will be displayed.
• In case of a function selection, the main menu will be displayed.
2nd Line
• When programming, the selected function will be displayed. The function offered can be selected
using the OK key. Additional submenus will be indicated by an arrow in the right corner of the
line. Use the arrow keys assigned to the display to go to the right submenu.
• During a connection, the call charges will be shown in the right part of the display line, if
available on your ISDN line.
• An up-arrow sign () at the right side of the display line is the symbol for an activated So bus.
This could be the analog port, the V.24 port or any other terminal connected to the So Bus being
activated.
• The floppy disk sign () at the right side of the display is the symbol for an activated B-channel
for data via the V.24 interface.
3 GENERAL REMARKS
This handbook contains the necessary information for the operation of 3 types of ISDN telephones, all
belonging to the Deskmaster family:
• Deskmaster 500i: Basic phone (without local interface ports);
• Deskmaster 510i: Phone with data port (V.24);
• Deskmaster 520i: Phone with data port and analog port (external adaptor included).
Information related to a particular version is indicated in the text, where applicable.
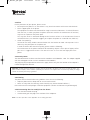
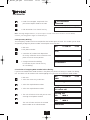
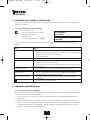
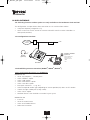
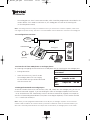
3.1 Connection
You connect the phone by plugging the connector of the phone line cord into one of the wall outlets
of your ISDN access (S
0
Bus).
1 Mains Inlet (Deskmaster 520i only)
2 Analog extensions, AB port (Deskmaster 520i only)
3 V.24 port, PC COM port
4 ISDN line port
HL_DM5201_GB.qxd 16-04-2003 13:24 Page 7

8
Deskmaster
3.2 Place
For the placement of your phone, please ensure:
• Do not place the phone in an area where it may come into contact with water and chemicals.
• Plastic support pads of the phone:
The equipment has been manufactured for usage in normal environments. Chemical influences
from the area, in which you place the phone (chemicals used for the maintenance of furniture)
may have an impact on the plastic pads.
This may then result in unwanted damage to the furniture surface. In the environment of new or
refreshed furniture, we therefore suggest you to place the phone on a nonskid mat (cloth etc.).
• Hands free speaking:
The hands free facility enables communication with the handset on hook. Other persons in the
room may then participate in the phone call.
In order to achieve best hands free quality, please mind the following:
The environment of the phone should not be covered by subjects such as piles of paper, coffee
pots etc. It is suggested to ensure a free area of at least 15 cm at the front right part of the
phone.
3.3 Security Notes
The ISDN Deskmaster has been manufactured in accordance with EN60950 :1992. The adaptor supplied
with the analog port version is also in accordance with EN60950.
The plug may only be operated at 230V mains supply. Please verify that the isolation of the adaptor is
neither damaged nor defective.
Attention: During operation, dangerous voltages may be generated in the phone. Do not try to open the phone. The
phone contains no parts, which could be repaired by the customer. The supplier does not assume any liability for usages
outside the warranty and safety regulations.
3.4 Cleaning
The phone can be cleaned without any problem. Please ensure the following:
•Wipe the phone with a damp cloth or use antistatic material.
• Never use a dry cloth for cleaning. (Static electricity may lead to electronic defects.)
Please take care that no liquid gets inside the equipment (switches and contacts may be damaged).
3.5 Disconnecting the Line Cord(s) from the Phone
•Press the lock towards the plug.
• Simultaneously pull the plug at the cord out of the telephone.
Note : The same procedure is also applicable for the analog port cable.
HL_DM5201_GB.qxd 16-04-2003 13:24 Page 8

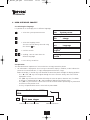
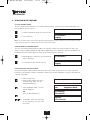
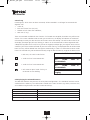
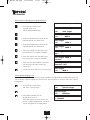
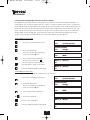
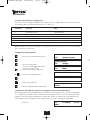
4 USER INTERFACE CONCEPT
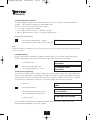
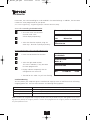
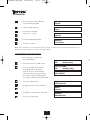
4.1 Selecting the language
It is possible to set the display texts in different languages.
• Select the system parameter menu
…•Select the language menu.
The menu can be directly accessed using
the shurtcut 261
• Confirm to enter
• Scrolling : You can now select the
different languages
•Press OK key to confirm
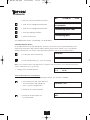
4.2 Operation
The ISDN Deskmaster implements a few mechanisms to simply control the phone:
• All information is displayed in the 2 lines by 20 characters display. In addition, 2 LEDs indicate the
presence of unanswered calls ( sign) and programmed features ( i sign).
Below the display, 5 function keys are allocated to control the phone through the display guidance:
– The “” and “” keys will navigate through the menu structure. Always one menu will be
displayed at a time.
– The „OK“ key will select the function offered by the menu or open a submenu level, if available.
A submenu is indicated by the “▼” sign immediately following the function name.
– The „ESC“ key will leave the current menu level or function without performing any commands
and return to the previous level.
– The key will provide direct access to the built-in phone book.
9
Deskmaster
250 System param.
System param.
253 charge
261 language
Language
English
Language
French
Function code Function name Submenu indication
Mo. 21 Feb 98 17:26
ISDN
210 tone ringer ▼
ESC
▼
HL_DM5201_GB.qxd 16-04-2003 13:24 Page 9

10
Deskmaster
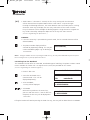
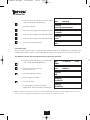
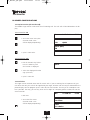
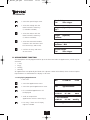
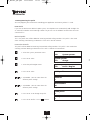
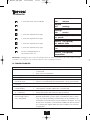
For users already familiar with the features of the phone, direct menu access mechanisms are provided:
• Each menu item (function) is displayed with a 3 digit function code in front of the function name
(display of function codes can be switched off). The menu/function can be directly accessed by
pressing the Function key “” (left side of the dialling keypad), followed by the function code
required, entered from the dialling keypad: e.g.:
• Another method to quickly access a menu is by searching the function by name. As all menus
within a menu level are arranged in alphabetical order, they can be accessed by typing the first
character of the function name required:
Note : Sometimes, the information available for the display may be longer than a display line (e.g. UUS messages etc.).
This will be indicated by arrow symbols () at the end of the display line. The remaining text can be viewed (horizonally
scrolled) by holding longer than 3 seconds the right (or left) arrow key below the display.
When the visual indicators (LEDs) for unanswered calls ( sign) or programmed feature information (i sign)
are lit, the corresponding function keys (left to the dialling keypad) can be pressed to display the information.
Any further action may then be completed using the menu control keys below the display as described
above. The following sections describe the available functions and menus in more detail and explain you how
to navigate through the menu system.
See Appendix “Menu/Function Overview” for a list of menus and functions.
5 ESTABLISHING A PHONE CALL
5.1 Outgoing Calls
• Lift handset (off hook).
Wait for dial tone.
• Dial calling party number.
•Talking ....
• Replace handset (on hook).
The number dialed will remain stored for redialing.
012
Please dial
071183998261
ringing
071183998261
connected
Mo. 21 Feb 99 17:26
Mo. 21 Feb 99 17:26
ISDN
330 V.24-port ▼
ESC
V
(= 3 x 8 from
the keypad)
▼
HL_DM5201_GB.qxd 16-04-2003 13:24 Page 10

11
Deskmaster
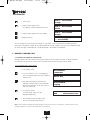
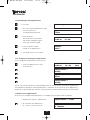
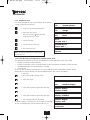
5.2 Incoming Call
When you use different MSN numbers on an ISDN line you can program up to 3 MSN number inside
the Deskmaster ISDN phone. When you get an incoming call, the Deskmaster will display on the
upper-line of the display the number that is calling and on the second like the MSN number this
person called. This allows the user of the Deskmaster to see what MSN number was called for
example business call or private call.
• Idle state.
• Incoming Call
Note : You can also program different ring tones for an incoming MSN number.
5.3 Call Log
The information for up to 20 unanswered calls (e.g. during absence) will be stored. A LED (marked
with an envelope) will indicate the presence of call log information. The information can be reviewed
by pressing the function key with the same symbol.
5.4 Group Listening
During a call, the loudspeaker/hands free key may be pressed to switch ON the loudspeaker.
Subsequent depression of the key will switch the loudspeaker OFF.
• Connection state.
• Loudspeaker ON.
• Loudspeaker OFF.
5.5 Hands Free Speaking
Using Hands free, you may communicate using the built-in microphone and loudspeaker, without
lifting the handset.
•Press hands free key.
Wait for dial tone.
• Dial phone number.
•Talking ...
• Hands free OFF. Lift handset (off hook).
Mo. 21 Feb 99 17:26
ISDN
012536874556
For : 7582568
071183998261
connected
071183998261
connected
071183998261
connected
071183998261
connected
Please dial
071183998261
ringing
071183998261
connected
HL_DM5201_GB.qxd 16-04-2003 13:24 Page 11

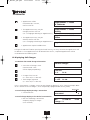
• Hands free ON again: Keep hands free
pressed and replace handset on hook.
• End connection: Press hands free key.
Note : With high background noise, no speech may be received. In this case it is better to use the handset,
otherwise your calling partner might not understand you.
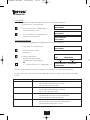
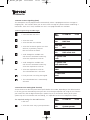
5.6 Preparatory Dialling
The called party number can be entered, before the handset goes off hook. This enables you to check
and possibly change the phone number entered prior to transmission.
• Idle state.
• Dial phone number.
• Correction of number: Each depression
of the key will delete the last character and
place the cursor to new position.
• Change and continue dialling.
Lift handset or press hands free key
to start dialling.
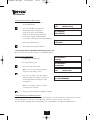
5.7 Selection of outgoing MSN number before dialling
If you have entered different MSN numbers in the phone, the phone will always use MSN1 for dialling
out. This MSN 1 will be send out with each outgoing call. If you want to use different MSN number:
• Idle state
• Select the menu entry to Dial out
• Select the required MSN number
• Select the required MSN number
• The unit will take the line and you can start
entering the telephone number
The unit will now send out the selected
MSN number to the called number.
12
Deskmaster
Mo. 21.Feb 99 17:26
ISDN
150 Dialling out
Dialling out
151 secret call
Dialling out
152 MSN 1
Dialling out
153 MSN 2
Please Dial
Mo. 21 Feb 99 17:26
0712_
071_
07118398261
071183998261
connected
Mo. 21 Feb 98 17:26
HL_DM5201_GB.qxd 16-04-2003 13:24 Page 12

13
Deskmaster
5.8 Special Dialling Procedure
The ISDN telephone supports special dialling procedures that can be used in the ISDN network for
example : CUG (closed user groups) or SUB (subadressing).
The keys * and # are used to activate these functions :
• * + 4 digits = dialling with subadres
• # + 2 digits between 01 and 15 = closed user group
• #* + 2 digits between 01 and 15 = closed user group access
Example for CUG dialling :
• Dial number followed by # + 2 digits
• Lift handsets or press handsfree key to dial out
Note :
Dialling with subadress or dialling into a closed user group always starts with a number followed by * and/or # key and
then the other digits.
5.9 DTMF Dialling
During a connection, the keypad is available for DTMF signals, e.g. to control a distant answering
machine. Depending on the key pressed, different tone frequences will be transmitted.
• Connection state.
• Enter the control codes from
the dialling keypad (e.g. “1234”)
5.10 D Channel Signalling
The Deskmaster allows certain network functions by entering function codes. The system (PBX or net-
work) will then respond by sending display messages to the phone or generating audible information.
Function codes will always be entered from idle state. The sequence typically starts with the * character
and ends with the # character. In between, a sequence of digits and characters may occur.
• Idle state.
• Dial keypad number.
• Lift handset or press hands free key
to start sending the D chanel info.
• System response
For the details of keypad codes available/required for your special system, please consult the
documentation provided by your system supplier.
071183#02
07118398261
connected
071183982611234
connected
Mo. 21.Feb 99 17:26
ISDN
*21*7128375#
A Message from System
HL_DM5201_GB.qxd 16-04-2003 13:24 Page 13

14
Deskmaster
6 DIALLING WITH COMFORT
6.1 Last Number Redial
You can automatically redial the last manually dialed number, e.g. because the called subscriber was
busy or did not answer the call.
• Handset offhook or hands free key pressed.
•Press redial key.
Note : Last number redial is also possible during preparatory dialling. Memory numbers are not stored to the redial
register and thus cannot be redialed using the last number redial feature.
6.2 Extended Last Number Redial
The last 10 manually dialed phone numbers are stored in a redial list. With the phone in idle state,
this list may be stepped through by subsequent depressions of the redial key. The entry displayed will
be dialed when the handset goes off hook or the hands free key is pressed.
• Repeatedly press redial key until the desired
entry is displayed.
• Lift handset or press hands free key.
6.3 Dialling from the Phone Book
The phone includes a phone book with up to 100 entries. Each entry consists of a name (up to 20
characters) and a phone number. The phone number may contain subaddress and the information for
a closed user group.
• Phone in idle state.
• RIGHT arrow to go to the menu.
(Function code “290” will be
displayed optionally.)
• Select telephone book, 1st entry
will be displayed.
OR
press the phone book key.
• SCROLLING: With each keystroke
on the arrow keys, you can scroll
the entries.
07118398261_
07118398261
ringing
Mo. 21 Feb 99 17:26
290 Telephone book
A_Company
0723198765
Topcom
07231396410
07118398261_
ringing
Please dial_
HL_DM5201_GB.qxd 16-04-2003 13:24 Page 14

15
Deskmaster
• SEARCHING: If a character is entered, the first entry starting with that character
will be selected from the phone book and the cursor moves a step to the right.
Entering the following characters, the search becomes more and more precise. Pressing
the RIGHT arrow key will display the next entry and switch off the search function.
Entry of characters will be through the dialling keypad. A single character assigned to a
key will be selected by subsequent depression of the key with short intervals.
(See also “Programming the phone book”. )
CHANGES:
• If the LEFT arrow key is pressed during search mode, the last entered character will be
deleted (UNDO).
• The phone number displayed will be
selected for preparatory dialling. This may be
used to add dialling digits e.g. for dialling to
an extension.
Notes : Lifting the handset off hook or pressing the hands free key, the entry will be dialed directly from the phone
book. Pressing the ESC key will stop phone book access.
6.4 Dialling from the Notebook
The notebook function offers an extended, comfortable type of redialing. The phone numbers stored
remain available for further calls. 10 register entries (notes) are provided for this feature.
(See also “Programming the notebook registers”.)
• Phone in idle state.
• Go to the note book menu.
(Function code “170” will be
displayed optionally.)
• Select notebook,
1st entry will be displayed.
• SCROLLING
With each keystroke on the arrow keys,
you can scroll the entries. If not all notes are
occupied, the last entry will be displayed as
“new note”.
Lifting the handset off hook or pressing the hands free key, the entry will be dialed from the notebook.
[A-Z]
07231396410_
Mo. 21 Feb 99 17:26
170 note book
note book
1 : 07231396410
note book
2 : 0711123456
HL_DM5201_GB.qxd 16-04-2003 13:24 Page 15

• Select note.
• RIGHT arrow to go to the
next option. Confirm deletion with OK.
• RIGHT arrow to go to the next option.
Change the entry.
The last empty entry will always be offered as “new note” until all records are occupied. During a
connection, the phone number of the connected party may be stored in the next free notebook record.
An error message “note book full” will be displayed, if all records are occupied.
7 DURING A PHONE CALL
7.1 Hold the line (Broker, Conference)
During a phone call, you can hold your conversation to have another call with a second subscriber.
Finishing the latter, you can return to the first connection to continue your conversation.
7.1.1 Establishing a Second Call
• Connection state.
•Press the flash key (“R”). The ongoing
call is on hold and you can now establish
another call.
• Dial phone number for 2nd call, the
subsciber will be called. If the subscriber
does not answer the call or you want to
end the second call:
•Press RIGHT arrow.
(Function code “400” will be
displayed optionally.)
• The second call will be broken and
the first call will be reconnected.
Note : If the handset is placed ON HOOK during the connection with the second call or you disconnect this call
using the hands free key, both communications will be broken.
07118398261
connected
Please dial_
07231396410_
ringing
400 disconnected call
16
Deskmaster
Note 2 : 0711123456
change
Note 2 : 0711123456
delete
Note 2 : 0711123456
change
Note 2 : change
2 : 0711123456
HL_DM5201_GB.qxd 16-04-2003 13:24 Page 16

17
Deskmaster
7.1.2 Broker
You have established a second call and you want to switch between both calls:
• 2nd call active, 1st call on hold.
•Press the flash key “R” followed by ”2“.
Connected to the 1st call.
•Press the Flash key “R” followed by ”2“.
Connected to the 2nd call.
7.1.3 Party Conference
You may connect yourself and both your calling partners to a 3 party conference:
• 2nd call active, 1st call on hold.
• Go to the menu function
conference.
•Switch to conference.
You can now speak to both
calling partners simultaneously.
OR
•Press the Flash key “R” followed by ”3“.
The first Caller ID shown is always the call that was active prior to switching to conference.
During a conference, you can activate the following functions, using the menu keys (left and right
arrows):
Menu Function
back to call 1 • The conference situation will be released.
•You are again connected to the 1st call.
• The 2nd call is placed on hold.
back to call 2 • The conference situation will be released.
•You are again connected to the 2nd call.
• The 1st call is placed on hold.
disc. call 1 • The conference situation will be released.
• The connection with the 1st call will be broken.
•You will be connected to the 2nd call.
disc. call 2 • The conference situation will be released.
• The connection with the 2nd call will be broken.
•You wil be connected to the 1st call.
07231396410
connected
07118398261
connected
07231396410
connected
07231396410
connected
410 conference
07231396410 + 07118398 >
Conference
1st call 2nd call
HL_DM5201_GB.qxd 16-04-2003 13:24 Page 17

18
Deskmaster
V.24 port • Status information of the data port or to disconnect the
data connection. (only deskmaster 510/520 model)
AB port • Status information of the AB port.
(only deskmaster 520 model)
• All connections will be broken.
7.2 Parking a connection
On an ISDN bus, a call can be parked temporarily, in order to:
• Resume the call some time later;
• Resume the call at another phone;
• Unplug the phone to plug it in another wall outlet of the installation.
The parking duration may not exceed 2 minutes.
7.2.1 Parking a Call
• Connection state.
• Go to the menu item park call.
(Function code “480”
will be displayed optionally.)
• Enter an ID number (2 digits).
You have to enter an ID number,
because it is possible to park several
calls within an ISDN bus.
• ON HOOK or press hands free key.
The call is now parked.
7.2.2 Unplugging the Phone
When a call is parked, it is possible to unplug the line cord and plug it in another ISDN wall outlet.
In case of an external connection, the call will continue to be charged!
7.2.3 Reconnect (Resume) a Parked Call
• Idle state.
• Go to the menu item pickup call.
(Function code “180”
will be displayed optionally.)
• Enter the ID number of the parked call.
• Lift handset or press the hands free key.
The conversation can now be continued.
07118398261
connected
480 Park call
Park call
ID : 10
Mo. 21 Feb 99 17:26
180 Pickup call
Pickup call
ID : 10
Mo. 21 Feb 99 17:26
****
connected
HL_DM5201_GB.qxd 16-04-2003 13:24 Page 18

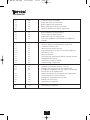
8 INCOMING CALL DURING A CONNECTION
During a call, another incoming call will be indicated by a special ringing tone and a message on the
display of the phone.
8.1 A 2nd Incoming Call (Call Waiting)
• Connection state.
•Ashort ringing tone will indicate
another incoming call.
• Requirement:
The call waiting feature is enabled.
You may now activate the following functions, using the RIGHT and LEFT arrow keys below the
display:
Menu Function
Take Call (460) • The 2nd call will be answered. The first call will be put on hold.
You now have the same possibilities as with any 2 call conversation:
•Broker function between both partners
•3party conference
Reject Call (470) • The 2nd call will be rejected.
Store Note (510) • The number of the caller will be stored in the notebook
(next free entry) for later retrieval.
An error message “notebook full” will be displayed, when all notebook records
are occupied.
Forward Call (500) • The incoming call will be transferred to another extension.
Identify (120) • Trace the identity of the caller in the network.
Secret (550) • Refuse transmission of your caller ID (Calling Line Identifaction
Restricted, CLIR) when you answer a call.
Disc. + Answer. (590) • First call will be disconnected and automatically you will receive
second call.
• The connections will be broken.
9 PERSONAL CONFIGURATIONS
9.1 Call Diversion (Call Forwarding)
You can automatically divert all incoming calls for your phone to another number. The following types
of diversions can be enabled and disabled:
• Direct diversion to : Incoming calls will be routed immediately to a programmed destination of
your choice.
• Delayed call forwarding : Incoming calls will be diverted to a programmed destination of your
choice, if they are not answered within 15 seconds (the delay can be configured in the exchange).
• Call Forwarding on busy : Incoming calls will be diverted to a programmed destination of your
choice, if your extension is occupied (busy).
19
Deskmaster
07118398261
connected
07118398261
Camping
HL_DM5201_GB.qxd 16-04-2003 13:24 Page 19

Please note, that Call Forwarding has to be enabled in the ISDN Exchange. In addition, the own MSN
number has to be programmed for your phone.
(See section Programming – Programming Multiple Subscriber Numbers (MSN)).
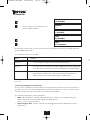
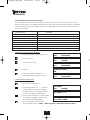
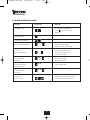
9.1.1 Call Forwarding Enabled/Disabled
• Idle State.
• Go to the menu item diversion.
(Function code “220”
will be displayed optionally.)
• Select the diversion required, using the
arrow keys : diversion to; delayed; on busy
9.1.2 Enter/Change Call Forwarding Destination
• Enter new destination for diversion.
• Select the right MSN number.
This menu is obsolete, if only one MSN
has been programmed.
• Display indicates temporarily that the
configuration was successful.
• The LED for the “INFO” key will start flashing.
9.2 Phone Barring
You can protect your telephone against unauthorised usage by means of 4 different levels of barring
outgoing public calls. You can chose between the following barring options:
Total •Your phone will be locked for all outgoing calls.
National • Only local calls will be allowed.
International • Only countrywide calls will be allowed.
Barring OFF • There are no restrictions.
Note : The phone has 3 programmable emergency numbers, which may be dialed at any time and regardless of the set bar-
ring options. By default, the emergency numbers 110 and 112 are programmed. The emergency numbers are available from
the system parameter menu.
20
Deskmaster
Mo. 21 Feb 99 17:26
220 Diversion
Typ of div. :
Diversion to
Number to
0711839262
Terminal addr.
MSN : 0 …
Mo. 21 Feb 99 17:26
Diversion ON
HL_DM5201_GB.qxd 16-04-2003 13:24 Page 20
La pagina si sta caricando...
La pagina si sta caricando...
La pagina si sta caricando...
La pagina si sta caricando...
La pagina si sta caricando...
La pagina si sta caricando...
La pagina si sta caricando...
La pagina si sta caricando...
La pagina si sta caricando...
La pagina si sta caricando...
La pagina si sta caricando...
La pagina si sta caricando...
La pagina si sta caricando...
La pagina si sta caricando...
La pagina si sta caricando...
La pagina si sta caricando...
La pagina si sta caricando...
La pagina si sta caricando...
La pagina si sta caricando...
La pagina si sta caricando...
La pagina si sta caricando...
La pagina si sta caricando...
La pagina si sta caricando...
La pagina si sta caricando...
La pagina si sta caricando...
La pagina si sta caricando...
La pagina si sta caricando...
La pagina si sta caricando...
La pagina si sta caricando...
La pagina si sta caricando...
La pagina si sta caricando...
La pagina si sta caricando...
-
 1
1
-
 2
2
-
 3
3
-
 4
4
-
 5
5
-
 6
6
-
 7
7
-
 8
8
-
 9
9
-
 10
10
-
 11
11
-
 12
12
-
 13
13
-
 14
14
-
 15
15
-
 16
16
-
 17
17
-
 18
18
-
 19
19
-
 20
20
-
 21
21
-
 22
22
-
 23
23
-
 24
24
-
 25
25
-
 26
26
-
 27
27
-
 28
28
-
 29
29
-
 30
30
-
 31
31
-
 32
32
-
 33
33
-
 34
34
-
 35
35
-
 36
36
-
 37
37
-
 38
38
-
 39
39
-
 40
40
-
 41
41
-
 42
42
-
 43
43
-
 44
44
-
 45
45
-
 46
46
-
 47
47
-
 48
48
-
 49
49
-
 50
50
-
 51
51
-
 52
52


in altre lingue
- English: Topcom 510 User manual
Documenti correlati
-
Topcom Sologic B901 Combo Guida utente
-
Topcom Sologic B935 Manuale utente
-
Topcom Allure 270 Manuale utente
-
Topcom Telephone 142 Manuale utente
-
Topcom Butler 930 Guida utente
-
Topcom T41 Manuale del proprietario
-
Topcom ULTRA SR1250 ECO Manuale del proprietario
-
Topcom Butler E300 Manuale del proprietario
-
Topcom Deskmaster 4000 Manuale del proprietario
-