Amprobe SM-10 & SM-20 Sound Level Meters Manuale utente
- Categoria
- Misurazione
- Tipo
- Manuale utente
Questo manuale è adatto anche per

SM-10
SM-20
Sound Level Meters
Users Manual
Mode d’emploi•
Bedienungshandbuch•
Manuale d’Uso•
Manual de uso•
Användarhandbok•

1
English
SM-10 / SM-20
Sound Level Meters
Users Manual
SM10_Rev001
© 2008 Amprobe Test Tools.
All rights reserved.

2
Limited Warranty and Limitation of Liability
Your Amprobe product will be free from defects in material and workmanship for
1 year from the date of purchase. This warranty does not cover fuses, disposable
batteries or damage from accident, neglect, misuse, alteration, contamination,
or abnormal conditions of operation or handling. Resellers are not authorized
to extend any other warranty on Amprobe’s behalf. To obtain service during the
warranty period, return the product with proof of purchase to an authorized
Amprobe Test Tools Service Center or to an Amprobe dealer or distributor. See
Repair Section for details. THIS WARRANTY IS YOUR ONLY REMEDY. ALL OTHER
WARRANTIES - WHETHER EXPRESS, IMPLIED OR STAUTORY - INCLUDING IMPLIED
WARRANTIES OF FITNESS FOR A PARTICULAR PURPOSE OR MERCHANTABILITY,
ARE HEREBY DISCLAIMED. MANUFACTURER SHALL NOT BE LIABLE FOR ANY
SPECIAL, INDIRECT, INCIDENTAL OR CONSEQUENTIAL DAMAGES OR LOSSES,
ARISING FROM ANY CAUSE OR THEORY. Since some states or countries do not
allow the exclusion or limitation of an implied warranty or of incidental or
consequential damages, this limitation of liability may not apply to you.
Repair
All test tools returned for warranty or non-warranty repair or for calibration
should be accompanied by the following: your name, company’s name, address,
telephone number, and proof of purchase. Additionally, please include a brief
description of the problem or the service requested and include the test leads
with the meter. Non-warranty repair or replacement charges should be remitted
in the form of a check, a money order, credit card with expiration date, or a
purchase order made payable to Amprobe® Test Tools.
In-Warranty Repairs and Replacement – All Countries
Please read the warranty statement and check your battery before requesting
repair. During the warranty period any defective test tool can be returned to your
Amprobe® Test Tools distributor for an exchange for the same or like product.
Please check the “Where to Buy” section on www.amprobe.com for a list of
distributors near you. Additionally, in the United States and Canada In-Warranty
repair and replacement units can also be sent to a Amprobe® Test Tools Service
Center (see address below).
Non-Warranty Repairs and Replacement – US and Canada
Non-warranty repairs in the United States and Canada should be sent to a
Amprobe® Test Tools Service Center. Call Amprobe® Test Tools or inquire at your
point of purchase for current repair and replacement rates.
In USA In Canada
Amprobe Test Tools Amprobe Test Tools
Everett, WA 98203 Mississauga, ON L4Z 1X9
Tel: 877-AMPROBE (267-7623) Tel: 905-890-7600
Non-Warranty Repairs and Replacement – Europe
European non-warranty units can be replaced by your Amprobe® Test Tools
distributor for a nominal charge. Please check the “Where to Buy” section on
www.amprobe.com for a list of distributors near you.
European Correspondence Address*
Amprobe
®
Test Tools Europe
In den Engematten 14
79286 Glottertal, Germany
Tel.: +49 (0) 7684 8009 - 0
*(Correspondence only – no repair or replacement available from this address.
European customers please contact your distributor.)

3
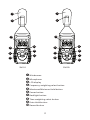
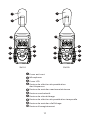
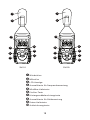
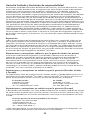
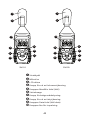
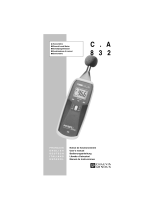
➊
Windscreen
➋
Microphone
➌
LCD display
➍
Frequency weighting select button
➎
Maximum/Minimum Hold button
➏
Power button
➐
Backlight button
➑
Time weighting select button
➒
Data Hold button
➓
Record button
REC
HOLD
+
MAX
FAST
SLOW
A / C
Fast Slow
HOLD MAX dBA
MIN dBCN
1
2
3
4
5
6
7
8
9
10
HOLD
+
MAX
FAST
SLOW
A / C
Fast Slow
HOLD MAX dBA
MIN dBCN
3
4
5
6
7
8
9
1
2
SM-10 SM-20

4
SM-10 / SM-20
Sound Level Meters
CONTENTS
Symbols .................................................................................................................5
Unpacking and Inspection ...................................................................................5
Introduction ..........................................................................................................5
Operation ............................................................................................................. 5
MAX/MIN .........................................................................................................6
HOLD ............................................................................................................... 6
Backlight ..........................................................................................................6
Record (SM-20 Only) .......................................................................................6
Calibration Procedures ..................................................................................6
Specifications ........................................................................................................7
Maintenance and Repair .................................................................................... 8
Battery Replacement .....................................................................................8

5
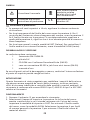
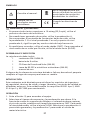
SYMBOLS
Refer to the manual
Do not dispose of this
product as unsorted
municipal waste.
Conforms to relevant
Australian standards.
Complies with EU
directives
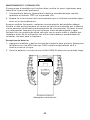
Warning and Precautions
For wind speeds over 10 m/sec (22.3 mph), use the windscreen on the •
microphone.
For general sound level measurements use A weighting. For checking the •
low-frequency content of noise use C weighting. If the C-Weighted level
is much higher than the A-weighted level, then there is a large amount of
low-frequency noise
For normal measurements use the FAST mode. For checking average level •
of fluctuation noise use the SLOW mode.
UNPACKING AND INSPECTION
Your shipping carton should include:
1 SM-10 / 20 sound level meter
1 9 volt battery
1 Download Suite CD-ROM (SM-20)
1 RS-232 to mini stereo phono jack (SM-20)
1 Users Manual
If any of the items are damaged or missing, return the complete package to
the place of purchase for an exchange.
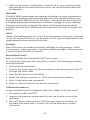
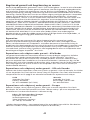
INTRODUCTION
This Sound Level Meter has been designed to meet the measurement
requirements of safety Engineers, Health, Industrial safety offices and quality
control in various environments. This unit conforms to the IEC651 Type 2,
ANSI S1.4 Type 2, JISC1502 requirements for Sound Level Meters.
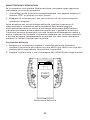
OPERATION
Press 1. button for power ON.
Select the desired response time and weighting. If the sound source 2.
consists of short bursts or only catching sound peak, set response to FAST.
To measure average sound level, use the slow setting. Select A weighting
for general noise sound level and C weighting for measuring sound level
of acoustic material.

6
Hold the instrument comfortably in hand or fix on tripod and point the 3.
microphone at the suspected noise source, the sound pressure level will
be displayed.
MAX/MIN
The MAX MIN feature reads and updates the display to show the maximum
or minimum average value measured after you press the MAX MIN button.
Pressing the MAX MIN button for less than 1 second will put the meter into
a mode of displaying the maximum, minimum, average, or actual readings.
Each time the button is pressed, the meter will alternate between MAX
and MIN. Press the MAX MIN button for more than 2 seconds to disable this
feature.
HOLD
Freezes the reading present on the LCD at the moment the button is pressed.
To use this button feature set up the meter for the type of measurement and
range desired before pressing the button.
Backlight
Press the button you enable the display backlight to easy readings in dark
environments. Press more than 1 second to disable backlight, which however
it automatically OFF after 15 seconds.
Record (SM-20 Only)
Refer to CD-ROM for Download Suite
TM
instructions .
To transfer the data from the instrument to the PC the following procedure
must be followed:
Switch ON the instrument1.
Connect the serial output of the instrument to the serial output of the PC 2.
through the serial cable
Press the REC button on the SM-20.3.
Install the software and start it – Close the introduction window4.
Press F2 and follow the commands.5.
Refer to software help file for further instructions.6.
Calibration Procedures
Using a standard Acoustic Calibrator (SM-CAL1) (94dB, 1 kHz Sine wave)
Set meter for dBA and FAST. 1.
Insert the Microphone nozzle carefully into the insertion hole of the 2.
calibrator.
Press A/C button then press the HOLD button, hold the 2 buttons at 3.
the same time more than 1 second. LCD will be blinking to confirm
calibration.

7
When LCD blinked, release the A/C and the HOLD buttons. The sound level 4.
meter will display 94.0 dBA . The calibration is done.
The 94 dB calibration process can be repeated until the meter reads 94.0 5.
dB. Recalibration cycle: 1 year.
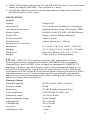
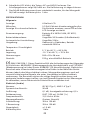
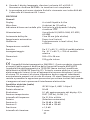
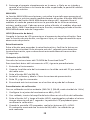
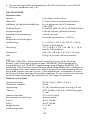
SPECIFICATIONS
General
Display: 4 digits LCD
Microphone: 1/2 inch Electret condenser microphone.
Low Battery Indication: Replace battery when LCD displays “”.
Power Supply: 9V NEDA 1604, IEC 6F22, JIS 006P battery.
Power Life : Approx. 50 hrs (alkaline Battery).
Auto Power Off: Approx. 5 min
Environment: Indoor operation, < 2000 m
Temperature / Humidity
Operation: 5 °C to 40 °C (41°F to 104°F); < 80% RH
Storage: -10 °C to 60 °C (14°F to 140°F); < 70 %RH
Dimension: 200 x 55 x 38 mm (7.8 x 2.2 x 1.5 in)
Weight: 233g. (0.5 lb.) Including battery
-EMC: EN61326-1 This product complies with requirements of the
following European Community Directives: 89/336/EEC (Electromagnetic
Compatibility) and 73/23/EEC (Low Voltage) as amended by 93/68/EEC (CE
Marking). However, electrical noise or intense electromagnetic fields in the
vicinity of the equipment may disturb the measurement circuit. Measuring
instruments will also respond to unwanted signals that may be present within
the measurement circuit. Users should exercise care and take appropriate
precautions to avoid misleading results when making measurements in the
presence of electronic interference.
Electrical (Audio)
Standard applied: IEC 651 Type2, ANSI 1.4 Type 2.
Dynamic range: 50 dB.
Resolution: 0.1 dB, Display Update: 0.5 sec.
Time weighting: FAST(125mS), SLOW(1 sec).
Frequency range: 31.5 Hz to 8 kHz.
Measuring level range: (Auto Range)
A Weighting: 30 to 130 dB.
C Weighting: 35 to 130 dB.
Accuracy: ± 1.5 dB.
Calibration cycle: 1 year.

8
MAINTENANCE AND REPAIR
If there appears to be a malfunction during the operation of the meter, the
following steps should be performed in order to isolate the cause of the
problem.
Check the battery. Replace the battery immediately when the symbol 1.
“” appears on the LCD.
Review the operating instructions for possible mistakes in operating 2.
procedure.
Except for the replacement of the battery, repair of the meter should be
performed only by a Factory Authorized Service Center or by other qualified
instrument service personnel. The front panel and case can be cleaned with
a mild solution of detergent and water. Apply sparingly with a soft cloth and
allow to dry completely before using. Do not use aromatic hydrocarbons or
chlorinated solvents for cleaning.
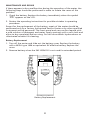
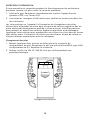
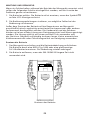
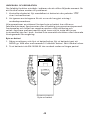
Battery Replacement
Turn off the meter and slide out the battery cover. Replace the battery 1.
with a NEDA type 1604 or equivalent 9V alkaline battery. Replace the
cover.
Remove battery when the SM-10/SM-20 is not used for extended period.2.
Battery Replacement
OPEN

9
SM10_Rev001
© 2008 Amprobe Test Tools.
Tous droits réservés.
SM-10 / SM-20
Sonomètres
Mode d’emploi
Français

10
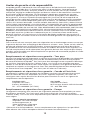
Limites de garantie et de responsabilité
Amprobe garantit l’absence de vices de matériaux et de fabrication de ce produit
pendant une période d’un (1) an prenant effet à la date d’achat. Cette garantie ne
s’applique pas aux fusibles, aux piles jetables ni à tout produit mal utilisé, modifié,
contaminé, négligé ou endommagé par accident ou soumis à des conditions anormales
d’utilisation et de manipulation. Les distributeurs agréés par Amprobe ne sont pas
autorisés à appliquer une garantie plus étendue au nom d’Amprobe. Pour bénéficier
de la garantie, renvoyez le produit accompagné d’un justificatif d’achat auprès d’un
centre de services agréé par Amprobe Test Tools ou d’un distributeur ou d’un revendeur
Amprobe. Voir la section Réparation pour tous les détails. LA PRESENTE GARANTIE EST
LE SEUL ET EXCLUSIF RECOURS. TOUTES AUTRES GARANTIES, EXPLICITES, IMPLICITES OU
STATUTAIRES, NOTAMMENT LE CAS ECHEANT LES GARANTIES DE QUALITE MARCHANDE
OU D’ADAPTATION A UN OBJECTIF PARTICULIER, SONT EXCLUES PAR LES PRESENTES. LE
FABRICANT NE SERA EN AUCUN CAS TENU RESPONSABLE DES DOMMAGES PARTICULIERS,
INDIRECTS, ACCIDENTELS OU CONSECUTIFS, NI D’AUCUNS DEGATS OU PERTES DE
DONNEES, SUR UNE BASE CONTRACTUELLE, EXTRA-CONTRACTUELLE OU AUTRE. Etant
donné que certaines juridictions n’admettent pas les limitations d’une condition de
garantie implicite, ou l’exclusion ou la limitation de dégâts accidentels ou consécutifs,
il se peut que les limitations et/ou les exclusions de cette garantie ne s’appliquent pas à
votre cas.
Réparation
Tous les outils de test renvoyés pour une réparation ou un étalonnage couvert ou non par
la garantie doivent être accompagnés des éléments suivants : nom, raison sociale, adresse,
numéro de téléphone et justificatif d’achat. Ajoutez également une brève description
du problème ou du service demandé et incluez les cordons de mesure avec l’appareil. Les
frais de remplacement ou de réparation hors garantie doivent être acquittés par chèque,
mandat, carte de crédit avec date d’expiration ou par bon de commande payable à l’ordre
de Amprobe
®
Test Tools.
Remplacements et réparations sous garantie – Tous pays
Veuillez lire la déclaration de garantie et vérifier la pile avant de demander une réparation.
Pendant la période de garantie, tout outil de test défectueux peut être renvoyé auprès
de votre distributeur Amprobe
®
Test Tools pour être échangé contre un produit identique
ou similaire. Consultez la section « Where to Buy » sur le site www.amprobe.com pour
obtenir la liste des distributeurs dans votre région. Les appareils sous garantie devant être
remplacés ou réparés au Canada et aux Etats-Unis peuvent également être envoyés dans
un centre de services Amprobe
®
Test Tools (voir les adresses ci-dessous).
Remplacements et réparations hors garantie – Canada et Etats-Unis
Les appareils à réparer hors garantie au Canada et aux Etats-Unis doivent être envoyés
dans un centre de services Amprobe
®
Test Tools. Appelez Amprobe
®
Test Tools ou
renseignez-vous auprès de votre lieu d’achat pour connaître les tarifs en vigueur de
remplacement ou de réparation.
Aux Etats-Unis Au Canada
Amprobe Test Tools Amprobe Test Tools
Everett, WA 98203 E-U Mississauga, Ontario L4Z 1X9 Canada
Tél. : 877-AMPROBE (267-7623) Tél. : 905-890-7600
Remplacements et réparations hors garantie – Europe
Les appareils européens non couverts par la garantie peuvent être remplacés par votre
distributeur Amprobe
®
Test Tools pour une somme nominale. Consultez la section
« Where to Buy » sur le site www.amprobe.com pour obtenir la liste des distributeurs dans
votre région.
Adresse postale européenne*
Amprobe
®
Test Tools Europe
In den Engematten 14
79286 Glottertal, Allemagne
Tél. : +49 (0) 7684 8009 - 0
*(Réservée à la correspondance – Aucun remplacement ou réparation n’est possible à
cette adresse. Nos clients européens doivent contacter leur distributeur.)

11
REC
HOLD
+
MAX
FAST
SLOW
A / C
Fast Slow
HOLD MAX dBA
MIN dBCN
1
2
3
4
5
6
7
8
9
10
HOLD
+
MAX
FAST
SLOW
A / C
Fast Slow
HOLD MAX dBA
MIN dBCN
3
4
5
6
7
8
9
1
2
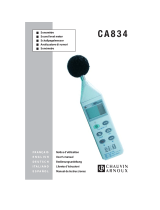
SM-20SM-10
➊
Ecran anti-vent
➋
Microphone
➌
Ecran LCD
➍
Bouton de sélection de pondération
des fréquences
➎
Bouton de maintien maximum/minimum
➏
Bouton marche/arrêt
➐
Bouton de rétroéclairage
➑
Bouton de sélection de pondération temporelle
➒
Bouton de maintien d’affichage
➓
Bouton d’enregistrement

12
Symboles .............................................................................................................13
Deballage et inspection .....................................................................................13
Introduction ........................................................................................................13
Fonctionnement .................................................................................................13
MAX/MIN .......................................................................................................14
Maintien d’affichage ....................................................................................14
Rétroéclairage ...............................................................................................14
Enregistrer (SM-20 seulement) .....................................................................14
Procédures d’étalonnage ............................................................................ 14
Specifications ......................................................................................................15
Entretien et reparation .....................................................................................16
Changement des piles ................................................................................. 16
SM-10 / SM-20
Sonomètres

13
SYMBOLES
Se reporter au manuel.
Ne pas mettre ce produit
au rebut avec les déchets
ménagers non triés.
Conforme aux normes
australiennes.
Conforme aux directives
de l’UE.
Mises en garde et précautions
Installer l’écran anti-vent sur le micro quand la vitesse du vent est •
supérieure à 10 m/s (22,3 mph).
Utiliser une pondération A pour les mesures acoustiques globales. Pour •
vérifier le contenu en basse fréquence du bruit, utilisez une pondération
C. Le bruit à basse fréquence est important si le niveau pondéré C est très
supérieur au niveau pondéré A.
Utiliser le mode rapide FAST pour les mesures normales. Utilisez le mode •
lent SLOW pour vérifier le niveau moyen du bruit aléatoire.
DEBALLAGE ET INSPECTION
Le carton d’emballage doit inclure les éléments suivants :
1 sonomètre SM-10 / 20
1 pile de 9 volts
1 CD-ROM Download Suite (SM-20)
1 mini-prise phono/stéréo vers RS-232 (SM-20)
1 mode d’emploi
Si l’un de ces éléments est endommagé ou manquant, renvoyez le contenu
complet de l’emballage au lieu d’achat pour l’échanger.
INTRODUCTION
Ce sonomètre a été conçu conformément aux exigences de mesure des
ingénieurs travaillant dans la sécurité, la santé, les agences de sécurité
industrielle et le contrôle qualité dans divers environnements. Cet appareil
est conforme aux exigences CEI651 type 2, ANSI S1.4 type 2, JISC1502 pour
les sonomètres.
FONCTIONNEMENT
Appuyez sur le bouton 1. pour mettre l’appareil sous tension.
Sélectionnez la pondération et le temps de réponse souhaités. Si la source 2.
sonore comprend de brèves rafales ou ne capte que la crête du signal
acoustique, réglez la réponse sur FAST. Utilisez le réglage lent SLOW pour
mesurer le niveau sonore moyen. Sélectionnez la pondération A pour le
niveau de bruit global et la pondération C pour mesurer le niveau sonore
du matériel acoustique.

14
3. Tenez l’instrument bien dans la main ou fixez-le sur un trépied, puis
pointez le micro vers la source de bruit suspectée ; le niveau de pression
acoustique s’affiche.
MAX/MIN
La fonction MAX MIN lit et met à jour l’affichage pour indiquer la valeur
maximum ou minimum quand le bouton MIN MAX est activé. Si le bouton
MAX MIN est enfoncé moins d’une seconde, l’appareil passe dans un mode
d’affichage présentant les valeurs maximum, minimum ou brutes. L’appareil
bascule alternativement entre MAX et MIN à chaque pression du bouton.
Appuyez sur le bouton MAX MIN pendant 2 secondes pour désactiver
cette fonction.
Maintien d’affichage
Ce bouton gèle la mesure affichée sur l’écran LCD. Pour utiliser cette
fonction, configurez l’appareil pour le type de mesure et la gamme souhaités
et appuyez sur le bouton.
Rétroéclairage
Appuyez sur ce bouton pour activer le rétroéclairage et lire facilement
les résultats dans les environnements faiblement éclairés. Appuyez
pendant plus d’une seconde pour désactiver le rétroéclairage, qui s’éteint
automatiquement après 15 secondes.
Enregistrer (SM-20 seulement)
Reportez-vous aux instructions du CD-ROM pour Download Suite
TM
.
Pour transférer les données de l’instrument vers le PC, appliquez la
procédure suivante :
Mettez l’instrument sous tension.1.
Branchez la sortie série de l’instrument à la sortie série du PC par le biais 2.
du câble série.
Appuyez sur le bouton REC sur le SM-20.3.
Installez le logiciel et démarrez-le. Refermez la fenêtre d’introduction.4.
Appuyez sur F2 et suivez les commandes.5.
Reportez-vous au fichier d’aide du logiciel pour toutes les instructions.6.
Procédures d’étalonnage
Utilisation d’un calibrateur acoustique standard (SM-CAL1) (signal sinusoïdal
1 kHz, 94 dB)
Réglez l’appareil sur dBA et FAST. 1.
Insérez soigneusement le nez du micro dans le trou d’insertion 2.
du calibrateur.
Appuyez sur le bouton A/C puis sur HOLD, maintenez les 2 boutons 3.
enfoncés en même temps pendant plus d’une seconde. L’écran LCD
clignote pour confirmer l’étalonnage.

15
4. A l’apparition du clignotement, relâchez les boutons A/C et HOLD. Le
sonomètre affiche 94,0 dBA. L’étalonnage est terminé.
5. Le processus d’étalonnage à 94 dB peut être répété afin d’obtenir un
résultat de 94,0 dB sur le sonomètre. Cycle de réétalonnage : 1 an.
SPECIFICATIONS
Caractéristiques générales
Affichage : LCD à 4 chiffres
Microphone : Microphone à condensateur Electret
1/2 po
Témoin de décharge de la pile : Remplacez la pile à l’apparition de
« » sur l’écran LCD
Alimentation : Pile 9 V NEDA 1604, CEI 6F22, JIS 006P
Autonomie : Environ 50 h (pile alcaline)
Arrêt automatique : Environ 5 mn
Environnement : Fonctionnement en intérieur, < 2000 m
Température/Humidité :
Fonctionnement : 5 °C à 40 °C (41 °F à 104 °F) ; < 80 % HR
Entreposage : -10 °C à 60 °C (14 °F à 140 °F) ; < 70 %
Dimensions : 200 x 55 x 38 mm (7,8 x 2,2 x 1,5 po)
Poids : 233 g (0,5 lb) avec la pile
CEM : EN61326-1. Ce produit est conforme aux exigences des directives
suivantes de la Communauté européenne : 89/336/CEE (Compatibilité
électromagnétique) et 73/23/CEE (Basse tension) modifiée par 93/68/CEE
(Marquage CE). Toutefois, le bruit électrique ou les champs électromagnétiques
intenses à proximité de l’équipement sont susceptibles de perturber le
circuit de mesure. Les appareils de mesure réagissent également aux signaux
indésirables qui seraient présents dans le circuit de mesure. Les utilisateurs
doivent faire preuve de prudence et prendre les mesures nécessaires pour
éviter les erreurs de mesure en présence de parasites électromagnétiques.
Electricité (audio)
Norme appliquée : CEI 651 type 2, ANSI 1.4 type 2
Gamme dynamique : 50 dB
Résolution : 0,1 dB, actualisation de l’affichage : 0,5 s
Pondération temporelle : rapide (125 mS), lente (1 s)
Gamme de fréquence : 31,5 Hz à 8 kHz
Gamme de niveau de mesure : (Gamme automatique)
Pondération A : 30 à 130 dB
Pondération C : 35 à 130 dB
Précision : ± 1,5 dB
Cycle d’étalonnage : 1 an

16
OPEN
Changement des piles
ENTRETIEN ET REPARATION
Si une anomalie est suspectée pendant le fonctionnement du multimètre,
procédez comme suit pour isoler la cause du problème.
Vérifiez la pile. Remplacez immédiatement la pile à l’apparition du 1.
symbole « » sur l’écran LCD.
Consultez les consignes d’utilisation pour vérifier les erreurs possibles lors 2.
de l’utilisation.
Les interventions sur l’appareil, à l’exception du changement des piles,
doivent être effectuées en usine dans un centre de services agréé ou par un
autre personnel de réparation qualifié. La face avant et le boîtier peuvent
être nettoyés à l’aide d’une solution légère à base d’eau et de détergent.
Appliquez cette solution avec modération en utilisant un tissu doux et laissez
bien sécher avant l’utilisation. N’utilisez pas de solvants à base de chlore ou
d’hydrocarbures aromatiques pour le nettoyage.
Changement des piles
Mettez l’appareil hors tension et faites glisser le couvercle du 1.
compartiment de pile. Remplacez-la par une pile alcaline NEDA type 1604
ou équivalent de 9 V. Replacez le couvercle.
Retirez la pile si le SM-10 / SM-20 n’est pas utilisé pendant une 2.
période prolongée.

17
SM10_Rev001
© 2008 Amprobe Test Tools.
Alle Rechte vorbehalten.
SM-10 / SM-20
Lautstärkemesser
Bedienungshandbuch
Deutsch

18
Beschränkte Gewährleistung und Haftungsbeschränkung
Es wird gewährleistet, dass dieses Amprobe-Produkt für die Dauer von einem Jahr ab
dem Kaufdatum frei von Material- und Fertigungsdefekten ist. Diese Gewährleistung
erstreckt sich nicht auf Sicherungen, Einwegbatterien oder Schäden durch Unfälle,
Nachlässigkeit, Missbrauch, Änderungen oder abnormale Betriebsbedingungen
bzw. unsachgemäße Handhabung. Die Verkaufsstellen sind nicht dazu berechtigt,
diese Gewährleistung im Namen von Amprobe zu erweitern. Um während der
Gewährleistungsperiode Serviceleistungen in Anspruch zu nehmen, das Produkt mit
Kaufnachweis an ein autorisiertes Amprobe Test Tools Service-Center oder an einen
Amprobe-Fachhändler/-Distributor einsenden. Nähere Einzelheiten siehe Abschnitt
„Reparatur“. DIESE GEWÄHRLEISTUNG STELLT DEN EINZIGEN UND ALLEINIGEN
RECHTSANSPRUCH AUF SCHADENERSATZ DAR. ALLE ANDEREN GEWÄHRLEISTUNGEN,
VERTRAGLICH GEREGELTE ODER GESETZLICHE VORGESCHRIEBENE, EINSCHLIESSLICH
DER GESETZLICHEN GEWÄHRLEISTUNG DER MARKTFÄHIGKEIT UND DER EIGNUNG
FÜR EINEN BESTIMMTEN ZWECK, WERDEN ABGELEHNT. DER HERSTELLER ÜBERNIMMT
KEINE HAFTUNG FÜR SPEZIELLE, INDIREKTE, NEBEN- ODER FOLGESCHÄDEN ODER
FÜR VERLUSTE, DIE AUF BELIEBIGER URSACHE ODER RECHTSTHEORIE BERUHEN. Weil
einige Staaten oder Länder den Ausschluss oder die Einschränkung einer implizierten
Gewährleistung sowie den Ausschluss von Begleit- oder Folgeschäden nicht zulassen, ist
diese Gewährleistungsbeschränkung möglicherweise für Sie nicht gültig.
Reparatur
Allen Geräten, die innerhalb oder außerhalb des Garantiezeitraums zur Reparatur
oder Kalibrierung eingesendet werden, müssen mit folgenden Informationen und
Dokumenten versehen werden: Name des Kunden, Firmenname, Adresse, Telefonnummer
und Kaufbeleg. Zusätzlich bitte dem Messgerät eine kurze Beschreibung des Problems
oder der gewünschten Wartung sowie die Messleitungen beilegen. Die Gebühren
für außerhalb des Garantiezeitraums durchgeführte Reparaturen oder für den
Ersatz von Instrumenten müssen per Scheck, Zahlungsanweisung oder Kreditkarte
(Kreditkartennummer mit Ablaufdatum) beglichen werden oder es muss ein Auftrag auf
Rechnung an Amprobe
®
Test Tools formuliert werden.
Garantiereparaturen und -austausch - alle Länder
Bitte die Garantieerklärung lesen und die Batterie prüfen, bevor Reparaturen angefordert
werden. Während der Garantieperiode können alle defekten Geräte zum Umtausch
gegen dasselbe oder ein ähnliches Produkt an den Amprobe
®
Test Tools-Distributor
gesendet werden. Ein Verzeichnis der zuständigen Distributoren ist im Abschnitt
„Where to Buy“ (Verkaufsstellen) auf der Website www.amprobe.com zu finden. Darüber
hinaus können in den USA und in Kanada Geräte an ein Amprobe
®
Test Tools Service-
Center (siehe Adresse unten) zur Reparatur oder zum Umtausch eingesendet werden.
Reparaturen und Ersatz außerhalb des Garantiezeitraums - USA und Kanada
Für Reparaturen außerhalb des Garantiezeitraums in den Vereinigten Staaten und
in Kanada werden die Geräte an ein Amprobe
®
Test Tools Service-Center gesendet.
Auskunft über die derzeit geltenden Reparatur- und Austauschgebühren erhalten Sie von
Amprobe
®
Test Tools oder der Verkaufsstelle.
In den USA: In Kanada:
Amprobe Test Tools Amprobe Test Tools
Everett, WA 98203 Mississauga, ON L4Z 1X9
Tel.: 877-AMPROBE (267-7623) Tel.: 905-890-7600
Reparaturen und Austausch außerhalb des Garantiezeitraums - Europa
Geräte mit abgelaufener Garantie können durch den zuständigen Amprobe
®
Test Tools-
Distributor gegen eine Gebühr ersetzt werden. Ein Verzeichnis der zuständigen
Distributoren ist im Abschnitt „Where to Buy“ (Verkaufsstellen) auf der Website
www.amprobe.com zu finden.
Korrespondenzanschrift für Europa*
Amprobe
®
Test Tools Europe
In den Engematten 14
79286 Glottertal, Deutschland
Tel.: +49 (0) 7684 8009 - 0
*(Nur Korrespondenz – keine Reparaturen und kein Umtausch unter dieser Anschrift.
Kunden in Europa wenden sich an den zuständigen Distributor.)

19
REC
HOLD
+
MAX
FAST
SLOW
A / C
Fast Slow
HOLD MAX dBA
MIN dBCN
1
2
3
4
5
6
7
8
9
10
HOLD
+
MAX
FAST
SLOW
A / C
Fast Slow
HOLD MAX dBA
MIN dBCN
3
4
5
6
7
8
9
1
2
SM-20SM-10
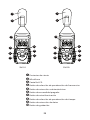
➊
Windschirm
➋
Mikrofon
➌
LCD-Anzeige
➍
Auswahltaste für Frequenzbewertung
➎
Min/Max-Haltetaste
➏
Ein/Aus-Taste
➐
Hintergrundbeleuchtungstaste
➑
Auswahltaste für Zeitbewertung
➒
Daten-Haltetaste
➓
Aufzeichnungstaste
La pagina si sta caricando...
La pagina si sta caricando...
La pagina si sta caricando...
La pagina si sta caricando...
La pagina si sta caricando...
La pagina si sta caricando...
La pagina si sta caricando...
La pagina si sta caricando...
La pagina si sta caricando...
La pagina si sta caricando...
La pagina si sta caricando...
La pagina si sta caricando...
La pagina si sta caricando...
La pagina si sta caricando...
La pagina si sta caricando...
La pagina si sta caricando...
La pagina si sta caricando...
La pagina si sta caricando...
La pagina si sta caricando...
La pagina si sta caricando...
La pagina si sta caricando...
La pagina si sta caricando...
La pagina si sta caricando...
La pagina si sta caricando...
La pagina si sta caricando...
La pagina si sta caricando...
La pagina si sta caricando...
La pagina si sta caricando...
La pagina si sta caricando...
La pagina si sta caricando...
-
 1
1
-
 2
2
-
 3
3
-
 4
4
-
 5
5
-
 6
6
-
 7
7
-
 8
8
-
 9
9
-
 10
10
-
 11
11
-
 12
12
-
 13
13
-
 14
14
-
 15
15
-
 16
16
-
 17
17
-
 18
18
-
 19
19
-
 20
20
-
 21
21
-
 22
22
-
 23
23
-
 24
24
-
 25
25
-
 26
26
-
 27
27
-
 28
28
-
 29
29
-
 30
30
-
 31
31
-
 32
32
-
 33
33
-
 34
34
-
 35
35
-
 36
36
-
 37
37
-
 38
38
-
 39
39
-
 40
40
-
 41
41
-
 42
42
-
 43
43
-
 44
44
-
 45
45
-
 46
46
-
 47
47
-
 48
48
-
 49
49
-
 50
50


Amprobe SM-10 & SM-20 Sound Level Meters Manuale utente
- Categoria
- Misurazione
- Tipo
- Manuale utente
- Questo manuale è adatto anche per
in altre lingue
Documenti correlati
-
Amprobe SM-10 & SM-20-A Sound Level Meters Manuale utente
-
-
-
-
Amprobe LM-120 Manuale utente
-
-
-
-
Amprobe TMD-10 Dual Temperature Meter Manuale utente
-
Altri documenti
-
 Chauvin-Arnoux CA832 Manuale del proprietario
-
 Chauvin-Arnoux CA834 Manuale del proprietario
-
Laserliner SoundTest-Master Manuale del proprietario
-
Tecnosystemi TSF1 digital sound level meter Manuale del proprietario
-
CAME DBC 01 Guida d'installazione
-
TFA Sound Level Meter SOUND BEE Manuale utente
-
GEV 1299 Manuale utente

