
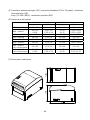
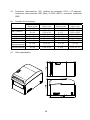
PT390

Every effort has been made to ensure that the information in this document is complete, accurate, and
up-to-date. The manufacturer assumes no responsibility for the results of errors beyond its control. The
manufacturer also cannot guarantee that changes in software and equipment made by other
manufacturers and referred to in this manual will not affect the applicability of the information in it.
Mention of software products manufactured by other companies does not necessarily constitute
endorsement by the manufacturer.
While all reasonable efforts have been made to make this document as accurate and helpful as possible,
we make no warranty of any kind, expressed or implied, as to the accuracy or completeness of the
information contained herein.
All rights are reserved by Oki Data Corporation. Unauthorized copying, transferring, translating, or
related actions are prohibited. You must obtain written permission from Oki Data Corporation before
doing any of the above.
© 2011 Oki
Data Corporation
OKI is a registered trademark of Oki Electric Industry Co., Ltd.
Energy Star is a trademark of the United States Environmental Protection Agency.
Microsoft, Windows, Windows Server and Windows Vista are registered trademarks of Microsoft
Corporation.
Apple, Macintosh, Rosetta, Mac and Mac OS are registered trademarks of Apple Inc.
Other product names and brand names are registered trademarks or trademarks of their proprietors.
As an Energy Star Program Participant, the manufacturer has determined that this product
meets the Energy Star guidelines for energy efficiency.
This product complies with the requirements of the Council Directives 2014/30/EU (EMC) and
2014/35/EU (LVD), 2014/53/EU (RED) and 2011/65/EU(RoHS) as amended where
applicable, on the approximation of the laws of the member states relating to Electromagnetic
Compatibility, Low Voltage, Radio & Telecommunications Terminal Equipment, Energy
related Products and Restriction on the use of certain Hazardous Substances in electrical
and electronic equipment.
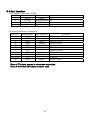
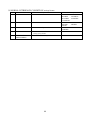
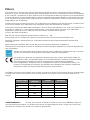
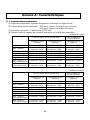
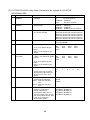
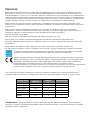
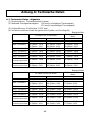
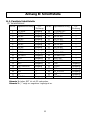
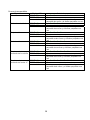
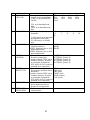
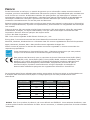
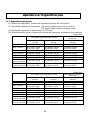
The following cables were used to evaluate this product to achieve EMC directive
2014/30/EU compliance and configurations other than this may affect that compliance.
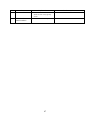
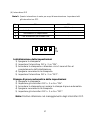
&$%/(7<3( &25(CORE
This is a class A product as defined in EN55022. In a domestic environment
this product may cause radio interference, in which case the user may be required to
take adequate measures.
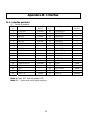
CABLE TYPE
LENGTH
(METRE)
CORE SHIELD
Power 2.0
88
USB 5.0
89
Serial (25pin)
15.0
89
Parallel 2.9
89
LAN
10.0
88
Drawer 1.8
88

M
ANUFACTURER
Oki Data Corporation,
4-11-22 Shibaura, Minato-ku,
Tokyo 108-8551,
Japan
For all sales, support and general enquiries contact your local distributor.
I
MPORTER
TO
THE
EU/A
UTHORISED
REPRESENTATIVE
OKI Europe Limited (trading as OKI Printing Solutions)
Blays House
Wick Road
Egham
Surrey, TW20 0HJ
United Kingdom
For all sales, support and general enquiries contact your local distributor.
E
NVIRONMENTAL
INFORMATION

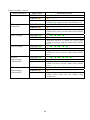
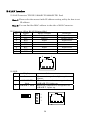
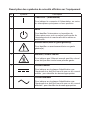
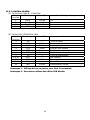
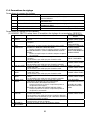
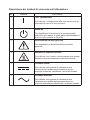
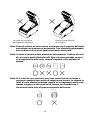
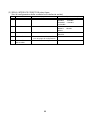
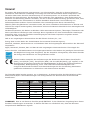
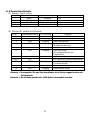
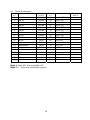
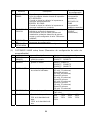
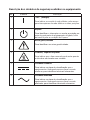
Description of Safety symbols displayed on the equipment
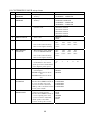
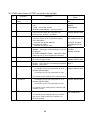
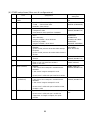
No. Symbol Description
1
"ON" (power)
To indicate connection to the mains, at least for
mains switches or their positions.
2
Stand-by
To identify the switch or switch position by means of
which part of the equipment is switched on in order
to bring it into the stand-by condition.
3
General warning/caution
To identify a general warning/caution.
4
Caution, hot surface
To indicate that the marked item can be hot and
should not be touched without taking care.
5
Direct current
To indicate on the rating plate that the equipment is
suitable for direct current only; to identify relevant
terminals.
6
Alternating current
To indicate on the rating plate that the equipment
is suitable for alternating current only; to identify
relevant terminals.

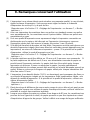
3
TABLE OF CONTENTS
1. Appearance and Names of Components ·································································· 4
2. AC Adapter and Thermal Roll Paper ······································································ 6
2-1. AC adapter····································································································· 6
2-2. Paper specification (Thermal paper) ·································································· 6
2-3. Recommended Thermal Paper ·········································································· 7
3. Preparations ······································································································ 9
3-1. Connecting Interface Cable ·············································································· 9
3-2. Connecting the drawer kick cable···································································· 13
3-3. Connecting the AC Adapter ············································································ 14
3-4. Disconnecting the AC Adapter ········································································ 16
3-5. Turning on the Power ···················································································· 17
3-6. Installing the Printer Software ······································································· 17
4. Inserting Paper for Printing ··············································································· 18
4-1. Replacing paper ···························································································· 18
5. Control Panel ··································································································· 27
5-1. Control Panel ······························································································· 27
5-2. Error Indications ·························································································· 27
6. Preventing and Clearing Paper Jams ··································································· 29
6-1. Preventing Paper Jams·················································································· 29
6-2. Clearing a Paper Jam ···················································································· 29
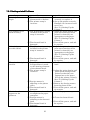
7. Troubleshooting································································································ 30
7-1. Power-on Problems and Errors ······································································· 30
7-2. Cutter-related Problems················································································· 30
7-3. Printing-related Problems ·············································································· 31
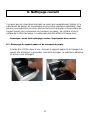
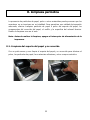
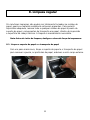
8. Regular Cleaning ······························································································ 32
8-1. Cleaning the Paper Holder and Paper Transport··············································· 32
8-2. Cleaning the Platen Roller ············································································· 33
8-3. Cleaning the Thermal Head ··········································································· 36
8-4. Cleaning the Cutter Blade and Frame ····························································· 37
9. Notes on Use ···································································································· 43
Appendix A: Specifications····················································································· 48
A-1.General Specifications···················································································· 48
A-2.Cutter Specifications······················································································ 50
A-3.Paper Supply Specifications ············································································ 50
A-4.Interface Specifications ·················································································· 50
A-5.Environment Specifications ············································································ 51
A-6.Specifications of Reliability············································································· 52
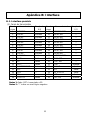
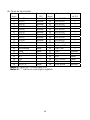
Appendix B: Interface ··························································································· 53
B-1.Parallel Interface ·························································································· 53
B-2.Dual Interface······························································································· 55
B-3.LAN Interface······························································································· 56
B-4.Drawer Kick Connector ·················································································· 58
B-5.Specifications of Power Supply ········································································ 60
Appendix C: Special Modes ···················································································· 61
C-1.Test Printing ································································································ 61
C-2.Hex Dump ···································································································· 62
C-3.Setting Up the Printer ··················································································· 63
C-4.Setup Items ·································································································· 85
C-5.Sample Print ································································································ 91

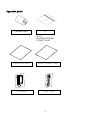
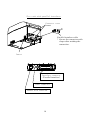
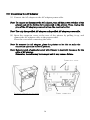
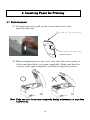
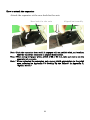
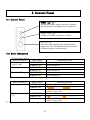
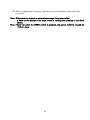
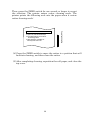
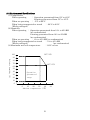
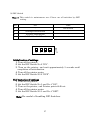
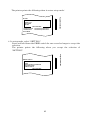
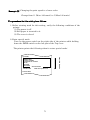
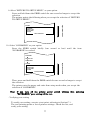
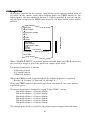
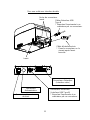
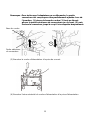
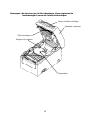
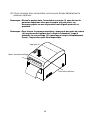
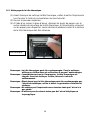
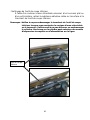
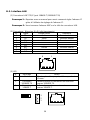
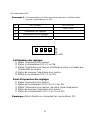
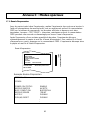
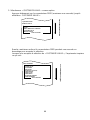
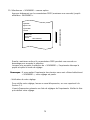
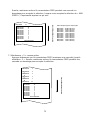
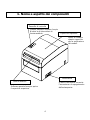
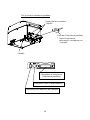
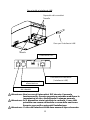
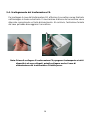
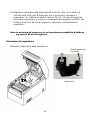
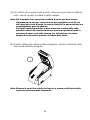
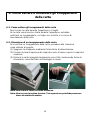
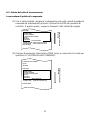
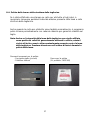
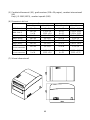
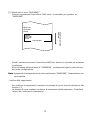
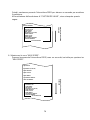
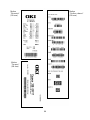
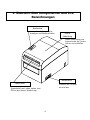
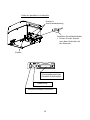
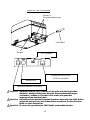
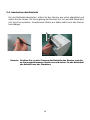
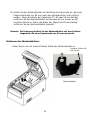
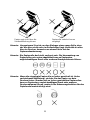
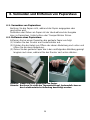
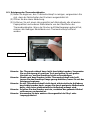
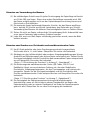
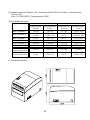
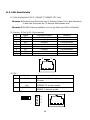
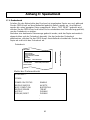
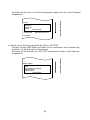
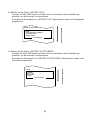
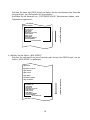
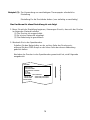
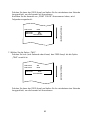
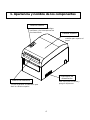
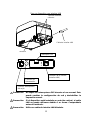
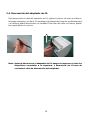
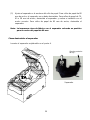
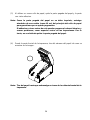
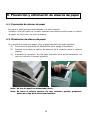
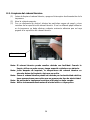
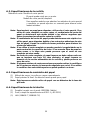
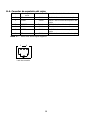
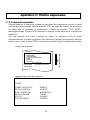
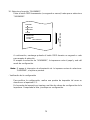
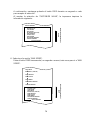
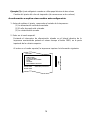
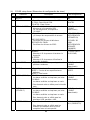
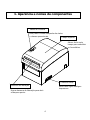
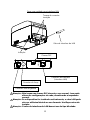
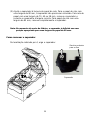
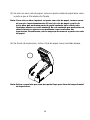
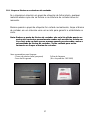
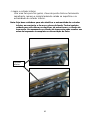
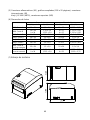
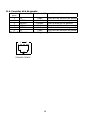
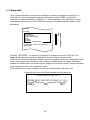
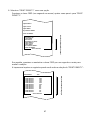
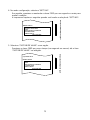
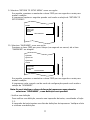
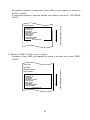
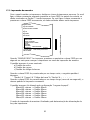
1. Appearance and Names of Components
4
Pull up the release lever to open the
top cover.
This switch turns the
printer power on and off.
Open and close this
cover to replace
forms.
This panel contains status lamps
and operating switches.
Top cover
Release lever
Control panel
Power switch

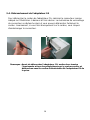
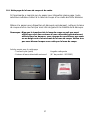
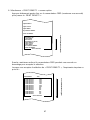
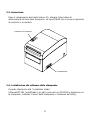
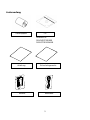
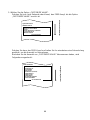
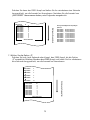
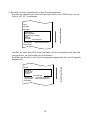
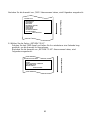
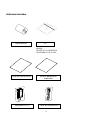
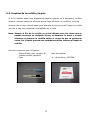
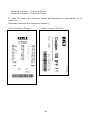
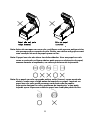
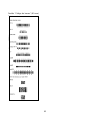
Appended goods
Thermal paper CD
MANUAL
PRINTER DRIVER
UTILITY SOFT
Instruction sheet Safety warranty sheet
AC adapter Power cable
5

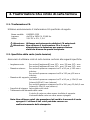
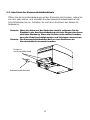
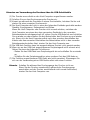
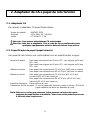
2. AC Adapter and Thermal Roll Paper
2-1. AC adapter
Only use the AC adapter specified below.
Model name: KA02951-0120
Input: 100 to 240V AC, 50/60Hz-
Output: DC24V±5%, 1.5A
Caution: Only use authorized AC adapters.
Caution: Do not use the bundled AC adapter and Power cable for any
electrical equipment other than this printer.
2-2. Paper specification (Thermal paper)
Be sure to use thermal roll paper that conform to the following specifications.
- Paper width: For paper 83mm wide, 83
0
-1.0
mm 80mm wide, 80
0
-1.0
mm
For paper 60mm wide, 60
0
-1.0
mm 58mm wide, 58
0
-1.0
mm
- Outside diameter: For paper 75 to 90µm thick, 102mm or less
For paper 90 to 150µm thick, 90mm or less
- Core diameter: For paper 75 to 90 m thick, 12±0.5mm (inside)
/18±0.5mm (outside)
For paper 90 to 150µm thick, 25.4±0.5mm (inside)
/32±0.5mm (outside)
- Printed surface: Outside of the roll
- Treatment of end of paper: The roll paper must not be glued to the core. The
end of the paper must also not be folded back.
Note: Do not use rolls that have rough sides or sides from which pieces of paper
extrude. Using such rolls could cause a printer failure.
6

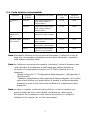
7
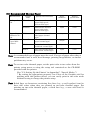
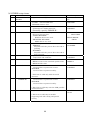
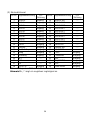
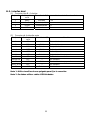
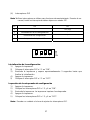
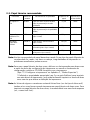
2-3. Recommended Thermal Paper
Manufacturer Product
name
Quality characteristics Paper
thickness
Density
specification
PD160R Monochrome thermal
paper (high-grade
preservation type)
75m
100% Oji Paper Co.,
Ltd.
PD190R Monochrome thermal
paper (mid-grade
preservation type)
75m
100%
Nippon Paper
Industries Co.,
Ltd.
HD75 Monochrome thermal
label paper (normal
type)
150m
130%
P220AE-1 Monochrome thermal
paper (normal type)
150m
100%
PB670 Two-color thermal paper
(red/black: normal type)
75m
105%
Mitsubishi
Paper Mills
Limited
PB770 Two-color thermal paper
(blue/black: normal type)
75m
100%
Note: A recommended type of paper must be used. If a type of paper other than a
recommended one is used, head damage, printing irregularities, or similar
problems may occur.
Note: To use two-color thermal paper, set the print color to two colors from the
printer setup menu or using the setup tool contained on the CD-ROM
provided with the printer.
(See "C-3 Setting Up the Printer" in Appendix C, "Special Modes.")
* By setting the appropriate property (use Color on the Graphics tab) for
printing with this printer driver, you can easily print in two-color mode
without having to change the printer setup.
Note: Ruled lines or characters containing fine lines (e.g. a serif typeface) tend to
have dull colors when they are printed on two-color thermal paper. For
printing on two-color thermal paper, a thick font (e.g., a sans serif font) is
recommended.

8
Note: Red or blue printing on two-color thermal paper has an inferior preservation
characteristic that is equivalent to that of normal thermal paper.
Note :Printouts on label paper or thick paper may contain blurs or voids, depending
on the humidity and other environmental conditions. Adjust the print speed
and print density as appropriate for the type of paper used. (See "C-3 Setting
Up the Printer" in Appendix C, "Special Modes.")
In particular, note that the paper transport accuracy may be negatively
affected by printing a barcode in the top margin at the beginning of paper
transport or in the Lower margin at the end of paper transport.

9
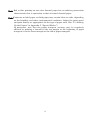
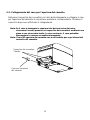
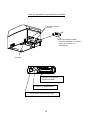
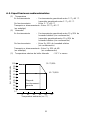
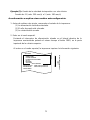
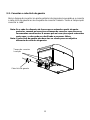
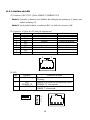
3. Preparations
No printer cable is provided with the product. Obtain a printer cable
suitable for the product interface. If you have any questions, consult your
dealer. Before connecting or disconnecting cables, make sure of the
following:
1) The power to the printer and all other devices connected to the
printer is turned off.
2) The AC adapter power cable has been unplugged from the outlet.
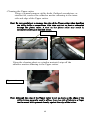
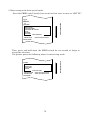
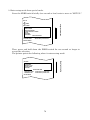
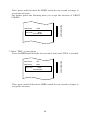
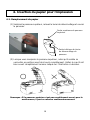
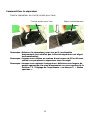
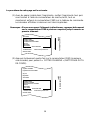
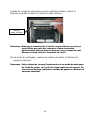
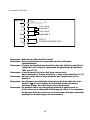
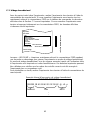
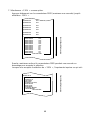
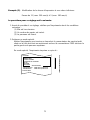
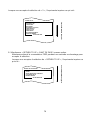
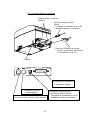
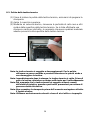
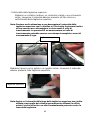
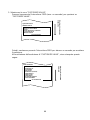
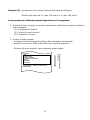
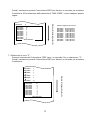
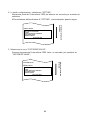
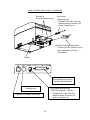
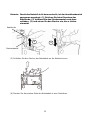
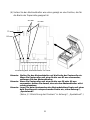
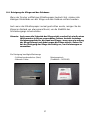
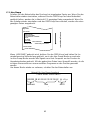
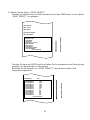
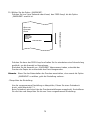
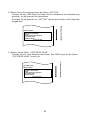
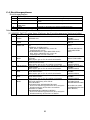
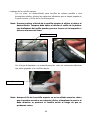
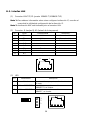
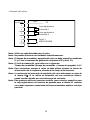
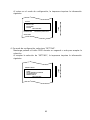
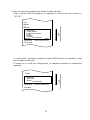
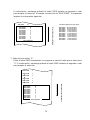
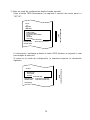
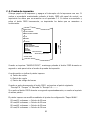
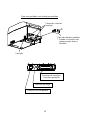
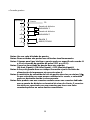
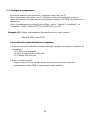
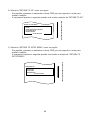
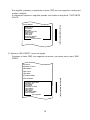
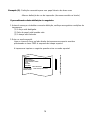
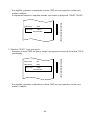
3-1. Connecting Interface Cable
Open the c
onnector cover at the rear of the printer
by pulling it up, and
connect the interface cable to its rear connector socket. Close the cover after
connecting the cable.
Note: If cables are arranged so that they extend from the rear or from the rear on the
right side, remove the inserts in the connector cover or the cover with nippers
or a similar tool. Unless the inserts are removed in this case, the cables may be
damaged and cause a failure.

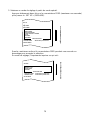
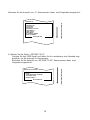
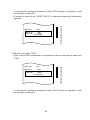
For a unit with parallel interfaces
Connector cover
Insert
Parallel interface cable
* Secure the connector with
clasps after making the
connection.
Insert
Interface connector
(Parallel interface)
Power connector
Drawer kick connector
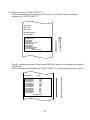
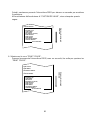
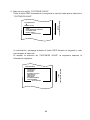
10

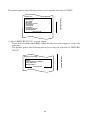
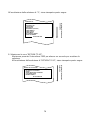
Insert
Connector cover
Insert
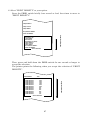
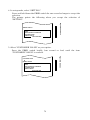
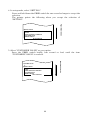
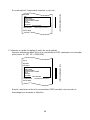
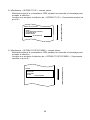
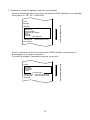
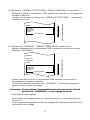
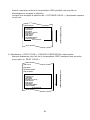
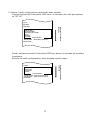
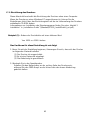
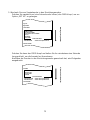
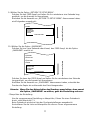
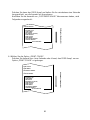
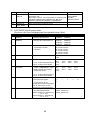
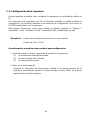
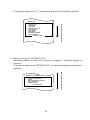
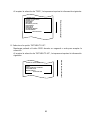
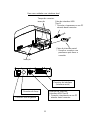
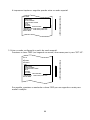
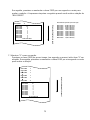
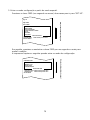
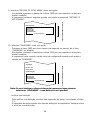
For a unit with Du
al interface
Serial interface cable
* Secure the connector wit
h
screws after making the
connection.
USB Interface Cable
Type-B
* Connect the printer to a PC
through this connector.
Interface connector
(Serial interface)
Interface Connector
(USB Interface Type-B)
* Connect the printer to a PC
through this connector.
Power connector
Drawer kick connector
11

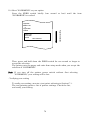
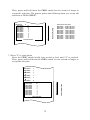
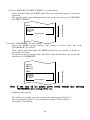
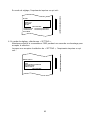
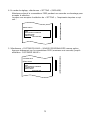
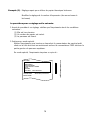
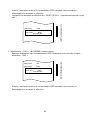
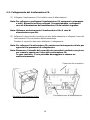
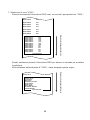
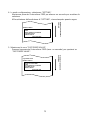
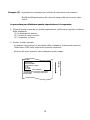
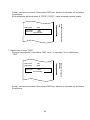
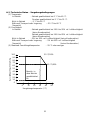
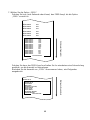
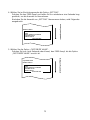
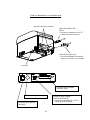
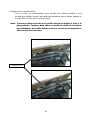
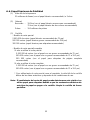
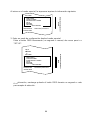
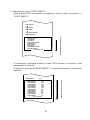
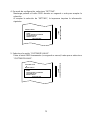
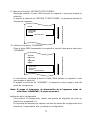
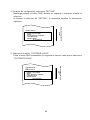
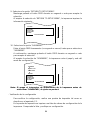
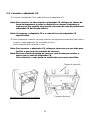
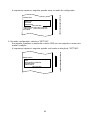
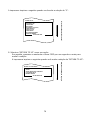
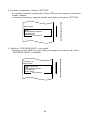
For a unit with LAN interface
Connector cover
Insert
12
Power connector
Drawer kick connector
Interface connector
(LAN interface)
LAN interface cable
Insert
DIP Switch
Caution: Do not touch the DIP switches during normal use. This may
change the network settings, disabling normal printing.
Caution: If the device is installed vertically, the LAN cable may not usable
due to its shape. Please check before installing.
Caution: The LAN interface cable must use the shield type.

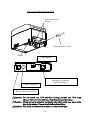
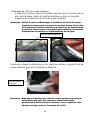
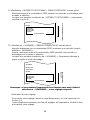
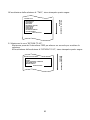
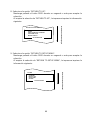
3-2. Connecting the drawer kick cable
Open the connector cover at the rear of the printer by pulling it up, and
connect the drawer kick cable to its rear connector socket. Close the cover
after connecting the cable.
Note : If the cable is arranged so that it extends from the rear, remove the inserts
in the connector cover with nippers or a similar tool. Unless the inserts are
removed in this case, the cable may be damaged and cause a failure.
Note : The drawer kick cable must not be used for a purpose other than for control
of the drawer.
Drawer kick cable
Connector cover
Insert
13

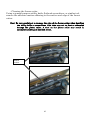
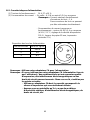
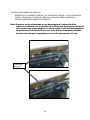
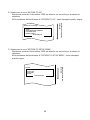
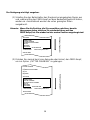
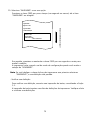
3-3. Connecting the AC Adapter
(1) Connect the AC adapter to the AC adapter power cable.
Note: To connect or disconnect the AC adapter, turn off the power switches of the
printer and all the devices to be connected to the printer. Then, unplug the
plug of the AC adapter power cable from the electrical outlet.
Note: Use only the specified AC adapter and specified AC adapter power cable.
(2) Open the connector cover at the rear of the printer by pulling it up, and
connect the AC adapter cable to the power socket.
Close the cover after connecting the cable.
Note: To connect the AC adaptor, place the printer on its side to make the
connection operation easier to perform.
Note: Remove notch of connector cover with Nipper, to maintain the space for the
cable of AC adapter.
Otherwise, the cable may be damaged and it way cause a failure.
Connector cover
14
Printer placed on its side
Power connector

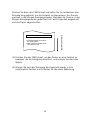
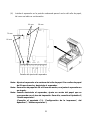
Note: To prevent the adaptor from slipping out, the connector section is
designed to be tight to fit. When inserting, (1) pinch the base of the cable,
(2) while sliding the outer section of the connector upwards, (3) and
insert the connector until it locks in place with a “click” sound.
15
Base of the cable
1
2
3
Outer section of
the connector
(3) Connect the plug of the power cable to electrical outlet.
(4) Plug the other end of the power cord into the power outlet.

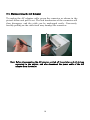
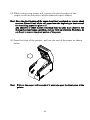
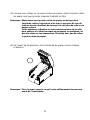
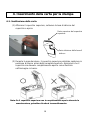
3-4. Disconnecting the AC Adapter
T
o unplug the AC adapte
r cable, grasp the connector as shown in the
picture below and pull it out. The lock mechanism of the connector will
then disengage, and the cable can be unplugged easily. Conversely,
forcibly pulling on the cable itself may damage the connector.
Note: Before disconnecting the AC adapter, switch off the printer and all devices
connected to the printer, and also disconnect the power cable of the AC
adapter from the outlet.
16

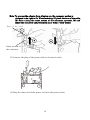
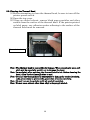
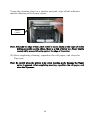
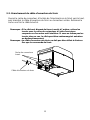
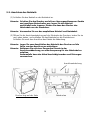
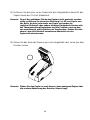
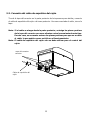
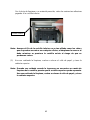
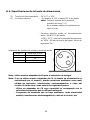
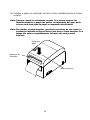
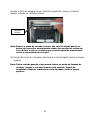
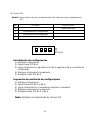
3-5. Turning on the Power
After the AC adapter is connected, turn on the power switch at the side of
the printer. The POWER lamp on the control panel lights.
Control panel
Power switch
3-6. Installing the Printer Software
Referring to the "Installation Guide"
(\Manuals\PT390_InstallGuide1_en.pdf) contained on
the CD-ROM provided with the printer, install the printer driver and
utility software.
17

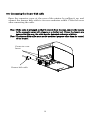
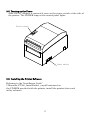
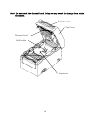
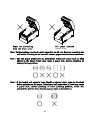
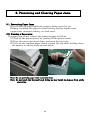
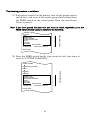
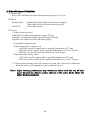
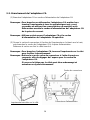
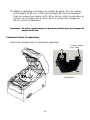
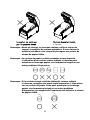
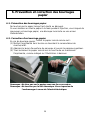
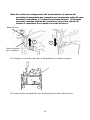
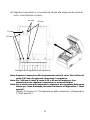
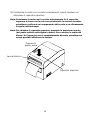
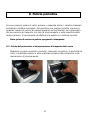
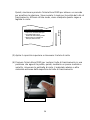
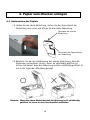
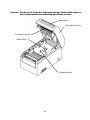
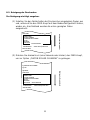
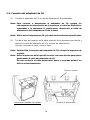
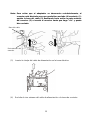
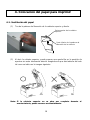
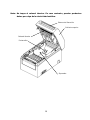
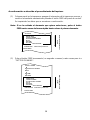
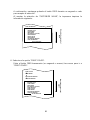
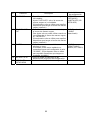
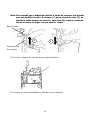
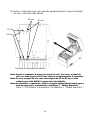
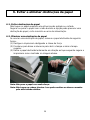
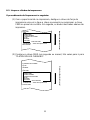
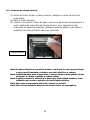
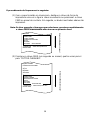
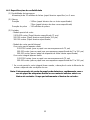
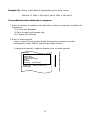
4. Inserting Paper for Printing
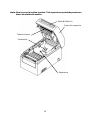
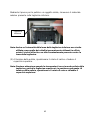
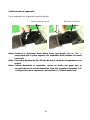
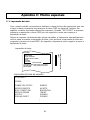
4-1. Replacing paper
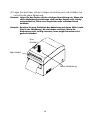
(1) Grasp the top cover, pull up the cover release lever, and
open the top cover.
18
▲
▼
Bottom part of the cover
release lever
Top part of the top cover
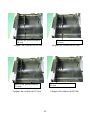
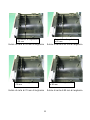
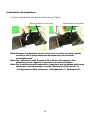
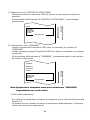
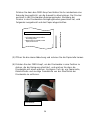
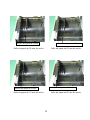
(2) When manipulating the top cover, note that the cover seems to
lock in p
osition before it is open completely. Make sure that the
cover is really open completely as shown in the picture below.
Note: If the top cover is not open completely during maintenance, it may close
inadvertently.
La pagina si sta caricando...
La pagina si sta caricando...
La pagina si sta caricando...
La pagina si sta caricando...
La pagina si sta caricando...
La pagina si sta caricando...
La pagina si sta caricando...
La pagina si sta caricando...
La pagina si sta caricando...
La pagina si sta caricando...
La pagina si sta caricando...
La pagina si sta caricando...
La pagina si sta caricando...
La pagina si sta caricando...
La pagina si sta caricando...
La pagina si sta caricando...
La pagina si sta caricando...
La pagina si sta caricando...
La pagina si sta caricando...
La pagina si sta caricando...
La pagina si sta caricando...
La pagina si sta caricando...
La pagina si sta caricando...
La pagina si sta caricando...
La pagina si sta caricando...
La pagina si sta caricando...
La pagina si sta caricando...
La pagina si sta caricando...
La pagina si sta caricando...
La pagina si sta caricando...
La pagina si sta caricando...
La pagina si sta caricando...
La pagina si sta caricando...
La pagina si sta caricando...
La pagina si sta caricando...
La pagina si sta caricando...
La pagina si sta caricando...
La pagina si sta caricando...
La pagina si sta caricando...
La pagina si sta caricando...
La pagina si sta caricando...
La pagina si sta caricando...
La pagina si sta caricando...
La pagina si sta caricando...
La pagina si sta caricando...
La pagina si sta caricando...
La pagina si sta caricando...
La pagina si sta caricando...
La pagina si sta caricando...
La pagina si sta caricando...
La pagina si sta caricando...
La pagina si sta caricando...
La pagina si sta caricando...
La pagina si sta caricando...
La pagina si sta caricando...
La pagina si sta caricando...
La pagina si sta caricando...
La pagina si sta caricando...
La pagina si sta caricando...
La pagina si sta caricando...
La pagina si sta caricando...
La pagina si sta caricando...
La pagina si sta caricando...
La pagina si sta caricando...
La pagina si sta caricando...
La pagina si sta caricando...
La pagina si sta caricando...
La pagina si sta caricando...
La pagina si sta caricando...
La pagina si sta caricando...
La pagina si sta caricando...
La pagina si sta caricando...
La pagina si sta caricando...
La pagina si sta caricando...
La pagina si sta caricando...
La pagina si sta caricando...
La pagina si sta caricando...
La pagina si sta caricando...
La pagina si sta caricando...
La pagina si sta caricando...
La pagina si sta caricando...
La pagina si sta caricando...
La pagina si sta caricando...
La pagina si sta caricando...
La pagina si sta caricando...
La pagina si sta caricando...
La pagina si sta caricando...
La pagina si sta caricando...
La pagina si sta caricando...
La pagina si sta caricando...
La pagina si sta caricando...
La pagina si sta caricando...
La pagina si sta caricando...
La pagina si sta caricando...
La pagina si sta caricando...
La pagina si sta caricando...
La pagina si sta caricando...
La pagina si sta caricando...
La pagina si sta caricando...
La pagina si sta caricando...
La pagina si sta caricando...
La pagina si sta caricando...
La pagina si sta caricando...
La pagina si sta caricando...
La pagina si sta caricando...
La pagina si sta caricando...
La pagina si sta caricando...
La pagina si sta caricando...
La pagina si sta caricando...
La pagina si sta caricando...
La pagina si sta caricando...
La pagina si sta caricando...
La pagina si sta caricando...
La pagina si sta caricando...
La pagina si sta caricando...
La pagina si sta caricando...
La pagina si sta caricando...
La pagina si sta caricando...
La pagina si sta caricando...
La pagina si sta caricando...
La pagina si sta caricando...
La pagina si sta caricando...
La pagina si sta caricando...
La pagina si sta caricando...
La pagina si sta caricando...
La pagina si sta caricando...
La pagina si sta caricando...
La pagina si sta caricando...
La pagina si sta caricando...
La pagina si sta caricando...
La pagina si sta caricando...
La pagina si sta caricando...
La pagina si sta caricando...
La pagina si sta caricando...
La pagina si sta caricando...
La pagina si sta caricando...
La pagina si sta caricando...
La pagina si sta caricando...
La pagina si sta caricando...
La pagina si sta caricando...
La pagina si sta caricando...
La pagina si sta caricando...
La pagina si sta caricando...
La pagina si sta caricando...
La pagina si sta caricando...
La pagina si sta caricando...
La pagina si sta caricando...
La pagina si sta caricando...
La pagina si sta caricando...
La pagina si sta caricando...
La pagina si sta caricando...
La pagina si sta caricando...
La pagina si sta caricando...
La pagina si sta caricando...
La pagina si sta caricando...
La pagina si sta caricando...
La pagina si sta caricando...
La pagina si sta caricando...
La pagina si sta caricando...
La pagina si sta caricando...
La pagina si sta caricando...
La pagina si sta caricando...
La pagina si sta caricando...
La pagina si sta caricando...
La pagina si sta caricando...
La pagina si sta caricando...
La pagina si sta caricando...
La pagina si sta caricando...
La pagina si sta caricando...
La pagina si sta caricando...
La pagina si sta caricando...
La pagina si sta caricando...
La pagina si sta caricando...
La pagina si sta caricando...
La pagina si sta caricando...
La pagina si sta caricando...
La pagina si sta caricando...
La pagina si sta caricando...
La pagina si sta caricando...
La pagina si sta caricando...
La pagina si sta caricando...
La pagina si sta caricando...
La pagina si sta caricando...
La pagina si sta caricando...
La pagina si sta caricando...
La pagina si sta caricando...
La pagina si sta caricando...
La pagina si sta caricando...
La pagina si sta caricando...
La pagina si sta caricando...
La pagina si sta caricando...
La pagina si sta caricando...
La pagina si sta caricando...
La pagina si sta caricando...
La pagina si sta caricando...
La pagina si sta caricando...
La pagina si sta caricando...
La pagina si sta caricando...
La pagina si sta caricando...
La pagina si sta caricando...
La pagina si sta caricando...
La pagina si sta caricando...
La pagina si sta caricando...
La pagina si sta caricando...
La pagina si sta caricando...
La pagina si sta caricando...
La pagina si sta caricando...
La pagina si sta caricando...
La pagina si sta caricando...
La pagina si sta caricando...
La pagina si sta caricando...
La pagina si sta caricando...
La pagina si sta caricando...
La pagina si sta caricando...
La pagina si sta caricando...
La pagina si sta caricando...
La pagina si sta caricando...
La pagina si sta caricando...
La pagina si sta caricando...
La pagina si sta caricando...
La pagina si sta caricando...
La pagina si sta caricando...
La pagina si sta caricando...
La pagina si sta caricando...
La pagina si sta caricando...
La pagina si sta caricando...
La pagina si sta caricando...
La pagina si sta caricando...
La pagina si sta caricando...
La pagina si sta caricando...
La pagina si sta caricando...
La pagina si sta caricando...
La pagina si sta caricando...
La pagina si sta caricando...
La pagina si sta caricando...
La pagina si sta caricando...
La pagina si sta caricando...
La pagina si sta caricando...
La pagina si sta caricando...
La pagina si sta caricando...
La pagina si sta caricando...
La pagina si sta caricando...
La pagina si sta caricando...
La pagina si sta caricando...
La pagina si sta caricando...
La pagina si sta caricando...
La pagina si sta caricando...
La pagina si sta caricando...
La pagina si sta caricando...
La pagina si sta caricando...
La pagina si sta caricando...
La pagina si sta caricando...
La pagina si sta caricando...
La pagina si sta caricando...
La pagina si sta caricando...
La pagina si sta caricando...
La pagina si sta caricando...
La pagina si sta caricando...
La pagina si sta caricando...
La pagina si sta caricando...
La pagina si sta caricando...
La pagina si sta caricando...
La pagina si sta caricando...
La pagina si sta caricando...
La pagina si sta caricando...
La pagina si sta caricando...
La pagina si sta caricando...
La pagina si sta caricando...
La pagina si sta caricando...
La pagina si sta caricando...
La pagina si sta caricando...
La pagina si sta caricando...
La pagina si sta caricando...
La pagina si sta caricando...
La pagina si sta caricando...
La pagina si sta caricando...
La pagina si sta caricando...
La pagina si sta caricando...
La pagina si sta caricando...
La pagina si sta caricando...
La pagina si sta caricando...
La pagina si sta caricando...
La pagina si sta caricando...
La pagina si sta caricando...
La pagina si sta caricando...
La pagina si sta caricando...
La pagina si sta caricando...
La pagina si sta caricando...
La pagina si sta caricando...
La pagina si sta caricando...
La pagina si sta caricando...
La pagina si sta caricando...
La pagina si sta caricando...
La pagina si sta caricando...
La pagina si sta caricando...
La pagina si sta caricando...
La pagina si sta caricando...
La pagina si sta caricando...
La pagina si sta caricando...
La pagina si sta caricando...
La pagina si sta caricando...
La pagina si sta caricando...
La pagina si sta caricando...
La pagina si sta caricando...
La pagina si sta caricando...
La pagina si sta caricando...
La pagina si sta caricando...
La pagina si sta caricando...
La pagina si sta caricando...
La pagina si sta caricando...
La pagina si sta caricando...
La pagina si sta caricando...
La pagina si sta caricando...
La pagina si sta caricando...
La pagina si sta caricando...
La pagina si sta caricando...
La pagina si sta caricando...
La pagina si sta caricando...
La pagina si sta caricando...
La pagina si sta caricando...
La pagina si sta caricando...
La pagina si sta caricando...
La pagina si sta caricando...
La pagina si sta caricando...
La pagina si sta caricando...
La pagina si sta caricando...
La pagina si sta caricando...
La pagina si sta caricando...
La pagina si sta caricando...
La pagina si sta caricando...
La pagina si sta caricando...
La pagina si sta caricando...
La pagina si sta caricando...
La pagina si sta caricando...
La pagina si sta caricando...
La pagina si sta caricando...
La pagina si sta caricando...
La pagina si sta caricando...
La pagina si sta caricando...
La pagina si sta caricando...
La pagina si sta caricando...
La pagina si sta caricando...
La pagina si sta caricando...
La pagina si sta caricando...
La pagina si sta caricando...
La pagina si sta caricando...
La pagina si sta caricando...
La pagina si sta caricando...
La pagina si sta caricando...
La pagina si sta caricando...
La pagina si sta caricando...
La pagina si sta caricando...
La pagina si sta caricando...
La pagina si sta caricando...
La pagina si sta caricando...
La pagina si sta caricando...
La pagina si sta caricando...
La pagina si sta caricando...
La pagina si sta caricando...
La pagina si sta caricando...
La pagina si sta caricando...
La pagina si sta caricando...
La pagina si sta caricando...
La pagina si sta caricando...
La pagina si sta caricando...
La pagina si sta caricando...
La pagina si sta caricando...
La pagina si sta caricando...
La pagina si sta caricando...
La pagina si sta caricando...
La pagina si sta caricando...
La pagina si sta caricando...
La pagina si sta caricando...
La pagina si sta caricando...
La pagina si sta caricando...
La pagina si sta caricando...
La pagina si sta caricando...
La pagina si sta caricando...
La pagina si sta caricando...
La pagina si sta caricando...
La pagina si sta caricando...
La pagina si sta caricando...
La pagina si sta caricando...
La pagina si sta caricando...
La pagina si sta caricando...
La pagina si sta caricando...
La pagina si sta caricando...
La pagina si sta caricando...
La pagina si sta caricando...
La pagina si sta caricando...
La pagina si sta caricando...
La pagina si sta caricando...
La pagina si sta caricando...
La pagina si sta caricando...
La pagina si sta caricando...
La pagina si sta caricando...
La pagina si sta caricando...
La pagina si sta caricando...
La pagina si sta caricando...
La pagina si sta caricando...
La pagina si sta caricando...
La pagina si sta caricando...
La pagina si sta caricando...
La pagina si sta caricando...
La pagina si sta caricando...
La pagina si sta caricando...
La pagina si sta caricando...
La pagina si sta caricando...
La pagina si sta caricando...
La pagina si sta caricando...
La pagina si sta caricando...
La pagina si sta caricando...
La pagina si sta caricando...
La pagina si sta caricando...
La pagina si sta caricando...
La pagina si sta caricando...
La pagina si sta caricando...
La pagina si sta caricando...
La pagina si sta caricando...
La pagina si sta caricando...
La pagina si sta caricando...
La pagina si sta caricando...
La pagina si sta caricando...
La pagina si sta caricando...
La pagina si sta caricando...
La pagina si sta caricando...
La pagina si sta caricando...
La pagina si sta caricando...
La pagina si sta caricando...
La pagina si sta caricando...
La pagina si sta caricando...
La pagina si sta caricando...
La pagina si sta caricando...
La pagina si sta caricando...
La pagina si sta caricando...
La pagina si sta caricando...
La pagina si sta caricando...
La pagina si sta caricando...
La pagina si sta caricando...
La pagina si sta caricando...
La pagina si sta caricando...
La pagina si sta caricando...
La pagina si sta caricando...
La pagina si sta caricando...
La pagina si sta caricando...
La pagina si sta caricando...
La pagina si sta caricando...
La pagina si sta caricando...
La pagina si sta caricando...
La pagina si sta caricando...
La pagina si sta caricando...
La pagina si sta caricando...
La pagina si sta caricando...
La pagina si sta caricando...
La pagina si sta caricando...
La pagina si sta caricando...
La pagina si sta caricando...
La pagina si sta caricando...
La pagina si sta caricando...
La pagina si sta caricando...
La pagina si sta caricando...
La pagina si sta caricando...
La pagina si sta caricando...
La pagina si sta caricando...
La pagina si sta caricando...
La pagina si sta caricando...
La pagina si sta caricando...
La pagina si sta caricando...
La pagina si sta caricando...
La pagina si sta caricando...
La pagina si sta caricando...
La pagina si sta caricando...
La pagina si sta caricando...
La pagina si sta caricando...
La pagina si sta caricando...
La pagina si sta caricando...
La pagina si sta caricando...
La pagina si sta caricando...
La pagina si sta caricando...
La pagina si sta caricando...
La pagina si sta caricando...
La pagina si sta caricando...
La pagina si sta caricando...
La pagina si sta caricando...
La pagina si sta caricando...
La pagina si sta caricando...
La pagina si sta caricando...
La pagina si sta caricando...
La pagina si sta caricando...
La pagina si sta caricando...
La pagina si sta caricando...
La pagina si sta caricando...
La pagina si sta caricando...
La pagina si sta caricando...
La pagina si sta caricando...
La pagina si sta caricando...
La pagina si sta caricando...
La pagina si sta caricando...
La pagina si sta caricando...
La pagina si sta caricando...
La pagina si sta caricando...
La pagina si sta caricando...
La pagina si sta caricando...
La pagina si sta caricando...
La pagina si sta caricando...
La pagina si sta caricando...
La pagina si sta caricando...
La pagina si sta caricando...
La pagina si sta caricando...
La pagina si sta caricando...
La pagina si sta caricando...
La pagina si sta caricando...
La pagina si sta caricando...
La pagina si sta caricando...
La pagina si sta caricando...
La pagina si sta caricando...
La pagina si sta caricando...
La pagina si sta caricando...
La pagina si sta caricando...
La pagina si sta caricando...
La pagina si sta caricando...
La pagina si sta caricando...
La pagina si sta caricando...
La pagina si sta caricando...
La pagina si sta caricando...
La pagina si sta caricando...
La pagina si sta caricando...
La pagina si sta caricando...
La pagina si sta caricando...
La pagina si sta caricando...
La pagina si sta caricando...
La pagina si sta caricando...
La pagina si sta caricando...
La pagina si sta caricando...
La pagina si sta caricando...
La pagina si sta caricando...
La pagina si sta caricando...
La pagina si sta caricando...
La pagina si sta caricando...
La pagina si sta caricando...
La pagina si sta caricando...
La pagina si sta caricando...
La pagina si sta caricando...
La pagina si sta caricando...
La pagina si sta caricando...
La pagina si sta caricando...
La pagina si sta caricando...
La pagina si sta caricando...
La pagina si sta caricando...
La pagina si sta caricando...
La pagina si sta caricando...
La pagina si sta caricando...
La pagina si sta caricando...
La pagina si sta caricando...
La pagina si sta caricando...
La pagina si sta caricando...
La pagina si sta caricando...
La pagina si sta caricando...
La pagina si sta caricando...
La pagina si sta caricando...
La pagina si sta caricando...
La pagina si sta caricando...
La pagina si sta caricando...
La pagina si sta caricando...
La pagina si sta caricando...
La pagina si sta caricando...
La pagina si sta caricando...
La pagina si sta caricando...
La pagina si sta caricando...
-
 1
1
-
 2
2
-
 3
3
-
 4
4
-
 5
5
-
 6
6
-
 7
7
-
 8
8
-
 9
9
-
 10
10
-
 11
11
-
 12
12
-
 13
13
-
 14
14
-
 15
15
-
 16
16
-
 17
17
-
 18
18
-
 19
19
-
 20
20
-
 21
21
-
 22
22
-
 23
23
-
 24
24
-
 25
25
-
 26
26
-
 27
27
-
 28
28
-
 29
29
-
 30
30
-
 31
31
-
 32
32
-
 33
33
-
 34
34
-
 35
35
-
 36
36
-
 37
37
-
 38
38
-
 39
39
-
 40
40
-
 41
41
-
 42
42
-
 43
43
-
 44
44
-
 45
45
-
 46
46
-
 47
47
-
 48
48
-
 49
49
-
 50
50
-
 51
51
-
 52
52
-
 53
53
-
 54
54
-
 55
55
-
 56
56
-
 57
57
-
 58
58
-
 59
59
-
 60
60
-
 61
61
-
 62
62
-
 63
63
-
 64
64
-
 65
65
-
 66
66
-
 67
67
-
 68
68
-
 69
69
-
 70
70
-
 71
71
-
 72
72
-
 73
73
-
 74
74
-
 75
75
-
 76
76
-
 77
77
-
 78
78
-
 79
79
-
 80
80
-
 81
81
-
 82
82
-
 83
83
-
 84
84
-
 85
85
-
 86
86
-
 87
87
-
 88
88
-
 89
89
-
 90
90
-
 91
91
-
 92
92
-
 93
93
-
 94
94
-
 95
95
-
 96
96
-
 97
97
-
 98
98
-
 99
99
-
 100
100
-
 101
101
-
 102
102
-
 103
103
-
 104
104
-
 105
105
-
 106
106
-
 107
107
-
 108
108
-
 109
109
-
 110
110
-
 111
111
-
 112
112
-
 113
113
-
 114
114
-
 115
115
-
 116
116
-
 117
117
-
 118
118
-
 119
119
-
 120
120
-
 121
121
-
 122
122
-
 123
123
-
 124
124
-
 125
125
-
 126
126
-
 127
127
-
 128
128
-
 129
129
-
 130
130
-
 131
131
-
 132
132
-
 133
133
-
 134
134
-
 135
135
-
 136
136
-
 137
137
-
 138
138
-
 139
139
-
 140
140
-
 141
141
-
 142
142
-
 143
143
-
 144
144
-
 145
145
-
 146
146
-
 147
147
-
 148
148
-
 149
149
-
 150
150
-
 151
151
-
 152
152
-
 153
153
-
 154
154
-
 155
155
-
 156
156
-
 157
157
-
 158
158
-
 159
159
-
 160
160
-
 161
161
-
 162
162
-
 163
163
-
 164
164
-
 165
165
-
 166
166
-
 167
167
-
 168
168
-
 169
169
-
 170
170
-
 171
171
-
 172
172
-
 173
173
-
 174
174
-
 175
175
-
 176
176
-
 177
177
-
 178
178
-
 179
179
-
 180
180
-
 181
181
-
 182
182
-
 183
183
-
 184
184
-
 185
185
-
 186
186
-
 187
187
-
 188
188
-
 189
189
-
 190
190
-
 191
191
-
 192
192
-
 193
193
-
 194
194
-
 195
195
-
 196
196
-
 197
197
-
 198
198
-
 199
199
-
 200
200
-
 201
201
-
 202
202
-
 203
203
-
 204
204
-
 205
205
-
 206
206
-
 207
207
-
 208
208
-
 209
209
-
 210
210
-
 211
211
-
 212
212
-
 213
213
-
 214
214
-
 215
215
-
 216
216
-
 217
217
-
 218
218
-
 219
219
-
 220
220
-
 221
221
-
 222
222
-
 223
223
-
 224
224
-
 225
225
-
 226
226
-
 227
227
-
 228
228
-
 229
229
-
 230
230
-
 231
231
-
 232
232
-
 233
233
-
 234
234
-
 235
235
-
 236
236
-
 237
237
-
 238
238
-
 239
239
-
 240
240
-
 241
241
-
 242
242
-
 243
243
-
 244
244
-
 245
245
-
 246
246
-
 247
247
-
 248
248
-
 249
249
-
 250
250
-
 251
251
-
 252
252
-
 253
253
-
 254
254
-
 255
255
-
 256
256
-
 257
257
-
 258
258
-
 259
259
-
 260
260
-
 261
261
-
 262
262
-
 263
263
-
 264
264
-
 265
265
-
 266
266
-
 267
267
-
 268
268
-
 269
269
-
 270
270
-
 271
271
-
 272
272
-
 273
273
-
 274
274
-
 275
275
-
 276
276
-
 277
277
-
 278
278
-
 279
279
-
 280
280
-
 281
281
-
 282
282
-
 283
283
-
 284
284
-
 285
285
-
 286
286
-
 287
287
-
 288
288
-
 289
289
-
 290
290
-
 291
291
-
 292
292
-
 293
293
-
 294
294
-
 295
295
-
 296
296
-
 297
297
-
 298
298
-
 299
299
-
 300
300
-
 301
301
-
 302
302
-
 303
303
-
 304
304
-
 305
305
-
 306
306
-
 307
307
-
 308
308
-
 309
309
-
 310
310
-
 311
311
-
 312
312
-
 313
313
-
 314
314
-
 315
315
-
 316
316
-
 317
317
-
 318
318
-
 319
319
-
 320
320
-
 321
321
-
 322
322
-
 323
323
-
 324
324
-
 325
325
-
 326
326
-
 327
327
-
 328
328
-
 329
329
-
 330
330
-
 331
331
-
 332
332
-
 333
333
-
 334
334
-
 335
335
-
 336
336
-
 337
337
-
 338
338
-
 339
339
-
 340
340
-
 341
341
-
 342
342
-
 343
343
-
 344
344
-
 345
345
-
 346
346
-
 347
347
-
 348
348
-
 349
349
-
 350
350
-
 351
351
-
 352
352
-
 353
353
-
 354
354
-
 355
355
-
 356
356
-
 357
357
-
 358
358
-
 359
359
-
 360
360
-
 361
361
-
 362
362
-
 363
363
-
 364
364
-
 365
365
-
 366
366
-
 367
367
-
 368
368
-
 369
369
-
 370
370
-
 371
371
-
 372
372
-
 373
373
-
 374
374
-
 375
375
-
 376
376
-
 377
377
-
 378
378
-
 379
379
-
 380
380
-
 381
381
-
 382
382
-
 383
383
-
 384
384
-
 385
385
-
 386
386
-
 387
387
-
 388
388
-
 389
389
-
 390
390
-
 391
391
-
 392
392
-
 393
393
-
 394
394
-
 395
395
-
 396
396
-
 397
397
-
 398
398
-
 399
399
-
 400
400
-
 401
401
-
 402
402
-
 403
403
-
 404
404
-
 405
405
-
 406
406
-
 407
407
-
 408
408
-
 409
409
-
 410
410
-
 411
411
-
 412
412
-
 413
413
-
 414
414
-
 415
415
-
 416
416
-
 417
417
-
 418
418
-
 419
419
-
 420
420
-
 421
421
-
 422
422
-
 423
423
-
 424
424
-
 425
425
-
 426
426
-
 427
427
-
 428
428
-
 429
429
-
 430
430
-
 431
431
-
 432
432
-
 433
433
-
 434
434
-
 435
435
-
 436
436
-
 437
437
-
 438
438
-
 439
439
-
 440
440
-
 441
441
-
 442
442
-
 443
443
-
 444
444
-
 445
445
-
 446
446
-
 447
447
-
 448
448
-
 449
449
-
 450
450
-
 451
451
-
 452
452
-
 453
453
-
 454
454
-
 455
455
-
 456
456
-
 457
457
-
 458
458
-
 459
459
-
 460
460
-
 461
461
-
 462
462
-
 463
463
-
 464
464
-
 465
465
-
 466
466
-
 467
467
-
 468
468
-
 469
469
-
 470
470
-
 471
471
-
 472
472
-
 473
473
-
 474
474
-
 475
475
-
 476
476
-
 477
477
-
 478
478
-
 479
479
-
 480
480
-
 481
481
-
 482
482
-
 483
483
-
 484
484
-
 485
485
-
 486
486
-
 487
487
-
 488
488
-
 489
489
-
 490
490
-
 491
491
-
 492
492
-
 493
493
-
 494
494
-
 495
495
-
 496
496
-
 497
497
-
 498
498
-
 499
499
-
 500
500
-
 501
501
-
 502
502
-
 503
503
-
 504
504
-
 505
505
-
 506
506
-
 507
507
-
 508
508
-
 509
509
-
 510
510
-
 511
511
-
 512
512
-
 513
513
-
 514
514
-
 515
515
-
 516
516
-
 517
517
-
 518
518
-
 519
519
-
 520
520
-
 521
521
-
 522
522
-
 523
523
-
 524
524
-
 525
525
-
 526
526
-
 527
527
-
 528
528
-
 529
529
-
 530
530
-
 531
531
-
 532
532
-
 533
533
-
 534
534
-
 535
535
-
 536
536
-
 537
537
-
 538
538
-
 539
539
-
 540
540
-
 541
541
-
 542
542
-
 543
543
-
 544
544
-
 545
545
-
 546
546
-
 547
547
-
 548
548
-
 549
549
-
 550
550
-
 551
551
-
 552
552
-
 553
553
-
 554
554
-
 555
555
-
 556
556
-
 557
557
-
 558
558
-
 559
559
-
 560
560
-
 561
561
-
 562
562
-
 563
563
-
 564
564
-
 565
565
-
 566
566
-
 567
567
-
 568
568
-
 569
569
-
 570
570
-
 571
571
-
 572
572
-
 573
573
-
 574
574
-
 575
575
-
 576
576
-
 577
577
-
 578
578
-
 579
579
-
 580
580
-
 581
581
-
 582
582
-
 583
583
-
 584
584
-
 585
585
-
 586
586
-
 587
587
-
 588
588
-
 589
589


OKI PT390 Guida utente
- Tipo
- Guida utente
- Questo manuale è adatto anche per
in altre lingue
- français: OKI PT390 Mode d'emploi
- español: OKI PT390 Guía del usuario
- Deutsch: OKI PT390 Benutzerhandbuch
- português: OKI PT390 Guia de usuario
Documenti correlati
Altri documenti
-
Tally Dascom DL-210 Guida utente
-
-
Dascom DL-310 Guida utente
-
-
-
Epson ESC specificazione
-
Citizen CBM-1000 Manuale utente
-
Bematech MP-4000 TH Guida Rapida
-
-
Casio SE-C450 Manuale utente