La pagina si sta caricando...

INSTRUCTION MANUAL
WARNING!! Before installing, thoroughly read this manual that is an integral part of this Kit.
QUIKO declines any responsabilità in the event curret stadards in the country of installation are not
comlplied with.
Control Board with Inverter
For Industrial automation
230Vac single phase power supply
230Vac three-phase motor output
QK-CE220RLINV
V02/2019
IMPORTANT NOTICE:
In case of connection of
230V single phase motor,
the motor must be connected
without capacitor.
IMPORTANT NOTICE:
In case of connection of
230V three phase motor,
the motor must be connected
with DELTA connection.

Main features:
Layout description
ü Open and close Frequency of work separately adjustable
ü Acceleration Ramp / adjustable deceleration and slowdown speed
ü Amperometric with obstacle sensitivity adjustable in opening and in closing
ü Logic obstacle inversion adjustable in opening and in closing.
ü Input for safety edge NC / 8.2 kohm
ü Inputs for photocell-safeties in opening and closing
ü Inputs Open / Close / Partial and Step-by-Step
ü Programs modes : automatic, semi-automatic or deadman selectable
ü Inputs status and functions viewable on display
ü Optional plug-in receiver plug-in for the management of fixed code transmitters or
Rolling-code
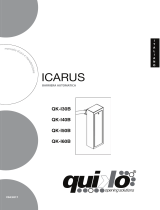
PLACEMENT/
PROGRAMMING
BUTTONS
DISPLAY
230 Vac line
INPUT
Power side input
fuse 10A
TRIPHASE MOTOR
OUTPUT
230 V FLASHING
LIGHT OUTPUT
IMPUT
STATUS LED
IMPUTS
Accessorizes 24 Vac
Terminal
Inputs
www.quikoitaly.com

General Characteristics :
Programming and self-learning via keys (increase, decrease, validation) and a
figures display
Management of three safety devices as photocell, a safety device inclosing and
in opening.
Contact for signaling automation / alarm state
12Vac Contact for control safety / auxiliary functions power
Extractable power and signal Terminals
Predisposed for coupling with filter
Complies with European Directives Reference:
Low Voltage 73/23 / EEC
Electromagnetic Compatibility (EMC) Directive 89/336 / EEC
(NB: only if installed mains filter or equivalent)
FILTER
Specifications:
Power supply 230Vac
Output Motor Three phase230 VAC – Single phase 230 Vac
Three phase motor connection DELTA
Single phase motor connection No capacitor
Motor power 2HP
Environmental conditions -20°C / + 55 °C
Accessories power supply 12-24 VDC/AC – 4 Watt
For higher powers, install an external transformer
Protections:
Motor protected by a fuse and electronic control
Power circuits electronically protected by varistors.
Secondary transformer, protected by self-resetting fuse and transil.
Filter capacitors on the input network
www.quikoitaly.com

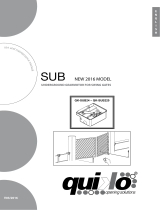
FLASHING LIGHT
M
L N
STOP
CLOSE
OPEN
START
Wiring MOTOR / FLASHING LIGHT/ COMMANDS / SAFETY
DEVICES
ON
1 2 3 4
SW1
P1
P2
P3
1 2 3 4 5 6 7 8
10 11 12 13 14 15 16 17 18 19 20 21 22 23 24 25 26 27 28 29
DL1
DL0
DL2
DL3
DL4
DL5
DL6
DL7
DL8
DL9
DL10
DL11
IN 2
IN 3
IN 4
IN 5
COM +
IN 6
IN 7
IN 8
IN 9
IN 10
IN 11
COM +
12V DC
DS1
- +
24Vdc
www.quikoitaly.com
IMPORTANT NOTICE:
In case of connection of
230V single phase motor,
the motor must be connected
without capacitor.
IMPORTANT NOTICE:
In case of connection of
230V three phase motor,
the motor must be connected
with DELTA connection.

F
C
A
Safety edge F
C
C
SAFETY DEVICES WIRINGS
Barrier/Safety edge in opening Safety photocell
ON
1 2 3 4
SW1
P1
P2
P3
1 2 3 4 5 6 7 8
10 11 12 13 14 15 16 17 18 19 20 21 22 23 24 25 26 27 28 29
DL1
DL0
DL2
DL3
DL4
DL5
DL6
DL7
DL8
DL9
DL10
DL11
IN 2
IN 3
IN 4
IN 5
COM +
IN 6
IN 7
IN 8
IN 9
IN 10
IN 11
COM +
12V DC
88
DS1
- +
24Vdc
www.quikoitaly.com

Terminal numbering / LEDs meaning
1Input Phase Power Supply 230Vac
2Input Neutral Power Supply 230Vac
3Input Ground Power Supply 230Vac
4Output Phase 1 motor
5Output Phase 2 motore
6Output Phase 3 motor
7Output flashing light 230V
8Common flashing light
10 Output voltage con tact NO
11
12 OUTPUT-12Vdc accessoires
13 OUTPUT +12Vdc accessoires (common)
14
OUTPUT Dry contact (NO)
15
16
INPUT safety edge (NC)
LD2
17
INPUT barrier/safety edge in opening (NC)
LD3
18
INPUT START (NO)
LD4
19
INPUT PEDESTRIAN (NO)
LD5
20 Common inputs 12Vdc
21
INPUT safety photocell (NC)
LD6
22 COMMON inputs 12Vdc
23
INPUT STOP (NC)
LD7
24
INPUT OPEN (NO)
LD8
25
INPUT CLOSE (NO)
LD9
26
INPUT OPEN LIMIT SWITCH (NC)
LD10
27
INPUT CLOSE LIMIT SWITCH (NC)
LD11
28
29
LD 0
Led indication discharge of
capacitors.
After disconnecting the power
supply, wait LD0 turns off before
working on the controller.
LD 1
LED ACTIVITY
MICROCONTROLLER
Output - 24Vdc
Output +24Vdc
www.quikoitaly.com
All NC contacts must
be connected (or
bridged if not used).
Once a NC terminal is
bridged/connected the
corresponding LED
will turn ON.
As for NO contacts,
the LED will turn ON
only when giving the
corresponding input
impulse (eg. START
input).

SETTINGS and PROGRAMMING
Verify the direction of rotation of motor
After connecting, unlock the motor , place the door outside the
closing limit switch,
re-lock the engine and give power to the electrical panel.
Use buttons on board having the following features:
P1 key CLOSE
P2 key OPEN
P3 key CONFIRM / SELECT PROGRAMMING PHASE
Check that pressing the P1 the door closes and bring it up
to the closed position, verify that LD11 goes off.
Otherwise reverse ONLY 2 of the 3 motor phases.
Check that on the display DS1 appears the
message =DOOR CLOSED
Check that the LED LD11 related to FCC is off
ü Function 01 - Select type of automation motor
three-phase 230Vac
=PS (Sliding Door / Sectional / Gate).
=PF (Fridge Door).
=PL (Folding Door).
P1
P2
P3
88
DS 1
PROCEDURE:
Press P3 until the display shows and release.
Press again P3 and release.
The display shows = sliding gate.
(NOTE: The sub-menu selection is distinguished from the point after the digit).
If you need to select another type of automation, act on the P2 button to display the
number corresponding to the type of automation desired.
Confirm pressing P3 (at this point will disappear the dots to the left of the digits).
After programming follow the procedure for ESC:
Press P2 (Forward) or P1 (Backward) l you see
Confirm pressing P3.
www.quikoitaly.com

PL
30Hz
Function 02 - Select type of automation motor single-phase 230Vac
=PS (Sliding Door / Sectional / Gate).
=PF (Fridge door).
=PL (Folding door).
PROCEDURE:
Press P3 until appears on the display, then release.
Press P2 (Forward) appears
Press again P3 and release.
On Display appears .= Sliding door.
(NOTE: The sub-menu selection is distinguished from the point after the digit).
If you need to select another type of automation press the P2 button to display the
number corresponding to the type of automation desired.
Confirm with P3.
After programming follow the procedure for ESC:
Press P2 (Forward) or P1 (Backward) until you see
Confirm pressing P3.
Learning of opening and closing work times
Automation in the closed position and check the position of the DIP 4
PROCEDURE:
ü Hold the P3 until the display shows
ü Press start: automation will start in opening
ü Press start when you want to begin slowing down.
ü Arrived on the opening limit switch, automation will stop.
ü Wait until the desired wait time and press start.
ü The automation starts closing.
ü Press start when you want to begin slowing down.
ü Arrived on the opening limit switch, automation will stop.
NOTE: During this phase, the board detects the the current absorption curve,
for the obstacle detection.
PL
30Hz
Closing in slow speed frequency in Hz
PL
50Hz
Opening in slow speed frequency in Hz
PL
50Hz
Closing speed frequency in Hz
Note:
FACTORY SETTING Min/Max Pre-set
Opening speed frequency in Hz 01 ÷99 PS
50Hz
PF
25Hz
01 ÷99 PS
50Hz
PF
25Hz
01 ÷99 PS
25Hz
PF
15Hz
01 ÷99 PS
25Hz
PF
15Hz
.
.
.
www.quikoitaly.com

Select type of logic for START input with DIP 4
This type of logic is to be selected after the Learning-Phase
ü DIP4 in OFF : The input-Start Open, assumes the function of
the Start. So button connected to this input will function either
by command that opens and closes.
ü DIP4 in ON : The entrance Start-Open, assumes the function
of command opens both impulsive or dead man. So, the button
connected to this input, it will work just as command opens. In
this case, will have to be used the Command Closes, (Close)
for the reclosing.
ON
1 2 3 4
SW1
ON
OFF
ü Place the automation in closed position
ü Hold the P3 until the display shows
ü Press pedestrian start: automation will start in opening
ü Press pedestrian start when you want the automation to stop.
ü Wait until the desired wait time and press pedestrian start.
ü The automation starts closing.
ü Arrived on the opening limit switch, automation will stop.
ü Learning partial working time (Pedestrian)
Function 03 - Changing pause time
Hold the P3 until the display shows e release P3
ü Press repeatedly P2 until appears on the display.
ü Press P3 and on the display .
appears = 4 seconds of pause or the one set in
learning.
ü Press the button P1 to increase and P2 to decrease the time in seconds
ü Press P3 for confirmation
If you want to quit the programming mode follow the procedure for ESC:
Press P2 (Forward) or P1 (Backward) until you see
Confirm pressing P3.
Function 04 – Max torque adjustment.
ü Hold the P3 until the display shows e release P3
ü Press repeatedly P2 until appears on the display.
ü Press P3, the display show . = the percentage of the maximum torque set.
ü Press the button P1 to increase and P2 to decrease the value.
ü Press P3 for confirmation
If you want to quit the programming mode follow the procedure for ESC:
Press P2 (Forward) or P1 (Backward) until you see
Confirm pressing P3.
www.quikoitaly.com

PL
30Hz
Closing in slow speed frequency in Hz PL
30Hz
Function 07 – Opening slowing down frequency setting in Hz
.
ü Hold the P3 until the display shows e release P3
ü Press repeatedly P2 until appears on the display
ü Press P3 the display shows . equal to the frequency set.
ü Press the button P1 to increase and P2 to decrease the value
ü Press P3 for confirmation.
If you want to quit the programming mode follow the procedure for ESC:
Press P2 (Forward) or P1 (Backward) until you see
Confirm pressing P3.
PL
50Hz
Opening in slow speed frequency in Hz 01 ÷99 PS
25Hz
PL
50Hz
Closing speed frequency in Hz
Function 05 – Opening frequency setting in Hz
ü Hold the P3 until the display shows e release P3
ü Press repeatedly P2 until appears on the display
ü Press P3 the display shows .equal to the frequency set.
ü Press the button P1 to increase and P2 to decrease the value
ü Press P3 for confirmation.
If you want to quit the programming mode follow the procedure for ESC:
Press P2 (Forward) or P1 (Backward) until you see
Confirm pressing P3.
Function 06 – Closing frequency setting in Hz
ü Hold the P3 until the display shows e release P3
ü Press repeatedly P2 until appears on the display
ü Press P3 the display shows . equal to the frequency set.
ü Press the button P1 to increase and P2 to decrease the value
ü Press P3 for confirmation.
If you want to quit the programming mode follow the procedure for ESC:
Press P2 (Forward) or P1 (Backward) until you see
Confirm pressing P3.
Note:
FACTORY SETTINGS Min/Max Pre-Set
Opening speed frequency in Hz 01 ÷99 PS
50Hz
PF
25Hz
01 ÷99 PS
50Hz
PF
25Hz
PF
15Hz
01 ÷99 PS
25Hz
PF
15Hz
www.quikoitaly.com

Function 08 – Closing slowing down frequency setting in Hz
ü Hold the P3 until the display shows e release P3
ü Press repeatedly P2 until appears on the display
ü Press P3 the display shows . equal to the frequency set.
ü Press the button P1 to increase and P2 to decrease the value
ü Press P3 for confirmation.
If you want to quit the programming mode follow the procedure for ESC:
Press P2 (Forward) or P1 (Backward) until you see
Confirm pressing P3.
Function 09 – Amperometric sensitivity in Open from 01 to 99
ü Hold the P3 until the display shows e release P3
ü Press repeatedly P2 until appears on the display
ü Press P3 the display shows . equal to the sensitivity set.
ü Press the button P1 to increase and P2 to decrease the value
To disable the control, set .
Note: id. 01= very sensitive – 99= less sensitive.
If you want to quit the programming mode follow the procedure for ESC:
Press P2 (Forward) or P1 (Backward) until you see
Confirm pressing P3.
Function 10 – Amperometric sensitivity in Close from 01 to 99
ü Hold the P3 until the display shows e release P3
ü Press repeatedly P2 until appears on the display
ü Press P3, the display shows . equal to the sensitivity set.
ü Press the button P1 to increase and P2 to decrease the value
To disable the control, set .
Note: id. 01= very sensitive – 99= less sensitive.
If you want to quit the programming mode follow the procedure for ESC:
Press P2 (Forward) or P1 (Backward) until you see
Confirm pressing P3.
www.quikoitaly.com

Function 11 – Amperometric sensitivity in slow Open from 01 to 99
ü Hold the P3 until the display shows e release P3
ü Press repeatedly P2 until appears on the display
ü Press P3, the display shows . equal to the sensitivity set.
ü Press the button P1 to increase and P2 to decrease the value
To disable the control, set .
Note: id. 01= very sensitive – 99= less sensitive.
If you want to quit the programming mode follow the procedure for ESC:
Press P2 (Forward) or P1 (Backward) until you see
Confirm pressing P3.
Function 12 – Amperometric sensitivity in slow Close from 01 to 99
ü Hold the P3 until the display shows e release P3
ü Press repeatedly P2 until appears on the display
ü Press P3, the display shows . equal to the sensitivity set.
ü Press the button P1 to increase and P2 to decrease the value
To disable the control, set .
Note: id. 01= very sensitive – 99= less sensitive.
If you want to quit the programming mode follow the procedure for ESC:
Press P2 (Forward) or P1 (Backward) until you see Confirm pressing P3.
Function 13 – Starting blow from 1 to 20 (tenths of a second)
ü Hold the P3 until the display shows e release P3
ü Press repeatedly P2 until appears on the display
ü Press P3, the display shows . = Disabled.
ü Set the time in tenths of a second
ü Press the button P1 to increase and P2 to decrease the value. Ex. ( . )
ü Press P3 for confirmation
If you want to quit the programming mode follow the procedure for ESC:
Press P2 (Forward) or P1 (Backward) until you see
Confirm pressing P3.
www.quikoitaly.com

Funzione 14 –Final blow after limit switch 1 to 20
(tenths of a second)
ü Hold the P3 until the display shows e release P3
ü Press repeatedly P2 until appears on the display
ü Press P3, the display shows . = Disabled.
ü Set the time in tenths of a second
ü Press the button P1 to increase and P2 to decrease the value. Ex. ( . )
ü Press P3 for confirmation
If you want to quit the programming mode follow the procedure for ESC:
Press P2 (Forward) or P1 (Backward) until you see
Confirm pressing P3.
Funcion 15 – Function test enabling
ü Hold the P3 until the display shows e release P3
ü Press repeatedly P2 until appears on the display
ü Press P3, the display shows . = Disabled.
ü Set the time of start delay in second
ü
Press the button P1 to increase and P2 to decrease the value of the start. Ex.(
.
)
ü Press P3 for confirmation.
If you want to quit the programming mode follow the procedure for ESC:
Press P2 (Forward) or P1 (Backward) until you see ES
Confirm pressing P3.
Function 16 – Count Maneuvers.
ü Hold the P3 until the display shows e release P3.
ü Press repeatedly P2 until appears on the display
ü Press P3 to view tens / units
ü Press P2 for thousands / hundreds
ü Press P2 for hundreds-thousands / tens-thousands
ü Press P3 for confirmation.
If you want to quit the programming mode follow the procedure for ESC:
Press P2 (Forward) or P1 (Backward) until you see
Confirm pressing P3.
www.quikoitaly.com

Dead man function setting
ü Hold the P3 until the display shows e release P3.
ü Press repeatedly P2 until appears on the display
ü Press P3 to confirm and select with P2 yes or
ü Press P3 to confirm the selection
Dip Switch meaning
ON
1 2 3 4
SW1
ON
OFF
Dip 1 ON : automatic reclosure enabled
Dip 1 OFF : automatic reclosure disabled
Dip 2 ON : inversion on start during closing enabled
Dip 2 OFF : inversion on start during closing disabled
Dip 3 ON : does not accept start when opening and opened
Dip 3 OFF : accept start when opening and opened
Dip 4 ON : Button works like open command
Dip 4 OFF : Button works like start command
Possible Errors reported on LED DS1
88
DS 1
Error 1.
Short circuit.
Setup FF failure.
Capacitors charge failure.
High Temperature.
Instantaneous overcurrent.
Delayed overcurrent..
Bus overvoltage.
www.quikoitaly.com

INDICATIONS ON DISPLAY DS1
88
DS 1
Door closed.
Door closing.
Door opening.
Door opened.
Self -learning.
Stop pressed.
Three-phase motor 230Vac
Single-phase motor 230Vac
. . Sliding gate . . Fridge door . . Sectional door;
confirm with P3.
Regulation pause time:
P2 1 second increment,
P1 1 second decrement,
Confirm with P3.
Max torque Display number of operation.
Frequency regulation OPEN
Frequency regulation CLOSE
Frequency slowing down regulation OPEN
Frequency slowing down regulation CLOSE
Amperometric sensitivity Open
Amperometric sensitivity Close
Amperometric sensitivity slow Open
Amperometric sensitivity slow Close
Starting blow.
Closing blow.
Test.
Count Maneuvers.
Deadman only operation. If activated display .
Press P3 to exit.
www.quikoitaly.com

|
DECLARATION OF CONFORMITY
The manufacturer claims that the device complies with the essential safety requirements of the
directives:
ü Radio equipment - 1999/5 / EC;
ü Low Voltage - 73/23 / EEC, 93/68 / EEC (EN 60335-1 (1998));
ü Electromagnetic Compatibility - 89/336 / EEC, 93/68 / EEC, 98/37 / EC (EN 50081-1, EN
50081-2, EN 61000-3-2, EN 61000-3-2 / A1, EN 61000-3-2 / A2, EN 61000-3- 2 / A14,
EN61000-3-3, EN 61000-6-2, ETSI EN 300220-3, ETSI EN 301489-3, ETSI EN 301489-1)
As well as their changes and updates, and the provisions that implement their assimilation within
the National Legal System of the country of destination and use of the car.
The data and images are purely indicative reserves the right to modify at any time characteristics
of the products described in its sole discretion, without notice.
www.quikoitaly.com
QUIKO ITALY
Via Seccalegno, 19
36040 Sossano (VI) - Italy
Tel. +39 0444 785513
Fax +39 0444 782371
info@quiko.biz
www.quikoitaly.com

QK-CE220RLINV
¡ATTENCIÓN!! Antes de efectuar la instalacion, lea attentamente el presente manual.
La Empresa QUIKO no asumirà responsabilidad alguna en caso de inobservancia de las normas
vigentes en el pais donde se lleva a cabo la installacion
Control automatizaciones
a INVERTER
para automatizaciones Industriales
alimentaciòn monofàsica 230Vac
salida motor trifàsica 230Vac
V01/2019

ü Frecuencia de trabajo en apertura y en cierre ajustable separado
ü Rampa de aceleración / deceleración y velocidad del paro suave ajustable
ü Amperométrica con sensibilidad ajustable tanto en apertura y cierre
ü Inversión regulable en apertura y cierre.
ü Entrada para banda de seguridad NC / 8,2 kohm
ü Entrada para fotocélula-seguridad en apertura y cierre
ü Entradas Abrir / Cerrar / Parcial y Paso a paso
ü Programación de funcionamento: automático, semiautomático o de hombre
presente seleccionable
ü Visualiciaciones de estado, y la función de asignación a través del menú de la
pantalla
ü Receptor enchufe opcional para la gestión de los transmisores de código fijo o
Rollin-code
Características principales:
Descripciòn General
BOTONES
PROGRAMACION/
EMPLAZAMIENTO
LCD
VISUALIZACION
ENTRADA LINEA
230Vac
FUSIBLE 10A
SALIDA Motor
Trifàsico
SALIDA
INTERMITENTE
230V
LED ESTADO
ENTRADAS
ENTRADAS
Abrasaderas 24Vdc
Accesorios
www.quikoitaly.com

Caracteristicas generales
Programaciòn y auto aprendizaje con botones
(aumento,disminuciòn,convalidaciòn) y un display a dos cifras
Gestiòn de tres medidas de seguridad: una fotocèlula, una seguridad en cierre y
una en apertura.
Contacto limpio para slar estado automatizaciòn/alarme
Contacto 12Vac para control alimentaciòn seguridad/funciones auxiliares
Abrasaderas de potencia y de sle extraibles
Predispuesta para acoplamiento con ltro de red
Conforme a las Directivas Europeas d referencia: Baja Tensiòn 73/23/CEE
Compatibilidad Eletromagnetica (EMC) 89/336/CEE
(N.B. : solamente si instalado el ltro de red o equivalentes)
Carateristicas Tecnicas
Alimentaciòn 230Vac
Salida motor Trifàsico 230 VAC – Monofàsico 230 Vac
Conexiòn motor Trifàsico A Triàngulo
Conexiòn motor Monofàsico No condensador
Potencia motor 2HP
Temp. funcionamiento -20°C / + 55 °C
Alimentaciòn accesorios 12-24 VDC/AC – 4 Watt
Para potencias superiores instalar transformador externo
Protecciones
Motor protejido con fusible y de control electrònico
Circuitos de potencia protejidos electrònicamente y a travèz de varistores.
Secundario transformador, protejido con fusible auto ajustable y transil.
Condensadores de ltro en el ingreso de la red.
www.quikoitaly.com
FILTRO

INTERMITENTE
M
L N
STOP
CIERRE
OPEN
START
Conexiones MOTOR / INTERMITENTE/ COMANDOS
START
PET.
ABRE
ON
1 2 3 4
SW1
P1
P2
P3
1 2 3 4 5 6 7 8
10 11 12 13 14 15 16 17 18 19 20 21 22 23 24 25 26 27 28 29
DL1
DL0
DL2
DL3
DL4
DL5
DL6
DL7
DL8
DL9
DL10
DL11
IN 2
IN 3
IN 4
IN 5
COM +
IN 6
IN 7
IN 8
IN 9
IN 10
IN 11
COM +
12V DC
88
DS1
- +
24Vdc
www.quikoitaly.com
NOTICIA IMPORTANTE:
En caso de conexión de
Motor monofásico de 230V,
el motor debe estar conectado
sin condensador
/