
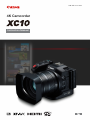
Instruction Manual
PUB. DIE-0470-000A
4K Camcorder

2
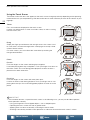
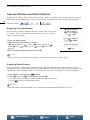
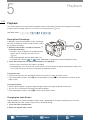
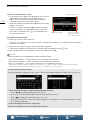
Menus
Table of Contents Index
Important Usage Instructions
WARNING
TO REDUCE THE RISK OF ELECTRIC SHOCK AND TO REDUCE ANNOYING INTERFERENCE, USE THE
RECOMMENDED ACCESSORIES ONLY.
COPYRIGHT WARNING:
Unauthorized recording of copyrighted materials may infringe on the rights of copyright owners and be
contrary to copyright laws.

3
Menus
Table of Contents Index
Trademark Acknowledgements
• SD, SDHC and SDXC Logos are trademarks of SD-3C, LLC.
• Canon is an authorized licensee of the CFast 2.0™ trademark, which may be registered in various
jurisdictions.
• Microsoft and Windows are trademarks or registered trademarks of Microsoft Corporation in the United
States and/or other countries.
• Apple, App Store, Mac OS, Final Cut Pro are trademarks of Apple Inc., registered in the U.S. and other
countries.
• IOS is a trademark or registered trademark of Cisco in the U.S. and other countries and is used under license.
• Avid and Media Composer are trademarks or registered trademarks of Avid Technology, Inc. or its
subsidiaries in the United States and/or other countries.
• Wi-Fi is a registered trademark of the Wi-Fi Alliance.
• Wi-Fi Certified, WPA, WPA2, and the Wi-Fi Certified logo are trademarks of the Wi-Fi Alliance.
• WPS as used on the camcorder's settings, onscreen displays and in this manual signifies Wi-Fi Protected
Setup.
• The Wi-Fi Protected Setup Identifier Mark is a mark of the Wi-Fi Alliance.
• JavaScript is a trademark or registered trademark of Oracle Corporation, its affiliates or subsidiaries in the
United States and other countries.
• HDMI, the HDMI logo and High-Definition Multimedia Interface are trademarks or registered trademarks of
HDMI Licensing LLC in the United States and other countries.
• Other names and products not mentioned above may be trademarks or registered trademarks of their
respective companies.
• This device incorporates exFAT technology licensed from Microsoft.
• This product is licensed under AT&T patents for the MPEG-4 standard and may be used for encoding MPEG-4
compliant video and/or decoding MPEG-4 compliant video that was encoded only (1) for a personal and
noncommercial purpose or (2) by a video provider licensed under the AT&T patents to provide MPEG-4
compliant video. No license is granted or implied for any other use for MPEG-4 standard.

4
Menus
Table of Contents Index
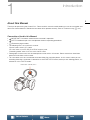
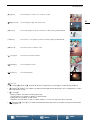
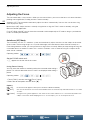
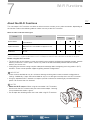
Highlights of the XC10
The Canon 4K Camcorder XC10 is a highly functional camcorder that is capable of producing outstanding
results when recording video at either 4K or HD quality, or taking photos of up to approx. 12 megapixels. The
XC10 continues Canon’s lineage of high-performance camcorders with robust features designed to help
articulate the discerning professional’s creative expression.
Exceptional Video and Photos
1.0-type CMOS sensor and DIGIC DV 5 image
processor
The combination of the XC10’s CMOS sensor and
DIGIC DV 5 image processor allows your camcorder
to capture videos and photos with low levels of
noise, even in dimly-lit shooting situations. Owing to
the DIGIC DV 5 image processor, this camcorder
boasts remarkable image quality.
4K/HD recording and the XF-AVC video format
The camcorder records 4K video to a CFast card
using XF-AVC intra-frame compression while it
records HD video to an SD card using XF-AVC Long
GOP. You can record 4K video at a maximum of 305
Mbps. The impressive video quality you produce
with the XC10 will make it your “go-to” main camera
for a multitude of projects. You could even shoot
B-roll for projects that use Cinema EOS cameras.
* This indicates the compression method used for each
frame of video. Intra-frame is also suitable for grabbing
frames from video and for editing.
Excellent photo quality
You can take photos of up to approx. 12 megapixels
(effective pixel count). You will find that the superb
photo functionality provide by the XC10 will allow it to
be more versatile in your projects, such as taking
photos while you shoot video (
A
39) or grabbing a
frame from 4K video playback (
A
106). You can
even attach an optional EX-series Speedlite for EOS
cameras.
Operability and Adaptability
Intuitive design
The camcorder is designed for a single operator to
access necessary camera functions both efficiently
and intuitively. The lens features separate rings for
focus and zoom while the articulated touch-screen
LCD panel lets you record in low- and high-angle
shooting situations. You can use the shooting mode
dial to select a mode, from special scene mode to
auto to full manual, that best suits how much control
you want over shooting functions (
A
49).
Depending on your shooting style, you may even
want to attach the supplied viewfinder unit to the
camcorder (
A
21) or use the supplied remote
controller (
A
35).
Software to help manage recordings
The Canon XF Utility for XF-AVC software and
Camera Window software are available as free
downloads from Canon’s Web site. Canon XF Utility
for XF-AVC allows you to easily save, manage and
playback your video clips (A 112) while Camera
Window lets you transfer photos to your computer
(A 115).
Versatile Artistic Expression
Creative recording modes
The camcorder offers a variety of recording modes
that you can use to control how your final video or
photo will come out. The slow and fast motion
recording mode (A 88) can go from slow motion at
x1/4 speed up to fast motion at x1200 speed. Pre-
recording mode (A 89), catches the 5 seconds of
video prior to the actual start of recording, which
helps ensure that you do not miss the action. You
can use interval recording mode (A 90) to take a
series of photos at a set interval.
Creating a professional look
You can add a professional feel to your shots by
using looks (A 63) to affect image-related settings,
such as sharpness and color depth. Use the pre-
installed looks or customize them to your
preference.
Diverse audio options
The camcorder can record sound as 2-channel
linear PCM audio (16-bit/48 kHz). The camcorder’s
audio scenes (A 78) are a convenient way to let
the camcorder take care of audio options depending
on the shooting situation. For more control, you can
adjust functions such as the audio recording level
(A 79), audio equalizer (A 81) and audio
compressor (A 84).

5
Menus
Table of Contents Index
Advanced Professional Features and
Flexibility
Wi-Fi network functions
When you use the Wi-Fi functions (A 117), you can
remotely record and play back using a connected
Wi-Fi device, such as your smartphone or tablet.
You can also use the media server function to view
photos on your camcorder’s SD card.
Time code and user bit output
The camcorder generates a time code and adds it
to your recordings. In addition, it can output that
time code and user bit from the HDMI OUT terminal
(A 75). This is useful for situations such as
referencing or shooting in a multi-camera setup.
Customization
The camcorder features 3 assignable buttons to
which you can assign often-used functions (A 97).
The main camera function menu can also be
customized so that you can quickly access and
adjust functions you find necessary (A 96).
Other Functions
• Assistance functions
Peaking and magnification (A 69) can be helpful
when you use manual focus, onscreen markers
(A 74) can be very useful to help you frame your
video, and zebra patterns (A 74) can give you a
reference point to avoid overexposures.
•ND filter
When activated, the built-in ND filter reduces the
amount of light by 3 stops, allowing you to better
capture your subject in the desired depth of field
(A 133).
•Push AF
While the camcorder is in manual focus mode,
you can use Push AF to switch the camcorder
temporarily to autofocus mode (A 71).
• HD playback from 4K video
When you play back a 4K clip, you can play back
an HD-sized area of your choosing (A 106).
• Image stabilization (IS)
In addition to the standard IS function, you can
use Dynamic IS, which compensates for
camcorder shake while walking and shooting, or
Powered IS, which is most effective when you are
stationary and zoom in on subjects far away
(A 73).
• Support for geotagging
You can use the optional GP-E2 GPS Receiver to
add GPS information to your recordings (A 86).

6
Menus
Table of Contents Index
1. Introduction 9
About this Manual 9
Conventions Used in this Manual 9
Supplied Accessories 11
Names of Parts 12
Viewfinder unit 17
RC-6 Remote Controller 17
2. Preparations 18
Charging the Battery Pack 18
Preparing the Camcorder 21
Attaching the Lens Hood 21
Using the Viewfinder Unit 21
Using the LCD Panel 23
Adjusting the Grip 24
Attaching the Shoulder Strap 24
Using a Tripod 24
Basic Operation of the Camcorder 25
Switching Between Movies and Photos 25
Switching Between Recording and Playback 25
Using the Touch Screen 26
Date, Time and Language Settings 27
Setting the Date and Time 27
Changing the Language 28
Changing the Time Zone 28
Using the MENU Button and Joystick 28
Using the FUNC. Menu and Setup Menus 29
Preparing Recording Media 31
Inserting a CFast Card 31
Removing a CFast card 32
Inserting and Removing an SD Card 33
Initializing the Recording Media 33
Recovering Data on a Recording Media 34
Using the Remote Controller 35
Inserting the Battery 35
Activating the Remote Sensor 35
Using the Remote Controller to Operate the
Camcorder 35
3. Recording 37
Recording Video and Taking Photos 37
Preparing to Record 37
Basic Recording 38
Selecting the Photo Size 40
Shooting Continuous Photos (Drive Mode) 40
Remote Operation Using Browser Remote 41
Onscreen Icons and Displays 42
Using the Fan 47
Video Configuration: Resolution (4K/HD), Frame
Rate and Bit Rate 48
Selecting the Resolution (Recording in 4K or
HD) 48
Selecting the Frame Rate and Bit Rate 48
Shooting Modes 49
Setting the Shooting Modes 49
Manual Exposure (n)49
Aperture Priority AE (“)51
Shutter Priority AE (‚)52
Program AE (’)52
Auto (N)52
Special Scene (ƒ)52
Adjusting Shooting Mode Settings 54
Automatic Gain and ISO Limits 56
Exposure 58
Exposure Lock 58
Touch Exposure 58
AE Shift 59
Light Metering Mode 60
White Balance 61
Using Looks 63
Selecting a Pre-installed Look 63
Creating a User-defined Look 64
Zooming 65
Adjusting the Focus 66
Autofocus (AF) Mode 66
Manual Focus (MF) 68
Push AF 71
Detecting and Focusing On Faces (Face Detection
& Tracking) 71
Table of Contents

7
Menus
Table of Contents Index
Image Stabilizer 73
Onscreen Markers and Zebra Patterns 74
Displaying Onscreen Markers 74
Displaying Zebra Patterns 74
Setting the Time Code 75
Selecting the Time Code Mode 75
User Bit 77
Setting the User Bit 77
User Bit Output 77
Recording Audio 78
Using Commercially Available Microphones 78
Audio Scenes (Built-in Microphone) 78
Audio Recording Level 79
Wind Screen (Built-in Microphone) 80
Microphone Attenuator (Built-in Microphone) 81
Audio Equalizer (Built-in Microphone) 81
Microphone Directionality (Built-in
Microphone) 82
Microphone Attenuator (External Microphone) 82
Low Cut Filter (External Microphone) 83
Switching the Input 83
Audio Limiter 83
Audio Compressor 84
Monitoring the Audio with Headphones 84
Colors Bars/Audio Reference Signal 85
Recording Color Bars 85
Recording an Audio Reference Signal 85
Recording GPS Information (Geotagging) 86
Slow & Fast Motion Mode 88
Pre-recording Mode 89
Interval Recording Mode 90
Self Timer 91
Orientation Detection 92
Using an Optional Speedlite Flash 94
Attaching the Speedlite 94
Configuring an Attached Flash 94
4. Customization 96
Customizing the FUNC. Menu 96
Assignable Buttons 97
Using an Assignable Button 98
Saving and Loading Menu Settings 99
Saving Menu Settings to an SD Card 99
Loading Menu Settings from an SD Card 99
5. Playback 100
Playback 100
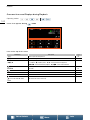
Playing Back Recordings 100
Changing the Index Screen 100
Onscreen Icons and Displays during
Playback 102
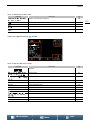
Playback Controls during Clip Playback 104
Playback Controls during Photo Playback 105
Adjusting the Volume 105
Displaying Clip Information 105
Playing an HD-sized Clip from a 4K Clip 106
Capturing Photos from 4K Clips (4K Frame Grab)
and HD Clips 106
Magnifying Photos during Playback 107
Deleting Recordings 108
Deleting Clips and Photos from the Index
Screen 108
Deleting a Clip During Playback Pause 108
Deleting a Photo during Playback 109
6. External Connections 110
Video Output Configuration 110
Recording Video Signal Configuration and Video
Output Configuration 110
Playback Video Configuration and Video Output
Configuration 110
Connecting to an External Monitor 111
Connection Diagram 111
Saving Clips to a Computer 112
Installation 112
Saving Photos to a Computer 115
Installation 115
Connecting the Camcorder to a Computer 115
7. Wi-Fi Functions 117
About the Wi-Fi Functions 117
Wireless Connections Using Wi-Fi 118
Wi-Fi Protected Setup (WPS) 118
Searching for Access Points 119
Manual Setup 121
Viewing and Changing Wi-Fi Settings 122
Browser Remote: Controlling the Camcorder from
a Network Device 124
Setting Up Browser Remote 124
Starting Browser Remote 124
Playback via Browser 128
Media Server 129


1
9
Menus
Table of Contents Index
Introduction
About this Manual
Thank you for purchasing the Canon XC10. Please read this manual carefully before you use the camcorder and
retain it for future reference. Should the camcorder fail to operate correctly, refer to
Troubleshooting
(A 139).
Conventions Used in this Manual
• IMPORTANT: Precautions related to the camcorder’s operation.
• NOTES: Additional topics that complement the basic operating procedures.
• A: Reference page number.
• The following terms are used in this manual.
“Screen” refers to the LCD screen.
“SD card” refers to an SD, SDHC or SDXC memory card.
“Recording media” refers to CFast cards and SD cards.
• Photographs in the manual are simulated pictures taken with a still camera. Some screenshots have been
altered to make them easier to read.
• This camcorder uses the same button to record video clips and take photos. In this manual, when you are
recording video clips, this button is referred to as the START/STOP button; when you are shooting photos, it is
referred to as the PHOTO button.
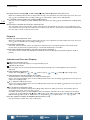
START/STOP (PHOTO) button

About this Manual
10
Menus
Table of Contents Index
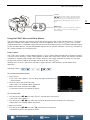
Operating modes and Format
A full icon (like ) indicates that the function
described can be used in the operating mode shown
or for recordings made in the movie format shown in
the icon; an empty icon (like ) indicates that the
function cannot be used. For details refer to
Basic
Operation of the Camcorder
(A 25) and
Selecting
the Resolution (Recording in 4K or HD)
(A 48).
When a function requires the use of the
menu, the quick reference shows the
submenus and, when applicable, the
default setting for the menu item. The
example illustration indicates that you
can find the function by selecting the
[ System Setup] menu and then the
[Fan] menu item.
The arrow > is used to abbreviate menu
selections. For a detailed explanation on how
to use the menus, refer to
Using the MENU
Button and Joystick
(A 28). For a concise
summary of all available menu options and
settings, refer to the appendix
Menu Options
(A 130).
When a procedure requires selecting an option,
the available options are listed within or after the
procedure. Brackets [ ] are used to refer to menu
options as they are displayed on screen.
The navigation bar at the bottom of the page offers buttons to
let you jump quickly to the information you want to find.
Takes you to the table of contents.
Takes you to the summary of menu options and settings.
Takes you to the alphabetical index.

11
Supplied Accessories
Menus
Table of Contents Index
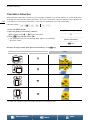
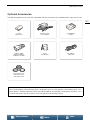
Supplied Accessories
The following accessories are supplied with the camcorder.
CA-570 Compact Power Adapter
(incl. power cord)
LP-E6N Battery Pack
(incl. protective cover)
Lens Hood
Viewfinder Unit
(incl. viewfinder unit cover)
Lens Cap RC-6 Remote Controller
(incl. CR2032 lithium button battery)
Shoulder Strap IFC-300PCU/S USB Cable HTC-100/S High Speed HDMI Cable
Quick Guide

Names of Parts
12
Menus
Table of Contents Index
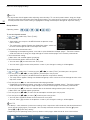
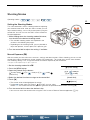
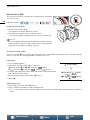
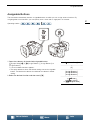
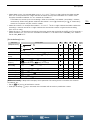
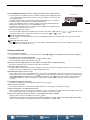
Names of Parts
3412
6
7
8
11910
5
1 Focus ring (A 66)
2Zoom ring (A 65)
3 FOCUS (focus mode) switch (A 66)
4 Shoulder strap mount (A 24)
5 MIC (microphone) terminal (A 78)
6HDMI OUT terminal (A 111)
7USB terminal (A 86, 115)
8DC IN terminal (A 18)
9 DISP. (display) button (A 46)/
Assignable button 1 (A 97)
10 PUSH AF (momentary autofocus) button (A 71)/
Assignable button 2 (A 97)
11 Exhaust ventilation outlet (A 47)


Names of Parts
14
Menus
Table of Contents Index
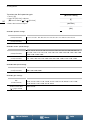
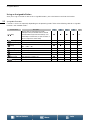
1
2
3
4
567
8910
1 LCD touch screen (A 23)
2 MAGN. (magnification) button (A 69)/
Assignable button 3 (A 97)
3 MENU button (A 28)
4Joystick (A 28)
5 ACCESS indicator (A 31)
6 CARD OPEN (open recording media slot cover)
lever (A 31)
7 Recording media slot cover
8 CFast card slot (A 31)
9SD card slot (A 31)
10 CFast card release button (A 31)

15
Names of Parts
Menus
Table of Contents Index
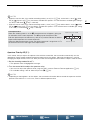
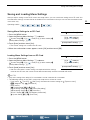
1
3
4
5
6
7
8
9
10
11
2
1 Built-in microphone (A 78)
2 Accessory shoe (A 86, 94): For attaching the
optional GP-E2 GPS Receiver or optional EX-
series Speedlite for EOS cameras.
3 ON/OFF button (A 27)
4START/STOP button (A 37)/PHOTO button
(A 37): When you are recording video clips, this
button is referred to in this manual as the START/
STOP button; when you are shooting photos, it is
referred to as the PHOTO button.
5 Movie/photo switch (A 25)
6 Control dial (A 49)
7 ^ (playback) button (A 100)
8 POWER/CHG (power/battery charging) indicator
(A 18)
9 Shooting mode dial (A 49)
10 Shooting mode dial button (A 49)
11 Built-in speaker (A 105)


18
2
Menus
Table of Contents Index
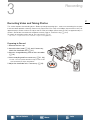
Preparations
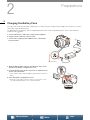
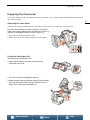
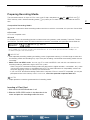
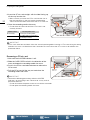
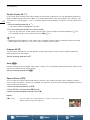
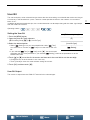
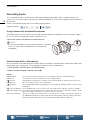
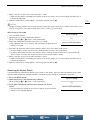
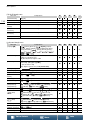
Charging the Battery Pack
The camcorder can be powered with a battery pack or directly using the compact power adapter. The first time you use the
camcorder, charge the battery pack.
For approximate charging times and recording/playback times with a fully charged battery pack, refer to
Recording and
Playback Times
(A 158).
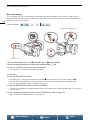
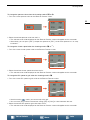
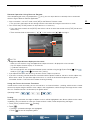
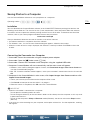
1 Connect the power cord to the compact power adapter.
2 Plug the power cord into a power outlet.
3 Connect the compact power adapter to the camcorder’s
DC IN terminal.
4 Slide the BATT. OPEN switch in the direction of the arrow
and open the battery compartment cover.
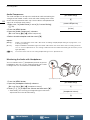
5 Insert the battery pack all the way into the compartment as
shown in the illustration.
• Push it all the way in until the battery release latch secures it in
place.
6 Close the battery compartment cover.
• Push the cover until you hear a click. Do not force the cover
closed if the battery pack is not correctly inserted.
햲
햴
햳
DC IN terminal
햳
햲

19
Charging the Battery Pack
Menus
Table of Contents Index
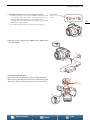
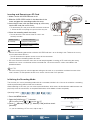
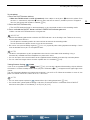
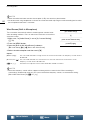
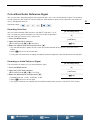
7 Charging will start when the camcorder is turned off.
• If the camcorder was on, the green POWER/CHG indicator will
go out when you turn off the camcorder. After a moment, the
POWER/CHG indicator will turn on in red (battery pack
charging). The red POWER/CHG indicator will go out when the
battery pack is fully charged.
• If the indicator flashes, refer to
Troubleshooting
(A 139).
8 Disconnect the compact power adapter in the order shown
in the illustration.
To remove the battery pack
Open the battery compartment cover and slide the battery
release latch in the direction of the arrow so the battery pack
springs out. Remove the battery pack and close the cover.
POWER/CHG
(battery pack charging)
indicator
햲
햳
햴
햵
햲
햳
햴
Battery
release latch

Charging the Battery Pack
20
Menus
Table of Contents Index
IMPORTANT
• Turn off the camcorder before connecting or disconnecting the compact power adapter. After you turn off the
camcorder, important data is updated on the recording media. Be sure to wait until the green POWER/CHG
indicator goes out.
• When using the AC adapter, do not fix it permanently to one place as this may cause a malfunction.
• Do not connect to the camcorder’s DC IN terminal or to the compact power adapter any electrical equipment
that is not expressly recommended for use with this camcorder.
• To prevent equipment breakdowns and excessive heating, do not connect the supplied compact power
adapter to voltage converters for overseas travels or special power sources such as those on aircraft and
ships, DC-AC inverters, etc.
NOTES
• You cannot charge the optional LP-E6 Battery Pack with the camcorder.
Check the bottom label of the battery pack and make sure it is an LP-E6N
Battery Pack.
• We recommend charging the battery pack in temperatures between 10 °C
and 30 °C. If either the ambient temperature or the battery pack’s
temperature is outside the range of approx. 0 °C to 40 °C, charging may take
longer than usual or charging may not start.
• The battery pack will be charged only when the camcorder is off.
• If the power supply was disconnected while charging a battery pack, make sure the POWER/CHG indicator
has gone out before restoring the power supply.
• If remaining battery time is an issue, you can power the camcorder using the compact power adapter so the
battery pack will not be consumed.
• Charged battery packs continue to discharge naturally. Therefore, charge them on the day of use, or the day
before, to ensure a full charge.
• We recommend that you prepare battery packs to last 2 to 3 times longer than you think you might need.
Model number
La pagina sta caricando ...
La pagina sta caricando ...
La pagina sta caricando ...
La pagina sta caricando ...
La pagina sta caricando ...
La pagina sta caricando ...
La pagina sta caricando ...
La pagina sta caricando ...
La pagina sta caricando ...
La pagina sta caricando ...
La pagina sta caricando ...
La pagina sta caricando ...
La pagina sta caricando ...
La pagina sta caricando ...
La pagina sta caricando ...
La pagina sta caricando ...
La pagina sta caricando ...
La pagina sta caricando ...
La pagina sta caricando ...
La pagina sta caricando ...
La pagina sta caricando ...
La pagina sta caricando ...
La pagina sta caricando ...
La pagina sta caricando ...
La pagina sta caricando ...
La pagina sta caricando ...
La pagina sta caricando ...
La pagina sta caricando ...
La pagina sta caricando ...
La pagina sta caricando ...
La pagina sta caricando ...
La pagina sta caricando ...
La pagina sta caricando ...
La pagina sta caricando ...
La pagina sta caricando ...
La pagina sta caricando ...
La pagina sta caricando ...
La pagina sta caricando ...
La pagina sta caricando ...
La pagina sta caricando ...
La pagina sta caricando ...
La pagina sta caricando ...
La pagina sta caricando ...
La pagina sta caricando ...
La pagina sta caricando ...
La pagina sta caricando ...
La pagina sta caricando ...
La pagina sta caricando ...
La pagina sta caricando ...
La pagina sta caricando ...
La pagina sta caricando ...
La pagina sta caricando ...
La pagina sta caricando ...
La pagina sta caricando ...
La pagina sta caricando ...
La pagina sta caricando ...
La pagina sta caricando ...
La pagina sta caricando ...
La pagina sta caricando ...
La pagina sta caricando ...
La pagina sta caricando ...
La pagina sta caricando ...
La pagina sta caricando ...
La pagina sta caricando ...
La pagina sta caricando ...
La pagina sta caricando ...
La pagina sta caricando ...
La pagina sta caricando ...
La pagina sta caricando ...
La pagina sta caricando ...
La pagina sta caricando ...
La pagina sta caricando ...
La pagina sta caricando ...
La pagina sta caricando ...
La pagina sta caricando ...
La pagina sta caricando ...
La pagina sta caricando ...
La pagina sta caricando ...
La pagina sta caricando ...
La pagina sta caricando ...
La pagina sta caricando ...
La pagina sta caricando ...
La pagina sta caricando ...
La pagina sta caricando ...
La pagina sta caricando ...
La pagina sta caricando ...
La pagina sta caricando ...
La pagina sta caricando ...
La pagina sta caricando ...
La pagina sta caricando ...
La pagina sta caricando ...
La pagina sta caricando ...
La pagina sta caricando ...
La pagina sta caricando ...
La pagina sta caricando ...
La pagina sta caricando ...
La pagina sta caricando ...
La pagina sta caricando ...
La pagina sta caricando ...
La pagina sta caricando ...
La pagina sta caricando ...
La pagina sta caricando ...
La pagina sta caricando ...
La pagina sta caricando ...
La pagina sta caricando ...
La pagina sta caricando ...
La pagina sta caricando ...
La pagina sta caricando ...
La pagina sta caricando ...
La pagina sta caricando ...
La pagina sta caricando ...
La pagina sta caricando ...
La pagina sta caricando ...
La pagina sta caricando ...
La pagina sta caricando ...
La pagina sta caricando ...
La pagina sta caricando ...
La pagina sta caricando ...
La pagina sta caricando ...
La pagina sta caricando ...
La pagina sta caricando ...
La pagina sta caricando ...
La pagina sta caricando ...
La pagina sta caricando ...
La pagina sta caricando ...
La pagina sta caricando ...
La pagina sta caricando ...
La pagina sta caricando ...
La pagina sta caricando ...
La pagina sta caricando ...
La pagina sta caricando ...
La pagina sta caricando ...
La pagina sta caricando ...
La pagina sta caricando ...
La pagina sta caricando ...
La pagina sta caricando ...
La pagina sta caricando ...
La pagina sta caricando ...
La pagina sta caricando ...
La pagina sta caricando ...
La pagina sta caricando ...
-
 1
1
-
 2
2
-
 3
3
-
 4
4
-
 5
5
-
 6
6
-
 7
7
-
 8
8
-
 9
9
-
 10
10
-
 11
11
-
 12
12
-
 13
13
-
 14
14
-
 15
15
-
 16
16
-
 17
17
-
 18
18
-
 19
19
-
 20
20
-
 21
21
-
 22
22
-
 23
23
-
 24
24
-
 25
25
-
 26
26
-
 27
27
-
 28
28
-
 29
29
-
 30
30
-
 31
31
-
 32
32
-
 33
33
-
 34
34
-
 35
35
-
 36
36
-
 37
37
-
 38
38
-
 39
39
-
 40
40
-
 41
41
-
 42
42
-
 43
43
-
 44
44
-
 45
45
-
 46
46
-
 47
47
-
 48
48
-
 49
49
-
 50
50
-
 51
51
-
 52
52
-
 53
53
-
 54
54
-
 55
55
-
 56
56
-
 57
57
-
 58
58
-
 59
59
-
 60
60
-
 61
61
-
 62
62
-
 63
63
-
 64
64
-
 65
65
-
 66
66
-
 67
67
-
 68
68
-
 69
69
-
 70
70
-
 71
71
-
 72
72
-
 73
73
-
 74
74
-
 75
75
-
 76
76
-
 77
77
-
 78
78
-
 79
79
-
 80
80
-
 81
81
-
 82
82
-
 83
83
-
 84
84
-
 85
85
-
 86
86
-
 87
87
-
 88
88
-
 89
89
-
 90
90
-
 91
91
-
 92
92
-
 93
93
-
 94
94
-
 95
95
-
 96
96
-
 97
97
-
 98
98
-
 99
99
-
 100
100
-
 101
101
-
 102
102
-
 103
103
-
 104
104
-
 105
105
-
 106
106
-
 107
107
-
 108
108
-
 109
109
-
 110
110
-
 111
111
-
 112
112
-
 113
113
-
 114
114
-
 115
115
-
 116
116
-
 117
117
-
 118
118
-
 119
119
-
 120
120
-
 121
121
-
 122
122
-
 123
123
-
 124
124
-
 125
125
-
 126
126
-
 127
127
-
 128
128
-
 129
129
-
 130
130
-
 131
131
-
 132
132
-
 133
133
-
 134
134
-
 135
135
-
 136
136
-
 137
137
-
 138
138
-
 139
139
-
 140
140
-
 141
141
-
 142
142
-
 143
143
-
 144
144
-
 145
145
-
 146
146
-
 147
147
-
 148
148
-
 149
149
-
 150
150
-
 151
151
-
 152
152
-
 153
153
-
 154
154
-
 155
155
-
 156
156
-
 157
157
-
 158
158
-
 159
159
-
 160
160
-
 161
161


in altre lingue
- English: Canon XC-10 User guide
Documenti correlati
-
Canon XC10 Guida Rapida
-
Canon XC15 Guida Rapida
-
Canon XC 10 Istruzioni per l'uso
-
-
-
-
Canon EOS C300 Mark II PL Manuale utente
-
-
-
Canon LEGRIA HF G50 Manuale utente
Altri documenti
-
Nikon COOLPIX P610 Guida Rapida
-
SVP DV-8530 Manuale utente
-
Toshiba Camileo Pro HD Guida utente
-
-
Eizo FDF2304W-IP Manuale del proprietario
-
Smeg KSGT63X Manuale utente
-
Trevi GO 2700 KUB Manuale utente
-
-
-