Netgear CG3000 Manuale utente
- Categoria
- Punti di accesso WLAN
- Tipo
- Manuale utente

350 East Plumeria Drive
San Jose, CA 95134
USA
April 2011
202-10842-01
v1.0
Wireless Cable Gateway
CG3000
User Manual

2
NETGEAR Wireless Cable Gateway CG3000
© 2010 by NETGEAR, Inc. All rights reserved.
No part of this publication may be reproduced, transmitted, transcribed, stored in a retrieval system, or translated
into any language in any form or by any means without the written permission of NETGEAR, Inc.
P/N: Part Number TBD v1.0
Technical Support
When you register your product at http://www.netgear.com/register, we can provide you with faster expert
technical support and timely notices of product and software upgrades.
NETGEAR, Inc.
350 East Plumeria Drive
San Jose, CA 95134 USA
E-mail: [email protected]
Website:
http://www.netgear.com
Phone: 1-888-NETGEAR, for US & Canada only. For other countries, see your Support information card.
Trademarks
NETGEAR, the NETGEAR logo, ProSafe, Smart Wizard, and Auto Uplink are trademarks or registered
trademarks of NETGEAR, Inc. Microsoft, Windows, Windows NT, and Vista are registered trademarks of Microsoft
Corporation. Other brand and product names are registered trademarks or trademarks of their respective holders.
Statement of Conditions
To improve internal design, operational function, and/or reliability, NETGEAR reserves the right to make changes
to the products described in this document without notice. NETGEAR does not assume any liability that may occur
due to the use or application of the product(s) or circuit layout(s) described herein.

3
Table of Contents
Chapter 1 Connect to the Internet
Gateway Front Panel . . . . . . . . . . . . . . . . . . . . . . . . . . . . . . . . . . . . . . . . . .6
Gateway Rear Panel . . . . . . . . . . . . . . . . . . . . . . . . . . . . . . . . . . . . . . . . . .7
Install the Voice Gateway. . . . . . . . . . . . . . . . . . . . . . . . . . . . . . . . . . . . . . .7
Check the Installation Requirements . . . . . . . . . . . . . . . . . . . . . . . . . . . .8
Cable the Gateway . . . . . . . . . . . . . . . . . . . . . . . . . . . . . . . . . . . . . . . . . . 8
Log In to Your Gateway . . . . . . . . . . . . . . . . . . . . . . . . . . . . . . . . . . . . . .9
Connect to the Internet and VoIP . . . . . . . . . . . . . . . . . . . . . . . . . . . . . .10
View the Gateway Status . . . . . . . . . . . . . . . . . . . . . . . . . . . . . . . . . . . . . .10
Chapter 2 Wireless Configuration
Set Up Your Wireless Network. . . . . . . . . . . . . . . . . . . . . . . . . . . . . . . . . .12
Manually Configure The Wireless Settings. . . . . . . . . . . . . . . . . . . . . . . . .12
WPA or WPA2 Wireless Security . . . . . . . . . . . . . . . . . . . . . . . . . . . . . .13
WEP Security . . . . . . . . . . . . . . . . . . . . . . . . . . . . . . . . . . . . . . . . . . . . .15
Push 'N' Connect (WPS) Wireless Setup . . . . . . . . . . . . . . . . . . . . . . . . . .16
WPS Button . . . . . . . . . . . . . . . . . . . . . . . . . . . . . . . . . . . . . . . . . . . . . . 16
PIN . . . . . . . . . . . . . . . . . . . . . . . . . . . . . . . . . . . . . . . . . . . . . . . . . . . . .17
Chapter 3 Content Filtering
View or Email Logs. . . . . . . . . . . . . . . . . . . . . . . . . . . . . . . . . . . . . . . . . . .19
Block Keywords, Sites, and Services . . . . . . . . . . . . . . . . . . . . . . . . . . . . .19
Block Keywords and Domains . . . . . . . . . . . . . . . . . . . . . . . . . . . . . . . .20
Services . . . . . . . . . . . . . . . . . . . . . . . . . . . . . . . . . . . . . . . . . . . . . . . . . . . 21
Chapter 4 Manage Your Network
Gateway Status . . . . . . . . . . . . . . . . . . . . . . . . . . . . . . . . . . . . . . . . . . . . . 23
MTA Status. . . . . . . . . . . . . . . . . . . . . . . . . . . . . . . . . . . . . . . . . . . . . . . . .24
Signal Status . . . . . . . . . . . . . . . . . . . . . . . . . . . . . . . . . . . . . . . . . . . . . . .25
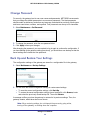
Change Password . . . . . . . . . . . . . . . . . . . . . . . . . . . . . . . . . . . . . . . . . . . 26
Back Up and Restore Your Settings. . . . . . . . . . . . . . . . . . . . . . . . . . . . . .26
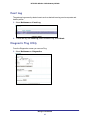
Event Log . . . . . . . . . . . . . . . . . . . . . . . . . . . . . . . . . . . . . . . . . . . . . . . . . .27
Diagnostic Ping Utility. . . . . . . . . . . . . . . . . . . . . . . . . . . . . . . . . . . . . . . . .27
Chapter 5 Advanced Settings
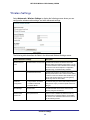
Wireless Settings . . . . . . . . . . . . . . . . . . . . . . . . . . . . . . . . . . . . . . . . . . . .30
Access Control by MAC Address . . . . . . . . . . . . . . . . . . . . . . . . . . . . . .31

4
NETGEAR Wireless Cable Gateway CG3000
Firewall Rules: Port Blocking . . . . . . . . . . . . . . . . . . . . . . . . . . . . . . . . . . . 32
Firewall Rules: Port Forwarding . . . . . . . . . . . . . . . . . . . . . . . . . . . . . . . . . 33
Considerations for Port Forwarding . . . . . . . . . . . . . . . . . . . . . . . . . . . . 34
WAN Setup. . . . . . . . . . . . . . . . . . . . . . . . . . . . . . . . . . . . . . . . . . . . . . . . . 34
Assign a Computer as The DMZ Host . . . . . . . . . . . . . . . . . . . . . . . . . . 35
Remove a Computer from Being a DMZ Computer: . . . . . . . . . . . . . . . 35
Dynamic DNS. . . . . . . . . . . . . . . . . . . . . . . . . . . . . . . . . . . . . . . . . . . . . . . 35
LAN IP Setup . . . . . . . . . . . . . . . . . . . . . . . . . . . . . . . . . . . . . . . . . . . . . . . 36
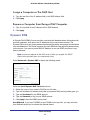
Reserving an IP Address for DHCP Use . . . . . . . . . . . . . . . . . . . . . . . . 37
Remote Management. . . . . . . . . . . . . . . . . . . . . . . . . . . . . . . . . . . . . . . . . 38
Universal Plug and Play (UPnP) . . . . . . . . . . . . . . . . . . . . . . . . . . . . . . . .40
Chapter 6 Troubleshooting
Basic Functions . . . . . . . . . . . . . . . . . . . . . . . . . . . . . . . . . . . . . . . . . . . . . 42
Using LEDs to Troubleshoot. . . . . . . . . . . . . . . . . . . . . . . . . . . . . . . . . . 42
Access the Gateway Configuration . . . . . . . . . . . . . . . . . . . . . . . . . . . . . . 43
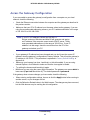
Troubleshoot the ISP Connection . . . . . . . . . . . . . . . . . . . . . . . . . . . . . . .44
Troubleshoot a TCP/IP Network Using a Ping Utility . . . . . . . . . . . . . . . . .44
Test the LAN Path to Your Gateway . . . . . . . . . . . . . . . . . . . . . . . . . . . 44
Test the Path from Your PC to a Remote Device. . . . . . . . . . . . . . . . . . 45
Wireless Performance and Gateway Location . . . . . . . . . . . . . . . . . . . . . . 45
Appendix A Technical Specifications
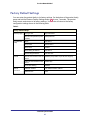
Factory Default Settings . . . . . . . . . . . . . . . . . . . . . . . . . . . . . . . . . . . . . . . 47
Technical Specifications. . . . . . . . . . . . . . . . . . . . . . . . . . . . . . . . . . . . . . . 49
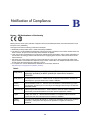
Appendix B Notification of Compliance
Index

5
1
1. Connect to the Internet
This chapter describes how to configure your gateway’s Internet connection and includes these
sections:
• Gateway Front Panel on page 6.
• Gateway Rear Panel on page 7.
• Log In to Your Gateway on page 9.
• View the Gateway Status on page 10.
For information about product features and compatible NETGEAR products, see the NETGEAR
website at http://www.netgear.com.
For information about the topics covered in this manual, visit the Support website at
http://support.netgear.com.
For help installing the gateway, see the Wireless Cable Gateway CG3000 Quick Install Guide.
Note: For optimal performance, place the gateway vertically in the stand.
Do not mount this unit to a wall; it is not suitable for wall mounting.

Connect to the Internet
6
NETGEAR Wireless Cable Gateway CG3000
Gateway Front Panel
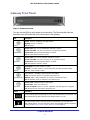
Figure 1. Gateway front view
You can use the LEDs to verify status and connections. The following table lists and
describes each LED and button on the front panel of the gateway.
LED Description
Power
• Green. Power is supplied to the cable modem.
• Blinking. Power on self-test.
• Off. No power.
Downstream
• Green solid. One or more downstream channels is locked.
• Green slow blink. The unit is scanning for a downstream channel.
• Green blink. Data is being transmitted or received.
• Off: No downstream channel is locked.
Upstream
• Green solid. One or more upstream channels is locked.
• Green slow blink. The unit is scanning for an upstream channel.
• Green blink. Data is being transmitted or received.
• Off: No upstream channel is locked.
Internet
• Solid green. The cable modem is online.
• Blinking. The cable modem is synchronizing with the cable provider’s CMTS.
• Off: The cable modem is offline.
LAN (Ethernet)
Green indicates 1,000 Mbps. Amber indicates 100/10 Mbps.
• Solid. An Ethernet device is connected and powered on.
• Blinking. Data is being transmitted or received on the Ethernet port.
• Off. No Ethernet device is detected on the Ethernet port.
Phone Port
• Green Solid. Registered with the Call Agent.
• Green Blink. There is an active call.
• Green Slow Blink. Phone is on-hook, registration with Call Agent is in progress.
• Off. No phones are connected to the phone port.
Button Description
Wireless On/Off
Turn the wireless radio in the gateway on and off. The wireless radio is on by default. The
LED located below this button indicates if the wireless radio is on or off.
WPS
Pushing this button opens a 2-minute window for the gateway to connect with other
WPS-enabled devices. For more information, about using the WPS method to implement
security, see the Push 'N' Connect (WPS) Wireless Setup on page 16

Connect to the Internet
7
NETGEAR Wireless Cable Gateway CG3000
Gateway Rear Panel
Ethernet LAN ports
USB
port
Coaxial
cable
connector
Power
adapter
input
Power On/Off
button
Voice ports
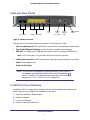
Figure 2. Gateway rear panel
The rear panel includes the following connections, viewed from left to right:
• Two voice/phone ports. WIth VoIP service, connect one or two handsets to these ports.
• Four Gigabit-Ethernet LAN ports. Use these ports to connect local computers.
• USB port. The USB port is a USB host and can be used for connecting a USB printer.
Note: USB functionality is only available with future firmware upgrades.
• Coaxial cable connector. Attach coaxial cable to the cable service provider’s connection.
• Power. Power adapter input.
• Power On/Off button.
Note: You can return the gateway to its factory settings. On the bottom of
the gateway, press and hold the Restore Factory Settings button
for over 7 seconds. The gateway resets, and returns to its factory
settings. See Factory Default Settings in Appendix A.
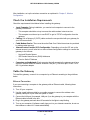
Install the Voice Gateway
Installation is the four-step process summarized here and described in the headings that
follow. Make sure you complete the installation in this order.
1. Check the Installation Requirements.
2. Cable the Gateway.
3. Log in to the Gateway.
4. Connect to the Internet.and VoIP.

Connect to the Internet
8
NETGEAR Wireless Cable Gateway CG3000
After installation, set up the wireless connection as explained in Chapter 2, Wireless
Configuration.
Check the Installation Requirements
Check the requirements listed below before installing the gateway:
• Local Computer. During installation, you need a local computer to connect to the
gateway via Ethernet.
- This computer should be set up to access the cable modem Internet service.
- This computer must be set up to use DHCP to get its TCP/IP configuration from the
gateway.
• Cabling. Use a Category 5 (CAT5) cable such as the one provided with your gateway for
your LAN connections.
• Cable Modem Service. There must be active Data Over Cable Internet service provided
by cable modem account.
• Internet Service Provider (ISP) Configuration. Depending on how the ISP set up the
Internet account, you will need one or more of these configuration settings to connect the
gateway to the Internet:
- Host and Domain Names
- ISP Domain Name Server (DNS) Addresses
- Fixed or Static IP Address
• Computers on the Network. Each computer that will connect to the gateway must have
either an installed Ethernet Network Interface Card (NIC), USB Host port, or 802.11b or
802.11g wireless adapter.
Cable the Gateway
To install the gateway, connect it to a computer by an Ethernet according to the guidelines
below.
Ethernet Connection
If you are connecting a computer to the gateway with an Ethernet cable, following these
instructions.
1. Turn off your computer.
2. Use the coaxial cable provided by your cable company to connect the wireless voice
gateway cable port to your cable line splitter or outlet.
3. Connect the LAN port (for example, LAN port 4) on the gateway to your computer with the
Ethernet cable included in the box.
4. Plug in the gateway and wait about 30 seconds for the lights to stop blinking.
5. Turn on your computer. If software usually logs you in to your Internet connection, do not run
that software or cancel it if it starts automatically.

Connect to the Internet
9
NETGEAR Wireless Cable Gateway CG3000
6. Verify the following:
a. The power light
is lit after turning on the gateway.
b. The Internet light
is solid green, indicating a link has been established to the
cable network.
c. The LAN LED
is lit for the port where you connected the computer.
Log In to Your Gateway
You can log in to the gateway to view its settings. A link to the documentation is also available
on the gateway main menu.
Note: To connect to the gateway you must use a computer configured for
DHCP (most computers are).
When you have logged in, if you do not click Logout, the gateway waits for 5 minutes after no
activity before it automatically logs you out.
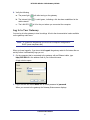
1. On the computer that is connected to the gateway with an Ethernet cable, type
http://192.168.0.1 in the address field of your Internet browser.
A login window opens.
2. Log in with the user name admin and its default password of password.
When you connect to the gateway the Gateway Status screen displays.

Connect to the Internet
10
NETGEAR Wireless Cable Gateway CG3000
To view the gateway’s settings for the Internet connection, see the following section, View
the Gateway Status on page 10.
Connect to the Internet and VoIP
If you have VoIP service, connect the phone to a Voice Port 1 . If your service includes
a second line, you can connect that phone to Voice Port 2.
To check the voice status, see MTA Status on page 24. To set up a wireless connection, see
Chapter 2, Wireless Configuration.
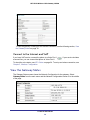
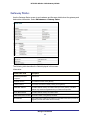
View the Gateway Status
The Gateway Status screen shows the Network Configuration for the gateway. Select
Gateway Status from the main menu and the Network Configuration section is in the middle
of the page.
D: 01 H: 00 M: 00

11
2
2. Wireless Configuration
Note: Before changing wireless settings, connect the gateway and set up
its Internet connection as described in the Wireless Cable Gateway
CG3000 Quick Install Guide.
This chapter includes:
• Set Up Your Wireless Network on page 12.
• Manually Configure The Wireless Settings on page 12.
• Push 'N' Connect (WPS) Wireless Setup on page 16.
• On the computer that just joined the wireless network, make sure you can connect to the
Internet. You should see the gateway’s Internet LED blink, showing that its Internet
connection is in use. on page 17..

Wireless Configuration
12
NETGEAR Wireless Cable Gateway CG3000
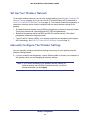
Set Up Your Wireless Network
To set up the wireless network, you can enter wireless settings, (see Manually Configure The
Wireless Settings on page 12) or you can use Wi-Fi Protected Setup (WPS), described in
Push 'N' Connect (WPS) Wireless Setup on page 16. To wirelessly connect to the gateway, a
computer or wireless device must be configured with the same wireless settings as the
gateway.
• The default wireless network name (SSID) for the gateway is shown on the product label.
This product comes with a preconfigured Wi-Fi SSID and passphrase.
• By default the gateway works with WPA and WPA 2 wireless security. The default
passphrase is shown on the product label.
• To use Push 'N' Connect (WPS), your wireless computers and equipment must support
WPS technology. See
Push 'N' Connect (WPS) Wireless Setup on page 16.
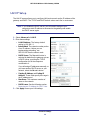
Manually Configure The Wireless Settings
You can manually configure the wireless settings and security for your gateway from the
Wireless Settings screen.
1. If you are located near the gateway, use an Ethernet cable to connect your computer to
the gateway while you are changing the wireless settings.
Note: If you connect wirelessly to the gateway and then change its
wireless network name (SSID) or wireless security, you will be
disconnected after you click Apply.

Wireless Configuration
13
NETGEAR Wireless Cable Gateway CG3000
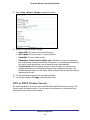
2. Select Setup > Wireless Settings to display this screen.
3. Specify the Wireless Network settings.
• Name (SSID). The name of the wireless network.
• 802.11 Mode.This is set to Up to 11 b/g/n by default.
• Bandwidth. The rate of data transfer.
• SIdeband for Control Channel (40Mhz only). Sideband is a band of frequencies
that is either lower or higher than the carrier frequency. You would adjust this setting if
you want to refine the gateway’s use of electrical power and bandwidth.
• Control channel. Which operating channel is used. Normally, the channel is not
changed unless there are interference problems with a nearby access point. The
available channels depend on the region. Some countries have laws specifying which
channels can be used.
4. For help with Security Options, see the following sections
5. If you made changes, click Apply so that they take effect.
WPA or WPA2 Wireless Security
By default the gateway is set up to work with both WPA and WPA2 wireless security. (This
security option is already selected.) You can specify the Network Key, which works like a
password to access the wireless network.

Wireless Configuration
14
NETGEAR Wireless Cable Gateway CG3000
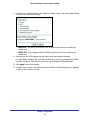
1. In the Security Options section of the Wireless Settings screen, leave the default setting
or
FINALAN0AS
select one of the WPA settings:
• WPA-PSK. This setting provides the TKIP encryption type and a pre-shared key
passphrase.
• WPA2-PSK. This setting provides the AES encryption type and a pre-shared key
passphrase.
2. Depending on the WPA settings that you select, enter the required information.
For WPA-PSK or WPA2-PSK, enter the pre-shared key, which is a passphrase between
8 and 63 characters. This product comes with a preconfigured WPA passphrase.
3. Click Apply to save your settings.
4. Configure your wireless computers with the same WPA2 or WPA settings as your gateway
so that you will be able to connect.

Wireless Configuration
15
NETGEAR Wireless Cable Gateway CG3000
WEP Security
Note: By default, the gateway is set up to work with WPA and WPA2
wireless security, both of which are newer than WEP. Typically, the
only reason you might need to set up WEP would be to allow access
to older wireless computers or devices that cannot support WPA.
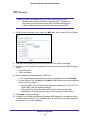
1. On the Wireless Settings screen, select the WEP radio button under Security Options.
2. Select the Authentication type from the drop-down list.The default is Automatic.
3. Depending on the encryption strength that you want, select one of these WEP Encryption
options:
• 64-bit encryption
• 128-bit encryption
4. Enter a Passphrase (recommended) or WEP Keys:
• To use a passphrase and generate keys, enter a passphrase and click Generate.
• To enter the keys, fill in the Key 1 through Key 4 fields. Write down the keys and keep
them in a secure location.
- For 64-bit WEP, enter 10 hexadecimal digits (any combination of 0–9 or A–F). For
128-bit WEP, enter 26 hexadecimal digits.
- Select which key will be the default, which will be used to encrypt data
transmissions. The other keys can only be used to decrypt received data.
5. Click Apply to save your settings.
6. Configure your wireless computers with the same WEP settings as your gateway so that
you will be able to connect. If you entered the keys, you will need to type them exactly as
you did when you set up the gateway.

Wireless Configuration
16
NETGEAR Wireless Cable Gateway CG3000
Push 'N' Connect (WPS) Wireless Setup
Push 'N' Connect (WPS) can be a quick way to automatically set up your gateway’s wireless
network and set up your wireless computer to connect to it at the same time. WPS, also
called Wi-Fi Protected Setup, is relatively new technology, so before you decide to use it,
check to make sure your wireless computers and devices support WPS. Look for the
symbol on all the computers that will connect wirelessly to the gateway.
If you do not see the symbol on all the computers that will connect to the wireless
network, then you should manually set up your network first (see Manually Configure The
Wireless Settings ). After that, you can still use WPS to set up the wireless connection for the
computers that support WPS.
Note: All WPS-capable products should be compatible with the gateway.
For more detailed information about the WPS standard, see
http://www.wi-fi.org).
There are two Push 'N' Connect methods, Push Button and PIN (personal identification
number).
• Push Button. This is the preferred method. See the following section, WPS Button .
• PIN. See PIN on page 17.
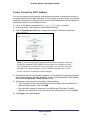
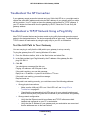
WPS Button
You can use the WPS button to automatically set up wireless settings in your gateway and to
set up your wireless computer to connect to it.
1. First, make sure you know how WPS works on your computer or wireless device. If it
works with WPS, it has a WPS utility and might also have a WPS button that you can
press.
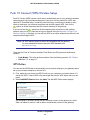
2. Select Add WPS Client and then click Next. The Add WPS Client screen displays:
Any computer or wireless device that will wirelessly connect to the gateway is a client.
After it is added as a client, it will be able to automatically connect to the gateway.

Wireless Configuration
17
NETGEAR Wireless Cable Gateway CG3000
3. Either click the WPS button, or press the button on the front of the gateway.
• The WPS LED on the front of the gateway begins to blink.
• The gateway tries to communicate with the wireless computer or device for 2 minutes.
• If the Security Option in the Wireless Settings screen was set to Disabled, it is
automatically changed to WPA-PSK [TKIP] + WPA2-PSK [AES] including a random
wireless security password.
4. Go to the wireless computer, and run its WPS configuration utility. Follow the utility’s
instructions to click a WPS button.
When the computer connects to the wireless network, the gateway sends its SSID and
WPA-PSK or WPA2-PSK configuration to that computer.
5. On the computer that just joined the wireless network, make sure you can connect to the
Internet. You should see the gateway’s Internet LED blink, showing that its Internet
connection is in use.
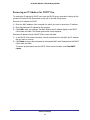
PIN
1. First, make sure you know how WPS works on your computer or wireless device. If it
works with WPS, it has a WPS utility. Use this utility to determine the PIN for your
wireless computer or device.
2. Select WPS Settings. The Add WPS Client screen displays.
Any computer or wireless device that will wirelessly connect to the gateway is a client.
After it is added as a client, it will be able to automatically connect to the gateway.
3. Select the PIN radio button.
4. Type the PIN that you located in Step 1 in the Enter Client’s PIN field, and then click Next.
• The WPS LED on the front of the gateway begins to blink.
• The gateway tries to communicate with the wireless computer or device for 4 minutes.
• If the Security Option in the Wireless Settings screen was set to Disabled, it is
automatically changed to WPA-PSK (including a PSK security password).
When the computer connects to the wireless network, the gateway sends its SSID and
WPA-PSK or WPA2-PSK configuration to that computer.
5. On the computer that just joined the wireless network, make sure you can connect to the
Internet. You should see the gateway’s Internet LED blink, showing that its Internet
connection is in use.

18
3
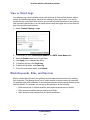
3. Content Filtering
This chapter describes how to use content filtering s for the gateway. This chapter includes:
• View or Email Logs on page 19.
• Block Keywords, Sites, and Services on page 19.
• Services on page 21.

Content Filtering
19
NETGEAR Wireless Cable Gateway CG3000
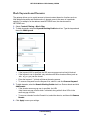
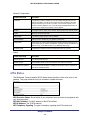
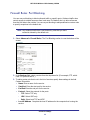
View or Email Logs
Your gateway logs security-related events such as Denial of Service (DoS) attacks, hacker
probes, and administrator logins, based on the settings on the Logs screen. If you set up
content filtering on the Block Sites screen, you can also log when someone on your network
tried to access a blocked site. You can specify which events are logged and you can send the
logs to the specified email address.
1. Select Content Filtering > Logs.
2. To use email, fill in the Contact Email Address and SMTP Server Name fields.
3. Select the Enable check box for E-mail Alerts.
4. Click Apply so your changes take effect.
5. To email the log now, click E-mail Log.
6. To delete all log entries. click Clear Log.
7. To see the most recent entries, click Refresh.
Block Keywords, Sites, and Services
With its content filtering feature, the gateway prevents objectionable content from reaching
your computers. The gateway allows you to control access to Internet content by screening
for keywords within Web addresses. It can also block access to all sites except those that are
explicitly allowed. For example, you can set up the gateway to do the following:
• Block access from to Internet locations that contain keywords that you specify.
• Block access to websites that you specify as off-limits.
• Allow access to only websites that you specify as allowed.

Content Filtering
20
NETGEAR Wireless Cable Gateway CG3000
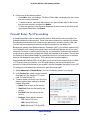
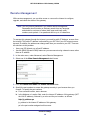
Block Keywords and Domains
The gateway allows you to restrict access to Internet content based on functions such as
Web address keywords and Web domains. A domain name is the name of a particular
website. For example, for the address www.NETGEAR.com, the domain name is
NETGEAR.com.
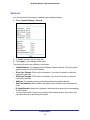
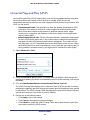
1. Select Content Filtering > Block Sites.
2. To block keywords, select the Keyword Blocking Enable check box. Type the keyword and
then click Add Keyword.
• If the keyword XXX is specified, the URL www.zzzyyqq.com/xxx.html is blocked.
• If the keyword .com is specified, only websites with other domain suffixes (such as
.edu, .org, or .gov) can be viewed.
• Enter the keyword “.” to block all Internet browsing access.
• To remove a keyword from the Keyword List, select it, and click Remove Keyword.
3. To block domains, select the Domain Blocking Enable check box. Enter a domain and click
Add Domain.
• If the domain www.zzzyyqq.com is specified, the URL
<http://www.zzzyyqq.com/xxx.html> is blocked, along with all other URLs in the
www.zzzyyqq.com site.
• To remove a domain from the Domain List, select the domain, and then click Remove
Domain.
4. Click Apply to save your settings.
La pagina si sta caricando...
La pagina si sta caricando...
La pagina si sta caricando...
La pagina si sta caricando...
La pagina si sta caricando...
La pagina si sta caricando...
La pagina si sta caricando...
La pagina si sta caricando...
La pagina si sta caricando...
La pagina si sta caricando...
La pagina si sta caricando...
La pagina si sta caricando...
La pagina si sta caricando...
La pagina si sta caricando...
La pagina si sta caricando...
La pagina si sta caricando...
La pagina si sta caricando...
La pagina si sta caricando...
La pagina si sta caricando...
La pagina si sta caricando...
La pagina si sta caricando...
La pagina si sta caricando...
La pagina si sta caricando...
La pagina si sta caricando...
La pagina si sta caricando...
La pagina si sta caricando...
La pagina si sta caricando...
La pagina si sta caricando...
La pagina si sta caricando...
La pagina si sta caricando...
La pagina si sta caricando...
La pagina si sta caricando...
La pagina si sta caricando...
-
 1
1
-
 2
2
-
 3
3
-
 4
4
-
 5
5
-
 6
6
-
 7
7
-
 8
8
-
 9
9
-
 10
10
-
 11
11
-
 12
12
-
 13
13
-
 14
14
-
 15
15
-
 16
16
-
 17
17
-
 18
18
-
 19
19
-
 20
20
-
 21
21
-
 22
22
-
 23
23
-
 24
24
-
 25
25
-
 26
26
-
 27
27
-
 28
28
-
 29
29
-
 30
30
-
 31
31
-
 32
32
-
 33
33
-
 34
34
-
 35
35
-
 36
36
-
 37
37
-
 38
38
-
 39
39
-
 40
40
-
 41
41
-
 42
42
-
 43
43
-
 44
44
-
 45
45
-
 46
46
-
 47
47
-
 48
48
-
 49
49
-
 50
50
-
 51
51
-
 52
52
-
 53
53


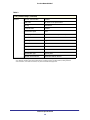
Netgear CG3000 Manuale utente
- Categoria
- Punti di accesso WLAN
- Tipo
- Manuale utente
in altre lingue
- English: Netgear CG3000 User manual
Documenti correlati
-
Netgear CG3100 Manuale utente
-
Netgear WNHDE111 Manuale utente
-
Netgear WN3000RP-100PAS Manuale utente
-
Netgear WN2500RP Manuale utente
-
Netgear Universal Dual Band WiFi Extender Manuale utente
-
-
-
Netgear WNCE3001-100NAS Manuale utente
-
-
Altri documenti
-
Linksys WAG200G Manuale utente
-
König CMP-WNROUT55 Manuale del proprietario
-
-
ZyXEL NBG6716 Guida utente
-
-
ZyXEL NBG6815 Manuale del proprietario
-
Edimax BR-6228NS V2 Manuale utente
-
Asus TV Box Manuale utente
-
Cisco DPC3939 XFINITY Manuale del proprietario
-